Introduction
Differential overtime is secondary over time that the company defines for different pay rate purposes. In some companies, their employees are given a different overtime rate after a particular work period.
The Diff. OT column is only displayed if you have configured the Diff. OT setting in your Clocking Schedule. Below are the steps to configure it.
Process
1) For Weekly type schedule:
Set the ‘Overtime Differential Rate Interval’ option under the Overtime tab
For Flexi type schedule:
Set the ‘Differential overtime if total flexi-work hour exceeds workhour of’ option under the Over time tab 2) Generate the Attendance Sheet to apply the differential overtime setting
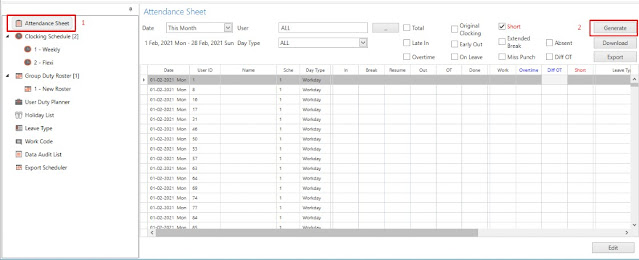
Select user(s) > Specify the date range for the data to be generated > Click the OK button to generate the attendance 3) There is a new column, “Diff OT”, which appears on the Attendance Sheet. The software splits the OT hour with normal rate and differential OT into two columns, making it easy for viewing and reading.
Note: If some of the screenshots or steps viewed here are different from the ones in the current system, this is due to our continuous effort to improve our system from time to time. Please notify us at info@fingertec.com, we will update it as soon as possible.
Introduction
FingerTec offers 2 types of software which are known as the TCMS V3 - Time Attendance system and Ingress - Time Attendance & Access Control system respectively. Currently, TCMS V3 offers only 1 option to support the Microsoft Access (MDB) database whereas Ingress Software offers 2 options for the database type which are the MySQL and/or the Microsoft Access (MDB).
Most Ingress MySQL users would have already noticed that there is an application that needs to be run for the connection of the software with its database residing in the MySQL Server in their Ingress Server. Using this application, users will be able to connect, update, diagnose, and backup the database.

Therefore, our team has developed a similar function in the software that uses the Microsoft Access (MDB), for instance, TCMS v3 and the Ingress MDB. If you are dealing with a huge backup database, you may consider applying the following steps to compact the data and reduce the size.
Diagnostic
This Diagnostic will be troubleshooting the database issues such as hangs, slow performance, memory fragmentation and etc. This will enhance the performance of the system and the database.
Compact and Repair
Database files can grow quickly as you use them, sometimes might even disrupt the performance. They can also get corrupted or damaged occasionally. In order to reduce such situations, you may use the Compact and Repair to prevent or fix these problems. The compact process will not compress your data — the function of this process only makes your database file smaller by eliminating unused spaces. The Compact and Repair Database can also help to improve your database performances.
Example
The following is presenting one of the cases where the database size is too big. The users are facing a problem of a huge size of database when creating a backup database. In the case of an event whereby the users are required to conduct backup twice a month, the system storage will be taken up a lot more than expected.
By completing Compact and Repair, this will resize and reduce the database used spaces. However, the result depends on how much data has been stored inside the database. Once completed, you will be able to notice a difference whenever you make a backup again.
Note: If some of the screenshots or steps viewed here are different from the ones in the current system, this is due to our continuous effort to improve our system from time to time. Please notify us at
info@timeteccloud.com, we will update it as soon as possible.
Introduction
In some cases, administrators may need to disable a user either temporarily or permanently from using the TCMSv3 or Ingress. These tips here will provide 2 ways to perform such an action depending on the preferred method and requirements. This has been made easy for admin to understand and differentiate between both of the ways.
Process
1) If you wish to disable a device from accepting verification of a user, you will need to go to the ‘Suspended’ option to confirm if you have enabled such option. Go to the Users tab > Double click on the user > Details > Edit > Check on the ‘Suspended’ option > Save.
By checking this option, the expiry date will be automatically set to the same date as you have suspended the user.
Then, sync or upload the user to your device in order to apply the setting. Under the Users tab > Upload User > Select which device to upload > Select the user > Select data > Upload.
For the attendance sheet and report, the user’s data will only be made available to view until the stated expiry date.
2) If you do not wish to have the user’s data to appear in the attendance sheet and report from a specific date, however, you wish to keep them in your database, you will need to set an expiry date for the users. The expiry date is the last date of the user’s data. This can be shown in the attendance sheet and report.
For example, if you set the expiry date to 6/4/2020, you can only view the data in the attendance sheet and report until 6/4/2020.
Go to Users tab > Double click on the user > Details > Edit > Set an expiry date > Save and then generate the attendance sheet in order to apply the setting.
Note: If some of the screenshots or steps viewed here are different from the ones in the current system, this is due to our continuous effort to improve our system from time to time. Please notify us at
info@timeteccloud.com, we will update it as soon as possible.
Introduction
FingerTec has recently introduced a new feature for Ingress and TCMS V3 software, where users can enable the Pay Rate display in 3 decimal places. It’s available in the latest Ingress v4.0.0.12 and TCMSv3 v3.0.0.11 . This enhancement gives users the flexibility to manage the payroll wages report. There are a few companies in the market that require this kind of feature to help them calculate the wages accordingly and efficiently.
Process
1) Go to System Settings > System Parameter Setting > User > Click Edit > Tick Enable Pay Rate display in 3 decimal places
2) Configure the Users’ Pay Rate. Go to User tab > choose the user > click Edit > select Pay Type per hour then configure the Pay Rate > Click Save
3) View Gross Wages Report – Pay Rate with 3 decimal places
Related Post
To learn more on how the Gross Wages works, you may refer to the link below
Note: If some of the screenshots or steps viewed here are different from the ones in the current system, this is due to our continuous effort to improve our system from time to time. Please notify us at
info@timeteccloud.com, we will update it as soon as possible.
Introduction
We have been receiving feedback from some TCMS V3/Ingress Software users, whereby their transaction log data in the Data Audit List become red in colour and have inadvertently caused the users’ clocking data to not have appeared in the Attendance Sheet. This issue has occurred due to the process of incorrect change of User ID.
Example: Based on the picture below, the transaction log in the Data Audit List listed in red can be observed.
Processes
Therefore, we have prepared a guide to help users to resolve the TCMS V3 and Ingress software issues. Please follow the steps below:
1) Download the tool from the link below > Extract the folder
2) Once finished, please copy the downloaded zip file and paste it into a specified location in the software. The location for Ingress or TCMS v3 software is provided below.
Ingress Software Location: C:\Program Files (x86)\FingerTec Worldwide\FingerTec Ingress\Ingress Server
TCMSv3 Software Location: C:\Program Files (x86)\FingerTec\FingerTec TCMS V3\TCMS V3
3) Run the file as an administrator > Fill up the user ID in the bracket stated in red > Tick Select all related > Choose MySQL / MDB depend on software > Click Start
4) Once the loading up has finished > Go to the Attendance Sheet > Click Generate > Select the User and Date range that is showed in the red brackets below.
Note: If some of the screenshots or steps viewed here are different from the ones in the current system, this is due to our continuous effort to improve our system from time to time. Please notify us at info@timeteccloud.com we will update it as soon as possible.