Showing posts with label Data Audit List. Show all posts

Enhancement of Data Audit List in TimeTec TA


Introduction
Users can fill in the company name and contact person in the TA App for traceability. Therefore, these data are added in the clocking remark column from the data audit list, data audit list report and mobile location report.

1.       Device > Data Audit List – Clocking Remark Popup
In the data audit list, it is clickable under the clocking remark column to see the clocking remark's pop-up details, including the mentioned company name, contact person, and the reason input from the mobile app during the clocking.


2.       Data Audit List Report - Added New Columns for Company Name & Customer Name
Similarly, the data audit list under the report section can view the clocking remark details in the generated report. Because this data is generated to be downloaded as a file, the pop-up view is not included. Thus, you can view the details directly from the report itself with its column.

3.       Mobile Location Tracking Report – Added New Columns for Company Name & Customer Name
While the mobile location tracking report provides the mobile clocking location and its coordinates, the clocking remark details are also included in this report, as it comes from the mobile GPS clocking.


Note: If some of the screenshots or steps viewed here are different from the ones in the current system, this is due to our continuous effort to improve our system from time to time. Please notify us at info@fingertec.com, we will update it as soon as possible.


How to Check User Clocking Transaction History in TimeTec TA


Introduction
Clocking data history is very important. Maintaining great attendance is crucial to help you do well as an employee. Being present and on time helps you strengthen your work credibility and work history. Below are the 3 sections for Admin to check their users' clocking transaction history in TimeTec TA.

1. Data Audit List 
View all clocking activities along with their details such as clocking date-time, location, reporting channel, etc in this tab. You can also convert the attendance log into a data sheet and purge selected data when necessary.

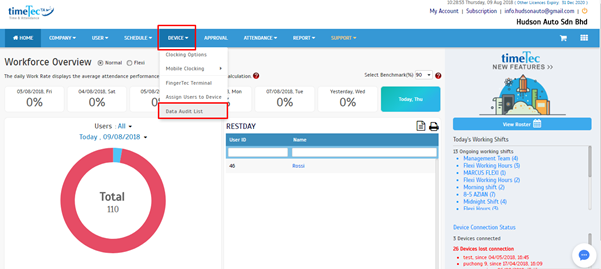
Go to Device > Data Audit List


- Data Audit List will show you full information of the user clocking history log. You can select the user and customise the date range.

2. Staff Movement Analysis 
List every attendance transaction based on the date & time selected and chosen users. It is useful to determine the movement of the users during working hours.
- Go to Report > Device Analysis > Staff Movement Analysis

- Select users > Choose date range > Click Submit to generate report
Sample Staff Movement Analysis Report


3. Mobile Location Tracking Report 
The report provides information on users' clock in locations and which clocking channels are particularly used by the users.

- Go to Report > Device Analysis > Mobile Location Tracking Report

- Select users > Choose date range > Choose Reporting Channel > Click Submit to generate report

Sample Mobile Location Tracking Report

Note: If some of the screenshots or steps viewed here are different from the ones in the current system, this is due to our continuous effort to improve our system from time to time. Please notify us at info@timeteccloud.com, we will update it as soon as possible.

How to Solve the Red Color Issue in the Data Audit List for Ingress/TCMSv3 software


Introduction
We have been receiving feedback from some TCMS V3/Ingress Software users, whereby their transaction log data in the Data Audit List become red in colour and have inadvertently caused the users’ clocking data to not have appeared in the Attendance Sheet. This issue has occurred due to the process of incorrect change of User ID.
Example: Based on the picture below, the transaction log in the Data Audit List listed in red can be observed.


Processes
Therefore, we have prepared a guide to help users to resolve the TCMS V3 and Ingress software issues. Please follow the steps below:
1) Download the tool from the link below > Extract the folder
2) Once finished, please copy the downloaded zip file and paste it into a specified location in the software. The location for Ingress or TCMS v3 software is provided below.


Ingress Software Location: C:\Program Files (x86)\FingerTec Worldwide\FingerTec Ingress\Ingress Server
TCMSv3 Software Location: C:\Program Files (x86)\FingerTec\FingerTec TCMS V3\TCMS V3
3) Run the file as an administrator > Fill up the user ID in the bracket stated in red > Tick Select all related > Choose MySQL / MDB depend on software > Click Start

4) Once the loading up has finished > Go to the Attendance Sheet > Click Generate > Select the User and Date range that is showed in the red brackets below.


Note: If some of the screenshots or steps viewed here are different from the ones in the current system, this is due to our continuous effort to improve our system from time to time. Please notify us at info@timeteccloud.com we will update it as soon as possible.

TimeTec TA - How To Export Data Audit List Into A Customized File Format


Introduction
In TimeTec TA, Data Audit List allows users to view all clocking activities along with their details such as clocking date-time, location, reporting channel, etc. That said, we now provide an ‘Export’ function which allows users to export the Data Audit List into a customized file format for a third party system. To know more about the procedure, please refer to the steps below:

Process:
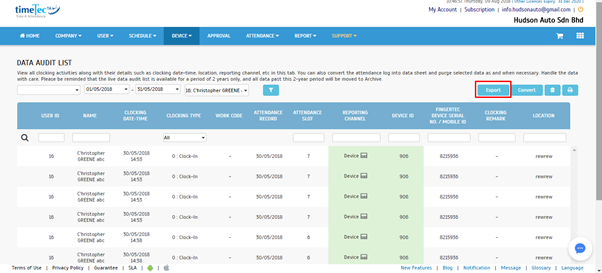
1. To export the Data Audit List, proceed to Data Audit List under Device module and the Export button is located at the top right corner as shown in the screenshot.


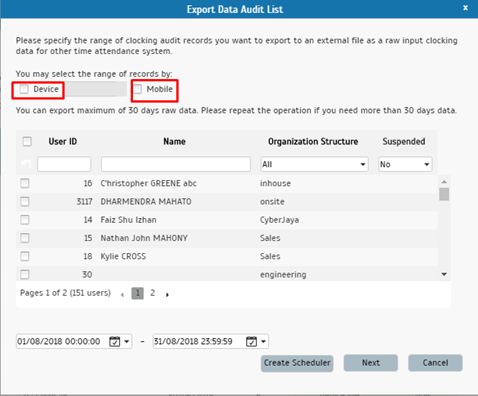
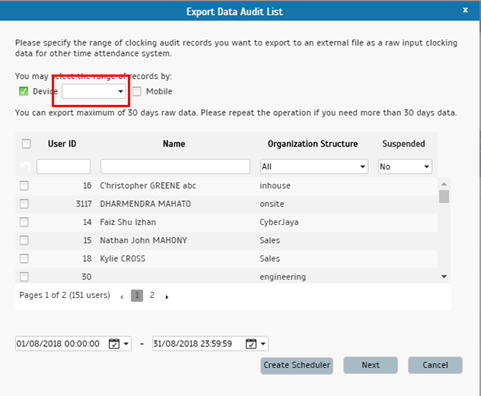
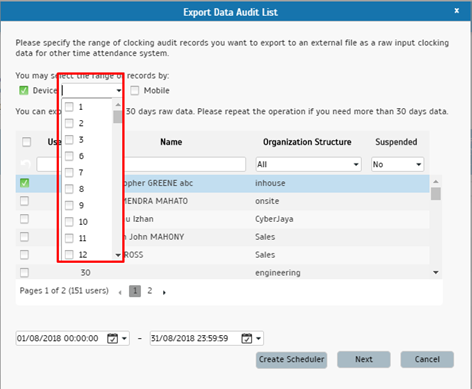
2.  After clicking on the Export button, a pop-up window: ‘Export Data Audit List’ will be displayed. Hence, users may select the range of records by Device, Mobile or even both options. If Device is chosen, users will have to select the Terminal ID from the drop-down list located beside the option. Next, select the user as well as the date range of the data that the users wish to export. Click ‘Next’ to proceed.


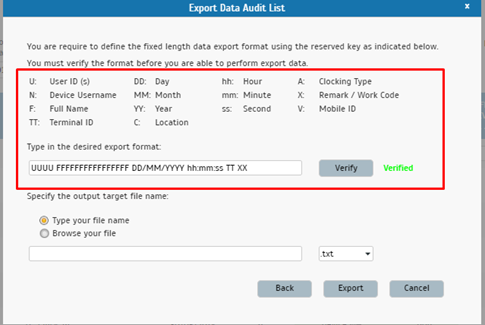
3.   Moving on, users have to input the export format. After selecting the desired export format, click ‘Verify’ and confirm whether the format is correctly configured.
 

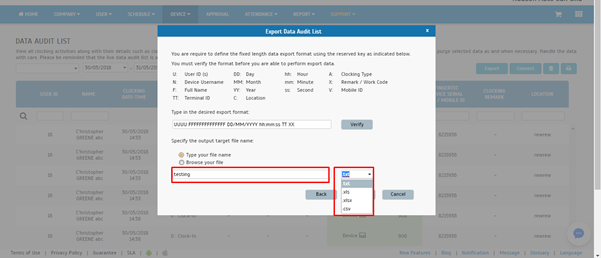
4.   If users wish to save the file as a new file, the ‘Type your file name’ option has to be selected. Next, type the file name and select the file type from the drop-down list.
 

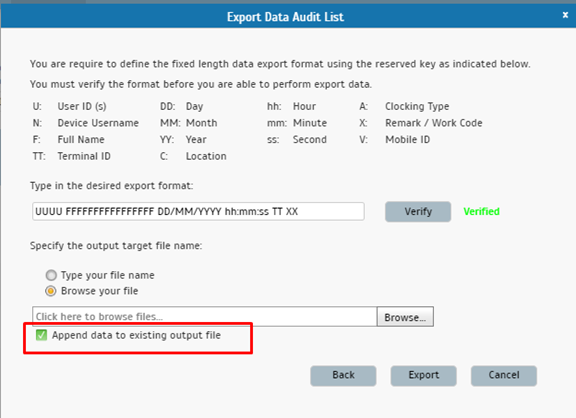
5.   If users choose ‘Browse your file’, an option (Append data to existing output file) will thus appear at the bottom of the window. By selecting this option, the system will update the existing exported file along with the new data.
 

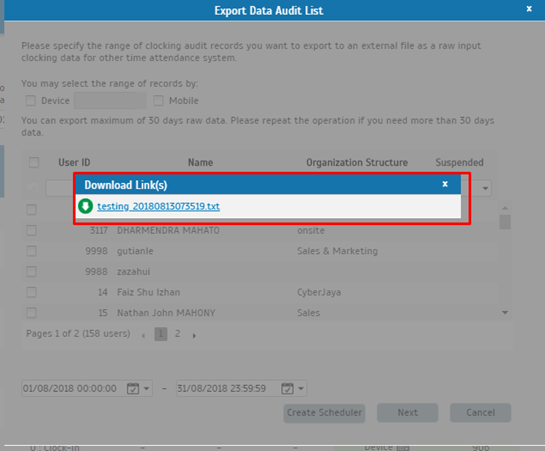
6.  Finally, click on Export and the system will generate a download link for the exported file. Click on the link and download the file into local PC. That’s it, you’re all done.


Note: If some of the screenshots or steps viewed here are different from the ones in the current system, this is due to our continuous effort to improve our system from time to time. Please notify us at info@timeteccloud.com, we will update it as soon as possible.

Troubleshoot Missing Attendance Data in TimeTec TA


Introduction:
Missing attendance data within the Electronic Time Card report is most often caused by a few issues such as wrong issuance, expired date, no group duty roster assigned and no clocking data in the device itself. Therefore, we’ve prepared some tips on how to troubleshoot this issue in order to identify the exact root cause of the problem.

Process:
A. Check if the user’s raw data is available in the Data Audit List report
1. Go to Report > Device Analysis > Data Audit List


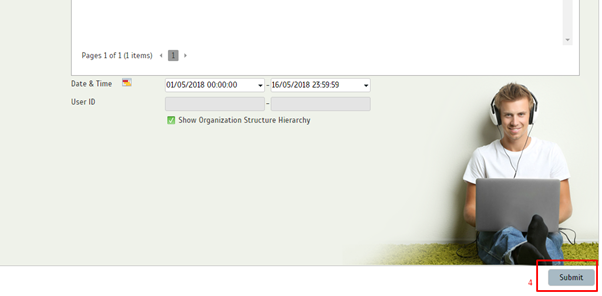
2.  Search for the User ID of the employee, choose the correct date range(date range where the data is missing on the Electronic Time Card report) and then click on the Submit button.


3.  Check if there is any data listed on the Data Audit List report. If the data is available on this report, please proceed to Step B. If the data is not available, kindly check the connection status of the device and please ensure that the device is connected.

B. Check the user’s Issuance Date and Expiry Date
1. Go to User > Manage User


2. Search for the User ID of the employee and then click on the Settings button.


3.   Check the Issuance Date and Expiry Date and make sure that both dates are correct and then click on the Tick icon. (Issuance Date is the period when the employee has joined in the workforce while Expiry Date is the period when the employee has resigned from the workforce.) Note that if the employee is still working, please do not fill in the Expiry Date field.


4.  Please double check on the Electronic Time Card report after you have made the changes to the Issuance Date or Expiry Date. If the same problem still persists on the report, kindly proceed to Step C.

C. Re-Assign the User to Group Duty Roster
1. Go to Schedules > Assign Schedules and Users into Roster.


2. Click the ‘+’ button on the User’s Duty Roster.


3.   Search for the User ID of the employee, then tick the box beside the User ID and click on the Submit button.


4.   A Generate Attendance window will be displayed. Hence, choose the correct Start Date and End Date. Once done, click on the Submit button.
 

5.   After the generation process is completed, please generate the Electronic Time Card report again and check if the same problem still persists. If the problem still persists, kindly report the problem to TimeTec Support Team at support@timeteccloud.com.

Note: If some of the screenshots or steps viewed here are different from the ones in the current system, this is due to our continuous effort to improve our system from time to time. Please notify us at info@timeteccloud.com, we will update it as soon as possible.  

Learn Troubleshooting for Missing Attendance in Ingress & TCMS v3


Introduction 
New users always encounter problem with missing attendance data and transaction data. Fret not! There are steps to troubleshoot these errors. Data enters the Attendance Listing & Attendance Analysis Reports based on the attendance sheet generated in the software. Therefore, in case of any data missing from the reports, the first step to do is to check the data and information in the Attendance sheet.

Benefits
Now, you can troubleshoot the missing data on your own!

Process
First of all, you  need to download all the transactions from device by going to the Attendance tab > Download > select device > OK.

The transactions downloaded from the devices into Ingress will be listed in the Data Audit List. You could also check your transaction data from the Attendance tab > Data Audit List. Please make sure to select the correct date range when doing the troubleshooting. Check whether the data is already exist in the data audit list of the software.

If the data did not appear in the Data Audit List, try another possible solution, try download the transaction data using Automatic Download Time. To set the download run time, go to System Settings > System Parameter Setting > Attendance > Specify 2 Daily Download Intervals…> Set the times accordingly > save and let the Ingress server run within the set times.

It is important to check the Issuance Date of the user. The user attendance sheet will not appear if the issuance date is set before the current date.

The Attendance sheet is generated based on the data audit list and the clocking schedule setup. Hence, after you have confirmed that the Data Audit List contains the transaction data of the user, check the Group Duty Roster and the Clocking Schedule settings.
 
If there are any changes made in the Clocking Schedule or the Group Duty Roster for the user and to make sure that the data enters attendance sheet accordingly, you need to generate the attendance at the Ingress > Attendance > Attendance Sheet > Generate > Select User ID and Date range> Ok.

This tip will come handy when you have your attendance data missing. Give this tip to your technical personnel to practise on. They will catch up in no time at all.

Ingress & TCMSv3 Software - Exporting Data from Audit List to TXT and CSV format


Introduction

CSV file, also known as Comma Separated Values file, allows data to be saved in a table structured format. You can use this CSV file format to exchange data from a database or a spreadsheet between applications. Each line in a CSV file represents a record in the database, or a row in a spread sheet. Each field in a database record or cell in a spread sheet row is usually separated by a comma. However, you can use other characters to delimit a field, such as a tabulator character.

Benefit

FingerTec's Ingress & TCMSv3 software comes with a feature for exporting of Data from Audit List in either TXT or CSV format. These transaction data are the raw data output obtained from the terminal. You can use the raw data in the third party software or payroll system that requires TXT or CSV file format.

Note:
The images below are from Ingress software, however the steps also apply to TCMSv3 which has a slightly different interface.

Process:

Follow the steps below on how to Export Data from Audit List to either TXT or CSV format.

1) Log in to Ingress software > Attendance Tab > Select Data Audit List from the left panel > click
    on Export Data Audit.


2) In the Export Audit Data window, select Export Type 2.

3) Type in the desired export format and click Verify to lock and save the data format. System will show the status of either Parse Successful or Parse Failed.

4) Select at least a minimum of one User and choose the Output Target File where you want to save the exported file.

5) Specify the effective date and time.

Note: If you want to save the data for 1 day, i.e. 20.08.2015, you must key in the date range from 20.08.2015 to 21.08.2015 and enter 00.00 in both time columns.


6)  Press Ok once you are done with the all the settings. The system will generate the request
      and a successful message will be prompted once it is completed.


7)  You can open the file directly or you can get the file inside the target folder. Below are the
      examples of the output files in TXT and CSV format.

  
      TXT


     CSV