Ingress Software Release v4.2.1.4

Monday, February 28, 2022 TimeTec 1 Comments

The new release for Ingress software v4.2.1.4 adds 20 bug fixes to enhance the user experience when using Ingress Software.
Bug Fix:
1. Fixed Activity Log display issue for Report Scheduler in Health Screening Report
2. Fixed License display failed to activate Serial No. for certain devices (Face ID 5)
3. Fixed Transfer to Device error
4. Fixed new user Fingerprint does not download from AWDMS issue
5. Fixed issue to save Permanent Door Open Close Timezone and Permanent Door Open Close Holiday Timezone
6. Fixed Door details display incorrect information
7. Fixed Fingerprint create date display issue (as 1900-01-01) when download from AWDMS
8. Fixed attendance generation issue for Flexi Schedule In - Out pair (overnight)
9. Fixed Username unable update to other language character
10. Fixed attendance calculation when Schedule is manually changed during edit attendance sheet
11. Fixed incorrect language display for Serbian language
12. Fixed Hourly Rate display issue when generating Electronic Time Card Report
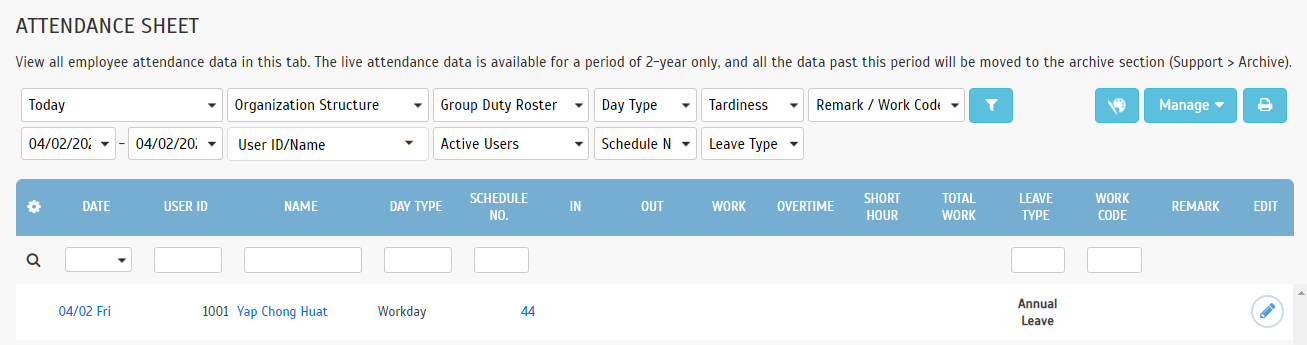
13. Fixed incorrect Day Type display in Attendance for Leave Type at User Module
14. Fixed Quickbooks (USA Payroll) export in wrong format
15. Fixed Export USA Payroll does not save correctly
16. Fixed import user issue when Username is alphanumeric from Import From File
17. Fixed upload FP to AWDMS issue for new user
18. Fixed incorrect attendance calculation for Flexi Schedule if IN have value
19. Fixed export attendance job costing issue: work hour become work hour pair instead of total work hour
20. Fixed device assigned into device group selection issue during Batch Device Operation

1 comments:

Have any questions or inquiries about FingerTec? Drop your input here.

TCMSv3 Software Release v3.2.1.4

Monday, February 28, 2022 TimeTec 4 Comments


FingerTec has released the TCMS V3 software v3.2.1.4 which consists of 14 bug fixes to enhance the user experience when using TCMS V3 Software.
Bug Fix:
1. Fixed display problem of Activity Log for Report Scheduler in Health Screening Report
2. Fixed attendance generation issue for Flexi Schedule In - Out pair (overnight)
3. Fixed Username update to other language character issue
4. Fixed the attendance calculation when the Schedule is manually changed during edit attendance sheet
5. Fixed incorrect language display for Serbian language
6. Fixed Hourly Rate display issue when generating Electronic Time Card Report
7. Fixed incorrect Day Type display in Attendance for Leave Type at User Module
8. Fixed Quickbooks (USA Payroll) export in wrong format
9. Fixed Export USA Payroll save function
10. Fixed import user issue when Username is alphanumeric from Import From File
11. Fixed incorrect attendance calculation for Flexi Schedule if IN have value
12. Fixed export attendance job costing issue: work hour become work hour pair instead of total work hour
13. Fixed device assigned into device group selection issue during Batch Device Operation
14. Fixed Auto Calc OT calculation issue if Diff OT are enabled
Software update is available at https://www.fingertec.com/softwareupdate/TCMSV3/

4 comments:

Have any questions or inquiries about FingerTec? Drop your input here.

How to Upgrade or Reinstall AWDMS Program

Thursday, February 24, 2022 TimeTec 1 Comments


Introduction
FingerTec has launched the new Face ID5 device with the AWDMS program in 2020. Since then, we have distributed thousands of devices worldwide and released several versions of the AWDMS program to upgrade the system's performance to match the clients' requirements.
 
This article will guide how to upgrade the AWDMS program from the old version to the latest version and give the best performance when using the system.
 
Download Installer File
 Download the latest installer files for Ingress and AWDMS program from the below links.
 
Ingress Server v4.1.1.0 = https://www.fingertec.com/softwareupdate/ingress/software-ingress_download_e.html
AWDMS Program v3.4.1 = https://www.fingertec.com/download/AWDMS.zip
AWDMS Setup Tools v1.3 = https://s3.amazonaws.com/files.fingertec.com/Software+Releases/AWDMS/2021/AWDMS+3.3+%26+AWDMS+Setup+1.3/AWDMS+Setup+Tool+v1.3.zip
 
Step to reinstall AWDMS program 
1.    Before upgrading the AWDMS or any FingerTec software, please make sure that you have backup the database file. There are two options to back up the database file.
-    First, backup from Ingress program by going to the System Setting > Database Configuration > Database Management. If you have already used the latest Ingress software (v4.1.1.0) system will automatically backup the AWDMS database together with Ingress.

Second, back up using SQL manager tools from the following article. Please make sure you have backed up both Ingress & AWDMS table as explained in the picture below:

https://www.fingertectips.com/2015/11/backuprestore-ingress-database-using_26.html


2.    Please backup or copy the 'zkbiosecurity' folder to save the user photo pictures. In case the user photo was missing after the installation, and you cannot download the photos from the Face ID5 terminal, you can use this file/photo as a backup. The default location is C:\Program Files\BioSecurity\service\zkbiosecurity

3. If you have already activated the AWDMS program's license, please cancel the current program by opening AWMDS > select About (i icon) > select Cancel.

4.    Uninstall TimeTec Cloud AWDMS program from the Control Panel > Program & Features > select Uninstall.

5. Restart the PC. When the PC opens, start to install the AWDMS program using the latest installer file that you have downloaded from the given link.
 
6. Once you have finished the AWDMS installation, please make sure to run the AWDMS Setup Tools to complete the installation. For installation guidance, you can refer to the below link.
 
https://s3.amazonaws.com/files.fingertec.com/Software+Releases/AWDMS/AWDMS.docx-new.pdf
 
7. After a moment, when you can open or run the AWDMS program together with the Ingress software, please check the WDMS Configuration in Ingress software by going to System Setting > WDMS Configuration. Please key in and update the AWDMS Information like Server IP, Port and AWDMS password. Then, make sure you can connect to the AWDMS server.

8. Open the AWDMS program and check the Device Connection status. Reactivate the device in the Ingress software to establish the connection.
 
9. Inside the same AWDMS program, check the Transaction log status under Access > Report > Transaction Log and User Data status under Personal > Person. Make sure all User data are updated, especially to user face pictures.


10.  If you cannot find the previous and current transaction log or complete User data, you can download all the data from the Face ID5 terminal by going to AWDMS > Access > Devices > View and Get Device Info > select Get Personal Information and then Get Transaction.

11. You can reactivate the AWDMS license using the same license file after updating all data. You can also start to use the system and manage the Attendance record in Ingress software.
 
Note: If some of the screenshots or steps viewed here are different from the ones in the current system, this is due to our continuous effort to improve our system from time to time. Please notify us at info@timeteccloud.com, we will update it as soon as possible.


1 comments:

Have any questions or inquiries about FingerTec? Drop your input here.

Face ID 5 Two Magnetic Locks Connection

Tuesday, February 22, 2022 TimeTec 2 Comments


Introduction
Face ID 5 hybrid face recognition access device is a multi-type recognition device to fulfil security and human resources requirements. The device can be used as an entrance access, exit point and time attendance device. Examples of access types that can be paired with Face ID 5 are door access, turnstiles, and gates.

The most comment access lock peripheral to pair with Face ID 5 is EM lock that uses electromagnet as the locking mechanism. This type of lock mechanism is commonly used in building as it is compatible with many types of doors, including wooden doors, glass doors, and steel doors.

EM lock is also suitable to use on double door access setup. Double door access setup requires two EM locks where each EM Lock needs to hold a door. When using two EM locks, one must consider the current load that needs to be used to power up the device with two magnetic locks. The cable's length, size and route can contribute to the high current usage that will affect the device and magnetic lock functionality. Even with a high current power supply being used, the factor or the cable not suitable to carry a current can cause a fire hazard where the cable will heat up due to high current loads.

As for safety measurement and the system operating well, you can use two power supplies to separate the current load of Face ID 5 and two EM locks. Below are the example of wiring diagrams for Two power supplies for the system.


Note: If some of the screenshots or steps viewed here are different from the ones in the current system, this is due to our continuous effort to improve our system from time to time. Please notify us at info@timeteccloud.com, we will update it as soon as possible.


2 comments:

Have any questions or inquiries about FingerTec? Drop your input here.

Installation Guide of Face ID 4d (FMM) With AdapTec Plus

Tuesday, February 22, 2022 TimeTec 1 Comments


Introduction
FingerTec Face ID 4D is now supplied with a new version of the coreboard (FMM) that comes with new hardware parts and new exterior parts. To ensure the reader connects with secured wiring, we suggest using the AdapTec Plus connection. Using AdapTec Plus can easily prevent someone from breaking into the premise.

Requirements
·         Face ID 4D
·         AdapTec Plus
·         Contactless exit button
 
Wiring diagram

Setup External Siren
Requirements

·         External siren 12VDC
·         Power Supply AdapTec Plus
·         Face ID 4D reader
·         Switch (siren mute)

Wiring diagram

-          Follow the diagram above for a wiring connection to install an external siren.
Please also make sure to connect the siren mute switch to stop the external siren.
-          If you are using a 240vac external siren. You need to add relay connect with NO/COM from the device.

 How to Setup Siren from Device
·         Go to Main Menu – Select Personalize – go to Bell Schedules – choose Options – click External Bell Relay – tick on NC2
·         Please make sure if you set Bell Schedule, don’t forget to change Repeat = ‘Never’ to the day you want to set the Schedule Bell.
 

Note: If some of the screenshots or steps viewed here are different from the ones in the current system, this is due to our continuous effort to improve our system from time to time. Please notify us at info@timeteccloud.com, we will update it as soon as possible.


1 comments:

Have any questions or inquiries about FingerTec? Drop your input here.

How to Setup Charge Rates for Season Pass on TimeTec Parking

Tuesday, February 22, 2022 TimeTec 0 Comments


Introduction
Season pass parking is a parking system where vehicle owners can park vehicles regularly near their homes or workplaces at a fixed monthly rate. The season parking module of the TimeTec Parking Management System by far is providing the most comprehensive features that the market has ever offered. Through TimeTec Parking, the admins can manage all season passes applications, renewals and terminations online. In addition, users can review, purchase, renew and terminate season passes through the TimeTec Parking web portal or mobile app. 

In TimeTec Parking, car park management or operators can define the parking rate charges and create multiple rates for different parking lots, users and guests based on a seasonal pass.

Process
1. Go to Parking Rule > Charge Rates > Click Add button > Season Pass.


2. Setup the basic information
a) Application Name: Season pass rate name
b) Parking Type: Random Parking for public season pass, Reserved Parking for private season pass.
c) Application Form: Parker’s information form type
d) Start & End Date: Rate start date and expiry date.
e) Terms & Conditions: Terms and conditions agreement for parker.
f) Effective On: Days allowed to enter the parking lot

3. Start with the initial payments for deposit, admin fee and lost card compound. The system only charges the deposit and admin fee once during the first contract.

4. Setup Recurring Payments
a) Contract Cycle: Select payment cycle Weekly, Bi-Weekly, Semi-Monthly or Monthly.
b) Contract Fee: Season pass rates.
c) Contract Fee Style: Fixed rates or Per Tier.

d) Contract Fee Per Tier: Discounted rate when buying season pass in bulk for Corporate or Company Group.

5. Setup Notifications
a) Alert Notifications: Select days to notify parker before next renewal date
b) Overdue Tolerance: Select tolerance days to allow parkers to enter the parking lot after the renewal date.

6. Assign Charge Rates into Parking Lot
a) Go to Parking Rule > Parking Lot > Edit 

b) Click Add button to define parking rates

c) Select Public Season Pass User Group for public season pass and define its Charge Rates.

d) Select Season Pass User Group for corporate or private season pass. Define which Company/Group and Charge Rates for the parking space.

Note: If some of the screenshots or steps viewed here are different from the ones in the current system, this is due to our continuous effort to improve our system from time to time. Please notify us at info@timeteccloud.com, we will update it as soon as possible.


0 comments:

Have any questions or inquiries about FingerTec? Drop your input here.

TimeTec Leave - How to Configure Accrual Interval in Leave Policy to Allow Monthly Earned Leave Balance

Tuesday, February 22, 2022 TimeTec 0 Comments


Introduction
Some company regulations provide a prorated leave balance from the full yearly entitlement based on staff’s joining date, while others practice prorated calculation earned monthly. However, the monthly earned leave is usually calculated on a prorated basis. For example, the staff is entitled to 18 days annual leave per year. Therefore, every month the staff is eligible for 1.5 days of annual leave. If the staff is entitled to 12 days yearly, they shall receive one day of annual leave monthly. This article will demonstrate how to configure the leave policy to allow for earned leave balance every month.

Process
1. In TimeTec Leave, go to Leave Settings > Leave Policy

2. Search for the policy group, click on the edit button to review and amend the current settings.


3. Click on the edit button for the leave type that needs to be configured based on the monthly earned leave. Set the Default Balance as Empty so when a user is first assigned into this policy, they will not receive any balance yet and shall only receive the balance based on the accrual interval settings. Under the Upon Renewal column, change reset to Full Allowance into Carry Over All or Carry Over Limit, and set the carry over settings accordingly for the limit and expiry date, if any. 


4. Accrual Interval will be the column to set for the monthly earned leave. Change the accrual interval from None to Every X Month. Set to earn the balance every how many months (e.g. every 1 month) and the day of the month to receive the balance (e.g. Day 1, Hired day, Last day). Set the amount to be credited into the balance under Accrual by. For Accrue until, select Until Allowance is Full so that the total accrual received by users will not exceed their yearly allowance (e.g. if yearly allowance is 16, accrual monthly by 1.5 days; the user will receive 1.5 days monthly until the tenth month of the accrual, while the eleventh month will only receive 1 day, and none on the 12th month).


5. Click on the Update button to Update button to update the changes, and then the Save button.

6. Reassign Users into the policy to apply the changes in the settings. Copy the leave policy name and paste it under the Leave Policy search box to reassign easily. Once users within that policy have appeared, tick the box above to select all users and then submit.


7. Please note that existing users assigned to the policy before you made the changes will remain with the leave types and balance in the previous settings. Amendment to the user balance is required to change existing users balance. You may refer to this article to update/import user leave balance through Excel file https://www.fingertectips.com/2021/08/how-to-import-user-leave-balance-using.html

Note: If some of the screenshots or steps viewed here are different from the ones in the current system, this is due to our continuous effort to improve our system from time to time. Please notify us at info@timeteccloud.com, we will update it as soon as possible.


0 comments:

Have any questions or inquiries about FingerTec? Drop your input here.

How to Import Leave in TimeTec TA

Thursday, February 10, 2022 TimeTec 1 Comments


Introduction
Every organization has its own set of leaves that employees are entitled to. Leave types such as Annual Leave, Sick Leave, Maternity Leave, Paternity Leave, Bereavement, etc. This section will show you how to import and update user leave taken in TimeTec TA.

Steps
Setup and download file sample
To import leave to TimeTec TA, go to ATTENDANCE > Attendance

Click on the Manage > Import Leave

You may download the excel sample 

Fill the leave inside the excel file and save the file


Insert User ID, Name, Leave Date, Shift No (insert 1), and Leave Taken (insert leave type. Must ensure the leave type is similar to what has been set inside TimeTec. Refer below on how to check for leave type setting)

*Remark: Please be informed that the leave name needs to be the same as the TimeTec TA Leave Type. You may refer leave type as per the steps  below

Go to Company > Leave Type


Import Leave 
Click on the Manage > Import Leave

Select the saved file > Click on the next to preview > submit

Note: If some of the screenshots or steps viewed here are different from the ones in the current system, this is due to our continuous effort to improve our system from time to time. Please notify us at info@timeteccloud.com, we will update it as soon as possible.


1 comments:

Have any questions or inquiries about FingerTec? Drop your input here.