TimeTec TA Mobile App - Personal Clocking

Tuesday, June 20, 2017 TimeTec 16 Comments


Screen Shot 2017-06-20 at 1.55.50 PM.png

Note: This post was originally published in June 2017 and was updated in May 2018.

Introduction 
To cater to employees who are always on the go and those with flexible working arrangements, TimeTec TA offers 4 different ways for users to clock their attendance from a smartphone. The options available for personal clocking in TimeTec TA mobile include:
   -  GPS Geolocation
   -  Beacon
   -  NFC
   -  Wifi Checkpoint
Before the employees can use mobile clocking, the admins first need to make a few configurations in the TimeTec TA account, which we have covered here.

Process 
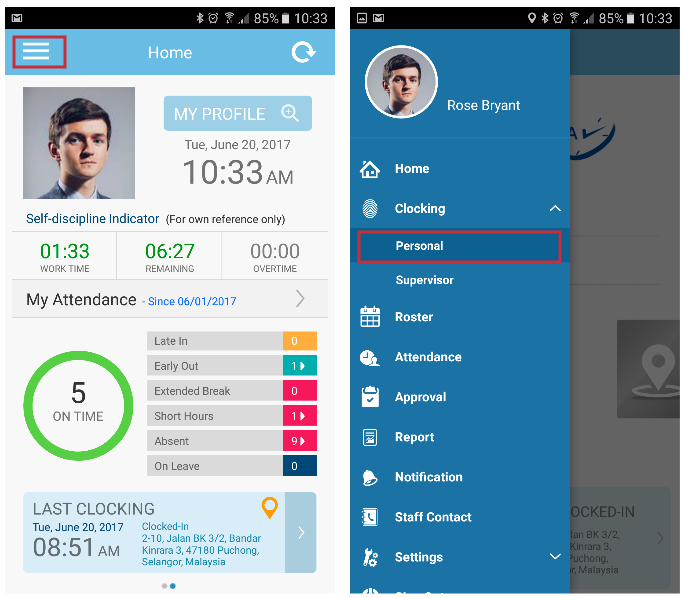
1. To clock your attendance, go to Menu > Clocking > Personal


2. Select your Clocking Type; Clock-In, Clock-Out, Break Out, Resume In, OT-In or OT-Out. This step is optional, depending on your company’s policy. By default, system will determine the clocking type automatically and insert the time into the relevant clocking column based on the schedule set.


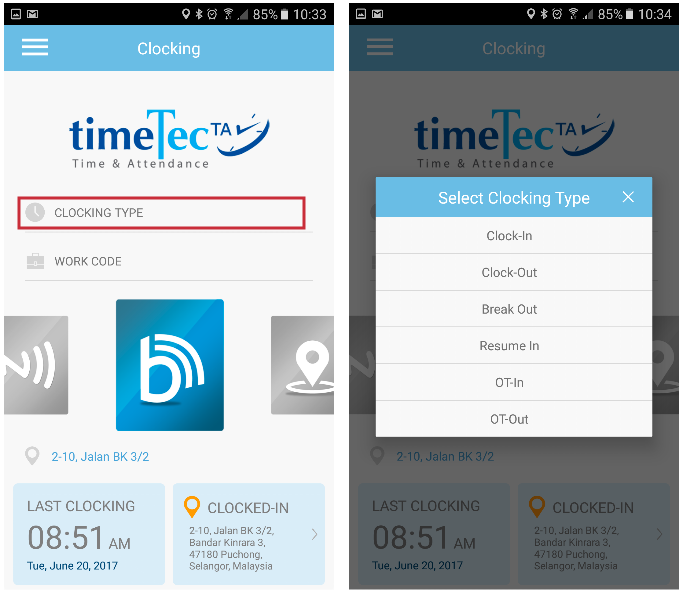
3. Select Work Code (if any)
This step is also optional, depending on your company’s policy. The work code list is only available if Admin has added the work code list in TimeTec TA. 


4. Choose your clocking method by swiping the clocking method options left or right; GPS Geolocation (orange color), Beacon (blue color with letter B), NFC (blue color with letter N) or Wifi Checkpoint (blue colored signal icon). Please note that NFC clocking is available for Android smartphones only. The availability of the clocking method options is based on your company’s permission. Therefore, please check with your company if any of the clocking options is not enabled. 

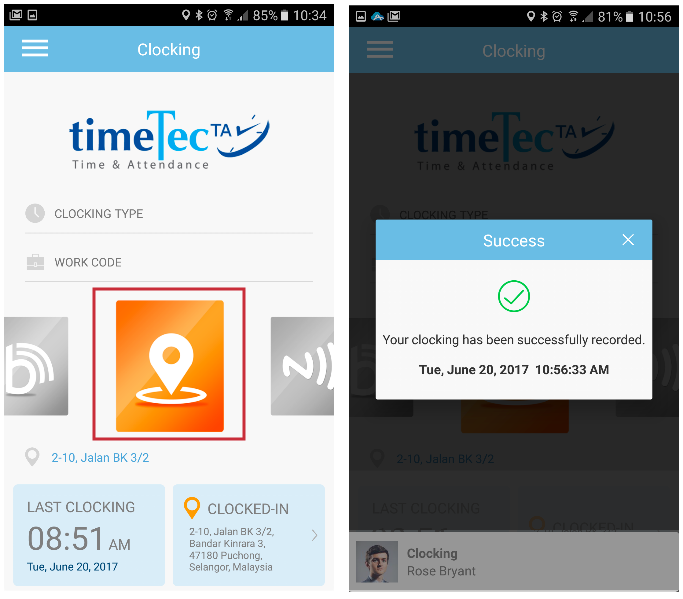
a. Clocking via GPS Geolocation 
Click at the GPS Geolocation icon and wait for the successful message. Please make sure you have enabled your phone’s Location option. 


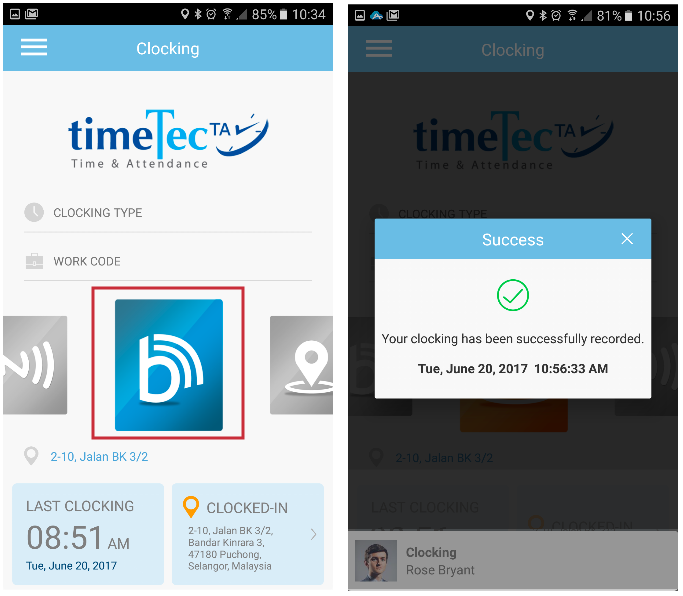
b. Clocking via Beacon
Make sure your phone is within the Beacon’s reading range; 10 metres from the Beacon device. Click at the Beacon icon and wait for the successful message. Please make sure you have enabled your phone’s Bluetooth and Location options. 


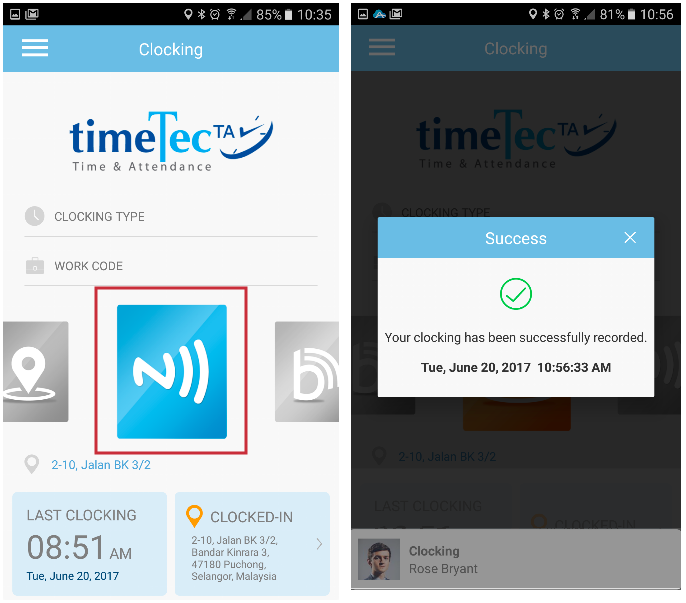
c. Clocking via NFC (for Android only)
Click at the NFC icon and tap your smartphone at the NFC tag, until you receive a successful message. Please make sure you have enabled your phone’s NFC feature. 


d. Clocking via Wifi Checkpoint
Click at the Wifi Checkpoint icon and wait for the successful message. Please make sure your phone is currently connected to the wifi checkpoint to which you have been assigned.  


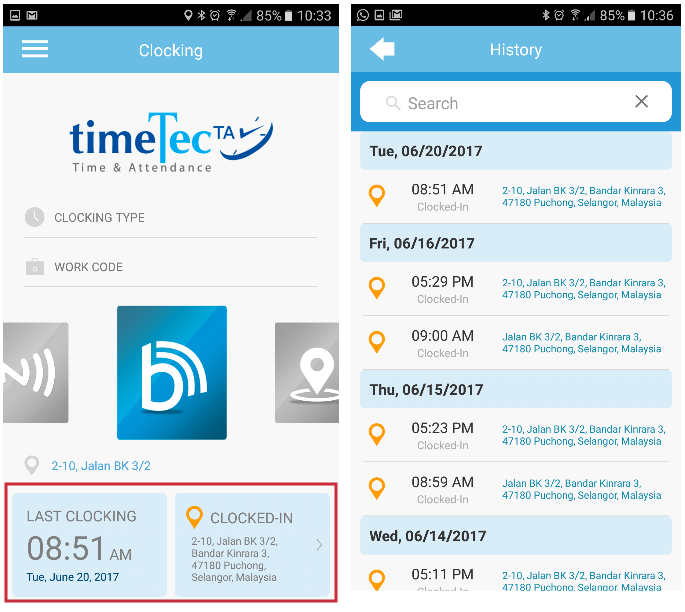
5. Check your last attendance clocking history at the bottom section labelled Last Clocking to make sure that the time has been clocked properly before you go about doing your thing.


Related Posts
Using TimeTec TA App for the First Time
TimeTec TA – Having Problem to Use Mobile Clocking with Your New Mobile Phone? Get to Know How to Reset Your Mobile ID

16 comments:

Have any questions or inquiries about FingerTec? Drop your input here.

Use of Clocking settings for Overtime in Ingress & TCMS V3

Monday, June 19, 2017 TimeTec 2 Comments


FingerTec’s Ingress & TCMS V3 software comes with several useful rules in the Clocking schedule that you can define for Overtime calculations. Depending on the configuration used, you will find different results for the attendance data of users especially work time, over time, short time and etc. This flexibility in the clocking settings provides users with the ability to implement many different settings for almost any working environment. Learn more from the examples below:

1.  Minimum Minutes Must Work to Qualify for Overtime (Applicable for Weekly/Daily/Flexi)
2.  Maximum Number of Hours Allowed to Claim for Overtime (Weekly/Daily/Flexi)
3.  Early Time for Work Before IN Time (Weekly/Daily)
4.  Deduct Short Time from OT (Weekly/Daily)
5.  Work Time Recorded into OT and Done Columns as OT or Work Time (Weekly/Daily)
6.  Work Treat as Overtime – Restday, Offday, Holiday (Weekly/Daily/Flexi)

Note:
The below configurations are done on Ingress software, as shown in the accompanying images. However, this can also be applied in TCMSV3 to achieve comparable results, as the configuration is similar with only a slight difference in the interface.    


Minimum Minutes Must Work to Qualify for Overtime (Weekly/ Daily/ Flexi)

Example:
The working schedule is IN = 08:00 and OUT = 17:00

Without configuring Minimum minutes must work to qualify for overtime, the system will calculate overtime immediately after the defined OUT time. Based on the example, the system will then start to calculate overtime at 17:01 onwards as shown below.


If you change the highlighted setting to 30 minutes, the system will then only calculate overtime 30 minutes after the defined OUT time. As per the example below, the system will calculate overtime only if the user works until at least 17:30. 


Minimum Minutes Must Work to Qualify for Overtime (Weekly/Daily/ Flexi)

Example:
The working schedule is IN = 08:00 and OUT = 17:00

By default, Maximum no. of hours allowed to claim for overtime is set to 24.00 (24 hours). The system will calculate overtime to include all hours between the defined OUT time and before the next day's IN time. Based on the example, OT will be calculated from 17:01 to 07:59.


However, if Maximum no. of hours allowed to claim for overtime is set to 0.00, the system will not calculate overtime at all.


For further example, if Maximum no. of hours allowed to claim for overtime is set to 4.00, the system will limit overtime calculations to 4 hours only even if an employee works for more than that duration as per the example below.


Early Time for Work Before IN Time (Weekly/ Daily)

Example:
The working schedule is IN = 08:00 and OUT = 17:00

By default, Early time for work before in time is disabled. 


If the user comes earlier than the defined IN time, the system will not count it as overtime. Based on the example, the system will not calculate times earlier than 08:00am as overtime. 


If Early time for work before in time is enabled, the system will then start to calculate the early time as overtime. 


Deduct Short Time from OT (Weekly/ Daily)

By default, the system will not deduct any short time from overtime.


If you enable Deduct short time from OT, the system will then deduct short time from overtime.


Based on the highlighted settings, the calculation will take place as shown below. 


Work Time Recorded into OT and Done Columns as OT or Work Time (Weekly/ Daily)

Example:


Go to Attendance > Clocking Schedule > General. By default, Work time recorded into OT and Done column considered as is set to OT. 


Based on the default configuration, the clocking time that appears in the OT and Done columns will be calculated as overtime. 


However, if Work time recorded into OT and Done column considered as is set to Work Time, the OUT and OT columns will act as the second break and Done column will act as your OUT time. 


You will also be able to exclude the second break from the work time as shown in the smaller red box below. 


Based on the above configurations, the system will then deduct both the first and second break from work time. If the user works more than the defined Done time, the system will calculate it as overtime. 


Work Treat as Overtime – Restday, Offday, Holiday (Weekly/ Daily/ Flexi)

Example:
The working schedule is IN = 08:00 and OUT = 17:00
Using a weekly schedule, key in the times for work days and rest days/off days (e.g. Saturday and Sunday). If you do not fill in the clocking slots for rest days/off days, clocking times on those days will not be calculated.

At Overtime tab > check the box for ‘Work treat as Overtime’ for Restday, Offday and Holiday.
With the above settings, you can see the worktime of the employee being calculated as overtime in the Attendance Sheet if they come to work on their rest days, off days or holidays.


Further, you will notice that once a user performs clocking on a rest day/off day, in addition to Overtime being computed, if the user works less than the defined Out time, the system will also calculate it as Short.


If this is not entirely suitable to cater for flexible overtime work on weekends in your company, you can also create a new flexi schedule for weekend only and later add this new schedule into an existing group duty roster. For further information on configurations required, please refer to the link below.


2 comments:

Have any questions or inquiries about FingerTec? Drop your input here.

Utilize OT/Done Columns in Clocking Schedules

Friday, June 16, 2017 TimeTec 7 Comments


OT.jpg

Introduction
You will find the attendance data of users especially work time, over time, short etc will change if you do different configurations in clocking schedule. This might be due to the OT/ Done columns in the clocking schedule.

Benefit
This feature allow you to set whether to calculate overtime automatically without setting a time into schedule OR calculate overtime by fixed time assign in clocking schedule.

Procedure
Example 1
Clocking schedule without OT/Done Settings in clocking schedule:

Clocking time of user
Number of clocking
1st
2nd
3rd
4th
5th
6th
Cloking time
09:00
12:39
13:15
16:15
19:05
23:40

Result in Attendance Sheet

There is no preset time available in the OT/ Done column in this clocking schedule. When employee clocks out after the preset out time, 6:00pm, Ingress/TCMS V3 will calculate and show result in his OT column. The logic and calculations of Ingress/TCMS V3 are based on the clock out time of the employee.

If Actual Out time of user > Preset out time
--> OT = Actual Out time – Preset Out time

Actual Out time of user = 11:40pm or 23:40
Preset Out time of user = 6:00pm or 18:00
Therefore  OT = 23:40 – 18:00
= 5 hours 40 min

Ingress/TCMS V3 will do calculation on total working time. Please take note that work time does not include OT of employees.

If Actual Out time of user > Preset Out time
--> Work time = Preset out time – actual in time
Where work time = 18:00 – 09:00
= 9 hours
If Actual Out time of user < Preset Out time
--> Work time = Actual Out time – Actual In time

Example 2
Clocking Schedule with OT/ Done Setting in clocking schedule

Clocking time of user

Number of clocking
1st
2nd
3rd
4th
5th
6th
Cloking time
09:00
12:39
13:15
16:15
19:05
23:40

Result


Ingress & TCMS V3 will capture the 2 extra clocking times if user configured OT and DONE times in the clocking schedule.
OT is defined as 19:00 in clocking schedule. This means that employee can perform OT work, but the OT will only start at 7:00pm. DONE is defined as 23:00 in clocking schedule. This allows employee to work and claim for OT. Anyway, working time after DONE, 23:00 will not be considered as OT.

OT
DONE
Difference
Preset
19:00
23:00
4 hours
Actual
19:05
23:40
4 hours 35 min
Calculated by Ingress/
TCMS
19:05
23:40
3 hours 55 min

As preset in clocking schedule, the difference between 19:00 and 23:00 is  4 hours.
The formula is
OT = Preset Done time – Preset OT time
OT = 23:00 – 19:00
= 4 hours.

Now TCMS will not allow the OT of user more than 4 hours, as  preset.

If user OT time is earlier than preset OT time, Ingress/TCMS V3 will use preset OT time.
Example 18:55; TCMS will capture and show 18:55 in Attendance Sheet. TCMS will use preset time, 19:00 for calculation of OT.


If user OT time is later than preset OT time, Ingress/TCMS V3 will use the actual OT time.
Example 19:05, TCMS will capture and show 19:05 in Attendance Sheet. TCMS will now using this 19:05 for calculation of  OT.

If user Done time is earlier than preset Done time, Ingress/TCMS V3 will use the Actual Done time.
Example 22:50, TCMS will capture and show 22:50 in Attendance Sheet. TCMS will now using this 22:50 for calculation of  OT.

If user Done time is later than preset Done time, Ingress/TCMS V3 will use the preset Done time.
Example 23:40, TCMS will capture and show 23:40 in Attendance Sheet. TCMS will now using preset Done time, 23:00 for calculation of  OT.

In this example, user OT time is 19:05, which is later than preset OT time; TCMS will use 19:05 for calculation. User DONE time is 23:40, which is later than preset DONE time, TCMS will use preset DONE time, 23:00 for calculation.

OT = Preset Done time – actual OT time
--> OT = 23:00 – 19:05
= 3 hours 55 min (<4hours)

The calculation of work time is same in Example 1, Clocking schedule with- out OT/Done.

Example 3
Clocking Schedule with OT/ Done Column as Scheduled Work Settings in Clocking Schedule


Clocking time of user

Number of clocking
1st
2nd
3rd
4th
5th
6th
Cloking time
09:00
12:39
13:15
16:15
19:05
23:40

Result

The calculation of Ingress/TCMS of work time and OT will change, if the option “Work time recorded into OT and Done column considered as” is set to Work.

Now the OT and Done column will become scheduled work columns as IN   and OUT do. User will have 2 break times in a working day. First break will be from 12:30 to 13:30, and second break will be from 18:00 to 19:00.

Now the Work time is calculated as below,
Work time = Done time – In time

If Actual Done time of user > Preset Done time
Work time = Preset Done time – actual in time
Where work time = 18:00 – 09:00
= 9 hours
If Actual Done time of user < Preset Done time
Work time = Actual Done time – Actual In time

In this example, Done time is 23:40 (> preset Done time), therefore
Work time = Preset Done time – Actual In time
= 23:00 – 14:00
= 14 hours

Since the Done time is more than preset Done time, Ingress/TCMS will calculate the OT of user.
OT = Actual Done time – Preset Done time
OT = 23:40 – 23:40
= 40 min
Ingress/TCMS V3 will also calculate the Short time of user. Short time will only calculate if user comes in later than preset In time and preset OT time. Late from lunch will not consider as short time.  The calculation is as follow,
Total short time = short time (IN) + short time (OT)
Short time (IN) = Actual In time – Preset In time
= 09:00 – 09:00
= 0 min

Short time (OT) = Actual OT time – Preset OT time
= 19:05 – 19:00
= 5min
Therefore total short time = 0 min + 5 min
= 5min

7 comments:

Have any questions or inquiries about FingerTec? Drop your input here.