How to Connect EpiCamera with i-Neighbour

Friday, January 31, 2020 TimeTec 1 Comments


EpiCamera’s cloud-based system eases the setup towards numbers of compatible IP cameras and/or webcams for storing the data online.

Linked Epicamera system with i-Neighbour helps to enhance the security of a neighbourhood with its cloud surveillance system. By installing IP Cameras at the perimeters of a neighbourhood, guard houses and common areas would help to capture any suspicious identities that could be used as evidence in the case of house break-in, kidnapping, vandalism and etc.

For example, all house owners will be given by the management with the access to the IP Cameras which are fixed at a playground. Therefore, when the residents’ children are playing at the playground with or without any supervision, parents or guardians will still be able to observe their loved ones by connecting to live camera footage of the playground via their smartphones or laptops.

Step 1 - Sign up EpiCamera account and add a camera.

Guide on how to connect camera into EpiCamera can be referred to this link : https://www.epicamera.com/connect_to_camera2

For more information on supported camera, you can refer to this link : https://www.epicamera.com/supportedcamera

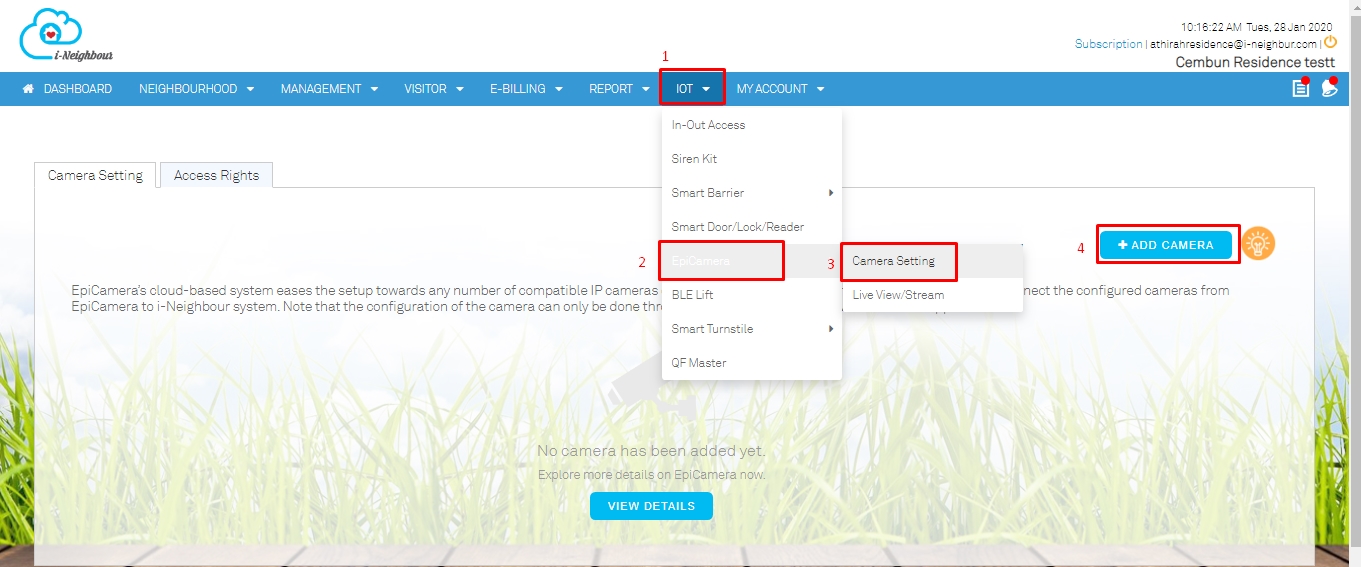
Step 2 - Login i-Neighbour account > IOT > EpiCamera > Camera Setting > Add Camera


Step 3 - Insert EpiCamera username and password


Step 4 - All the cameras that have been added into the EpiCamera account will appear accordingly. Select the preferred camera to be linked with the i-Neighbour account.

Tick on the boxes > Click +ADD


Step 5 - By clicking the +Add button will add the selected camera(s) into the i-Neighbour account

Step 6 - Click on the “Access Right” tab to allow unit owner to view the camera footages

Step 6.1 - Select roles and click on the pencil icon


Step 6.2 - For example to enable roles “Owner” to view camera


Step 6.3 - Click on owner and double click to grant accessible camera right to the selected role


Steps 7 - Unit owner can view the camera footages from his/her i-Neighbour mobile app

Sign into the i-Neighbour app > More > Smart device category > Live View / Stream


Note: If some of the screenshots or steps viewed here are different from the ones in the current system, this is due to our continuous effort to improve our system from time to time. Please notify us at info@i-neighbour.com, we will update it as soon as possible.

1 comments:

Have any questions or inquiries about FingerTec? Drop your input here.

Timeline 100 External Bell Connection and Setup

Friday, January 24, 2020 TimeTec 0 Comments


External bell is used to alert or remind user of break time, shift change or for safety purposes. It is generally installed in schools, factories, warehouses and other organizations. A schedule bell specifies the start time and duration of one or more instructional periods of a daily pattern.

Requirements   


Steps
Connect External siren to Timeline 100
- Open the Timeline 100 back casing screw

-  Connect the cable 4 pin connector to the ‘Alarm’ port from the MCU.

Wiring Diagram

Using 12VDC External Siren

Using AC240 External Siren

Setup Schedule Bell in TA100
Power up the Timeline 100 -> Press MENU -> Select Options


Select Power Mng -> Go to Scheduled Bell -> Configure the day and time to schedule the bell to ring


Set the Schedule time for the day


Then, set the time period for the bell to ring


Note: If some of the screenshots or steps viewed here are different from the ones in the current system, this is due to our continuous effort to improve our system from time to time. Please notify us at info@timeteccloud.com, we will update it as soon as possible.


0 comments:

Have any questions or inquiries about FingerTec? Drop your input here.

Troubleshooting Steps for Missing GPS location in iOS and Android Mobile Phones for TimeTec TA

Friday, January 24, 2020 TimeTec 0 Comments


Introduction
TimeTec TA cloud attendance system offers various methods to carry out clocking for attendance namely Biometric Terminal, QF Master App, Web Clocking and Smartphones. TimeTec TA app offers 5 ways of attendance clocking using a smartphone such as Mobile Clocking with Geo Location, Mobile Clocking with Wifi, Mobile Clocking with Time Beacon, Mobile Clocking with NFC and Supervisor Mobile Clocking (with photo option).

In this article, we will be discussing how to troubleshoot the missing GPS location when users attempt to clock attendance using TimeTec TA app for iOS and Android mobile phone. Please do ensure that your location Service has been turned on on your mobile phone.


Steps for iOS
Make sure the location service is turned on. Open up the TimeTec TA app setting and ensure the app has been enabled to access with the Location services. Please refer to the following steps:
1) Go to Settings > Privacy > Location Services.
2) Make sure that Location Services is on.

3) Open Settings
4) Search for TimeTec TA
5) Select the Location option and ensure the Location Access is set to “While Using App”.

4) Make sure to select “While Using the App” so the app is allowed to use the mobile location services.

Steps for Android:
Make sure the location service is turned on. Open up the TimeTec TA app setting and ensure the app has been enabled to access with the Location services. Please refer to the following steps:
1) Go to Settings > Security > Location Services.
2) Make sure the Location Services is on and select High Accuracy.

3) Go to Location setting, go to App-level permission > search for TimeTec TA > make sure the permission has been granted to the TimeTec TA app.


Note: If some of the screenshots or steps viewed here are different from the ones in the current system, this is due to our continuous effort to improve our system from time to time. Please notify us at info@timeteccloud.com, we will update it as soon as possible.

0 comments:

Have any questions or inquiries about FingerTec? Drop your input here.

Managing New Staff in TimeTec Leave

Thursday, January 23, 2020 TimeTec 0 Comments


Introduction
One of the hardest tasks that HR members and/or administrators need to manage daily is the staff leave information. This includes the handling of newcomers’ leave registration. With TimeTec Leave, admin will be able to arrange and administer all new staff in a systematic way with a reliable system that tracks and records clear data of leave balance. The following article will be demonstrating the process of managing new staff enrollment in the TimeTec Leave browser. 

Process 
Assign user(s) to TimeTec Leave
1. Click on User > Manage User > Assign Users to Application

2. A window as shown below will display. You can find new users available in your account from the list. To assign new user into TimeTec Leave, tick the user and click Submit.

3. The system will prompt a confirmation message before proceeding the chosen action.
4. Once Submit is selected, the user(s) will be able to access to TimeTec Leave.

Set Users’ Leave Approver 
1. Go to User > Manage User > Select user that you want to amend the Leave Approver

2. Click Manage and select the Change Approval Method from the drop down menu.

3. Choose the most relevant option at the Method drop down menu. Select from ‘ANY ADMIN’, ‘IMMEDIATE SUPERVISOR’, SPECIFIC SEQUENCES, ANY [X] APPROVERS’

Method:
A.   Any Admin - The application will be submitted to any admin in the system role
B.   Immediate Supervisor - The immediate supervisor according to the Hierarchy Chart will be set as the approver.
C.   Specific Sequences - Any user can be assigned as the Approver. The applications will be sent to the first approver followed by the second approver and so on.
D.   Any [X] Approvers - This approval method allows you to select multiple approvers for the user's application. Note that [x] number of approvers is required for the approval.

Assign user(s) to Leave Policy
1. Click on ​Leave Settings > Leave Policy > at Edit column, select Apply Policy

2. From the pop-up window, there is a user list with all user’s information, which includes User ID, Name, Organization Structure, Leave Policy Name (if a user had been assigned to leave policy previously)


3. By ticking the box next to each User ID, selected user(s) will be assigned to the leave policy.

4. Submit your selection and you are done with this configuration.

Assign user(s) to Service Accrual
1. Go to Leave Setting > Service Accrual

2. Identify the corresponding service accrual name of the staff and Click ‘Apply service Accrual’ icon

3. Select or search the user and click Submit.

Edit Leave Balance
1. Go to User > Manage User > At the Edit column, click Settings button

2. From the pop-up window, click on the Balance tab to edit specific Leave Type

3. To edit a specific Leave Type, click on the Edit button.

4. Edit Leave Balance, update the Settings by clicking on the Tick button.

Note: If some of the screenshots or steps viewed here are different from the ones in the current system, this is due to our continuous effort to improve our system from time to time. Please notify us at info@timeteccloud.com, we will update it as soon as possible.


0 comments:

Have any questions or inquiries about FingerTec? Drop your input here.

Manage User in TimeTec Patrol

Wednesday, January 22, 2020 TimeTec 0 Comments


Introduction
Managing users is often overlooked. Dealing as an easy part of a system setup, however, it becomes crucial for users who are going to employ the system. It grants users the amount of time to access the system. TimeTec Patrol provides an easy solution for managing your users without any major hassle.

Managing Users
1) Firstly, select a user from the main system panel at the top. A drop down box will then appear. Next, select the Manage User tab for further editing.

2) The following manage user page will be launched as figure shown below.

Adding user
1) Go to manage>add user tab to proceed of adding user.

2) Proceed in adding new user information into the respective fields.


Note : Fields with an asterisk are compulsory fields.

Import user
1) Another way of adding users is by importing user data from an excel file into the TimeTec Patrol software. Importing users from an excel file is generally used for companies that have a large amount of users that need to be synced into TimeTec Patrol quicker.
2) Firstly, go to Manage> Import User.

3) Click on Download the example excel sheet.

4) Follow the template and fill in the respective field for new users information. Note that the important fields in the adding user page also applies to the import of user template.


Delete User
1) To delete a user, select relevant users and go to Manage>Delete User.

Note : After deleting a user/ users, the process is irreversible and the User ID cannot be used anymore.

Editing User information
1) To edit users information, select the user > select the Pencil logo located at the right side of the user data to enter the editing user page.

2) Admin will be directed to the editing user page. Start editing user information by selecting the pencil button on the right.
3) Admin can also reset the user password from this page if the access is granted.


Note : Besides deleting a user/ users, the admin can also deactivate the user if the admin wishes to reuse the User ID rather than creating a new one in the future.

Note: If some of the screenshots or steps viewed here are different from the ones in the current system, this is due to our continuous effort to improve our system from time to time. Please notify us at info@timeteccloud.com, we will update it as soon as possible.

0 comments:

Have any questions or inquiries about FingerTec? Drop your input here.