Connecting FingerTec Devices to Shutter Doors

Monday, August 30, 2021 TimeTec 0 Comments


Introduction
Some offices or factories use shutters for the front door or loading bay access. By incorporating FingerTec devices, only registered people will have access to the shutters using face verification, fingerprint, card access or password.

Requirements
-          Shutter controller
-          Power supply
-          FingerTec device
-          Door switch control
-          Shutter door

Installation Diagram


* Registered users need to verify their face, palm, fingerprint, card or password at a FingerTec device before pressing the close and open switch to open and close a shutter door.
* The roller shutter controller must use a pulse signal/dry contact to close and open input(door control input).
* The roller shutter controller must have its timer for closing and opening completely where it receives pulse signal/dry contact at the door control input.

Wiring Diagram

Note: If some of the screenshots or steps viewed here are different from the ones in the current system, this is due to our continuous effort to improve our system from time to time. Please notify us at info@timeteccloud.com, we will update it as soon as possible.


0 comments:

Have any questions or inquiries about FingerTec? Drop your input here.

How to Backup and Restore AWDMS Database using a Third Party mySQL Manager Tool

Monday, August 30, 2021 TimeTec 1 Comments


Introduction
It is crucial to backup the database of AWDMS regularly. This backup process is necessary to avoid losing all of the software's contents and settings should the software crash or the hard disk of the computer malfunctions. Only with a backup can all the data be restored. By using any MySQL manager, admin or GUI tool, you can tremendously reduce the time needed to restore a large database. The MySQL Manager is inexpensive, you can obtain it for free by downloading it from the Internet.

Backup Process
1. Please download the MySQL Manager tool from the link below:
SQLyog installer (64-bit operating system)
https://s3.amazonaws.com/SQLyog_Community/SQLyog+12.2.1/SQLyog-12.2.1-0.x64Community.exe

2. After successfully installing the SQL Community, please run the software to connect with the MYSQL database. First, you need to fill the required Host address, Username and Port of the MYSQL database. Then, click on Test Connection and Connect.

3. Upon connecting to the localhost database, you should see on the left panel of the window a list of the available databases. Next, right click on AWDMS and select Backup/Export and Backup database as SQL Dump.

4. Click on Structure and Data > Select ALL Object(s) > Choose folder to store the database > Now that the settings have been configured, click 'Export' to start the backup process. The program will inform you when it is completed.

5. Now, you need to copy one folder that contains a user photo for backup purposes in case there is no user photo available once you restore the AWDS backup database on a different PC.

Go to C:\Program Files\BioSecurity\service\zkbiosecurity\BioSecurityFile\upload and copy the whole Upload folder. You can paste this folder in the same location above if you are moving AWDMS to a different PC.

Restore Database
1. At the SQLyog Community software, connect into the localhost database. Right click on AWDMS, select Import, and then Execute SQL Script.

2. Click the “…” icon to select the backup file path. Click Execute to restore the database.

3. Next, you can copy and paste the Upload folder (Step 5) in the same location at C:\Program Files\BioSecurity\service\zkbiosecurity\BioSecurityFile. Now, the restore process for AWDMS is complete and you can use AWDMS with Ingress software as usual.

Note: If some of the screenshots or steps viewed here are different from the ones in the current system, this is due to our continuous effort to improve our system from time to time. Please notify us at info@timeteccloud.com, we will update it as soon as possible.


1 comments:

Have any questions or inquiries about FingerTec? Drop your input here.

How To Book Joint Inspection for i-Neighbour

Monday, August 30, 2021 TimeTec 0 Comments


Introduction
A JOINT INSPECTION is defined as an inspection where Developers jointly conduct a compliance inspection activity with homeowners. The joint inspection can be customized and designed for various types of entire inspections, complete with tickets. Booking a joint inspection through this application eases the whole process of developers assisted inspections professionally.   

i-Neighbour Smart Community Solution offers house owners/purchasers the easy booking of Joint Inspection with the Developers team through the App.

Steps
Following are the steps on how to submit a booking for joint inspection via i-Neighbour.
Step 1: Launch the i-Neighbour App > More > select Joint Inspection icon under Management. 


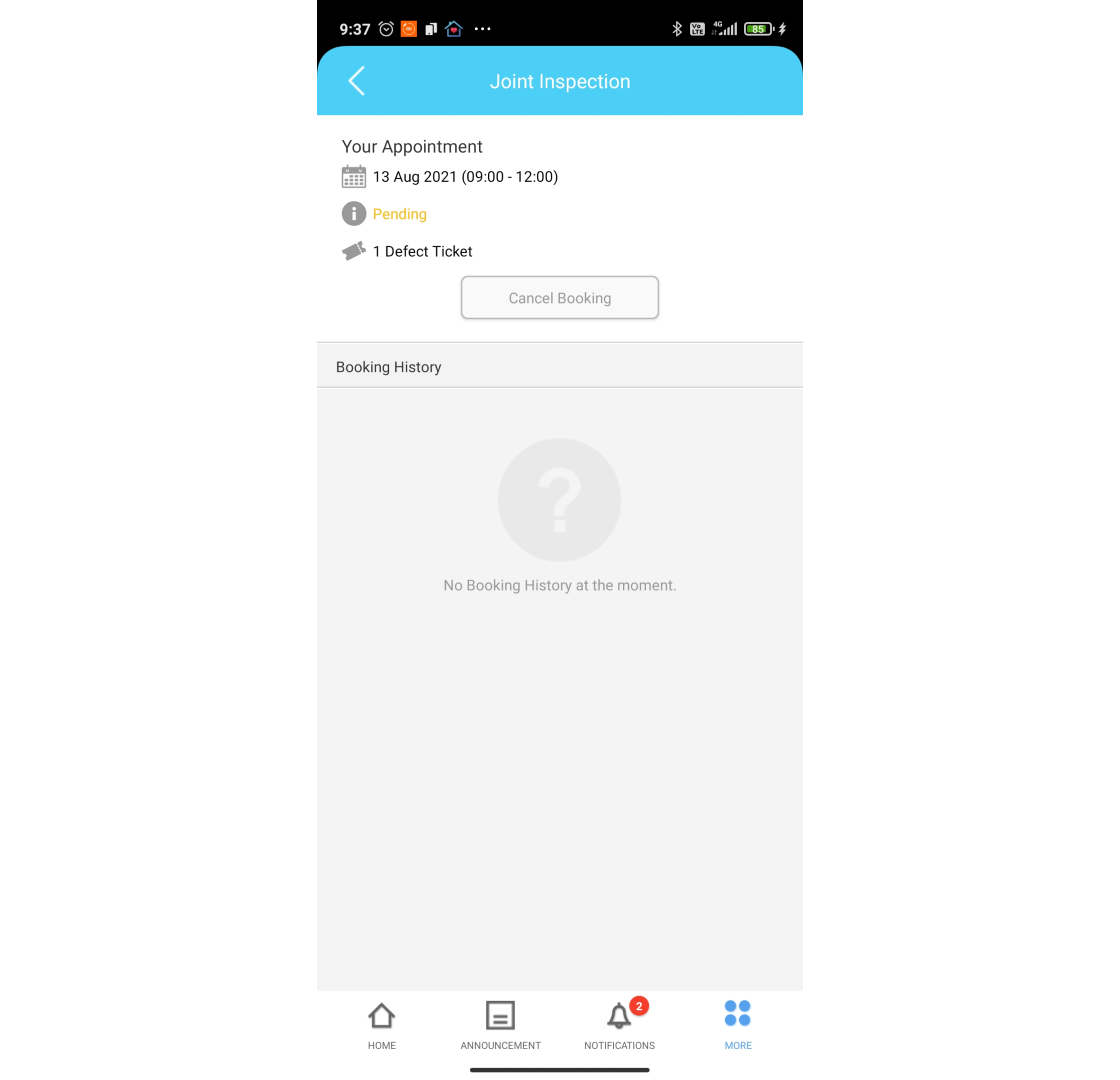
Step 2: Click Book Now and select the available date and slot to book a joint inspection. Click Book, and a prompt message will appear when you have made your booking successfully.


Step 3: A user will receive a notification once the Developer approves the booking of the joint inspection.


Step 4: During a joint inspection with the Developer, go to More > select Defect Report icon under Management. 


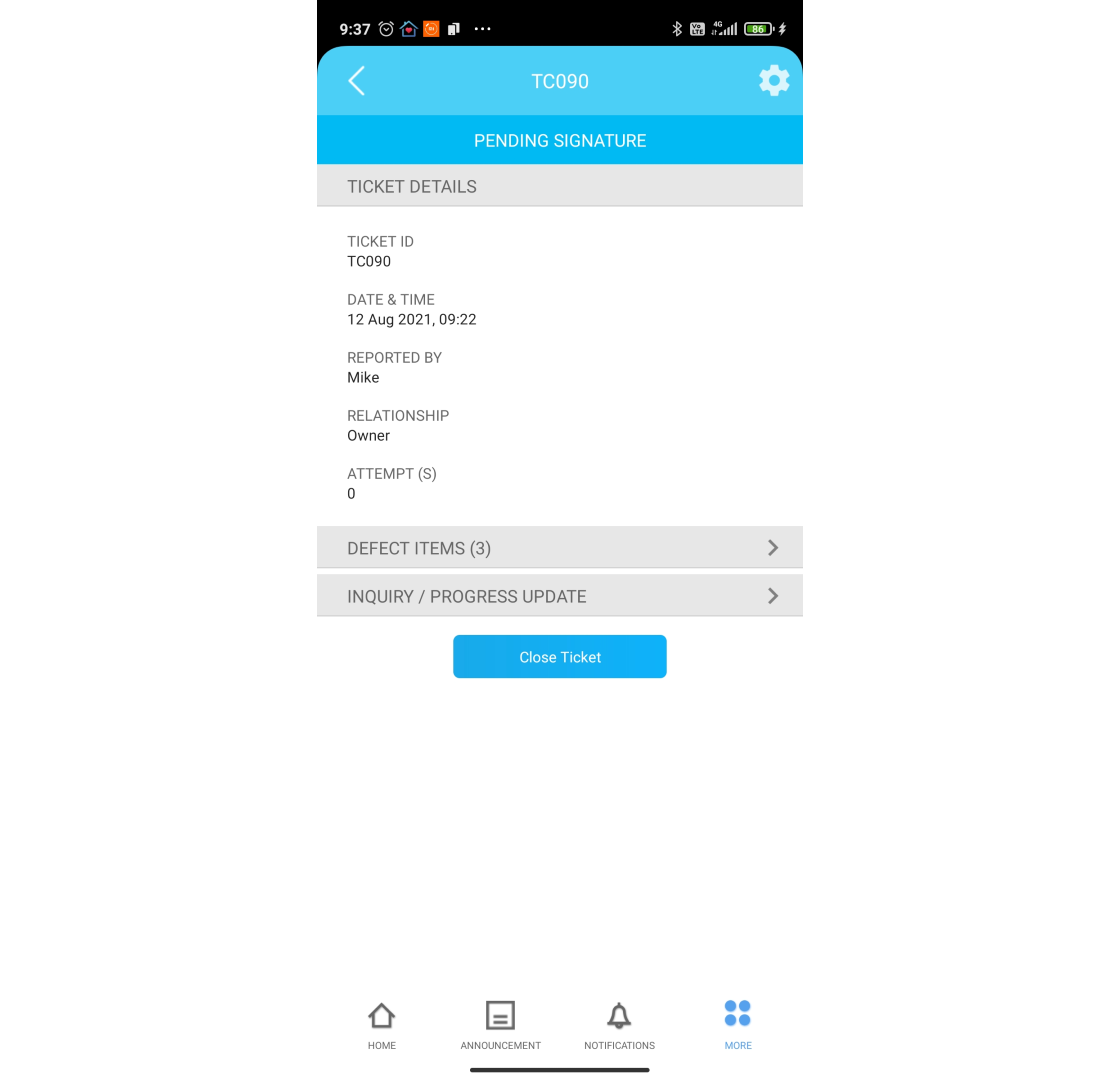
Step 5: Select ticket > click Close Ticket


Step 6: Write a remark and tick disclaimer to proceed to close the ticket. Give your remark and click submit.


If you are still having problems after completing all of the steps stated above, please contact us via support@i-neighbour.com. 
 
Note: If some of the screenshots or steps viewed here are different from the ones in the current


system, this is due to our continuous effort to improve our system from time to time. Please notify us at info@i-neighbour.com, we will update it as soon as possible.


0 comments:

Have any questions or inquiries about FingerTec? Drop your input here.

Step-By-Step Guide for Admin to Manage Defect Reports in i-Neighbour

Monday, August 30, 2021 TimeTec 0 Comments


Introduction
This article is a guide for an Admin to configure and manage the Defect Report module. The Defect Report module centralizes all the defect reports lodged by the Unit Owners, and it manages the report tickets efficiently for the management team. 

Note: All Defect Report settings are available in the i-Neighbour web platform, which is not available in the App.

Steps
How To Configure the Defect Report Settings on the Web
Step 1
: Go to Defect Report and navigate Settings (the Cog icon is next to the Ticket Closed button).

Step 2: At the ‘Defect Type’ tab, the Admin can add different types of defects/items. Once you select all items, click the Save button. All added defect types are available in the unit owner’s Defect Report form.
Example: 
Select type: Door
Enter item type: Frame
Code: E2

Step 3: At the ‘Defect Locations’ tab, the Admin can add different types of locations. Once you add the location, click the Save button. All added locations are available in the unit owner’s Defect Report form.

Step 4: At the Auto Mailer tab, customize your mailer by editing the email subject and text message. Click on the Edit button to amend the Auto Mailer.

Step 5: Next, under the Settings tab, configure the settings for Defect Report module such as Alert Message, Joint Inspection, Person-in-charge, Ticket Prefix, etc.

Step 6: Go to the Defect Eligibility tab to view or edit the defect report eligibility status of each of the unit owners. Click on any of the Edit icons for which the user wants to edit or view the eligibility status of the selected unit owner.

Step 7
: Choose the Start and End date of the validity period for the unit owner to lodge any of the defect reports.

Step 8: Enable the Defect Report Eligibility button. The Developer may disable this button if necessary. Once disabled, the unit owner cannot submit a defect report — Click Submit button to save the changes.

Note: If some of the screenshots or steps viewed here are different from the ones in the current system, this is due to our continuous effort to improve our system from time to time. Please notify us at info@i-neighbour.com, we will update it as soon as possible.


0 comments:

Have any questions or inquiries about FingerTec? Drop your input here.

How To Lodge A Defect Report To The Developer using i-Neighbour App

Monday, August 30, 2021 TimeTec 0 Comments


Introduction
DEFECT REPORT is a document that identifies a defect in a residence detected by a house owner/purchaser, and they need to send the report to the Management for further action. The report explains the problems found for the developers to identify the defect quickly and fix it promptly. 

Through i-Neighbour Smart Community Solution, the house owner/purchaser can easily send the defect reports to the management team through the App. In addition, the App stores all information about the defect reports for future reference by both parties.

Steps
Following are the steps on how to submit a defect report via i-Neighbour.
Step 1: Launch the i-Neighbour App > More > select Defect Report icon under Management. 


Step 2: To lodge a new Defect Report, tap on the ‘+’ icon.

Step 3: Specify your role, an Owner (a houseowner/purchaser) or a Non-house owner/purchaser (a person who reports on behalf of the houseowner). 

Step 4: Fill in the defect information and Submit. Click on ‘Add New Case’ to lodge more than one (1) ticket.

Step 5: Once the owner/purchaser submits a Defect Report, he needs to wait for the Management Team to respond.

Step 6: The house owner/purchaser can check their Defect Reports’ status from time to time at the Defect Report section and select the particular ticket to view the details. Check for the new updates from the Management (if any) at the Notification tab. Once repairs are completed, the owner can book a joint inspection.


Note: If some of the screenshots or steps viewed here are different from the ones in the current system, this is due to our continuous effort to improve our system from time to time. Please notify us at info@i-neighbour.com, we will update it as soon as possible.


0 comments:

Have any questions or inquiries about FingerTec? Drop your input here.

How to Set Leave and Holiday Reminder in TimeTec Leave

Friday, August 20, 2021 TimeTec 0 Comments


Introduction
There are cases where the staff were not aware of their leaves and holidays due to their busy schedules. TimeTec Leave has a feature to remind them regarding their upcoming leaves and holidays. Therefore, the system will email the individual staff to remind them of their upcoming leaves or holidays. This reminder will help staff to plan for their leave accordingly.

Process
A. Leave Reminder

1. Go to Leave Settings > Reminder

2. Leave > Add (+)

3. Select Organization Structure > Leave Type > Reminder > Recipients > Additional Recipient (Email, Optional) > Submit(OK)

i. Organization Structure: You need to select a department that will use this setting.
ii. Leave Type: You need to choose the leave type for the reminder.
iii. Reminder: Frequency of the event to be sent out before the upcoming leave.
iv. Recipient: You may select the reminder recipients, either all users or only selected users.
v. Additional Recipient: You can add other recipients that will receive the notifications by adding their email addresses.

4. New leave reminders created will be shown after you click Submit. 

5. Leave Reminder (Email)
i. User

ii. System Admin or Admin

B. Holiday Reminder

1. Go to Leave Settings > Holiday (Please ensure that you have already configured all the holiday settings on the Holiday tab). 

2. Go to Leave Settings > Reminder

3. Holiday > Add (+).

4. Select Organization Structure > Leave Type > Reminder > Recipients > Additional Recipient (Email, Optional) > Submit(OK).
i. Organization Structure: You need to select a department that will use this setting.
ii. Leave Type: You need to choose the leave type for the reminder.
iii. Reminder: Frequency of the event to be sent out before the upcoming leave.
iv. Recipient: You may select the reminder recipients, either all users or only selected users.
v. Additional Recipient: You can add other recipients that will receive the notifications by adding their email addresses.

5. New holiday reminders created will be shown after you click Submit.

6. Holiday Reminder
i. User

ii. System Admin or Admin

Note: If some of the screenshots or steps viewed here are different from the ones in the current system, this is due to our continuous effort to improve our system from time to time. Please notify us at info@timeteccloud.com, we will update it as soon as possible.


0 comments:

Have any questions or inquiries about FingerTec? Drop your input here.