TimeTec Leave - How to Change the Leave Type of Leave Records by Cancelling the Approved Leave and Import Leave Taken

Friday, March 25, 2022 TimeTec 2 Comments


Introduction
When applying for leave in TimeTec Leave, users will need to select the Leave Type (e.g. Annual Leave, Medical Leave) before being able to submit the request. However, there are situations where users are not entitled to a particular leave type yet and have to apply for leave using other leave types. For instance, one might still be under probation and need to apply for leave using Unpaid Leave first, but will need to re-apply using Annual Leave type once they are confirmed. Therefore, the previous leave record (Unpaid Leave) will need to be cancelled first before re-import the leave taken using the Annual Leave type. This article will demonstrate how to cancel the leave taken and then import the leave taken using an excel file.

Process
PART 1: Cancelling the approved leave taken
A) Request cancellation by user (Mobile App)
1. Login into user’s TimeTec Leave account, go to Application.

2. Tap on the leave application that you want to cancel.


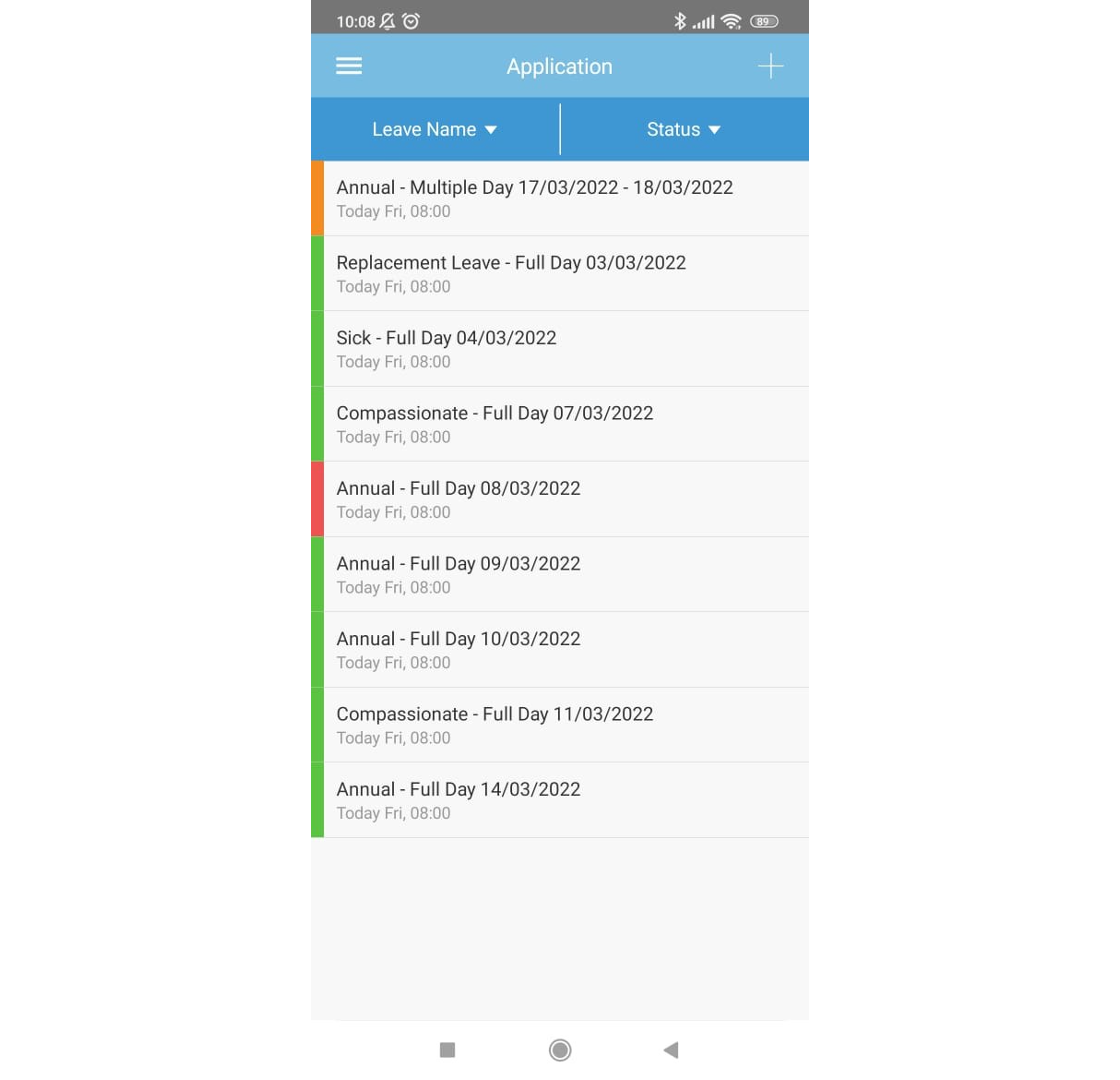
3. Tap on Request Cancellation and insert reason to cancel the leave.

4. The cancellation will need to be approved by the approver. Once the approver has approved the cancellation, the status will only become Cancelled.

B) Request cancellation by user (Web)
1. Login into TimeTec Leave website using user’s account, Home > Leave Overview > select filter for users as “Only Me” > Submit.

2. Select the leave from the appropriate calendar date > Enter the reason for the cancellation > click Request Cancellation > Confirm.

3. The cancellation will need to be approved by the approver.


C) Cancellation from Approver account
1. Login as an approver, go to Approval module

2. Find the application that needs to be cancelled, click on the application.

3. Click the Cancel / Request Cancel button


4. If there is other approver, let the other approver cancel the leave request by following the above steps.

PART 2: Import Leave Taken using an Excel file
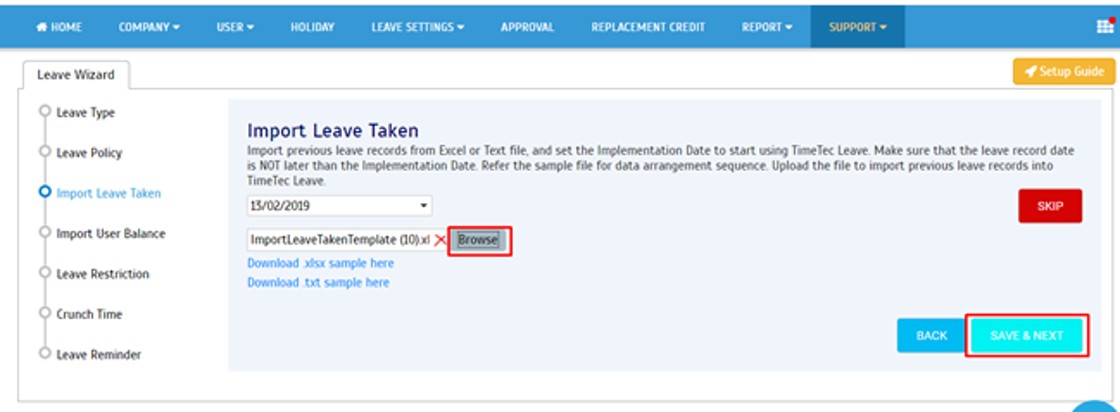
1. Login as system administrator into TimeTec Leave, go to Support > Wizard > Leave Wizard

2. Once  you are in  the Leave Wizard page, please click on Import Leave Taken from the left panel. Then download sample file for reference either in Excel or Text format.


3. After downloading the sample file, fill in the leave record details inside the column given. Note that you must separate each leave taken record. The Start Time and End Time must follow the working hours (8 working hours for full-day leave and 4 working hours for partial day leave). The leave type must also be an exact match with the one defined in the TimeTec Leave. 

4. After filling the data in the file, choose the Implementation Date. (Implementation Date must be LATER than the Leave Record Dates added in the file). If you require the imported leave to be deducted from the user’s current balance, tick the Deduct leave taken from the balance option. Otherwise, keep the box untick only to import the leave taken as a record without deducting the user’s balance.

5. Moving on, click on Browse and select leave record file. Once done, click on SAVE & NEXT  to begin importing the leave record file.

6. Once complete, you should be able to view user’s leave taken in the Leave Overview.

Note: If some of the screenshots or steps viewed here are different from the ones in the current system, this is due to our continuous effort to improve our system from time to time. Please notify us at info@timeteccloud.com, we will update it as soon as possible.


2 comments:

Have any questions or inquiries about FingerTec? Drop your input here.

How To Add New User to TimeTec TA (Geofence User)

Friday, March 25, 2022 TimeTec 0 Comments


Introduction
Time attendance, scheduling management & work from home are effective solutions for the modern workforce. The TimeTec TA automates your time data collection process and seamlessly integrates it with biometrics identification devices. This tip will show you how to register new users in TimeTec TA for the GPS Geofence module. 

Process
A.Go to User > Manage User > Manage > Add User


B.Fill up the below information > Submit

C. Go to User > Manage User > Click on the setting button > Assign user roster


D.Assign User to Geofence 
I. Go to DEVICE > Mobile Clocking > Geofence. 

II. Select Geofence location > Select Assign User 

III.Select users > Submit  


Note: If some of the screenshots or steps viewed here are different from the ones in the current system, this is due to our continuous effort to improve our system from time to time. Please notify us at info@timeteccloud.com, we will update it as soon as possible.


0 comments:

Have any questions or inquiries about FingerTec? Drop your input here.

How To Add New User to TimeTec TA From Device to TimeTec TA (Webster Terminal)

Friday, March 25, 2022 TimeTec 0 Comments


Introduction
Time attendance, scheduling management & work from home are effective solutions for the modern workforce. The TimeTec TA automates your time data collection process and seamlessly integrates it with biometrics identification devices. This tip will show you how to register new users in TimeTec TA for the Webster Terminal module.

Process
DEVICE:
A. Register new users and add fingerprints to the device.
i. Go to Menu > User Mgmt 
ii. Add new user
iii. Register new user 

TimeTec TA:
B. Go to DEVICE > Terminal > Select Device > Manage Terminal > Download User


C. Select User > Submit


After the user downloaded into the system, you may proceed with editing the user information
D. Go to USER > Manage User > Edit user 

E. Fill below information > Submit


F.  Go to User > Manage User > Click on the setting button > Assign user roster 

Note: If some of the screenshots or steps viewed here are different from the ones in the current system, this is due to our continuous effort to improve our system from time to time. Please notify us at info@timeteccloud.com, we will update it as soon as possible.

0 comments:

Have any questions or inquiries about FingerTec? Drop your input here.

How To Add New User to TimeTec TA From TimeTec TA to Device (Smart DBS)

Friday, March 25, 2022 TimeTec 0 Comments


Introduction
Time attendance, scheduling management & work from home are effective solutions for the modern workforce. The TimeTec TA automates your time data collection process and seamlessly integrates it with biometrics identification devices. This tip will show you how to register new users in TimeTec TA for  the Smart DBS module.

Process
A.Go to User > Manage User > Manage > Add User


B.Fill up the below information > Submit

C. Go to User > Manage User > Click on the setting button > Assign user roster


D. Upload user to the device
 I. Go to DEVICE > Terminal. 


II. Select Terminal 

III. Manage Terminal > Upload User 


IV. Select User > Submit


V. After the user setup is completed, proceed with user clocking enrollment in the device. 

Note: If some of the screenshots or steps viewed here are different from the ones in the current system, this is due to our continuous effort to improve our system from time to time. Please notify us at info@timeteccloud.com, we will update it as soon as possible.


0 comments:

Have any questions or inquiries about FingerTec? Drop your input here.

TimeTec Access Report

Wednesday, March 23, 2022 TimeTec 0 Comments


Introduction
TimeTec Access is a cloud-based Access Control System designed to effectively manage and monitor employees in a building or office. TimeTec Access offers various reports for listing, stored data and checking processes, and it retains data for up to 2 years.

Process to generate a report

1. Go to Reports. Select the type of report to generate.


2. You could  filter the report by Date, Access Point or User, depending on which type of report you generate.


3. Click Generate button to generate the report. You can print the report or save it as PDF file.


Type of Timetec Access Report. 
1. Access Group Listing - Display all the Access Group settings created


2. Access Time Listing - Display Access Time settings


3. Access Point & Device Listing - Display all the Access Point and Device added in TimeTec Access.

4. Access Point Activities Analysis - Display all activities on Access Point/Door. You may filter by Date and Access Point.


5. User Activities Analysis -  Display user’s activities, filtered by Date and User.

6. Transaction Logs Analysis -  Display all transaction logs, filtered by Date, User and Access Point.


7. Access Point Events Analysis - Display all the Access Point events filtered by Date, Access Point, Activities and User.

8. Entry Exit Analysis - Display all user’s Entry and Exit time filtered by Date and User.


9. Last Known Position Report - Display the User’s last position or transaction filtered by Date and User.

10. Fire Roll Call display the records of who is in and those who have visited a building. For more details, please refer here


Note: If some of the screenshots or steps viewed here are different from the ones in the current system, this is due to our continuous effort to improve our system from time to time. Please notify us at info@timeteccloud.com, we will update it as soon as possible.


0 comments:

Have any questions or inquiries about FingerTec? Drop your input here.