Connecting Ingressus Controller to COMM RS485 for Ingress

Tuesday, December 22, 2015 TimeTec 1 Comments


Introduction


FingerTec’s terminals offer a few communication methods including TCP/IP, RS232/485 or USB client. Communication configuration is very important because a lot of tasks such as enrolment, download/upload transactions and update user information can be performed from the software. If the terminal is connected via TCP/IP or RS232/485, users will be able to synchronize the changes or information from the software.

Benefits

Besides TCP/IP, RS485 communication is an inexpensive local network with multi-drop communication links. Since RS485 is using a twisted pair cable type, which can support connection distance up to 1200m (4000 feet).


Process:

1.    During terminal activation, go to Devices > Add Device


     2.   The Ingressus controller needs to be configured as below:
         Device Type                     : Ingressus
         Device Name                  : (Compulsary to be filled)
         Communication Mode   : RS232/RS485
         Serial Port                       : Depend on the computer serial port. (Please refer to point
                                                   #3 to check the Serial Port number)

         Baudrate                         : 38400

         Please take note that the Baudrate for first time configuration is 38400. Ingressus 
         controller’s default baudrate is 38400. User will fail to communicate or connect to the
         controller if other baudrate is selected.

    3.   You can check the serial port number at your PC’s Device Manager > Ports (COM & LPT) >
          Look for the Serial Comm Port and the COM port numbers displayed in brackets. In the

          screenshot below, you can see the serial port used is COM 4.

      4.   After completed the configuration above, click at the Add button and the system will show
            “Device added successfully” message, if the activation is successful.


1 comments:

Have any questions or inquiries about FingerTec? Drop your input here.

Blast the External Siren Loudly with Face ID 4d

Tuesday, December 22, 2015 TimeTec 0 Comments


Introduction

FingerTec’s Face ID 4d Terminal can be customized to support External Schedule which is useful in alerting employees to change shift or clocking status. However, take note that upon enabling this option, the Door Access feature of this device will be disabled.

Benefits

By using the external bell function, you can increase the volume of the alert bell so it can be heard from a distance. This is suitable for industrial working environment, such as factories.

Process

1.      Update the firmware of the device. You can download the customized firmware from here.
     
       **Note: By updating this firmware, Door Access feature of this device will be disabled           

       
-       Run the FTFaceID4.exe > Insert Device’s IP Address > Connect > Update > Restart


2.      Set the Schedule Bell on Face ID 4D, select External.

Go to Menu Date/Time > Bell > Select Schedule Bell > Insert your bell trigger date and time followed by the trigger period.
3.      Connect the device to the external siren as shown in the wiring diagram below:
And you are ready to test it! Make sure you are not too close to the siren to avoid damage to your ears. 

0 comments:

Have any questions or inquiries about FingerTec? Drop your input here.

Troubleshooting Ingress Server – Client Connection

Tuesday, December 22, 2015 TimeTec 20 Comments


Introduction

Ingress is multi-user software with a Client-Server model, which means it can be used by multiple users concurrently. This article will explain to you the steps to connect Ingress Client to Ingress Server smoothly.

Benefits

By following these steps, users will be able to log in to Ingress from Ingress Client effortlessly.

Process

(A)   Ingress version installed in the Client PC must be the same as the one installed in the Server PC. For example, if you are running Ingress v3.0.4.9 in the server, you need to make sure that the Ingress Client is of the same version.

(B)  Enable Port 3000 and 3306 in Windows Firewall settings at both the Client and Server PC.

1)     Go to the Control Panel and select Windows Firewall.

 
2)     Select Advance settings from the left panel.
 
3)     Click on Inbound Rules, followed by the New Rule.
 
4)     Select Port and click Next. Select TCP, insert 3306 at Specific local ports and click Next again.
 
5)     Select Allow the connection and click Next, followed by ticking on Domain, Private and Public.
 
6)     Finally, insert a name for this set of firewall rules as Ingress Server 3306 and click
Next.
 
7)     Repeat step 1-6 for Outbound Rule

8)     Repeat step 1-7 for Port 3000 and name it “Ingress Server 3000”

(C)   MySQL Instance Configuration Wizard
1)     In the Server PC, go to Start Menu, and search for MySQL Instance Configuration Wizard, and launch it.
 
2)     Un-tick the “Enable Strict Mode” option.
 
3)     Enter your current “root” password at all 3 fields so that the root password will not change. Then, tick the “Enable root access from remote machines” option.
 
4)     Execute and wait until all 3 steps are completed.

(D)   Run DBInstaller.exe at Ingress Server PC.

1)     Go to Start Menu and search for Ingress DBInstaller, and launch it

2)     Key-in the “root”password of your database

3)     Click “Test Connection” > “Update Connection” > “Upgrade Database”.
 
Now that the connection is established between the Client and the Server, connect to your Ingress without any problems! 
 

20 comments:

Have any questions or inquiries about FingerTec? Drop your input here.

UPLOAD USER PHOTOS INTO FINGERTEC DEVICES USING THIS SIMPLE TOOL!

Tuesday, December 22, 2015 TimeTec 7 Comments


Introduction

The latest version of TA100C and AC100C devices are equipped with the new Core Board version known as FMM 100, replacing the FEM510. The new coreboard is loaded with 800MHz microprocessor, 128MB RAM and 256MB flash memory.

With the new coreboard, you can experience the newly designed menu icons and faster data processing.

However, due to the fact that FEM510 and FMM100 models are running on different platforms, uploading user photos into FMM100 model devices cannot be done directly from our bundled software.


Benefits

Having a photo identification during fingerprint verification will further validate that the machine is capturing the correct user.

This tool will allow administrators to upload multiple user photos at the same time, without requiring any use of software.


Process

To upload user photos into FMM100 devices, please follow the steps below:


Step 1:

Make sure the device is connected to a PC. You can test the connection by pinging the device’s IP address, and connect it to Device Info tool (Refer : http://www.fingertectips.com/2014/01/how-to-use-fingertec-device-info-tool.html)

 
Step 2:

Download the “FT User Photo” tool from this link here.


Step 3:

Prepare the user photo appropriately according to the specs.
-          The resolution of the photo must be 320x210px , and the size must not be more than  
 30KB.
-          File type must be in JPEG format (.jpg)
-          Rename the user photos the same as the user IDs (for example user ID is 900, the photo  must be renamed as 900.jpg)
 

Step 4:

Copy all user photos and paste them in the “FT User Photo” folder (User photo must in the same folder with the FTUserPhoto tool)


Step 5
-          Turn OFF your PC’s Wifi,Firewall and Antivirus  
-          Run the FTUserPhoto tool
-          Insert device IP address (Tool will show the device information once connected)


Step 6:
-          Tick User Photo (box 1)
-          Then click the button (box 2) and Select user photos.


Step 7:

Click update button

Step 8:
After successfully updating those photos, you will be able to see the photo during verification process. Refer the picture below.
BEFORE


AFTER


7 comments:

Have any questions or inquiries about FingerTec? Drop your input here.

TimeTec TA New Feature: Notification for Announcement and Attendance

Monday, November 30, 2015 TimeTec 0 Comments


Introduction

Since the introduction of TimeTec TA, clients have been asking for notifications on tardiness to alert the admins on these activities. We are proud to introduce this feature in the latest release of TimeTec TA and it can be set online and in mobile app!

We offer two types of notifications, announcement and attendance, which come in default messages but customizable according to your company’s preferences.

Announcement notifications can be configured to notify users about new employees that are joining your company, employee’s birthday, anniversary of services and etc.

Attendance notifications can be configured to notify Admin and/or users about their tardiness activities.

Benefits

By having notification feature in TimeTec TA, the company can improve employer-employee relationship with new employee and birthday alerts, and both parties are informed of tardiness activities to seek room for improvements.

Process
1.      Click notification (Bell Icon) > Settings (Gear Icon)
    2.       In the current version, the Notification feature only applies for Announcement and
            Attendance, many more to come in our future releases.


      3.     
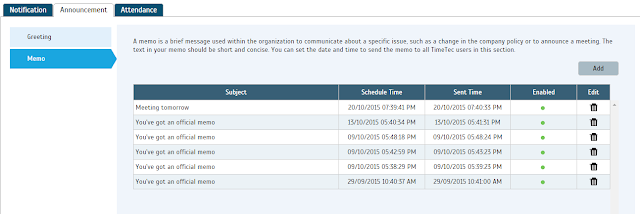
In the Announcement window, there are two types of notifications, Greeting and Memo. 
4.      Notifications in Greeting include Welcome, Birthday, and Anniversary wishes.
 
5.    Memo is a short message that contains important information from the employer for the employees for example change in company’s policy, announcement on certain rules, and etc. You can configure the memo as shown below. Administrators can set the date and time to send the memo to all TimeTec users. Click ‘Add’ to configure the memos.
 
 
6.      For Attendance notification, you can set the Late In, Early Out and Clocking notifications.
   Late In and Early Out notifications will notify admin and alert users on users’
attendance’s tardiness.
          
           The Clocking notification will notify the administrators and alert users on users’ clocking
           activities. Both administrators and users will receive notifications every time users Clock-In
           their attendances not on time.


       7.    The notification will be received on the smart phone that has been installed with TimeTec
             
Mobile app.


0 comments:

Have any questions or inquiries about FingerTec? Drop your input here.

Ingress & TCMS V3 Software – Reports for Job Costing Function

Friday, November 27, 2015 TimeTec 0 Comments


Introduction

Job costing is a function that tracks the cost of a particular job that has been assigned to specific employees. This function provides a company with data about the job type and the duration it takes to complete the job for accurate assessment and pay calculations.  Examples of companies that usually use the job costing function are accounting firms, law firms, automobile servicing companies, construction companies and etc.

In Ingress & TCMS V3, this function is available when using flexi schedule. As the weekly and daily schedule in both software only provide allowances for 3 pairs of clocking records, companies that require more clocking slots (e.g. need 4 pairs when employees are entitled to 3 breaks a day) may also find this function appropriate for their working arrangements. Using this, the software will calculate work time for each In-Out pair, to provide a better attendance analysis. 


Benefits
By using the Job Costing feature in Ingress software, the management’s work is simplified. And by generating two such reports from Ingress software, which are the Job Cost Analysis & Detailed Employee Time Card reports, the management does not have to calculate all the job costs manually even though the pay rate is different for each task.


Process
Note:
Please be informed that the below configurations are done on Ingress software, as shown in the accompanying images. However, this can also be applied in TCMSV3 to achieve comparable results, as the configuration is similar with only a slight difference in the interface.

1) Create a flexi schedule.


2) Enable Job Costing Features in the Flexi Schedule’s General tab.


3) Define Work Code at the Remark.


4) For different employees, you can configure different pay rates for different jobs.


5) Upload the work code into the terminal.


6) After downloading the transaction data from the FingerTec terminal, the attendance sheet will
    display the user with the transaction data.


Result: Job Cost Analysis
This report is exclusively for the Job Cost Option at the flexi schedule. It displays the users’ multiple break times and also the job’s work code for the particular break time.


Result: Detailed Employee Time Card Report
This report is exclusively for the Job Cost Option at the flexi schedule. It displays the users’ multiple break times and also the job’s work code for the particular break time. Unlike the Job Cost Analysis, this report will summarize the attendance details.


0 comments:

Have any questions or inquiries about FingerTec? Drop your input here.

Login Issue after updating to Ingress v3.0.4 from an older Ingress version.

Friday, November 27, 2015 TimeTec 6 Comments


Introduction

Users have found issues when logging in to Ingress software after updating their Ingress software to v3.0.4, where “Invalid username/password” error pops up even when they have inserted the correct password. This is caused by the change to the database structure in the v3.0.4 update.
Benefits

By following the procedures below in Ingress Server PC, users will be able to login to Ingress software without any problems.
Process

1) Shut down Ingress and Ingress Server.

2) Download the DBinitialization tool here.

3) Extract the downloaded file. Copy the file and paste it in the Ingress Server folder (Local Disk C > Program Files (x86) > Fingertec Worldwide > Fingertec Ingress > Ingress Server)

4) Launch the DBinit.exe file by double clicking on the file.

5) Once completed, run Ingress DBInstaller, which is in the same Ingress Server folder.

6) Key-in root password and click the Test Connection button.

7) Click on the Update Connection button, and once done, click the Upgrade Database button.

8) Close the DBInstaller, and launch the Ingress software. Login using the existing username and password.

6 comments:

Have any questions or inquiries about FingerTec? Drop your input here.

Backup/Restore Ingress Database using 3rd Party MySQL Manager Tool

Friday, November 27, 2015 TimeTec 2 Comments


Introduction

Ingress was designed to work with MySQL database, which is known to be powerful, reliable and is widely used by many other systems. The downside of MySQL database is that the configuration requires advanced IT knowledge.

It is important to take regular backups of the databases of the Ingress software. Should the software crash or the hard disk of the computer malfunctions, all of the contents in the software as well as the settings will be lost. Only with a backup can all the data be restored.

Benefits

By using any MySQL manager, admin or GUI tool, the time needed to backup or restore large databases can be reduced tremendously. The time can be used to set up the software again. The MySQL Manager is inexpensive to use and you can obtain it for free by downloading from the Internet.

Process:

BACKUP THE DATABASE
1)     Once you have installed the SQL manager, run the program from the desktop shortcut. This is the first window you will see.
 
 
a)    Click the button on the top left labeled New. A window will appear asking for the name of this connection. Provide the connection name and click OK to continue.
 
a)    Provide the IP address of your database in the field labelled MySQL Host Address.
b)    Provide your database username and password in the appropriate fields.
c)    Enter 3306 in the Port Column.
d)    Click Save, then click Connect.
 
2)     Now that you have connected to the database, you can proceed to make a backup of your database. You should be able to see on the left panel of the window a list of the available databases.


3)      Select Ingress and right click on it. This will cause a menu to appear. Find the option labelled as 'Backup Database as SQL dump ...' and click it.
 
       4)    Under 'Export as SQL', you have the option of backing up the database structure or data or          
               both. Make sure both is selected for the backup to be successful.

 
      5)     Click the '....' button next to the 'Export to File:'. This will bring up a file save window. Find
               an appropriate folder to store your database backup.
6)    Now that the settings have been configured, click 'Export' to start the backup process. The
       program will inform you when it is completed.

RESTORING THE DATABASE
       1)    To restore your database, first connect to your MySQL server using the instructions from 1)
               and 2) in the database backup process above. When you have connected to the MySQL server, go to
               
the DB menu near the center top of the window then click on 'Restore from SQL dump ...’.


2)    Click the '...' or ellipsis button and find the database backup that you have saved and open it. Once you have found the database, click 'Execute'. This will recreate your database into the software and the restore process is complete.

2 comments:

Have any questions or inquiries about FingerTec? Drop your input here.