Get Your Own Attendance Reports Straight from TimeTec TA App

Tuesday, March 19, 2019 TimeTec 2 Comments


Introduction
On top of 31 reports offered by TimeTec TA to the admin of the System, each user is also offered three personalized attendance reports which can be generated via TimeTec TA mobile app. The first report is Electronic Time Card that summarizes all the clocking activities of a user, the second is Tardiness Report that presents the details of late and early clocking data, and the third is Mobile Location Tracking that details out the list of GPS clocking for that particular user. These reports can be generated according to custom timeline and it will be presented in a pdf form.

Benefit
These reports are useful for users to countercheck the information recorded by the system and to rectify with admin if any discrepancies are found. 

Process
Step 1 – Login to TimeTec TA mobile application.
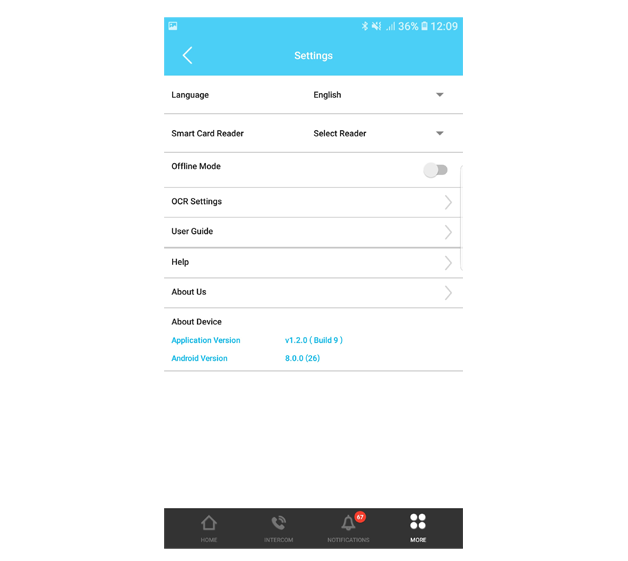
Step 2 – At the main menu, tap on “Report”.

Step 3 – Choose a report type, select the preset time range or you can customize the date using calendar. Tap on the Download button on top of the page to generate the report.

Step 4 – When the process is complete, you will see “Click to open report” button, tap on it and view your report. 
Step 5 – The report will be viewed.

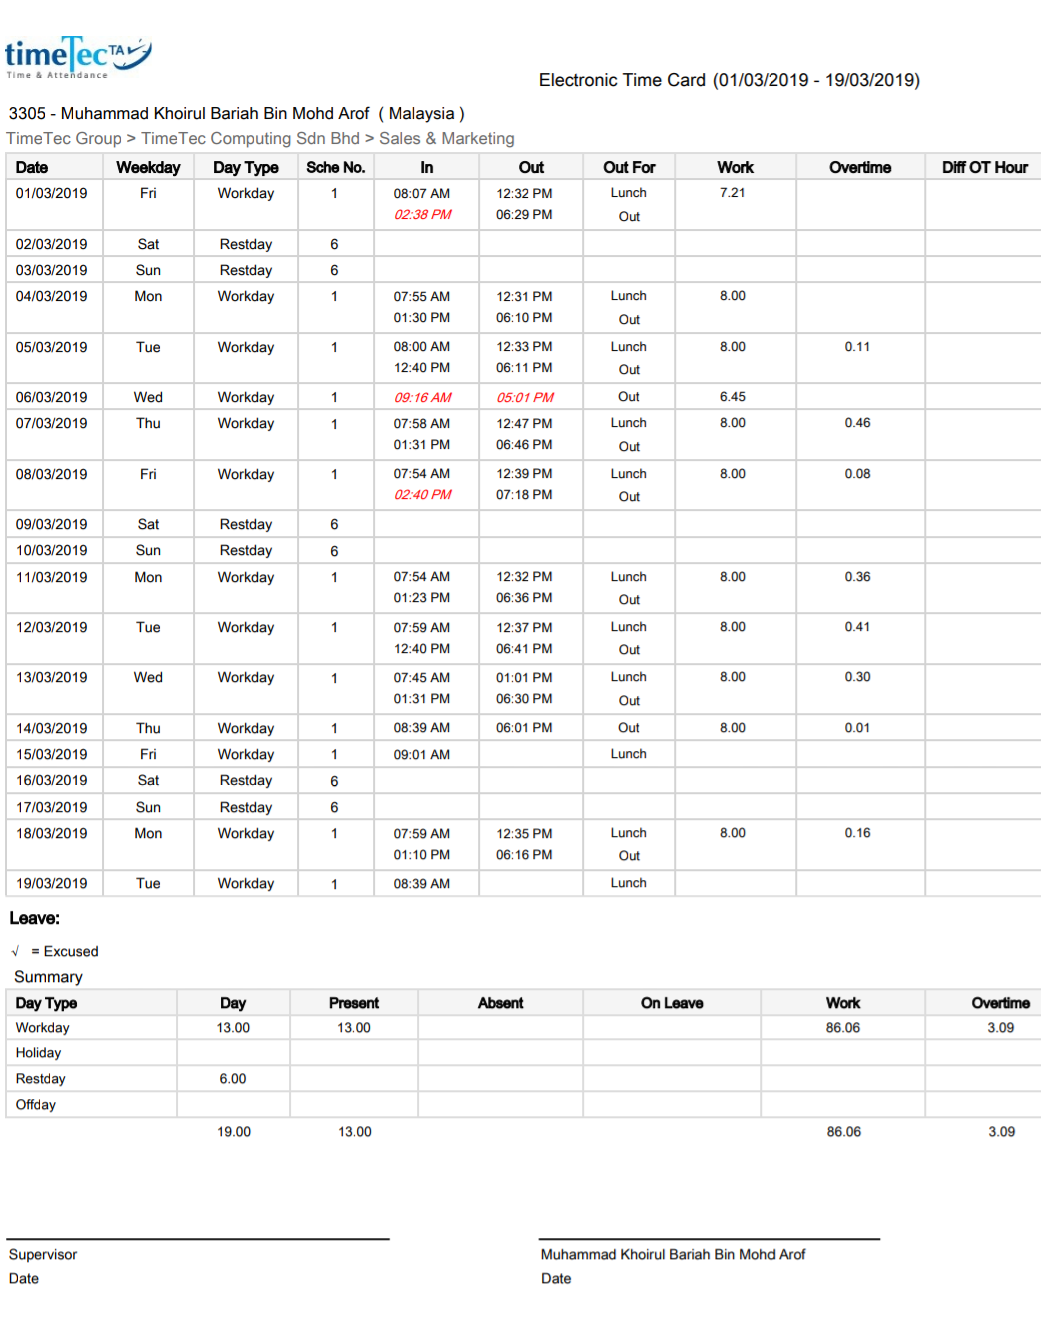
a) This is a sample of Electronic Time Card Report.


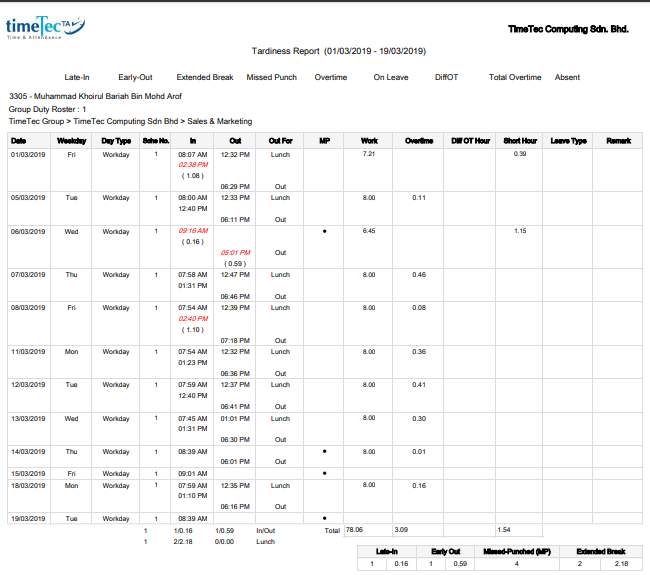
b) This is a sample of Tardiness Report.

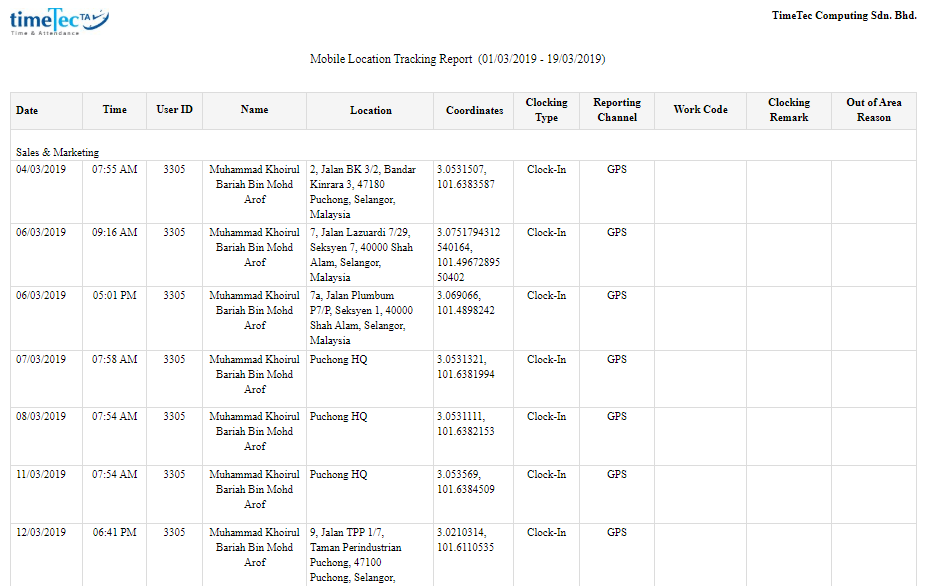
c) This is a sample of Mobile Location Tracking Report.

The PDF file of the report can be shared and printed for your own purposes. 

Note: If any of the screenshots or steps in this manual are different from the current system, it is due to our continuous effort to improve our system from time to time. Please notify us at info@timeteccloud.com. We will update it as soon as possible.

2 comments:

Have any questions or inquiries about FingerTec? Drop your input here.

TimeTec Patrol - Offline Mode

Friday, March 15, 2019 TimeTec 0 Comments


Introduction
TimeTec Patrol mobile app is designed to collect security guards’ patrolling records in real time. During patrolling, security guards can capture photos, report incidents in text or voice notes and so on. The data reported will be logged into the server immediately, thus connection to the Internet is required for the system to work properly. 

However, some patrolling sites might not have proper mobile data Internet or poor Internet connection. To handle this situation, security guard can enable the Offline mode in TimeTec Patrol mobile app. Below are the steps to use TimeTec Patrol Offline mode.

Steps
1. When guard is ready to perform his patrolling task, enable the Offline mode button to start. 
2. The mobile app will start downloading patrol routes and rules into the smartphone. Make sure the Internet connection is stable for the download process to complete. 
3. When download process is completed, security guard can start patrolling using Offline mode. All patrolling records, photos, text and voice incident reports will be saved in the smartphone storage. Please note that Panic Button feature is not available during Offline mode. 
4. When the security guard finished patrolling and got back to his office, the security guard can resume back to Online mode. Tap at the Upload Data button to push all patrolling records, photos, and incident reports to the server. Tap Offline mode toggle button to resume back to Online mode. 

Note: If any of the screenshots or steps in this manual are different from the current system, it is due to our continuous effort to improve our system from time to time. Please notify us at info@timeteccloud.com. We will update it as soon as possible.

0 comments:

Have any questions or inquiries about FingerTec? Drop your input here.

Importing Leave Records From Excel/Text File In TimeTec Leave

Friday, March 15, 2019 TimeTec 0 Comments


Introduction:
TimeTec Leave is a cloud-based solution that facilitates all leave proceedings online for a company regardless of its size. One of the handy features  included in TimeTec Leave is the capability to import previous leave records from an Excel or a Text file. This particular feature is especially useful for companies that are upgrading to TimeTec Leave since all leave records taken previously will be safely stored within the system for a clear audit trail throughout. Below is a quick guide on how to carry out this process.

Process:
1. To start importing the Leave Taken records, first go to TIMETEC LEAVE > SUPPORT > Wizard > Leave Wizard.
 

2. Once in the Leave Wizard page, please click on (1) Import Leave Taken.
3. Proceed to download the samples (2) for Excel format and (3) for Text format.


4. After downloading the respective files (e.g. Excel file as shown in the screenshot below), proceed to fill in the leave record details inside the column given. Note that each leave taken record must be separated.
5. The Start Time and End Time must be followed by the working hours (8 working hours for full day leave and 4 working hours for partial day leave).
6. It's also important that you match the leave names before starting with the Import process.
 

7. After filling the data in the file, proceed to choose the Implementation Date. (Implementation Date must be LATER than the Leave Record Dates added in the file).


8. Moving on, click on Browse and select leave record file. Once done, click on SAVE & NEXT  to begin importing the leave record file.


9. After the file is successfully imported, only the Leave Taken data will be updated without affecting the user leave balance. Note that the leave balance update needs to be done separately.
10. Below are the possible errors that a user might face during the import process:

No.
Error
Solution
1
User already has leave taken
Change to correct date.
2
Invalid User or Invalid Leave Type
Please make sure that the user name/leave type matches
the user account.
3
Invalid Implement date
Please make sure that the leave record date is NOT later
than the implementation date.
4
User is on holiday/rest day
Please make sure that the user’s leave record date is not
on a holiday/rest day.

11. That’s it, you should now be able to view the users' previous Leave Taken records within TimeTec Leave.


Note: If some of the screenshots or steps viewed here are different from the ones in the current system, this is due to our continuous effort to improve our system from time to time. Please notify us at info@timeteccloud.com, we will update it as soon as possible.

0 comments:

Have any questions or inquiries about FingerTec? Drop your input here.

i-Neighbour App: How To Enable GPS and Notification Features

Friday, March 15, 2019 TimeTec 0 Comments


Global Positioning System or GPS is a satellite-based radio navigation system. It basically uses radio waves between satellites and a receiver in your phone to provide information about time and location and time to any software. Your phone's GPS receiver uses the data from these signals to triangulate your location and time. 

Notification is a feature that updates users on new messages, updates, bonuses, reminders and etc.  It usually comes with an alert notification sound. 

When you are using i-Neighbour App and you disable the notification feature and/or the GPS settings, the i-Neighbour and your security guards won’t be able to receive your location when you triggered the panic button. 

Hence, if you are intend to use the panic button in the future, these are the steps to enable the notification and GPS feature for i-Neighbour on your phone. 

GPS - Steps Required: 
Settings > Installed apps > i-Neighbour > App permissions > Enable location

GPS Setting for Android                                                 
1. Go to Settings.
2. Find Installed apps.
3. Select i-Neighbour.
4. Find and select App permissions

5. Enable the Location to activate the GPS function for i-Neighbour.

GPS Settings for iOS
1. Click on Settings.
2. Select i-Neighbour.

3. Tap on Location to open the location settings.
4. Choose Always for Location Access

Notifications - Steps Required: 
Settings > Notifications & status bar > App notifications > i-Neighbour > Enable all

Notifications Setting for Android
1. Go to Setting.
2. Find Notifications & status bar.

3. Tap on the App notifications to see the apps list.
4. Search and select i-Neighbour.

5. Enable all functions to receive all notifications related to i-Neighbour.

Notifications Settings for iOS
1. Go to Settings.
2. Select Notifications.
3. Choose i-Neighbour.
4. Turn on all functions to receive all notifications from i-Neighbour.

Note: Every Android smartphone has a different user interface, hence the screenshots presented above might be different from your smartphone UI.

If you are still having problems after following the given instructions, please contact us via: support@i-neighbour.com 

Note: If some of the screenshots or steps viewed here are different from the ones in the current system, this is due to our continuous effort to improve our system from time to time. Please notify us at info@i-neighbour.com. We will update it as soon as possible.

0 comments:

Have any questions or inquiries about FingerTec? Drop your input here.

i-Neighbour Mobile App - Offline Mode

Thursday, March 14, 2019 TimeTec 0 Comments


Introduction
i-Neighbour mobile app needs to be connected to the Internet at all times for it to synchronize with the server in order to provide the latest information to all users. However, there could be a certain areas within a residential space whereby mobile data connection is unavailable, particularly at the lift lobby, basement car park and etc. To cater to this shortcoming, i-Neighbour mobile app offers an Offline mode for users to use the app even when there’s no Internet connection.

Steps
1. When a resident launches an i-Neighbour mobile app, the system will check for an Internet connection status and it will alert the resident if the Internet connection is not available. 

2. Tap at Go Offline to activate the Offline mode. Once this is done, the resident will see the main display as the image below:

3. During the Offline mode, the resident can still use the Smart Access, Lift Access and Panic button features. To use the Lift Access, tap at the Lift Access button to select the floor.

When the Internet connection resumes, the mobile app will automatically resume to Online mode. Hence, the residents don’t have need to do anything because the app will constantly check for Internet connection.

Note: If any of the screenshots or steps in this manual are different from the current system, it is due to our continuous effort to improve our system from time to time. Please notify us at info@timeteccloud.com. We will update it as soon as possible.

0 comments:

Have any questions or inquiries about FingerTec? Drop your input here.

i-Vizit Mobile App - Offline Mode

Thursday, March 14, 2019 TimeTec 0 Comments


Introduction
The i-Vizit mobile app requires Internet connection at all times to synchronize data from server and to upload all visitors check in-out records. However, a guard house might experience intermittent loss of Internet connection which will interrupt daily operation. Under this circumstance, security guard can enable Offline mode in i-Vizit mobile app so Internet connection is not required for it to operate. 

Steps
1. Security guard must first login to i-Vizit mobile app when Internet connection is still available. Go to Settings and enable Offline Mode.

2. The system will then alert the security guards about the mobile app restrictions during Offline mode. Tap Go Offline to continue. 

3. The app will start downloading data from the server to enable the app to operate under Offline mode. Please do not interrupt the download process. 

4. When download process is complete, mobile app will be running under Offline mode. Offline mode view is as below. During offline mode, security guard can:  
     a. Register walk in visitor, but the data will be stored inside the mobile app only.
     b. Review all checked-in visitors, but limited to visitors that have checked in before Offline mode.
    c. Scan QR code to check in the visitor but limited to the QR codes downloaded before Offline mode.


When Internet connection resumes, security guard can tap the Sync to Cloud button (at the top left corner) to upload all records to server. 

Under Offline mode, security guard can still use mobile app to unlock smart barrier, smart doors and also lift access. 

Note: If any of the screenshots or steps in this manual are different from the current system, it is due to our continuous effort to improve our system from time to time. Please notify us at info@timeteccloud.com. We will update it as soon as possible.

0 comments:

Have any questions or inquiries about FingerTec? Drop your input here.

i-Neighbour App: App Lock In Security Tablet (i-Vizit)

Monday, March 11, 2019 TimeTec 0 Comments


Introduction:
App Lock is a lightweight app that lets you lock almost any types of file in your Android. This app locks your applications to avoid other people from accessing or uninstall them, and at the same time, it can lock photographs, videos and even contacts as well as individual messages. App Lock can lock any apps you choose to prevent unauthorized access.

Steps Required:
1. On the Settings section, tap on the App Lock icon.
2. Enter the correct username and password to login.
3. Once you have entered the App Lock screen, select the application that needs to be auto-launched when the device boots.
4. Choose i-Vizit for i-Neighbour guard tablet.
5. Turn on the Pro Kiosk Mode and choose i-Vizit as your selected kiosk app.
6. Turn on the functions that you want to enable the device restriction.
7. These are the functions that you need to turn on:
 - Allow Screen Stay Awake (plug in)
 - Caller Screen
 - Caller Notification
 - Contacts
 - i-Neighbour Prevent Force Stop
 - Incoming SMS
 - Notification
8. Press the power button and tap on Restart.
9. After restart, the tablet can only view the i-Vizit screen.
10. To test, click the back button or touch anywhere on the screen to make sure that the App Lock functions well.
To unlock the App Lock app:
11. Press the power button and select ProKiosk Mode.
12. Enter the ProKiosk password to exit from the App Lock.
13. The App Lock now has been disabled and the tablet is successfully unlocked.
If you are still having problems after following the given instructions, please contact us via: support@i-neighbour.com

Note: If some of the screenshots or steps viewed here are different from the ones in the current system, this is due to our continuous effort to improve our system from time to time. Please notify us at info@i-neighbour.com. We will update it as soon as possible.

0 comments:

Have any questions or inquiries about FingerTec? Drop your input here.

How To Troubleshoot Missing Attendance Record via TimeTec TA

Friday, March 01, 2019 TimeTec 6 Comments


Introduction
Attendance plays an important role for HR staff to calculate staff payroll and determine staff performance in the industry. Hence, it is crucial if there is a missing attendance record in the system when the staff claimed that they have been presented to work, as it will be unprofitable for the staff.

In this tip, there will be a guidance for the TimeTec TA user to do troubleshooting if there is a missing attendance record in the system.

Steps
A : CHECK DEVICE CONNECTION
In this tab, you can manage your biometric terminals by edit the terminals' information, view the details of each terminal, upload, download, delete, reboot and determine the time zone.

1. Go to DEVICE > Fingertec Terminal.
 

2. This tab will allows you to see all device connection status. The green and red color in the connection status allow you to determine whether the device has connected to the system or not. Green means the device is connected and red means disconnected.


3. If it shows red color, you need to check with the staff that available at the device location to check the device connection or to reset the device.
4. If the device connection status shows that the device still connected to the system, you can proceed with the steps shown below.

B : STAFF MOVEMENT ANALYSIS REPORT
Track staff clocking record with STAFF MOVEMENT ANALYSIS REPORT.
The Staff Movement Analysis report is a list of every attendance transaction based on the date & time selected by the user. This report is to determine the movements of the users during working hours.

1. Go to REPORT > Device Analysis > Staff Movement Analysis


2. Select the user that you want to see their record. Then, select the Date & Time.


3. The record will show you every clocking details that the user has done during working hours.
4. Now you can see the staff movement record, whether the he/she do the clock-in or not.


C: DATA AUDIT LIST
The Data Audit List allows you to view all clocking activities along with the details such as clocking date-time, location, reporting channel, etc.

1. In TimeTec TA, Go to DEVICE > Data Audit List


2. Fill in all the  information you need in the column given and you can search the user by ID/Username.
3. Once done, click on the filter icon next to the ID/Username column to continue.


4. The result will show you all the clocking record done by the user.
5. In the Data Audit List you can see the type of reporting channel used by the staff.


D : GENERATE ATTENDANCE
This step allows you to view employees live attendance data. However, the live attendance data is available for a period of 2 years only, and all the data past this period will be moved to the archive section.

1. In TimeTec TA, go to ATTENDANCE > Attendance.


2. Click on Manage > Generate


3. Select a user, choose the date and click on “OK” button to start generating the attendance report for the user.
4. Once the attendance generating process is done, please check the staff record again.


If none of the above steps give the info that you need, please visit the link below:

Note: If any of the screenshots or steps in this manual are different from the current system, it is due to our continuous effort to improve our system from time to time. Please notify us at info@timeteccloud.com. We will update it as soon as possible.

6 comments:

Have any questions or inquiries about FingerTec? Drop your input here.