TA500 New Platform (FLM 60)

Monday, October 21, 2019 TimeTec 1 Comments


Introduction 
FingerTec recently introduced the new TA500 time attendance device which improves while adding new features and functionalities to serve users.

New Features
1. User role selection
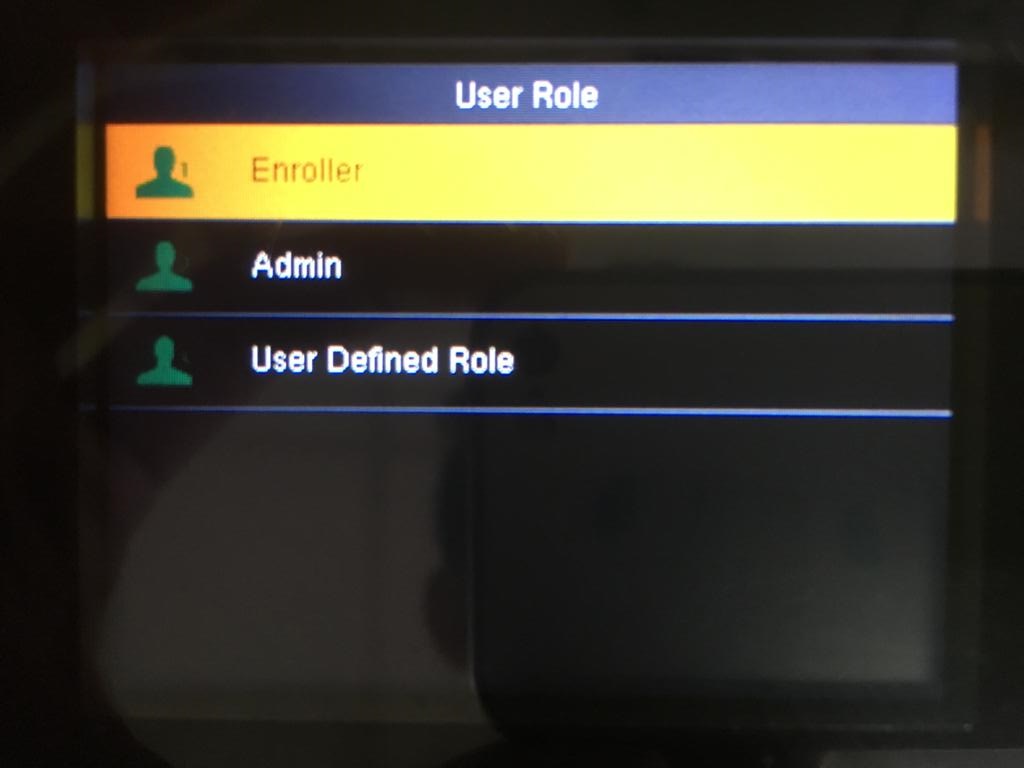
This option allows users to customize users’ privileges. It offers 3 roles - Admin, Enroller, and a customized role. The user must enroll at least one Super Admin to enable this role. For a newly enrolled user, he/she will automatically be assigned as a Normal User.

 2. DNS
DNS function is the new addition in the Communication menu. For network connection which is not using DNS function, may just leave it in the default value as  0.0.0.0.

3. PC Connection
PC Connection contains a configuration for Comm Key and Device ID. Compared to the previous version, TA500, the Comm Key setting is previously located in Comm. Menu and the Device id setting is in the Pendrive menu.

4. Attendance Menu
New features 
a. Duplicate Punch Period(m) (Menu > System > Attendance > Duplicate Punch Period(m))
Set for Duplication Punch Period (minutes) if you want to avoid duplicate verification within a certain time limit. For example, if you set the duplicate punch period for 1 minute, the system will only take the first verification and will automatically exclude any other verification (for the same user) done within the 1-minute timeframe. This feature can be disabled by selecting None or can be set up to 999999 minutes.

b. Attendance Log Alert (Menu > System > Attendance > Attendance Log alert)
Full log alert will appear on screen once the verification disk space is full. This function can be disabled or can be manually set up inserting 9999 on the logs. If you set 80 logs, the alert will appear when there are only 80 logs left free in the device.

c. Cyclic Delete ATT Data (Menu > System > Attendance > Cyclic Delete ATT Data)
Self-maintain Function to delete the oldest data. For example, if you select 100 in the device. The device will automatically delete the 100 oldest logs when the log count strikes 79900.

5. Personalize
a. Lock Power Key (Menu > Personalize > User Interface > Lock Power Key = ON/OFF)
To enable/ disable the user from turning off the device using the power key.

b. Bell Schedules (Menu > Personalize > Bell Schedules)
With the latest version TA500, you can set up to 63 sets of bell schedules. The default setting comes with internal and external Bell.

Note: If some of the screenshots or steps viewed here are different from the ones in the current system, this is due to our continuous effort to improve our system from time to time. Please notify us at info@timeteccloud.com, we will update it as soon as possible.

1 comments:

Have any questions or inquiries about FingerTec? Drop your input here.

Update User Information for TimeTec

Monday, October 21, 2019 TimeTec 0 Comments


Introduction
All user information is important for both the user and the company for references use. Especially, when it comes to determining users’ privileges as employees to the company. This includes preferences, personally identifiable information such as name, mailing address, email, and more.

By default, only Admins are allowed to edit user's information in TimeTec solutions. However, there is an option available in the TimeTec Profile settings that allow users to edit their personal information. The steps are as below:

At Master Account
Enable User Edit Profile in Profile Management TimeTec Profile.
A. Login into TimeTec Profile
1. Go to Company > System Setting

2. Go to Profile Management and enable “USER EDIT PROFILE”

3. Go to TimeTec Profile > Profile Field > Edit

4. Set privileges for selected users to allow them to edit their user information.

At User Account
A. Login into TimeTec Profile

1.  Login into TimeTec Profile using your registered TimeTec account login email and password

2. Click on “Edit” to edit User Information. e.g, Alias, Date of Birth, Race, etc.

3. User can also update his own profile picture, depending on the company settings. To update User Profile Picture, click on the icon as marked below.

4. Choose the file and click on “Open” > the user profile photo will be uploaded.

Note: If some of the screenshots or steps viewed here are different from the ones in the current system, this is due to our continuous effort to improve our system from time to time. Please notify us at info@timeteccloud.com, we will update it as soon as possible.


0 comments:

Have any questions or inquiries about FingerTec? Drop your input here.

Sync the Workcode in TimeTec TA and FingerTec Device

Monday, October 21, 2019 TimeTec 0 Comments


Introduction
The attendance system is implemented in a company for a reason. At the most basic level, the system must be able to notify the management about the level of staff compliance with the company’s attendance rules and policy.

Identify your user’s attendance discrepancies with remark and Work Code feature in TimeTec. HR or Admin may preset the Work Code in TimeTec TA and upload all the Work Code into the FingerTec devices. The Work Code must be set from code 11 because code 1-10 is used for Attendance clocking status, for example, the reason for tardiness is marked with remark 11, going to the clinic marked with code 22 or meeting client outside marked with code 13.

Process:
1. Go to Company > Remark / Work Code

2. Add the Work Code by clicking the ‘Add’ button. Insert the remark, Work Code and update. You can also group the work codes and create multi-layer codes using the drag and drop method.

3. Once the Work Code has been created, go to Device > FingerTec Terminal

4. Select the device you wish to upload the work code > Manage > Manage Work Code

5. Select the Work Code and click submit

6. The system will upload the data to the devices. You may check the status under Terminal Command Queue. Go to Support > Terminal Command Queue.

7. Once the status is updated, you may use the Work Code on the FingerTec Device.

8. The work code has been uploaded into TA100C device. On the main display, Press ‘ESC’ button to view and use the work code. Press ‘M/OK’ to use the Work Code

9. After the Work Code has been selected, the user needs to scan his fingerprint to verify.

10. Once it is verified, you may find the message prompted as per the below screen.

11. The selected Work Code will be recorded in the attendance report. Below is the example of an Electronic Time Card with a recorded Work Code.

Note: If some of the screenshots or steps viewed here are different from the ones in the current system, this is due to our continuous effort to improve our system from time to time. Please notify us at info@timeteccloud.com, we will update it as soon as possible.


0 comments:

Have any questions or inquiries about FingerTec? Drop your input here.

Resolve “Failed to initialize database connection” error message in Ingress MySQL

Monday, October 21, 2019 TimeTec 0 Comments


Introduction
Whenever a user launches the Ingress MySQL software, an error message “Failed to Initialize Database Connection” will appear. This error message occurs due to the service reboot every time you shut down your PC. The following tips provide you a solution to resolve this problem quickly.

Process
1) Open your PC’s Control Panel > Administrative Tools

2) Open Services

3) Restart MySQL, Ingress Service and Attendance Service


4) Search for Ingress DBInstaller in your PC’s Start Menu > Run DBInstaller > Key in MySQL password > Test Connection > Update Connection > Upgrade Database.
*Note : “root” is an all-time password for mySQL. This is the recommended password for you insert during the first installation of mySQL. 

5) Run Ingress as administrator > Go to System Settings tab > Server > Edit > Tick on ‘Auto start Ingress Server when PC is powered on’ option > Save.

Note: If some of the screenshots or steps viewed here are different from the ones in the current system, this is due to our continuous effort to improve our system from time to time. Please notify us at info@timeteccloud.com, we will update it as soon as possible.

0 comments:

Have any questions or inquiries about FingerTec? Drop your input here.

Mobile Location Tracking Report

Friday, October 18, 2019 TimeTec 0 Comments


Introduction
TimeTec TA GPS works by providing accurate location information. This system gives employees the ability to clock-in wherever they are working via GPS tracker. However, it may be difficult to check on each individual on a regular basis. TimeTec TA takes concern and provides a Mobile location tracking report to make it easy for you to keep track of all employees’ attendance records in just one single report.

Process
Log into TimeTec TA, click Report on the homepage

Click Device Analysis > click Mobile Location Tracking Report

In this page, you can choose to filter by either User details or Group Duty Roster.

Once you've filtered, you need to select the date you want in order to generate the report.

After selecting a date, you need to select a reporting channel. You must identify your employees' hours using GPS, NFC, WIFI, Beacons or Supervisors. Otherwise, you can opt into all existing reporting channels.

After selecting a reporting channel, you may click the submit button.

This is an example of a Mobile Location Tracking Report.

If you want to get this report scheduled, you can click the Create Scheduler button before you make the option to generate the report.

On the new window, follow the same steps as stated above. For any other changes, you can amend on the same page and, to continue, proceed by pressing the next button.

Following the previous page, you can choose and customize it at your convenience and click the submit button. This report will be automatically sent to you via email.

Note: If some of the screenshots or steps viewed here are different from the ones in the current system, this is due to our continuous effort to improve our system from time to time. Please notify us at info@timeteccloud.com, we will update it as soon as possible.


0 comments:

Have any questions or inquiries about FingerTec? Drop your input here.