How to Add New Patrol Device and Assign Guard to Use Patrol Device

Friday, July 29, 2022 TimeTec 0 Comments


Introduction
TimeTec Patrol is a solution designed to manage a company’s security, it offers a mobile solution for security guards to report their patrolling duties via NFC tags or Beacons and view their patrol routes. Admins can manage the patrol devices to assign security personnel accordingly. In this article, we will demonstrate how to add a new patrol device and assign a guard to the device.

Process
A. Adding Patrol device 

1. When logging into TimeTec Patrol using an Admin account, go to Routes  > Patrol Devices

2. Select the Patrol Devices List > Click the Add button to add the new device. Insert the patrol device’s name and mobile ID from the device accordingly. The pairing code will be generated automatically as you insert the mobile ID.

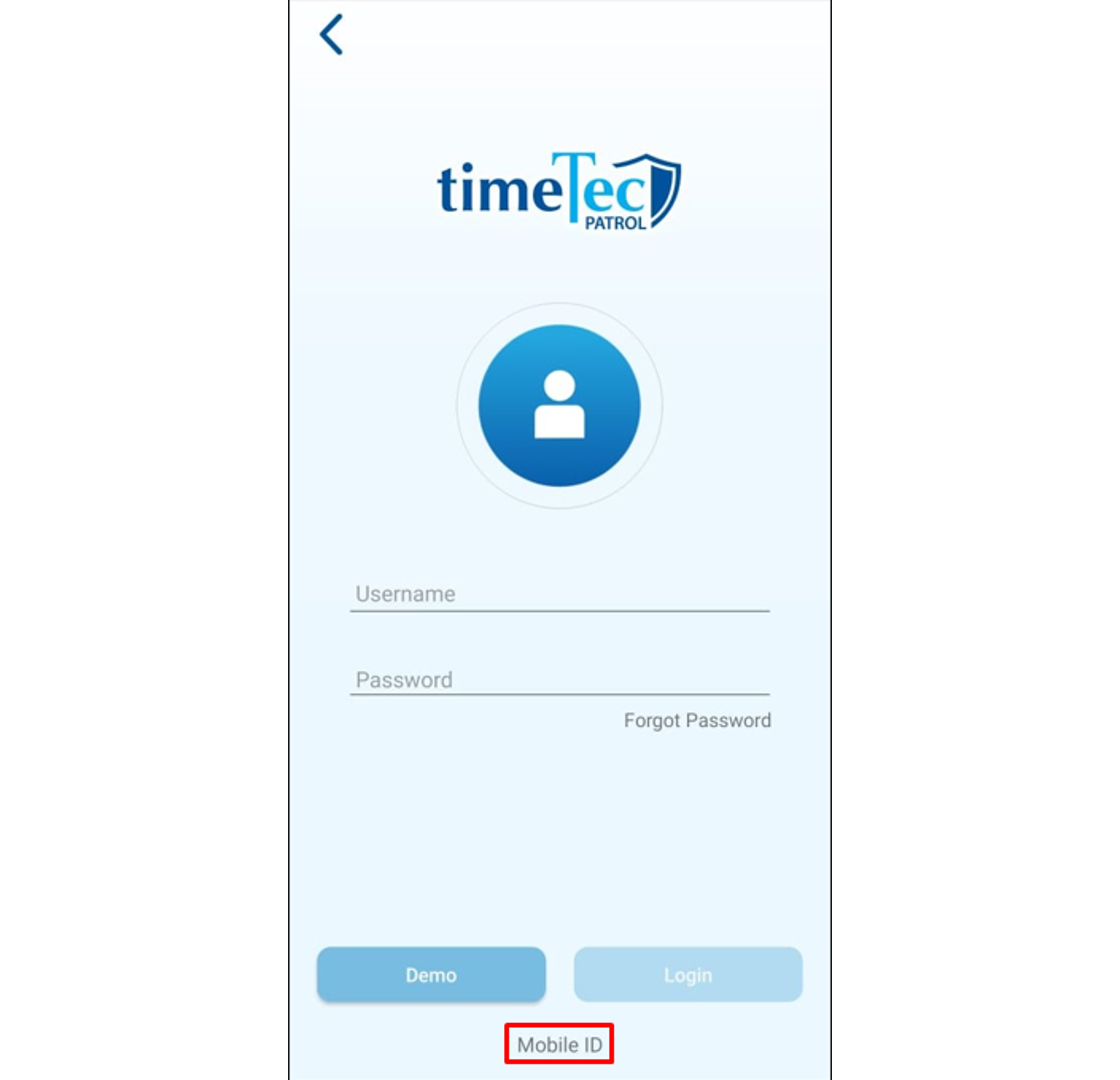
3. To retrieve the mobile ID, open the TimeTec Patrol app, at the Login Page of your mobile app,  click on the Mobile ID button. Then, at the web application, enter the prompted mobile ID into the Mobile ID box of the newly added patrol device. The additional information you may find here is the compatibility of your device, whether it's able to use a beacon or NFC tag for clocking.   
  

4. For first-time login, the guard will need to insert a username and password 
and enter the pairing code of the Patrol device, obtained from the step above.
                                    
Remarks: Any Android phone with OS v 4.0.0 and above that comes with NFC and/or BLE functionality.

B. Assign Security Guards
1. Go to Assign Security Guards To Device > Click on Assign

2. Select the security officer that will use the patrol device for patrolling and then click update. You may add multiple users to a single device or a single user can be assigned to multiple devices as well.

Note: If some of the screenshots or steps viewed here are different from the ones in the current system, this is due to our continuous effort to improve our system from time to time. Please notify us at info@timeteccloud.com, we will update it as soon as possible.


0 comments:

Have any questions or inquiries about FingerTec? Drop your input here.

How to Submit A Replacement Credit and Approval via TimeTec HR Application & TimeTec Leave Web

Friday, July 29, 2022 TimeTec 0 Comments


Introduction
Replacement Leave is commonly used among companies where the staff work on a Holiday/Rest day and in return, are entitled to an additional day of leave. TimeTec allows users to request their entitlement of replacement leave using the REPLACEMENT LEAVE CREDIT module. Here is how you can apply for a Replacement Leave Credit:

A. Request Credit via Mobile App
1. From the App’s options select Replacement Credit (For Admins/Approvers, Replacement
Credit > Credit Application). Then, select the Add icon to proceed with a new Credit Request.


2. Enter the Request Type along with Full Day, Multiple Days or Partial Day, then enter the date of the holiday/rest day that was replaced with work. Take note that Replacement Credit can only be requested on or after the Holiday/Rest day has taken place.

3. Enter the reason and add an attachment (if required), then select the Submit icon to send the application


4. Upon submission, the respective approver will be notified, and once the request is approved, the Replacement Leave balance (entitlement) will be updated accordingly. You can view the balance on the Homepage of your Mobile App.

* These steps only apply for replacement leave. To use the received credit is similar to other leave applications. Please refer to the Leave Application section on how to do so.


B. Request Credit Via Web
1. Log in and select Replacement Credit, click on APPLY to open a new Replacement Credit Request.

2. Enter the date of the holiday/rest day that you have worked. Take Note that the replacement credit can only be requested on or after the holiday/rest day has taken place. Moving on, include the reason and add an attachment (If required), then proceed to submit the request.

3. Once the request is approved, the Replacement Leave balance (entitlement) will be updated accordingly. View the updated balance in Leave Application, Current Allowance/Balance table.
* These steps only apply for replacement leave. To use the received credit is similar to other leave applications. Please refer to the Leave Application Section on how to do so.

C. Credit Approval - Mobile App
1. Login to TimeTec Leave App, and select Replacement Credit> Credit Approval from the menu options.


2. Select the submitted request and review the details including date, reason, and attachment, proceed to Approve/Reject/Cancel.


D. Credit Approval - Web
1. Login and Select Replacement Credit > Approval.


2. Click on Edit to review/revise the received applications.

Related Post:

Note: If some of the screenshots or steps viewed here are different from the ones in the current system, this is due to our continuous effort to improve our system from time to time. Please notify us at info@timeteccloud.com, we will update it as soon as possible.


0 comments:

Have any questions or inquiries about FingerTec? Drop your input here.

Troubleshoot Issue During AWDMS Setup Tool

Friday, July 29, 2022 TimeTec 0 Comments


Introduction
During the installation of AWDMS, it is required to run the AWDMS setup tool once the AWDMS installation is completed. This setup tool will create a database for AWDMS which is located on your MySQL Server.
However, there will be several errors which you might find when running the setup tools. The following will explain which error you should ignore and which you will need to solve before the installation is completed.
 
Steps
1.       During the configuration of AWDMS setup tools, it is advised to run the following query in any 3rd party MySQL database management software. Normally we will advise using SQLyog Community for 3rd party MySQL database management software. You may download the installer from the following links and install it on your workstation.
 
SQLyog Community Edition - 13.1.5 (64-Bit): https://s3.amazonaws.com/SQLyog_Community/SQLyog+13.1.5/SQLyog-13.1.5-0.x64Community.exe
SQLyog Community Edition - 13.1.5 (32-Bit): https://s3.amazonaws.com/SQLyog_Community/SQLyog+13.1.5/SQLyog-13.1.5-0.x86Community.exe

Run the following query in your SQLyog: GRANT ALL PRIVILEGES ON AWDMS.* TO 'ingress'@'localhost' IDENTIFIED BY 'ingress';


2.       Some cases will face the following error when running the AWDMS setup tools.


Please note that this is due to the Windows Server/Windows PC set-up. Please make sure to update Windows to the latest version and install all the necessary updates required for Windows Server/Windows PC. You may also check your Windows Server/Windows PC date and time settings and make sure that Windows is using a normal date and time setting. To check this, go to the control panel > click clock and region > click change date, time, or number formats > refer to screenshot. If the issue persists then we advise you to reformat your Windows or install it on another workstation and make sure to not configure Windows with any security or access privilege so the installation proceeds accordingly.


Note: If some of the screenshots or steps viewed here are different from the ones in the current system, this is due to our continuous effort to improve our system from time to time. Please notify us at info@timeteccloud.com, we will update it as soon as possible.


0 comments:

Have any questions or inquiries about FingerTec? Drop your input here.

Ingress & TCMSv3 - How to Allow Gmail to Send Emails for the Report Scheduler even though th Less Secure Apps Feature has been Disabled by Google

Friday, July 29, 2022 TimeTec 0 Comments


Introduction 
In previous technical tips, (refer to links below) we have explained how to configure your email (Gmail account) settings and allow it to send messages from the Report Scheduler feature in Ingress and TCMS V3 software.
https://www.fingertectips.com/2018/07/tcms-v3ingress-how-to-utilize-gmail-in.html
Recently, Google no longer supports the use of third-party apps or devices to help keep your account secure as of May 30, 2022. Thus, we are no longer able to use Gmail as an SMTP server by using the old steps from the link above as the Less Secure Apps feature has been disabled from Google. Even though the enforcement option has been removed, you can still allow the software to send Emails by referring to the steps below.
 
Steps
1. Please go to https://myaccount.google.com/ > Choose Security

2. Go to Signing in to Google > App Passwords

3. Please verify your Gmail Account

4. Then, Select app > Mail & Select device > Windows Computer and Click Generate

5. Then, it will generate a password

6. Next, you can copy the generated password above and paste it as your SMTP Password in the software. Once the email has been configured, click on Test Account Setting and Save. Finally, you can configure the Report Scheduler setting and send the email through your Gmail account.

Note: If some of the screenshots or steps viewed here are different from the ones in the current system, this is due to our continuous effort to improve our system from time to time. Please notify us at info@timeteccloud.com, we will update it as soon as possible.


0 comments:

Have any questions or inquiries about FingerTec? Drop your input here.

Face ID 5 External Alarm Wiring Diagram

Friday, July 29, 2022 TimeTec 0 Comments


Introduction
The Face ID 5 series are equipped with an alarm function to notify the user of any restrictions on entry or security measures such as a door or device being forced open, high body temperatures (Face ID 5 TD /FTD), denying unknown access, etc.
Face ID 5 features an output for an external alarm. The user can set a scheduled bell where the alarm goes off based on the time of day. It can be used to signal break, lunch or the end of a working shift depending on the user's needs.
In this tip, a wiring connection for integration with an external alarm, siren or bell has been drawn for reference to suit user requirements.


Wiring Diagram 1: Connection to external alarm, siren or bell that uses 12Vdc operating voltage.


Wiring Diagram 2: Connection for external alarm, siren or bell that uses 240Vac operating voltage.
 
Note: If some of the screenshots or steps viewed here are different from the ones in the current system, this is due to our continuous effort to improve our system from time to time. Please notify us at info@timeteccloud.com, we will update it as soon as possible.


0 comments:

Have any questions or inquiries about FingerTec? Drop your input here.

TimeTec TA - How to Import Overtime Request Approval By Batch For The Users

Friday, July 29, 2022 TimeTec 0 Comments


Introduction

TimeTec TA comes with an import OT feature that minimises the Admin / Human Resources workload from keying in the OT data in the Attendance Sheet manually. This feature accommodates the management with the quicker collection of the OT data and tabulates all data in our Xlsx file.
To use import approval overtime requests, you need to set up the Overtime Approval in TimeTec TA.

https://www.fingertectips.com/2017/03/effective-overtime-approval-with.html
https://www.fingertectips.com/2017/06/timetec-ta-overtime-request-via-mobile.html 

Steps
A. To set the company library application, login into your TimeTec account.
www.timetecta.com

B. Next, go to APPROVAL module tab and click on “Import Overtime Request”

C. Click on “Download .xlsx sample here” to download the sample template

Guide
1. Please ensure the OT hour format used in this file is the SAME as you have set in the System Settings: (hh. mm or hh. hh)

2. The system will not save information in the “Name” column; it is used for reference only.

3. The default value of Overtime Type is Normal. You can view or add Overtime Type at Company > Profile Field > Manage Data Field. 

4. Please ensure the date format used in this file is the same as you have previously set in the System Settings: (DD/MM/YYYY or MM/DD/YYYY or YYYY/MM/DD)

5. The default value of Shift Number is 1. Shift number is a setting for Shift group type in Schedule>Assign Schedules and Users into Roster. This setting is used to set multiple working shifts (maximum 3 shifts) in a workday. (Only apply to Daily Schedule)

6. The Remark field is limited to 250 characters. 
i. Fill up the user overtime request approval field in the .Xlsx file and save.
ii. Browse the file > Submit
iii. Once the request is submitted, it will go to the approver's approval module to be approved.


Note: If some of the screenshots or steps viewed here are different from the ones in the current system, this is due to our continuous effort to improve our system from time to time. Please notify us at info@timeteccloud.com, we will update it as soon as possible.


0 comments:

Have any questions or inquiries about FingerTec? Drop your input here.