Request & Approval for Edit Attendance in TimeTec TA App

Thursday, July 27, 2017 TimeTec 4 Comments


Introduction
If you are a TimeTec TA mobile user and you need to request Admin to edit your attendance, what should you do? You can do this directly via the TimeTec App through a function called Approval for Edit Attendance. This option will allow users to edit their attendance data and this step would require superiors’ approvals.

Before you are able to use this option, your admin must first set the approval rules for Edit Attendance and to find out more, please click on the link here.

There are two ways to request attendance edit, one is through web browser and another is through TimeTec TA App. Let’s look at the steps to do it in TimeTec TA App.

Process
USER REQUEST EDIT ATTENDANCE
1. Login to TimeTec TA mobile App. At the side menu, select Approval.
2. Tap on the add icon (+) at the top right to add a new request.


3. Select Edit Attendance request. Select the date to edit, fill in the correct clocking details and provide a remark. Tap on the arrow icon on the top right to Submit.


4. At the My Request screen, tap on the request to view Request details. The narrow left bar of each row indicates the status of respective request (e.g. blue is New, green is Approved, red is Rejected). Depending on the approval rules set by system admin, your request may be approved automatically or requires approval from a pre-set approver.


6. Once the request is approved, the users will then receive the notification and the request status will now turn to green. Go to Notification > Approval.


MANAGER/ADMIN APPROVAL
1. Go to Approval to view any of the New requests and select it to view its details. To approve or reject, insert your comment and tap on the Approve or Reject button. Select ‘Only disclose to approvers’ to limit the comment view to approvers only.


4 comments:

Have any questions or inquiries about FingerTec? Drop your input here.

Device Connection Notification in Ingress

Wednesday, July 26, 2017 TimeTec 2 Comments


Introduction
Meet our latest feature within the Event Alarm setting where you can receive notification regarding the device connection. Through this feature, the administrators will be notified when any of the devices lost connection and re-connected back to Ingress software.

Benefit
This feature is designed to ease administrators in monitoring the device connectivity.

Procedure
A) Configure the email setting
1) First, you need to configure your email account within Ingress in order for it to send notification via email. To do so, go to System Settings > Email > Edit > Edit Email Configuration > Save > Click Test Account Settings.

2) In the recipient info, click Add > configure your preferred email > Save

1.jpg

B) Configure the Alarm Event setting
1) Go to System Settings > Alarm > Select the priority level

2.jpg


2) Click Edit > Add > Select filter option for either Standalone device or Ingressus > Tick: Connected and Disconnected > Press OK

3.jpg

3) Tick Email and browse the recipients that you want to notify

4.jpg


Result: The recipient will then receive notifications regarding the device connection status


5.jpg

2 comments:

Have any questions or inquiries about FingerTec? Drop your input here.

Troubleshooting Ingress Server–Client by Restoring Fresh Database

Wednesday, July 26, 2017 TimeTec 0 Comments


Introduction
There are plenty of factors that can cause Ingress Server-Client connection problem. One of the reasons is caused by the different server and client locations in addition to it being connected through VPN or port forwarding.

Hence, this post can be referred to whenever you want to identify whether the connection issue occurred is due to the network blocking issue or the software issue. Below are the processes in which you can follow to determine such instances:

Process
1) Backup the existing database [IMPORTANT]. Refer to this link to backup your database: http://www.fingertectips.com/2016/03/backup-and-restore-database-management.html

2) Uninstall Ingress Server-Client at both PC and MySQL and delete all 4 folders as below:

a) Server - 3 folders [ingress / MySQL program file / MySQL program data]
- Delete Ingress Folder at C:\Program Files (x86)\FingerTec Worldwide\FingerTec Ingress
- Delete Mysql Folder at C:\Program Files\MySQL
- Delete Mysql Folder at C:\ProgramData\MySQL ( you need to tick “Show hidden folder” in order to view this folder )

b) Client - 1 folder [Ingress]
- Delete Ingress Folder at C:\Program Files (x86)\FingerTec Worldwide\FingerTec Ingress

3) Restart both PCs [server and client]

4) Then Start Menu > cmd > ipconfig in each PC.

REMARK: Please make sure that both PCs are connected to One Network connection only.

5) After that Start Menu > cmd > ping each other IP Addresses and check whether there is a reply or not.

6) Then, install MYSQL ONLY at the Server PC.

To install MySQL 5.5. You can download it at:

32 bit -
1.png

- Tick allow remote access
2.png

Once done, install SQLyog at the server > check whether it can read the MySQL database > if can, then restart the PC.

• If your client’s operating system is 64-bit type, please download SQLyog from:
https://s3.amazonaws.com/SQLyog_Community/SQLyog+12.2.1/SQLyog-12.2.1-0.x64Community.exe

• If your client’s operating system is 32-bit type, please download SQLyog from:
https://s3.amazonaws.com/SQLyog_Community/SQLyog+12.2.1/SQLyog-12.2.1-0.x86Community.exe

7) Once restarted and SQLyog is able to read MySQL database in the server > then you can install SQLyog at the client PC.

For SQLyog client side - configure the IP Address of the server PC and not localhost

REMARK:
This is to ensure that the MYSQL connection on both server/client PC is successful WITHOUT ANY INGRESS software.

8) If SQLyog at the client PC is able to read the MYSQL database at the server PC, then you may proceed to install Ingress Server-Client on both PCs.

9) Restart the PCs after installing Ingress Server-Client and run the DB installer after that.

REMARK:
If SQLyog at the client side is unable to read the MYSQL DB at the server side, then the problem occurred is not related to the Ingress software but rather due to the network blocking issue. Thus, you will need to check with the IT personnels of your company.


0 comments:

Have any questions or inquiries about FingerTec? Drop your input here.

The New Face ID 2 FMM 220 - 8 Possible Mishaps & the Quick Fixes

Friday, July 21, 2017 TimeTec 0 Comments


Introduction
The new Face ID 2 has recently been updated to FMM 220 firmware. With it’s improved, up-to-date and much-friendlier user interface, Face ID 2 offers a few new and enhanced features that will definitely benefit its users. However, this new firmware also comes with a few errors that you might encounter and the good news is, we have a quick fix for you if you encountered these errors while running your Face ID 2.

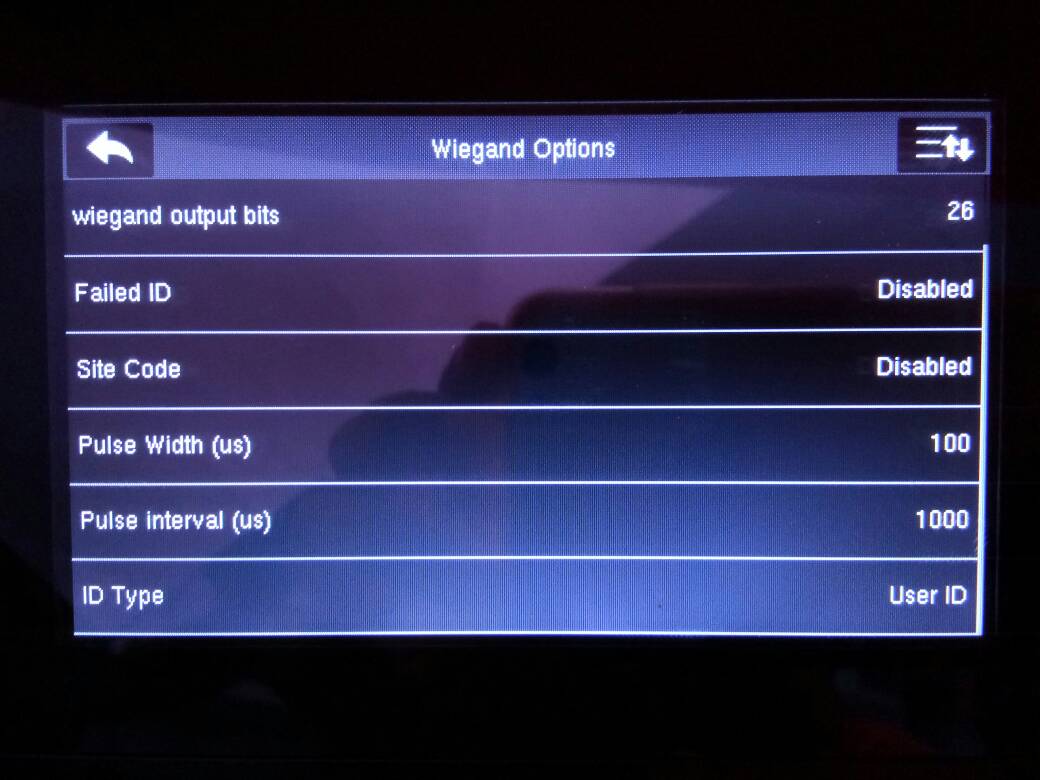
1. AdapTec Plus is Not Working Properly
You have connected a Face ID 2 with AdapTec Plus and the AdapTec Plus is not properly working. Bear in mind that the default settings for AdapTec Plus or AdapTec X is to emit a beeping sound whenever a verification is done. However, if there is no beeps emitted from Face ID 2, you can check the settings as below:-
Menu > Comm > Wiegand Setup > Wiegand Output > ID Type = User ID (Please use “User ID” because The term “Card ID” wouldn’t work on AdapTec Plus).
Note: You need to set this settings again if you reset the device to factory settings.

1.jpg

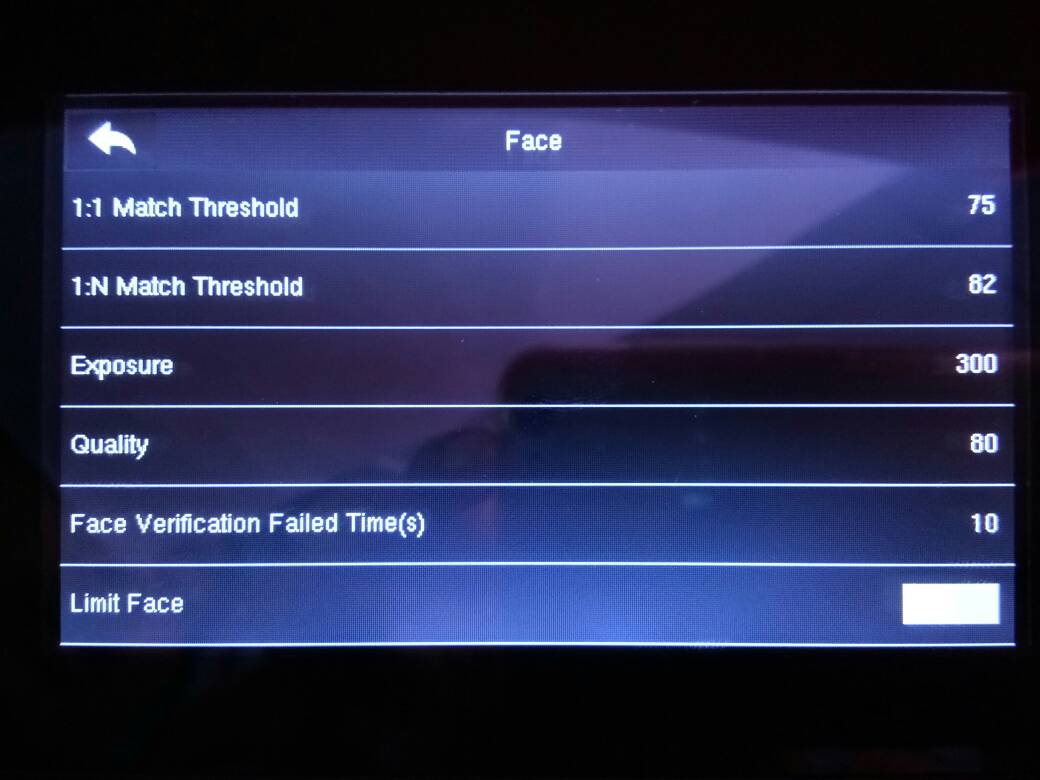
2. The Face is Not Detected
“Limit Face” is a setting to let the machine automatically detect facial features when a user is facing Face ID. By default, the “Limit Face” will be disabled which means whenever a user is facing Face ID, the machine will detect his/her face. By enabling “Limit Face”, a user needs to select his/her clocking type such as Clock In or Clock Out before the machine will detect facial features. By using this method, the clocking type will remain the same if the next person didn’t change the clocking type when he/she clocks if the next person is using other verification method other than face (fingerprint/password). To always get the right Clocking Type, users need to select his/her own clocking type before using Face ID 2. Follow the steps below to set “Limit Face” feature:

Menu > System > Face > Limit Face = disable/enable
Note: We strongly recommend you to disable this feature to provide convenience to users. 

2.jpg

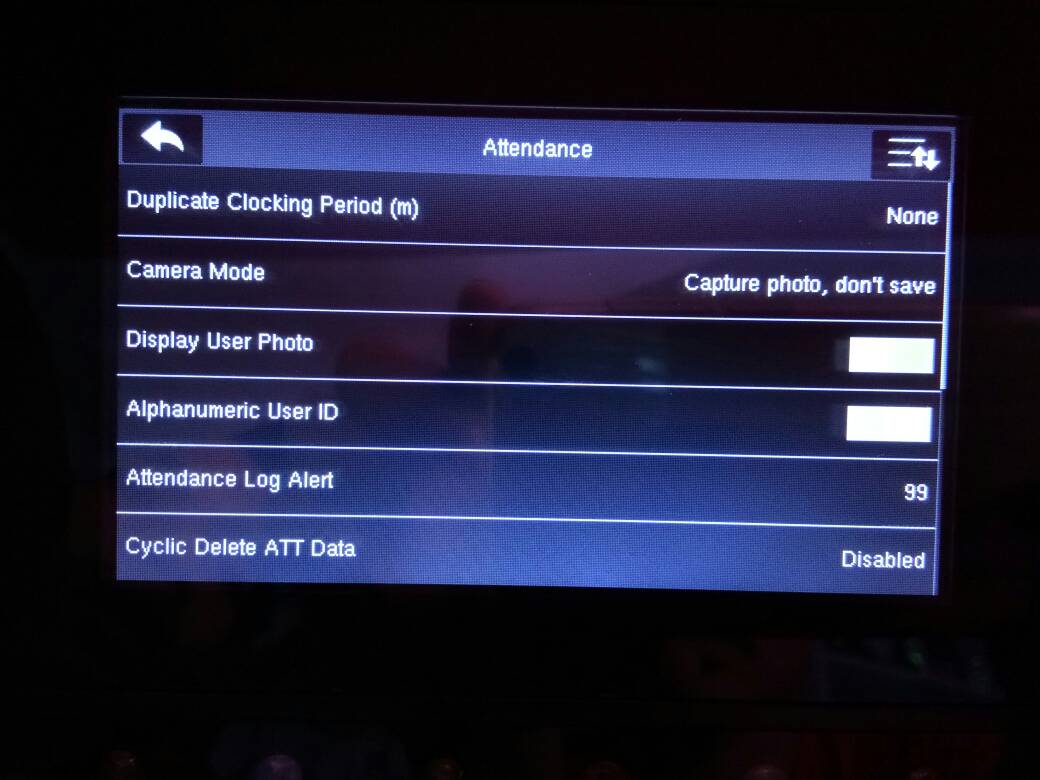
3. Verification Successful but the Screen is Showing Duplicate Punch
“Duplicate Punch” message will appear whenever a user verifies more than once after his/her  initial verification. This is caused by the amount of time you set in the settings to avoid duplicate punches. You can set the amount of time in which the message will appear or just shut it off altogether.
To shut off the message, please follow the settings below :
Menu > System > Attendance > Duplicate Clocking Period (m) = None

3.jpg

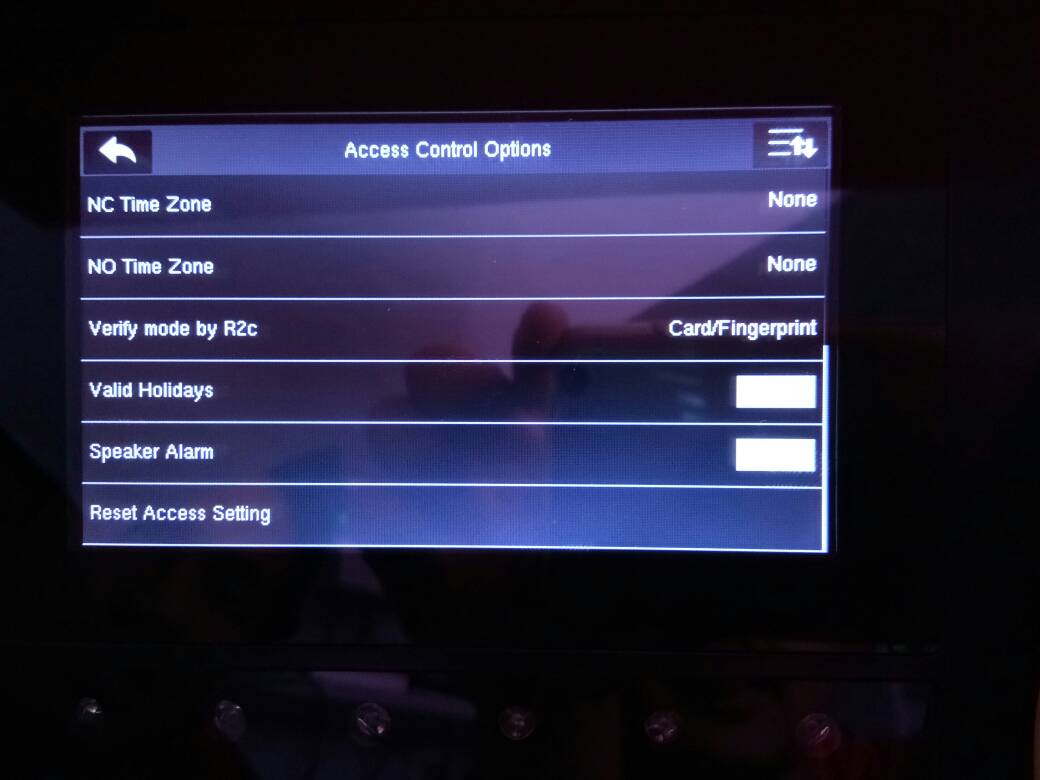
4. Alarm Sound Activating on Speaker
This alarm is triggered whenever the tamper switch at the back of device is released. This feature is important for door access use since the device is usually attached to a wall. Therefore, the alarm will go off if someone tampers or decides to remove the device. If you happen to use the device for the purpose of time attendance only, please follow the steps below to disable the speaker alarm
Note: the alarm sign will still be showing on the device

If you want to disable the alarm sound on the speaker
Menu > Access > Access Control Option > Speaker Alarm = Disable
If the Tamper Switch is released, the alarm will be muted on the speaker, but the alarm icon will still be showing on the Desktop Screen and this will in turn trigger the External Alarm.

To turn off the alarm sound when triggered, press the Tamper Switch and restart the device. Once you have done this, there will be no “Turn Off Alarm”  pop up message will appear on Face ID 2 FMM.

4.jpg

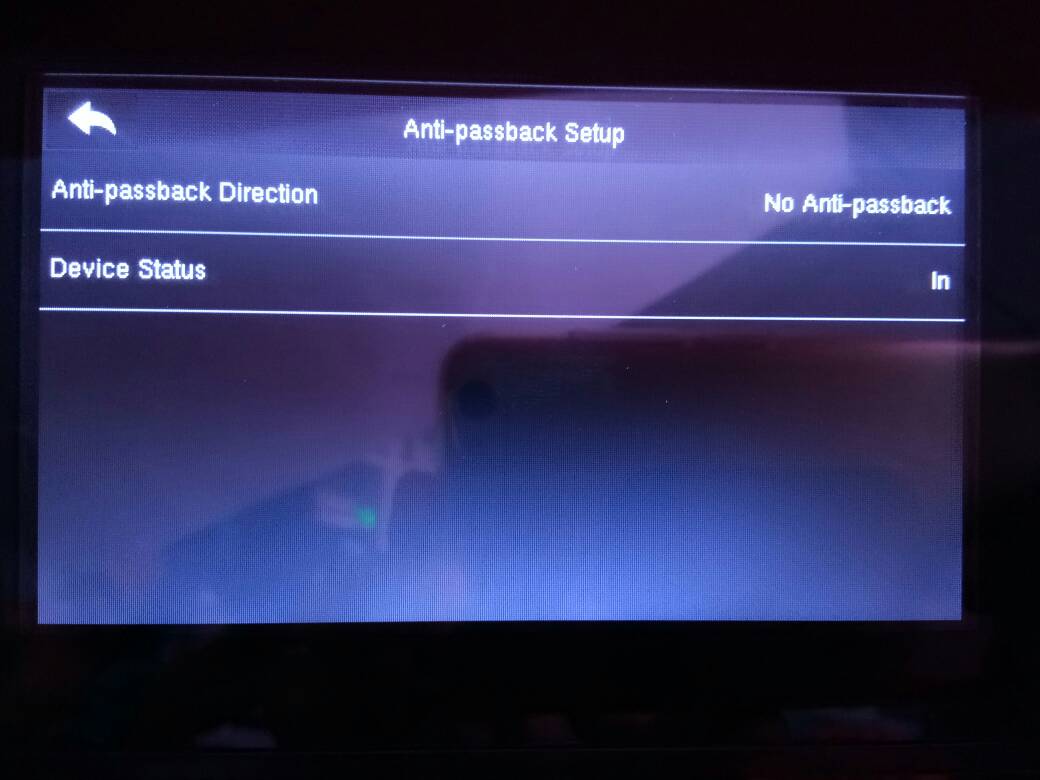
5. Registered User is Given an “Illegal Access” Message during Verification
This situation usually happened if the anti-passback settings are enabled.

Follow this simple step to turn off or disable the settings :-
Menu > Access > Anti-passback Setup > Anti-passback Direction = No Anti-passback

5.jpg

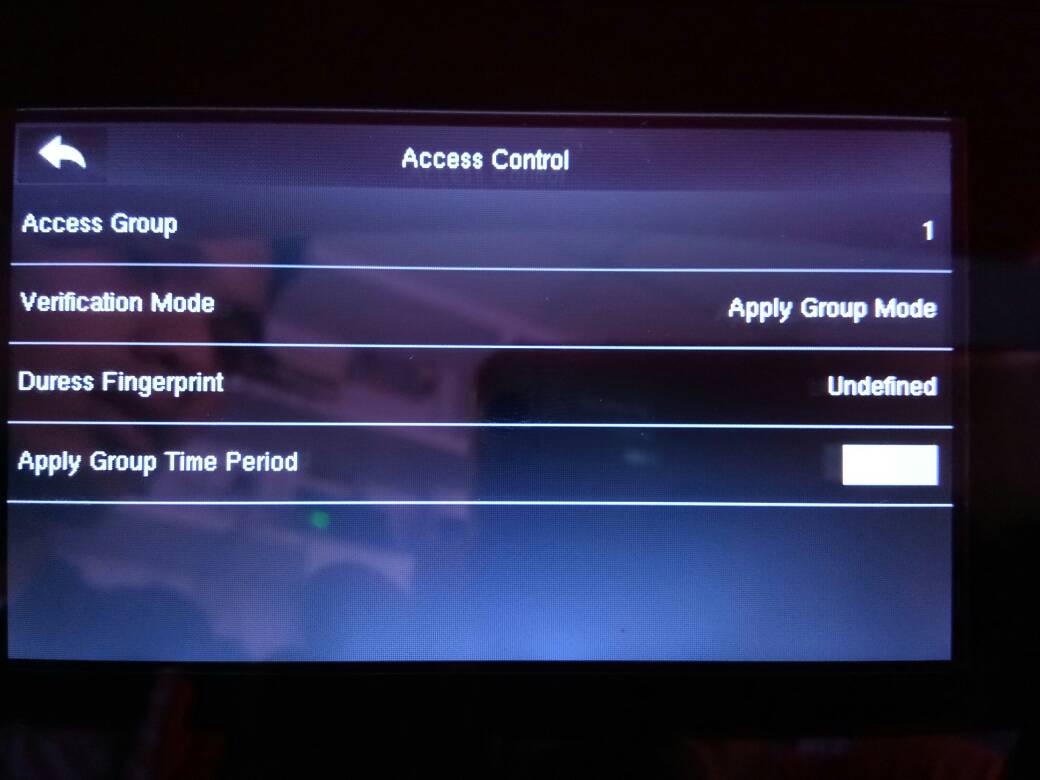
6. Registered User is Given “Invalid Time Period” message during verification
To overcome this issue, first you need to check your device’s time zone settings and ensure that it is YOUR Time Zone. Below is how you check your Time Zone:
Menu > Access > Time Zone

6.jpg

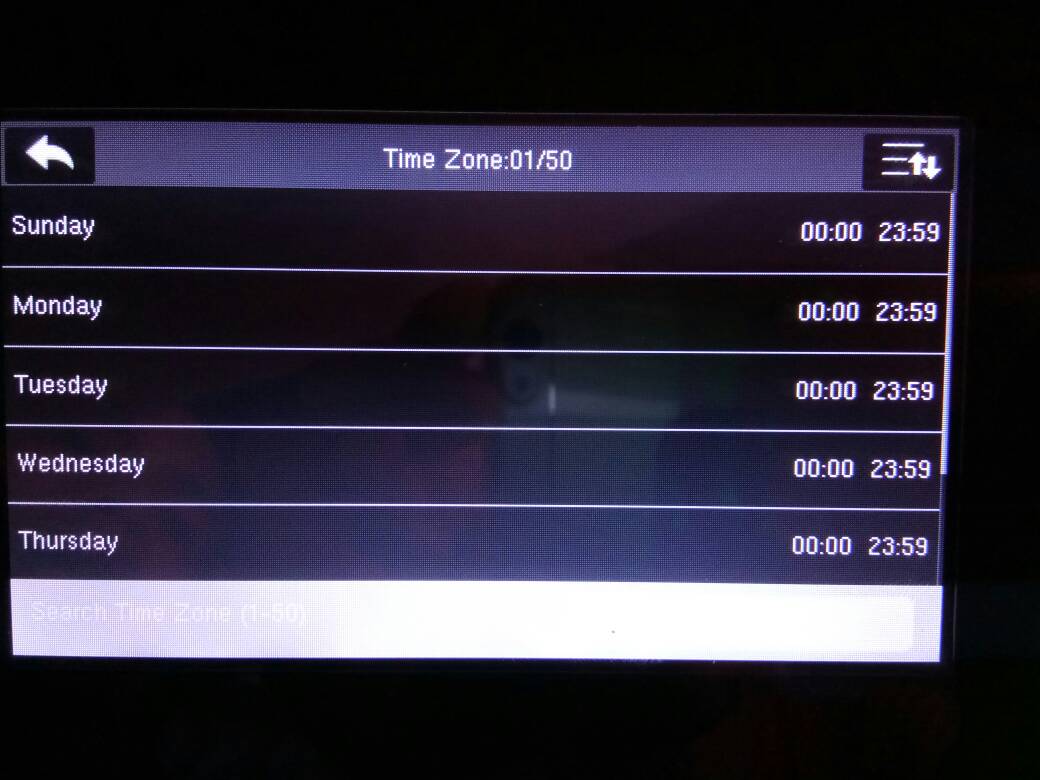
If you are already within your Time Zone, please check the user's access Group settings:

You must make sure that it is configured as below :-
Menu > User Management > All User > select User ID > Edit > Access Control Role > Access Group

7.jpg

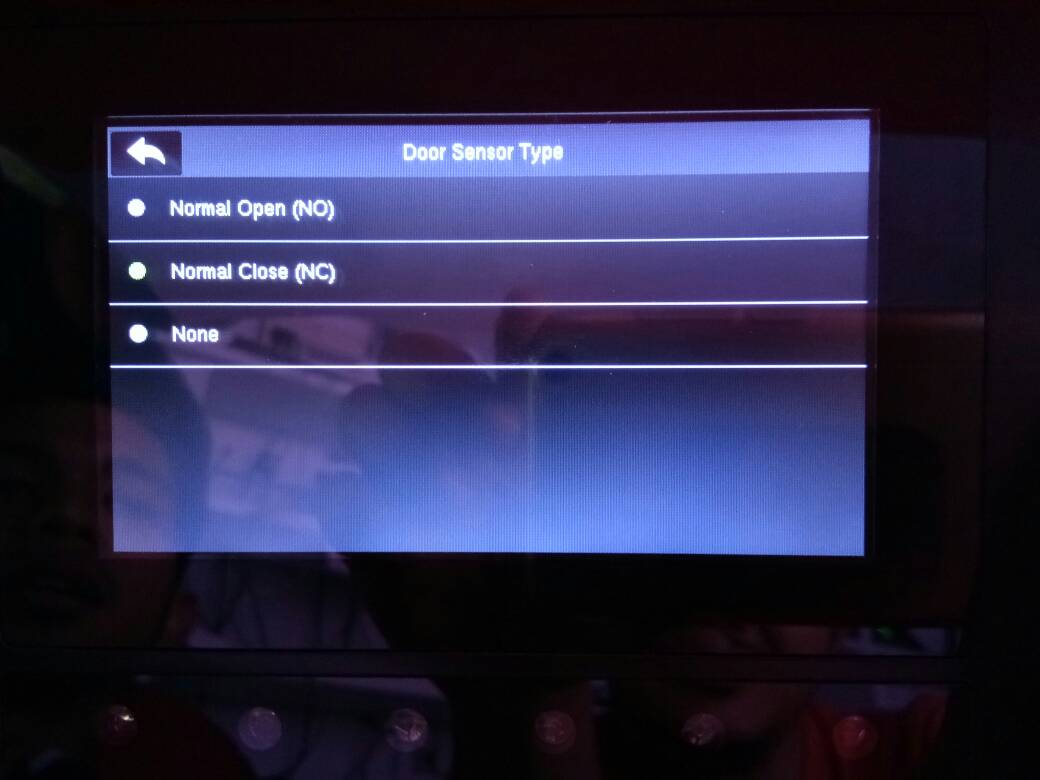
7. Door Sensor Settings
When you are using the door access terminal, you can choose the Door Type option for the door to be used as normally open or normally close. When it is normally close, the door will be closed again after a successful access.
- Enable Door Sensor on Menu > Access > Access Control Options > Door Sensor Type = NC

8.jpg

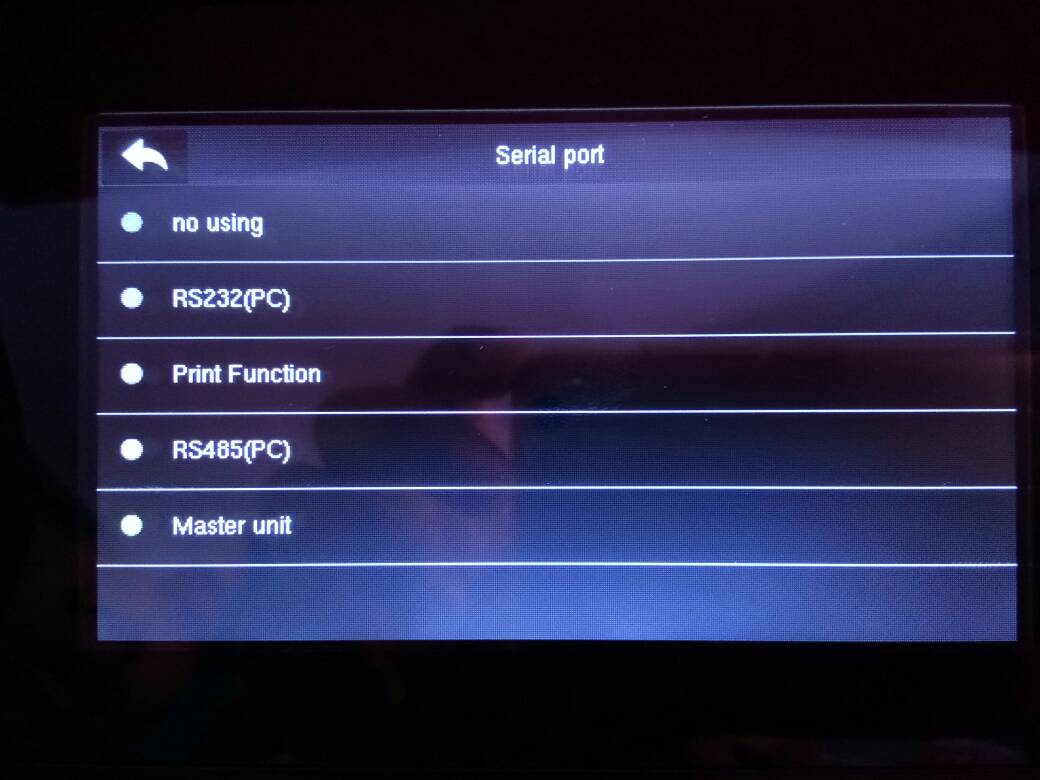
8. Using R2c on Face ID 2 / FMM 220
If you want to use R2c as slave devices for Face ID 2  with FM 220; besides having a proper wiring diagram, you need to also enable the feature below :-
- Menu > Comm. > Serial Port > Master Unit/R2c

9.jpg

0 comments:

Have any questions or inquiries about FingerTec? Drop your input here.

MANAGING USER DATA BETWEEN TWO INGRESS DATABASE

Friday, July 21, 2017 TimeTec 0 Comments


Introduction

In the case of any system, database management or database administrator are some of the important aspects to lookout for in the event of a hardware or software failures. Should any of these failures occur, the major objective is to ensure that there is no loss of data and that the supposed database is still available to the users.

In Ingress system, we provide the option or procedure where you can backup, restore and manage the users’ database. In other words, you can combine, remove or migrate the data from one Ingress system or PC to another Ingress system.

ADVANTAGES
1. If you have two Ingress database file from two different PC, you can combine or transfer information such as Device Info, User data, Door/Access Level Setting, Attendance record or Scheduling from one database to another.

2. You can remove or perform housekeeping for certain modules in Ingress like Device module, User, Door, Access Level, Monitoring all while maintaining the info within other modules.

PROCESS
A - Combining User Data from Two Ingress Database
If you happened to have 2 Ingress database and you want to combine the User Data from both of these databases, you can follow the steps below:

a) Restore the first or main database by heading to Ingress > System Setting > Database Management > Select the database and click Restore.

Pic1.png

b) From the second system or PC where you have the second database, go to User module > Export User > select the list of Users that you want to combine with the first database > Field List by following the format of the picture below> Export (Choose either to export in Excel or TXT format).
** Please note that you can view the export format in the sample pictures.

2.png

3.png

c) To combine the User Data, transfer the Excel or TXT file that you have exported to the main PC or database. Then, User module > Import from File > Excel or TXT file (The system will verify the file format and show Parse Successful) > Match the header with the column >  Next > tick the User > Read. Once you’ve finished, the system will then combine the User Data from the second database into your main Ingress database.

4.png

5.png

B - Transferring User Data, Attendance Record, Door/Access Level Setting.
If you wish to perform housekeeping on your database, you can follow the steps below in order to manage your database:

a) To remove certain Ingress modules you can go System Setting > Database Configuration > select Initialise Database. Here, you can choose which modules you want to remove from the Ingress software.

6.png

b) In the meantime, to transfer certain modules from one database to another; first of all, restore the first or main database by heading to Ingress > System Setting > Database Management > select the database and click Restore.

c) On the second database or PC, you can select which modules to backup by heading to System Setting > Database Configuration > select Backup Option > select Module > Ok > select Backup. Please note: The system will only backup the modules that you have selected.

7.png

d) In the main PC, restore the backup database that you have selected in Step c. Once finished, the Ingress system will only capture the modules that you have selected from the second database.

0 comments:

Have any questions or inquiries about FingerTec? Drop your input here.

Set your Clocking Boundary with TimeTec TA GPS Geofence Feature

Monday, July 17, 2017 TimeTec 0 Comments


Introducing our latest option for GPS clocking in TimeTec TA: Geofence. What is Geofence? Geofence is a virtual geographical perimeter or barrier made for a specific location, i.e your office. By setting a geofence in TimeTec TA, employees can clock their attendance using GPS clocking only if they are within the permitted area. This restriction will ensure employees are present within the assigned location during the clocking process.

Setup Process

Let's say you are setting up a Geofence for your company’s employees, for Site A.

1. Set your Geofence location
Go to Device > GPS Geofence and click Add. Create an ID and insert the Geofence Name. Select the Geofence Group to group this location. However, if you don’t have any Geofence Group created yet, you can skip this and do the grouping later at Geofence Group tab. Choose whether to display the location name as per the Location Name set or as per actual address.

Put the address in Search Map and drag the GPS pointer to the desired location. Set the Clocking Radius in meter. The boundary of the location (permitted clocking area) will be highlighted in the map for your reference.


Repeat these steps to add other locations.

2. Group Geofence Location & assign Users in Geofence Group
Geofence Group is made to allow users to manage Geofence locations and assign users into group easier. Click “Add” to create a new Geofence Group. Create an ID, name the group and click Save.


Once you have created the Geofence Group, click the Add icon under the Edit column to add Geofence Location into the group. 


Select the Geofence location(s) that you want to add under this group.


Click the User icon under Edit column to assign users to this group.


Select the user(s) you want to assign under this group. Click Submit to confirm. 


Once the setup is done, the assigned users can only clock their attendance via GPS clocking within the permitted area. 

Using GPS Geofence Clocking 

In TimeTec TA Mobile App, at the Clocking page, users need to tap on the GPS icon to clock his/her attendance. Users will be able to clock if he/she is within the permitted clocking area.


If the user’s current location is outside of the permitted clocking area, an alert will be prompted and the user can then view the allowed clocking area for reference.

Alternatively, users can view the permitted clocking location in the Clocking page by tapping the current location address. Zoom into the map to see the boundary of the permitted clocking area. 


Updated in January 2018:

To cater for occasions where employees’ clocking might take place outside of the Geofence perimeter, in Jan 2018, we've introduced a new feature called "Approval rule for Out of Area Clocking".

With this, employees are able to clock attendance out of the permitted area but it will then be submitted for approval (or Auto Approved) before it’s reflected in Attendance. Admin needs to first set a rule within the system by going to User > Manage Approval Rules > Out of Area Setting.

Refer to here for further guidance on Out of Area Clocking.

Related Post:

TimeTec TA: How To Manage Geofence Feature For Out of Area Clocking


0 comments:

Have any questions or inquiries about FingerTec? Drop your input here.

App Lock - Assign Smartphones to Security Guards without Worry

Thursday, July 13, 2017 TimeTec 2 Comments


When the management of a security company thinks about providing a smartphone to security guards, the main worry is that the guards might use the phone for something else apart from work.  Worry no more because the management can restrict them to use only TimeTec Patrol or iNeighbour mobile app in the provided smartphones by installing an “app lock” mobile app from third party developers.

Search the app from Google Play and Apple Appstore by using the keyword “app lock”.

Search "app lock" in Apple Appstore

Search "app lock" in Google Play

After installing the app lock mobile app, the admin must select the mobile apps to lock. We recommended you to lock all apps in the smartphones, except TimeTec Patrol and i-Neighbour and you need to configure a unlock password that is different from the smartphone/screen unlocking password so that your guards can’t access.

Below is the sample UI from one of the app lock mobile apps.


The app lock mobile app will request the security guard to insert the unlock password everytime he tries to use locked mobile app. The security guards can only use TimeTec Patrol and iNeighbour mobile app, which are not locked by App Lock Mobile App.

Below is the sample display of the mobile screen with App Lock Mobile App

Sample of mobile screen using App Lock Mobile App, allowing only TimeTec Patrol App

Sample of mobile screen using App Lock Mobile App, allowing only i-Neighbour App
The App Lock Mobile App will request for password whenever security guard tries to use any locked App.

Password is required when security guards tries to open other locked App


2 comments:

Have any questions or inquiries about FingerTec? Drop your input here.