The Flexibility Ingress Gives Your Doors (Ingress Permanent Door Open Close Feature)

Tuesday, May 31, 2016 TimeTec 0 Comments


Introduction
Ingress, as an access control management application is not only a control panel for door monitoring, but also an easy to use remote control for doors. The remote unlocking, and access level management are two features that makes Ingress more flexible to its users.

Benefits


Permanent Door Open Close Time Zone feature of Ingress, allows you to remotely control the unlocking of your doors, up to 3 different intervals daily. Moreover, users are able to set different time zones for the holiday season, and synchronize all changes along to their FingerTec access control terminals and controllers.

Process

A: Door Setting
1)     Create a door at your Ingress software, then assign your FingerTec Access Control
          terminal to the door.

 
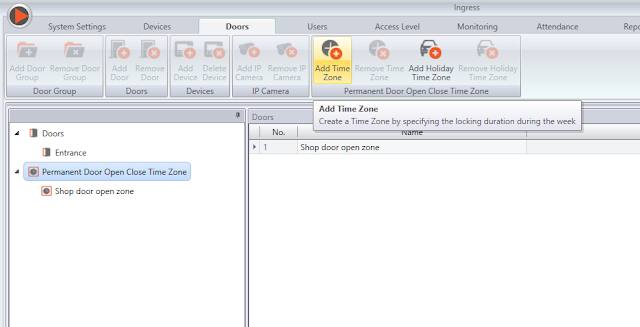
2.   Click on the Permanent Door Open Close Time Zone, then Click on Add Time Zone from
       the top menu and enter the Name and Description of your Door open close time zone
.
 

 3.   Enter the Intervals, when you need the door to be left open and save. You can choose
      
to have up to 3 intervals, at the end of which the doors will be locked.


P.S: The copy button can be used to repeat the same intervals for each day respectively.
 
B: Assign the Permanent Door Open Close to Your Doors
1)   To change the setting of your door, click on your door name and press Edit at “Details”
        setting:
       -   At the Permanent Door Open Close Time Zone, click on the drop down list
       -   Select your preferred Door Open Close Time Zone then press save and
             synchronize the changes to the device.
 
2.   To create Permanent Door Open Close Holiday Timezone, follow step A.1 and A.2,
      instructed above, save the changes and synchronize the changes to your device. 


0 comments:

Have any questions or inquiries about FingerTec? Drop your input here.

TCMS V2 Database Management and Housekeeping

Tuesday, May 31, 2016 TimeTec 5 Comments


Introduction

Any unmaintained database will be accumulating problems in one or more areas, which can eventually lead to poor application performance or even downtime, data loss and file corruption.

When referring to computer program, housekeeping is a term used to describe the optimization of database. It commonly involves removing old or unused files and data, backing up, or running disk utilities such as a ScanDisk, Defrag, or simply an antivirus scan.

Benefit

In this article, we will explain how to maintain the database and demonstrate some simple ways to manage and do housekeeping on TCMS V2’s database to keep the system organized and to ensure that it runs properly. It is advised for this routine to be performed at least six months once.

 
Process

1.   First of all, before you make any changes on the database and system, it is
       recommended to backup the database file. In TCMS V2 software you can backup
       the database at System Setting > Backup/Restore Database > select Backup > Apply.
       You can also refer to the article in the link here.

2.   Once you are done with the backup process, close the program and open the TCMS V2
      folder file. By default the TCMS V2 folder are located in C:\Program Files (x86)\
      FingerTec Worldwide\TCMS V2. Delete all the .CDX file and remove database file
      named Attend.DBF, History.DBF, Clkdata.DBF, and Fptaudit.DBF to another folder.


3.   Replace a new fptaudit.dbf from here into the TCMSv2 folder.


4.   Go to C:\\ Program Files > FingerTec Worldwide > TCMSv2 > etcom and copy the
       _etcom file. Then paste the _etcom file into the remote
      folder inside the TCMSv2 folder. Start up the TCMSv2 software, go to Attendance and
      click Download.

      The system will download the raw clocking data from the _etcom file. After the
      process is completed, the system will delete the file that you paste in the remote
      folder.


5.   Go to Employee tab and delete the user or employee who has resigned from the
       company.


6.   Last step is to proceed to the Attendance tab and generate new Attendance record
       based on the current transaction log and employee data. Perform the
       database backup again after you finish generate.
Kindly take note, by following these housekeeping steps, you can minimize the database size. If you need to view the transaction log that has been deleted, you can restore back the database file and retrieve User record and Transaction log by using the Restore Option features.

1.   To retrieve User or Employee Record, you can select Employee > tick on User  Record
       and Employee Management > select Employee you want to restore > Apply.


2.   To restore Transaction Log, you can select Devices > tick on Terminal Data Audit List >
       select the Date Range > select All terminal > Apply


3.   After you done this two step, please re generate the record at Attendance > Generate
      to view all the transaction log again.


5 comments:

Have any questions or inquiries about FingerTec? Drop your input here.

FingerTec Ingress blocked by Antivirus software

Tuesday, May 31, 2016 TimeTec 2 Comments


Introduction
Some antivirus software such as Kaspersky, Symantec and a few other brands are known to have issues with Ingress, as they detect some of the .dll and .exe file of Ingress as a threat in the form of malware/Trojan. This happens because Ingress has not been added to the “White-List” of these antivirus’ software but to curtail such interruption Ingress is now slowly being added to the list and the process is still on-going.


Benefits


By following these procedures, users will be able to run Ingress without any issues, and preserve the software from any corruption, even though they are using an antivirus that has not added Ingress into their White-List.

Process

1)     Temporarily disable your PC’s antivirus software

2)     Download and install Ingress software accordingly

3)     Restart the PC once

4)     Upon the PC start up, DO NOT run Ingress yet

5)     Go to your antivirus software, and add Fingertec Worldwide folder (Local Disk C > Program Files (x86) > Fingertec Worldwide) into the “Exclusion” / “Exception” list

(Note: Kindly check with your antivirus support/ knowledge-base on how to add a folder into the “Exception” / “Exclusion” list)

6)     Launch Ingress Normally
 

2 comments:

Have any questions or inquiries about FingerTec? Drop your input here.

Creating an Open Schedule for Shift Roster

Tuesday, May 31, 2016 TimeTec 3 Comments


Introduction
In an organization that has several working shift schedules without any fixed pattern the management may conveniently adopt this Open Schedule Roster to adjust accordingly to their requirement.

This roster is a solution to tackle their difficulties in assigning the correct shift schedule for each user. In this Open Schedule Roster, the system will automatically assign the respective shift schedule for each worker based on the 1st clock-in of the day.

However, each shift MUST NOT contain an overlapping time between each other to avoid redundancy on the clocking schedule. Furthermore, the system can only accommodate a maximum of 3 schedules in this open roster arrangement.

Benefits
The management team of a company may skip the hassle of thinking or managing fluctuating odd shifts. Once the Open Schedule Roster has been set up, the system will automatically allocate appropriate shift schedule based on the users' verification time at the terminal.

Process
Note:
Please be informed that the below configurations are done on Ingress software, as shown in the accompanying images. However, this can also be applied in TCMSV3 to achieve comparable results, as the configuration is similar with only a slight difference in the interface.

1.   Create a daily schedule for the morning shift. Fill in the IN and OUT column, for example: IN-07:00 OUT-15:00.  

2.   Create a daily schedule for the evening shift. Fill in the IN and OUT column, for example: IN-15:00 OUT-23:00.


3.   Create a daily schedule for the night shift. Fill in the IN and OUT column, for example: IN-23:00 OUT-07:00.  


4.   Create a weekly group duty roster for the open schedule roster. Go to Open Schedule Shift Roster > Edit > Auto Schedule > Assign the clocking schedules 1, 2 and 3 and the Day Type column.


5.   Once done, click OK and Save. It will not show any clocking schedules in this particular roster. This is due to the system that automatically allocates the appropriate shift for each user based on the verification time in the attendance sheet.

Note: The schedules' timing must not overlap each other. For example, if you have shifts from 10am – 5pm and 3pm to 10am, the open schedule function will not work.

3 comments:

Have any questions or inquiries about FingerTec? Drop your input here.