i-Account - How to Assign and Unassign Unit Owner to Customer Group

Friday, October 29, 2021 TimeTec 0 Comments


Introduction
Usually, Admin needs to assign unit owners into specific groups to differentiate when generating batch invoices or extracting the reports efficiently. To assign the unit owners into a specific group, Admin can follow the step as below:

Steps
1. Once login to i-Account, go to Property > Customer Groups to assign the unit owners into the relevant group. 

2. On the Customer Group page, the listing displays all customer groups that have been assigned previously. 


3. The action buttons on the listing are explained below:

Action Icon

Descriptions

To edit or rename the Customer Group Name and Descriptions.  

To assign or unassign unit owner/debtor to the selected customer group.

To remove the selected customer group.


4. The steps to complete basic settings for customer group is as follows:
A) Add a New Customer Group
i. At the bottom section of the Customer Group page, enter the Group Name and Description. 

ii. Then, click on “Add New” to add a new customer group. 


iii. Once the Customer Group successfully added, it will be listed in the Customer Group listing. 

B) Assign Unit Owner/Debtor to Customer Group
i. To assign a unit owner or debtor to a new or existing customer group, click on the middle assign icon.

ii. Tick the checkbox for all the new unit owners that need to be assigned to this group.
Note: A pre-ticked checkbox indicates the unit owners that have already been assigned to the group for existing groups.

iii. Scroll down and click on “Assign”.


iv. This pop up message will appear. Click on “OK” to proceed.


Additional Info: If you change unit owner in i-Neighbour’s Manage Unit by following the steps in this guide:https://www.fingertectips.com/2021/01/changing-unit-owner-in-i-account.html, the system will automatically remove the ex-owner from the group and assign a new owner.

C) Unassigned Unit in Existing Customer Group
i. To unassign the unit owner or debtor from the customer group, click on the middle assign icon.

ii. For example, in this Block B owners group, to unassign unit owners for B-10-4 and B-10-5, we have to untick the checkbox for both unit owners, as shown below:

iii. Untick the checkbox to unassign. 

iv. Scroll down to the bottom of the page and click “Assign” to save.


v. After clicking “Assign”, click on “OK” to successfully remove the unit owners from this particular customer group.


Note: If some of the screenshots or steps viewed here are different from the ones in the current system, this is due to our continuous effort to improve our system from time to time. Please notify us at info@timeteccloud.com, we will update it as soon as possible.


0 comments:

Have any questions or inquiries about FingerTec? Drop your input here.

How to Clear Cache and Cookies on i-Neighbour and i-Account

Friday, October 29, 2021 TimeTec 1 Comments


Introduction
Sometimes there may be an error when you try to login to i-Neighbour or i-Account. If you encounter this, clearing the cache and cookies from your web browser is an important first step for troubleshooting. The 'cache' is a tool used by your internet browser to speed up the page loading process. However, it could cause a problem when websites are updated and developed as files saved in the cache may conflict with what's coded into the website. 
Below are the steps on how to clear cookies and cache in different browsers. After following the steps below, try login into i-Neighbour and i-Account again.

Google Chrome
1. Open Chrome, and at the top right, click on the More icon (three dots) on the top right.

2. Click More Tools options.

3. Then select the Clear browsing data option. 

4. For the time range, select All time.

5. You need to tick the checkboxes for "Cookies and other site data" and "Cached images and files".

6.  Then, click the “Clear Data” icon to clear all the cookies and cache. 

Firefox 
Option 1
1. Click on the menu button (three horizontal lines) on the top right.

2. Select Settings.

3. On the Settings page, select Privacy & Security options.

4. After clicking Privacy & Security option, scroll down until you can see Cookies and Site Data. Then, click on the Clear Data box. 

5.  Tick the check mark in front of the below option box then click the Clear icon. 

6. This pop up message will appear. Click on “Clear Now”.

7. Next, login again to the page. 

Option 2
Alternatively, you can clear the cookies or cache by this option too:
1. Click the menu button (three horizontal lines) on the top right and select History.

2. Select History option.

3. Then, select Clear recent history.

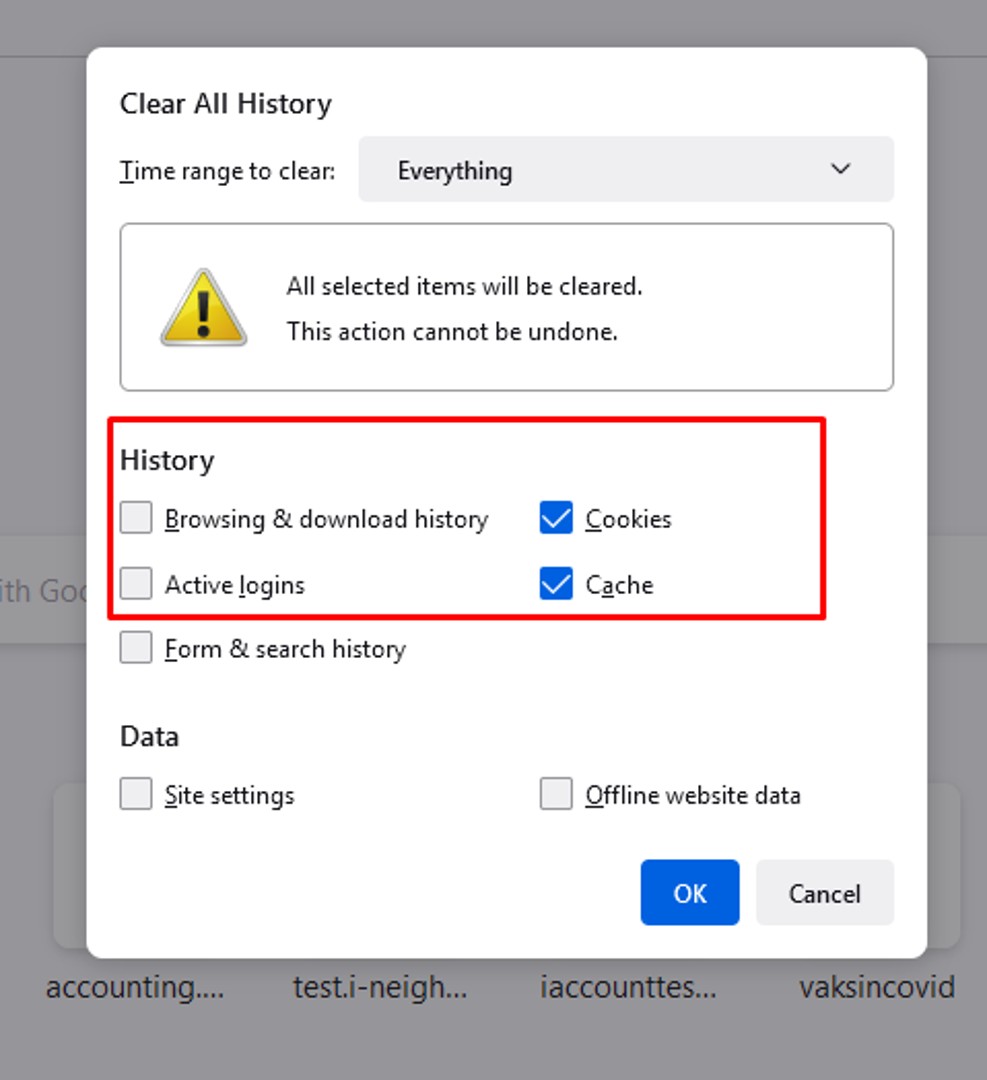
4. You need to click the drop-down menu next to Time range to clear choose “Everything”


5. Tick the checkboxes for “Cookies” and “Cache”. Click OK to proceed. 

6. The window will close and the items you have selected will be cleared from your history. 

Edge
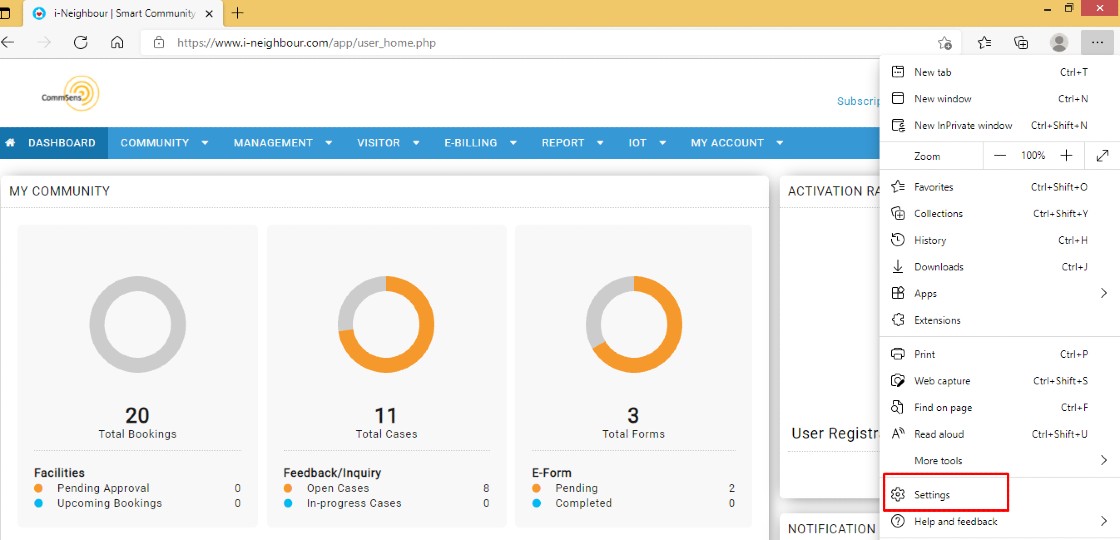
1. Open Microsoft Edge, select Menu (three dots) on the top right. 

2. Select Settings. 

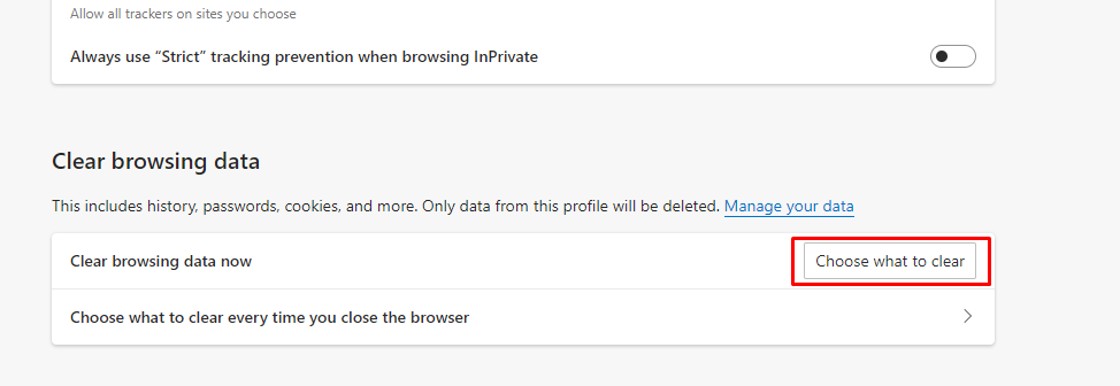
3. Then click on the “Privacy, Search and Services” option. 

4. Under Clear browsing data, select Choose what to clear.

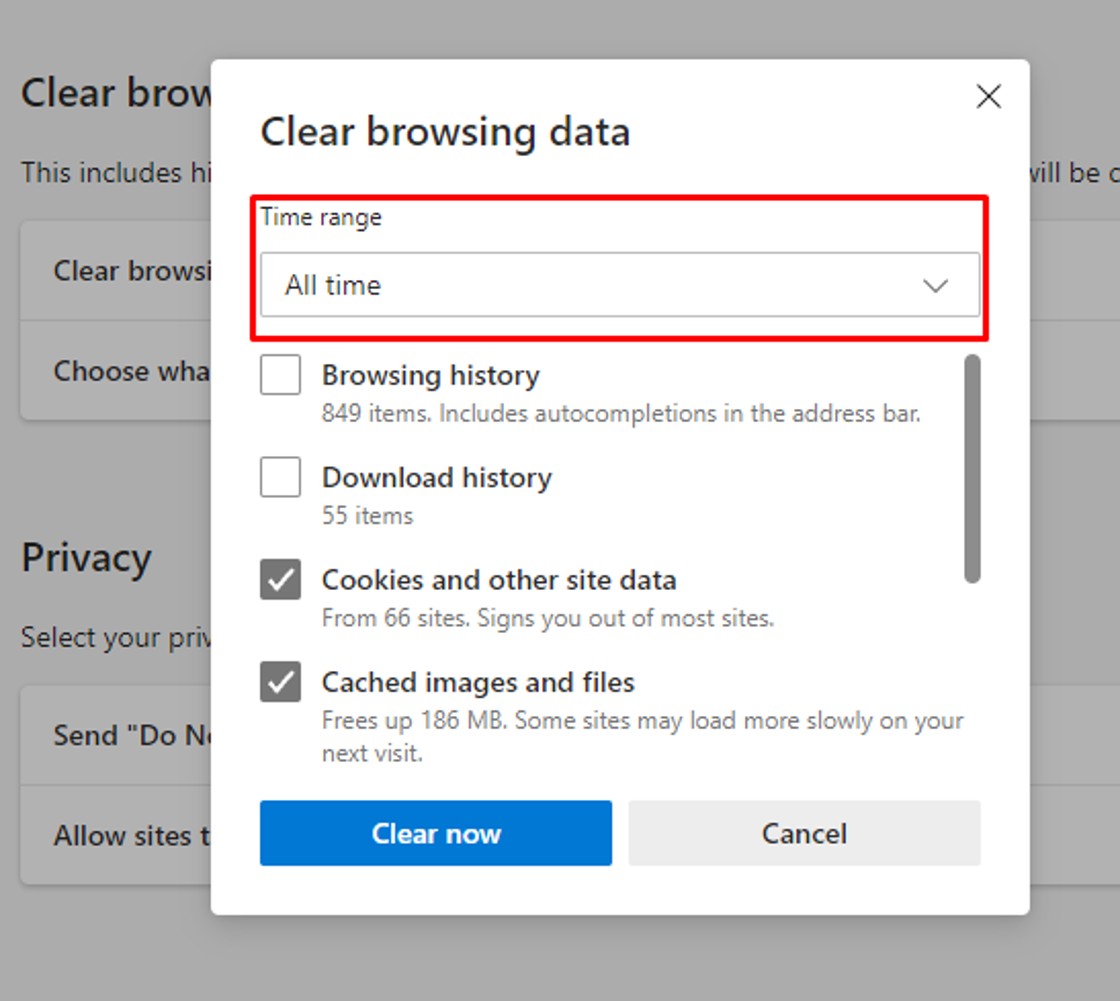
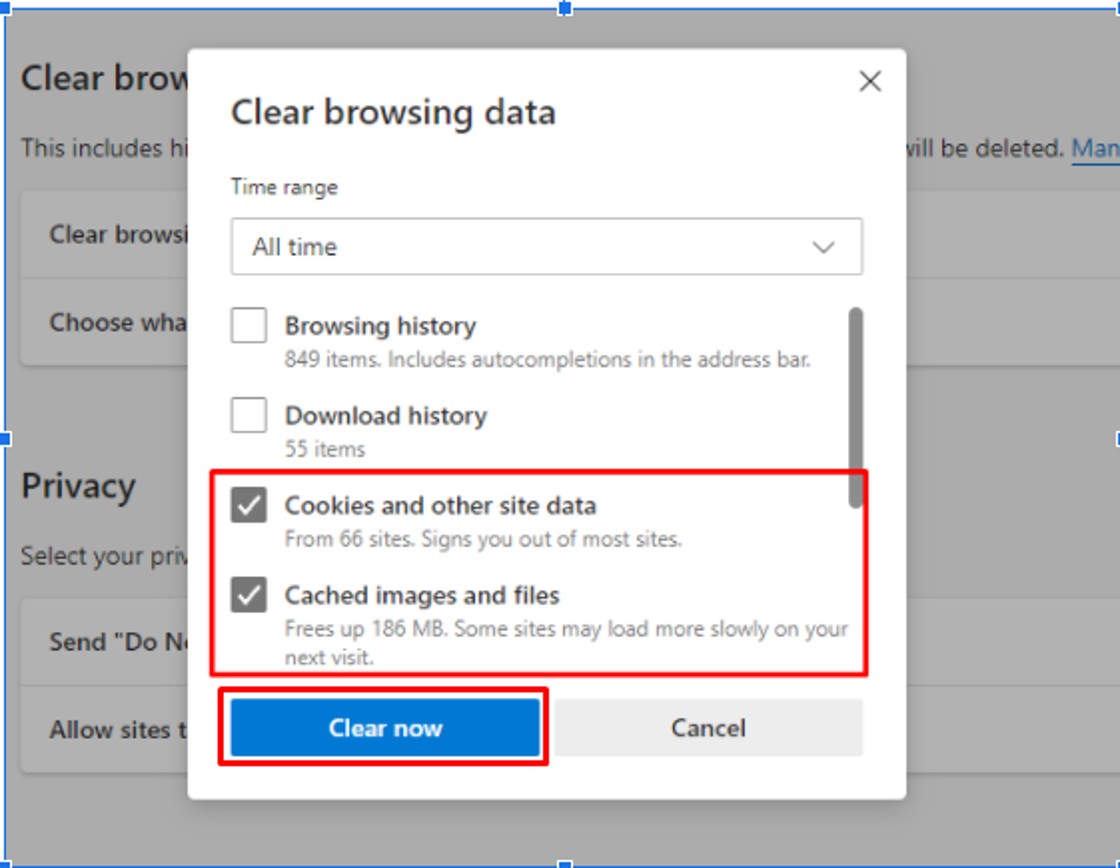
5. Under Clear browsing data, select the time range. You need to select “All time” to ensure all cookies and cache are cleared. 

6. Tick the checkboxes for "Cookies and other site data" and "Cached images and files" and click on “Clear Now” to proceed.

Alternative Option
The other more straightforward way to clear cache/cookies is to use keyboard shortcuts applied to most browsers. 

Using Internet Explorer, Edge, Google Chrome, or Mozilla Firefox, you can quickly clear cache with a keyboard shortcut. While in your browser, press Ctrl + Shift + Delete simultaneously on the keyboard to open the appropriate window.

Note: If some of the screenshots or steps viewed here are different from the ones in the current system, this is due to our continuous effort to improve our system from time to time. Please notify us at info@timeteccloud.com, we will update it as soon as possible.


1 comments:

Have any questions or inquiries about FingerTec? Drop your input here.

Replacing Checkpoint Tags in TimeTec Patrol

Friday, October 29, 2021 TimeTec 2 Comments


Introduction
A patrol route is a sequence of checkpoints that security guards need to follow during their patrol rounds. Each checkpoint has its specific location, and it contains the details of actions required from that checkpoint. If you want to use new devices, the checkpoints can remain by only removing the details, such as the checkpoint NFC ID. You can do this easily by going to TimeTec Patrol > Routes > Locations & Checkpoints.


Next, select the checkpoint location to preview the details. After confirming the correct checkpoint, click the reset button on the top right corner to reset the checkpoint ID.

Upon clicking the reset button, the admin will be prompted to click OK to proceed with a confirmation.

After reset, the system will empty the checkpoint ID.

To start enrolling for new devices, open TimeTec Patrol and click on the start button and enrol checkpoints. Then, click on the patrol routes.

After clicking on the patrol routes, there will be a list of checkpoint locations. Select the checkpoint location to enrol the tag. Then, place the phone near the device, such as the NFC tag. Upon successful detection, the system will capture a new checkpoint ID, then click on submit.

If the setup is done successfully, the system will show a successful message, and the checkpoint status on the list will be showing a green indicator as online.

Note: If some of the screenshots or steps viewed here are different from the ones in the current system, this is due to our continuous effort to improve our system from time to time. Please notify us at info@timeteccloud.com, we will update it as soon as possible.


2 comments:

Have any questions or inquiries about FingerTec? Drop your input here.