Connecting the TA100C (FMM) to AdapTec TA and 12Vdc or 240Vac External Sirens

Friday, August 21, 2015 TimeTec 2 Comments

Introduction

The TA100C (FMM) is a biometric terminal for time attendance that includes an internal siren and allows the connection of external sirens for an effective alarm system. This system can also be scheduled to signal events within the working schedule such as starting work time or end of break. The two types of sirens that can be connected to the TA100C (FMM) are:

  • 12Vdc for small industries or office use
  • 240Vac for big factories with a noisy environment
To compensate for the additional power required for the external sirens, the Adaptec TA can be used as a power supply and backup in case of power failures, ensuring that your alarm system is always running.

Benefits
Connecting your terminals to the Adaptec TA ensures a stable and reliable power source for your system to operate at optimum capacity. By connecting the terminal and external siren to the Adaptec TA, the internal relay of the terminal will be protected from the high voltage. If the voltage is too high, the fuse in Adaptec will break the circuit, thus protecting the internal components of the terminal.

Adaptec TA has 2 power sources, 5VDC and 12VDC and you can connect any of FingerTec terminals to Adaptec TA by selecting the correct voltage. It also comes with a backup power in case of power failure.
 
Process
To connect the external siren to the terminal, follow the steps below.
1.    Open the back casing of the TA100C (FMM) terminal.

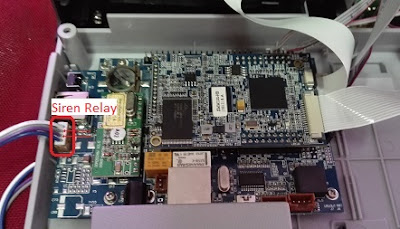
2.   Plug in the connector of the external siren into the MCU Board.
 
3.   Follow the wiring diagram to connect the terminal to Adaptec TA.
  
 
4.   Change the External Bell Relay settings in the terminal device itself.
      Go to Menu > Personalize > Bell Schedule > Options > External Bell Relay > NC2 

5.   To add a new bell schedule, go to Menu > Personalize > Bell Schedules > New Bell Schedule > Set
       the option accordingly:
·         Bell Status: To turn the bell on or off.
·         Bell Time: Set the time for the bell to ring automatically.
·         Repeat: Set the bell to repeat on certain days or every day.
·         Bell Type: You can set for the bell to be triggered from the internal bell or from an    
 external bell that is wired to the device.
·         Ring Tone: Select your preferred ringtone that will emit from the bell.
·         Internal Bell Relay: Specifies the time duration for the alarm to ring (ranges from 1s to999s).
·         External Bell Relay: Specifies the time duration for the alarm to ring (ranges from 1s to999s).

2 comments:

Have any questions or inquiries about FingerTec? Drop your input here.

Customization of Duty Rosters and Application of Leave Remark to Individual Employees in Ingress & TCMCS V3 software

Thursday, August 20, 2015 TimeTec 0 Comments

Introduction

In an organization, some employees who are working in the same working schedule for example from 9-6pm might have some deviation in their work schedule due to the work nature. Take for example, all of the office workers have to work from 9-6 in the office except for those in sales who have to go out on a certain day to pitch sales at a client’s place, or dispatch or admin staff members that need some flexibility to go to the banks etc. In Ingress and TCMS V3, employees can be grouped into one Group Duty Roster and this User Duty Planner can cater to the deviation of schedule for individual staff, without disturbing the rest of the Group Duty Roster’s settings. Not only can the Administrators customize individual users’ schedules, they can also apply a leave remark to indicate the type of leave taken by those individuals on which date.

Benefits

This option provides flexibility for Administrators to amend on the general Group Duty Roster rather than create a new Group Duty Roster for the select few because in general, all these individuals are working under the same Group Duty Roster but with slight deviations only.

Process
Note:
The below configurations are done on Ingress software, as shown in the accompanying images. However, this can also be applied in TCMSV3 to achieve comparable results, as the configuration is similar with only a slight difference in the interface.
Before applying Leave remark to employees who have applied/are entitled for Leave, Administrators are required to set the Leave Types available by including the name of the Leave and the description. To Apply Leave for Individual Employees, follow the steps below.

1) Set Leave Type
            Ingress Software > Attendance > Leave Type > Click Add > Key in leave type > Save


Once the Leave Types have been determined, Administrators can proceed with applying the Leave remark to the employee's working schedule.

2) Apply Leave Remark
Ingress Software > Attendance > User duty Planner > Select user (double click) > Click Edit > Right click on the date > Select Leave type > Select effective date > Click OK to confirm > All leave day will show in yellow color.


3) The Attendance sheet will show the Leave Type applied to the employee as per the screenshot below:


0 comments:

Have any questions or inquiries about FingerTec? Drop your input here.

FAQs - FingerTec BioBridge SDK

Thursday, August 20, 2015 TimeTec 54 Comments

Introduction

FingerTec terminals come bundled with either the TCMSV2 or Ingress software for a Time Attendance system. Both software packages come as a complete system for all your time attendance and door access needs. However, for system developers who would like to customize the software to incorporate features based on your own ideas or third party applications, you can access the BioBridge SDK software that comes together with your purchase of FingerTec terminals. The BioBridge SDK is a tool that allows you to customize your own software that can be integrated with your terminals for a personalized solution.

Benefits

The SDK in the developer program are packed with all the documentations to provide references should you become unclear of which coding to use. Manuals are provided to guide you to have easy linking and integration between your software and the FingerTec hardware. Take a look at the frequently asked questions concerning FingerTec BioBridge SDK for more insight in developing your own software.

FAQ

1.          When I want to run the BioBridge program, I encounter the following error “Class not registered (Exception from HRESULT: 0x80040154 (REGDB_E_CLASSNOTREG))”.
A: This error is due to the missing .dll that is required to run the BioBridge SDK Demo. Please install TCMSV2, Ingress or BioBridge SDK software before you start using the BioBridge SDK Demo.
 
2.          How can I determine whether the terminal I have includes the black & white or colored screen?
A: You can check your screen type by using the function IsTFTMachine. When the value returned is 0, it means that the terminal you have includes a colored screen. If the value returned is aside from 0, it means that your terminal has the black & white screen.


3.           I’m using a FingerTec colored screen model and having issues in reading the time
              attendance details via the sample code provided.
              A: Please select the appropriate colored screen model function in the BioBridge SDK Demo 
              to read the clocking data/user info. If you want to write your own program, kindly use the
              prefix SSR_ for colored screen terminals.


4.          Can I use the BioBridge SDK with Java?
A: Our BioBridge SDK is packed Active X dll. As Java programming cannot work directly with ActiveX, you will need to use a third party wrapper in order to use Java with our SDKs.


5.          Does the BioBridge SDK supports the programming languages PHP and Oracle Forms?
A: Unfortunately our BioBridge SDK does not support PHP and Oracle formats. Below is the list of sample codes available in our FingerTec Developer Program page.
> C#
> Delphi
> VB
> VB.NET

6.          How can I check which terminal the real-time event is from if I have more than 1 device connected?
A: You can use BioBridgeEventSDK.ocx as the reference to determine which terminal the event is from instead of using BioBridgeSDK.ocx.


7.          How can I connect multiple terminals at the same time?
A: Kindly refer to the developer program sample “WPF (Dynamic Declaration & Multiple Terminal)” which is available at
http://www.fingertec.com/developerprogram/biobridge_samplecode.php.


8.          I need a BioBridge SDK for Web applications.
A: Our BioBridge SDK is developed only for Windows platform. If you need to use it for web applications, you can use our FingerTec Webster, obtainable at the link below.
http://www.fingertec.com/developerprogram/webster_download.php


9.          I want to use BioBridge SDK in my programming language, what must I do?
A: To use BioBridge SDK in your programming language, you will need to add the ActiveX component to your development environment

For Windows 64bit Operating System
C:\Windows\SysWOW64\BioBridgeSDK.ocx

For Windows 32bit Operating System
C:\Windows\System32\BioBridgeSDK.ocx


10.        I want to upload User Photos and Advertisement Photos to the terminal via BioBridge SDK. How can I go about it?
A: Before you proceed, please ensure that the photos that you want to upload is in JPEG format and the size must be 320px X 210px, less than 30kb. You can use the command
UploadPicture() to upload advertisement and UploadUserPhoto() to upload user photo.

 
11.       I have both master and slave readers connected. How can I differentiate whether the transaction is from the master reader or the slave reader?
A: In GetGeneralLog(), you must use the value below to differentiate the master’s and slave’s transactions.
InOutMode = 0 (Master Unit)

InOutMode = 1 (Slave Unit)


12.        I have downloaded the transaction log into my USB Flash Disk and noticed that the file is encrypted. How can I decrypt the data?
A: You can use the command DecryptLog(Encrypt: String, Decrypt:String). If the value returned is 0, this means that the log has been successfully decrypted. Other value returned means that it failed to decrypt the file. The content that will be decrypted are:

·         Enroll No
                  ·         Date & Time
                  ·         Device ID
                  ·         InOutMode
                  ·         VerifyMode
                  ·         WorkCode


13.       How can I backup and restore the data in the terminal?
A: To backup data in the BioBridge SDK we need to use the command GetInfo, with SetInfo to restore the data. Basically only user information, fingerprint template and time zone are included in the backup and restore data process.  Do take note that due to security reasons, only transaction logs CANNOT be restored back to the reader.

·      User Info
                          Backup – GetUserInfo()          
                          Restore – SetUserInfo()


·       User Fingerprint Template
                          Backup – GetUserTemplate()
                          Restore – SetUserTemplate()


·      User TimeZone
                          Backup – GetUserTimezone()                      
                          Restore – SetTimezoneInfo()


·       Transaction Logs
                           Backup – ReadGeneralLog()

54 comments:

Have any questions or inquiries about FingerTec? Drop your input here.