i-Neighbour App: Incompatible Download Issue

Monday, January 28, 2019 TimeTec 0 Comments


Introduction:
If you have been facing an Incompatible Download Issue when trying to install our i-Neighbour App onto your smartphone, this issue is likely caused by a few reasons. Hence, we have thus prepare a quick fix guide to assist you in overcoming this particular scenario. Below are some of the steps that you can take to rectify the problem

Here are some steps:
1. Restart Your Device.

2. Clear Cache and Data: Sometimes your phone may contain corrupted files that might affect the download process of certain apps. Therefore, the solution here is to clear your cache along with the corrupted files.


3. Check Your Date and Time Settings: Please be informed that Google actually verify the Time and Date of your device as well. As such, the system couldn’t determine a date or time, there might lead to the cause of your issues.


4. Check Google Apps: This might seem trivial, but occasionally the Play Store App would not proceed with the automatic download process. Please ensure that you have downloaded the latest Google Play Store version.


5. Disable Your VPN: If you are using any VPN service, please disable it as this might be the cause of the problem. Proceed to your Settings and tap More or More Networks depending on your device. Tap on VPN and toggle it off.


6. Enable Download Manager: Go into your Settings and tap either Apps or Application Manager (depending on your device). You should then be able to view all of your apps from this point. Select Downloads or Download Manager and enable it.


7. Delete the file "hosts.txt" (requires root): For advanced users, who have already rooted their device, please open your root-privileged file explorer of choice. Then, proceed to your root/system directory and search for "hosts.txt" to delete the file. Note: Do not delete any of the other system files!

These are the few solutions that you can try to solve the incompatible download issue of i-Neighbour App. If you are still having problems after completing all of the steps, please contact us via: support@i-neighbour.com

0 comments:

Have any questions or inquiries about FingerTec? Drop your input here.

How To Utilize USB Function In TimeTec TA

Friday, January 25, 2019 TimeTec 0 Comments


Introduction:
TimeTec TA has recently released a new feature to ease the experience in retrieving user data/transaction log by allowing the data to be exported from FingerTec terminal into a USB for transferring into TimeTec TA.

Basically, USB function is used when the biometric device is in Offline Mode due to having no Internet connection available and the data has to be manually transferred instead. Before proceeding, users will first need to ensure that the biometric devices are already added into TimeTec TA account (Device > FingerTec Terminal). Please refer to the steps below on how to utilize the USB function in TimeTec TA.


Process:
A. Download Users from USB -

1) After downloading the user template from FingerTec terminal, you will receive a file named user.dat as well as template.fp10.1.dat (if there is any fingerprint registered for the user).


2) Next, login to TimeTec TA and go to Device tab > FingerTec Terminal > Manage Terminal > Download Users from USB.


3) Browse your .dat file that has been downloaded from the FingerTec terminal. Please note to also select template.fp10.1 file if you want to export the user’s template into TimeTec TA account.


4) Select user(s) that you wish to upload into TimeTec TA. Here, you may also customize the user’s Issuance Date and Group Duty Roster.


5) Once done, you will receive a message indicating that the user exporting process has been successfully completed.


6) Users will now be available in the TimeTec TA user list (User tab > Manage User).


B. Download Transaction Logs from USB -

1) In Device tab > Manage Terminal > Download Transaction Logs from USB.


2) Browse attlog.dat that has been downloaded from FingerTec Terminal. Here, you may select the users to download the transaction logs from.


3) Once done, you will receive a successful message indicating that you have completed downloading the transaction logs from the USB.


4) Lastly, the downloaded transaction logs will thus be available in the Attendance Sheet (Attendance tab > Attendance Sheet) for the selected users.


C. Export Users to USB -

1) Please be informed that you may also export user lists that are already available in TimeTec TA account into another device. Start by proceeding to Device tab > Export User to USB .


2) Here, you may select which user that you wish to export. Please also indicate the device type: Color Screen or Black & White Screen as well as the data that needs to be exported along with the user (card, fingerprint algorithm).


3) Once complete, you will receive a compressed file for User.data in the Download section as shown in the screenshot below.


4) Extract the file and you will receive the user.dat and template.dat file which can then be uploaded into FingerTec terminal.


Note: If some of the screenshots or steps viewed here are different from the ones in the current system, this is due to our continuous effort to improve our system from time to time. Please notify us at info@timeteccloud.com, we will update it as soon as possible.

0 comments:

Have any questions or inquiries about FingerTec? Drop your input here.

How To Customize User Privileges For Face ID 2 FMM

Friday, January 25, 2019 TimeTec 0 Comments


Introduction:
FingerTec Face ID 2 FMM terminal consists of a few types of privileges such as User, Enroller, Admin and Super Admin. As such, each of the privilege has a different authority and access into the terminal. In this article, we will thus be showing how you can customize the User Privileges in Face ID 2 FMM. Please refer to the process below to get started:

Process:
User Role
By default, whenever enrolling a new user into Face ID 2 FMM, the user roles that are available for selection will be listed as Normal User and Super Admin.


However, by selecting the User Role menu, note that there are 3 other roles that can be enabled for the device:

1. Enroller
2. Admin
3. User Defined Role


Before proceeding further, it is important that you first enroll at least one Super Admin before enrolling any other users. This is because without Super Admin, the system will prevent you from enabling a user role that you required.


Customizing User Role


Once added the Super Admin, you can now proceed to customising your preferred User Role. In doing so, you will be presented with these 3 options:

i. Enable Defined Role - Set on/off to enable/disable your User Role.
ii. Name - This field allows you to assign a name for the User Role.
iii. Define User Role - In this field, you are given the choice to select any function that can be accessed by this User Role. Please tick the function that you wish to enable access or vice versa as shown in the screenshot below.


After enabling the User Role being configured, you will now able to select the customized User Role during the enrollment process.


That’s it, you’re all set and ready to start your very own customization process.

Note: If some of the screenshots or steps viewed here are different from the ones in the current system, this is due to our continuous effort to improve our system from time to time. Please notify us at info@timeteccloud.com, we will update it as soon as possible.

0 comments:

Have any questions or inquiries about FingerTec? Drop your input here.

How To Configure Rounding Feature In TCMS V3 And Ingress Software

Friday, January 25, 2019 TimeTec 0 Comments


Introduction: 
Rounding is a feature in FingerTec TCMS V3 and Ingress software, whereby users can determine the clocking time and attendance record within the Clocking Schedule to be rounded into the nearest minutes as specified in the field (based on the rounding rules).

Benefits:
By using the Rounding feature in TCMS V3 and Ingress software, Admin can set various rounding rules for all employees, i.e. specific punch, total worked time, or a specific rounding range; hence, when an employee clocks in/out within that range, the system will in turn round the data according to what has been configured.

Process:
Therefore, in this article, we will be guiding you on how to configure the Rounding feature in TCMS V3 and Ingress software. There is 2 option for Rounding in TCMS V3 and Ingress software that you can use to manage your Attendance Sheet Record for each employee.

1. Rounding the clocking time for each column in Clocking Schedule
 With this option, you can round your clocking time for Check In, Break, Resume, Check Out, OT and Done to the nearest minutes. Please refer to the screenshot below to start setting the rule for rounding the punch data to a specific time.

Figure 1

There are 3 types of Rounding that users can select which is Round Up, Round Down and Midpoint. Below is a brief description:

· Round Up: If Round Up is selected and set at 15 minutes, i.e. when an employee clocks-in fo work at 9:06AM, his/her IN time will be recorded as 9:15AM.
· Round Down: If Round Down is selected and set at 15 minutes, i.e. when an employee clocks-in for work at 9:06AM, his/her IN time will be recorded as 9:00AM.
· Round Midpoint: If Midpoint is selected and set at 15 minutes, when an employee clocks-in at 9:06AM, his/her IN time will be recorded as 9:07AM.

Here is an example of the Attendance record when using the Rounding option for each Clocking Time column.
 
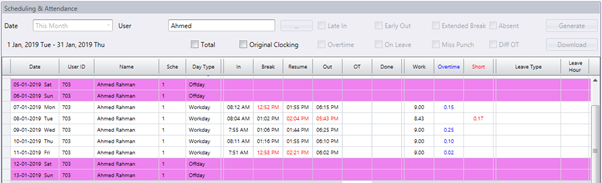
Attendance Record Without Rounding Setting 

· In this example, we will be setting the Round Up feature for Check In and Resume time at 15 min while Round Down for Break and Check Out time at 15 min. (Refer to screenshot below)
 

· Once configured the Rounding setting, the system will thus generate the Attendance Record as shown below.


2. Rounding Rules for Attendance Sheet
 This Rounding option is to determine the “rounding of minutes” rules allowed in the Clocking Schedule as well as the rules that will determine the presentation of time within the attendance sheet. Please refer to the screenshot below to start setting the rule.
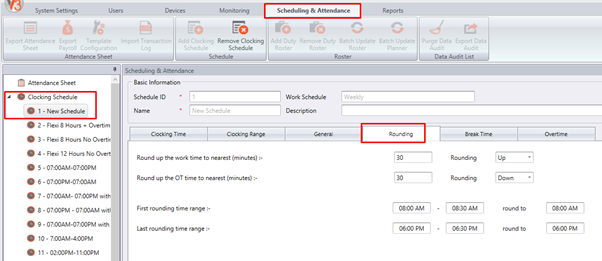
Figure 2

· Round up the work time to nearest minutes:
This option allows you to set a rounding rule for the total Work time per day. As shown in Figure 2, whereby the ‘Round up the work time to nearest minutes’ is set at 30; the system will thus generate the data as shown in the screenshot below.


 · Round up the OT time to nearest minutes:
This option allows you to set a rounding rule for the total Overtime per day. As shown in Figure 2, whereby the ‘Round up the OT time to nearest minutes’ is set at 30; the system will thus generate the data as shown in the screenshot below.


· First rounding time range and Last rounding time range:
These options will allow you to set a rule for a specific range that if any employees clock in or out in that period, the system will automatically round the punch time according to the setting. This rule is mainly used if you do not wish to take into account for employees clocking in early and clocking out late. As configured in Figure 2, any IN punch made between 8.00AM to 8.30AM will automatically round to 8.00AM and any OUT punch made between 6.00PM to 6.30PM will automatically round to 6.30PM as shown in the screenshot below.


However, if there are any timings that are not in the rounding range, the system in turn will not calculate or generate that timing as per setting.

*Please be informed that once the Rounding Rules are configured in the clocking schedule, you will need to Save the setting and regenerate the Attendance Sheet before you can obtain the updated result.

Note: If some of the screenshots or steps viewed here are different from the ones in the current system, this is due to our continuous effort to improve our system from time to time. Please notify us at info@timeteccloud.com, we will update it as soon as possible.

0 comments:

Have any questions or inquiries about FingerTec? Drop your input here.

Importing FingerTec Data from Webster to Ingress / TCMS V3 Explained

Friday, January 25, 2019 TimeTec 1 Comments


Introduction: 
Webster acts as a platform that allows user to access raw time attendance data from FingerTec hardware either installed locally or remotely. Additionally, this process also allows you to connect the data to your third-party application software effortlessly. In Webster, users can likewise save their terminal information, transaction logs and user data as raw database and can be imported as a readable file when transferring into Ingress or TCMS V3 software. Here, we will guide you on how this process can be carried out:

Process: 
A: Import Data from Webster to Ingress / TCMS V3 software installed within the same server
1. Once installed Webster and Ingress, click at Ingress icon (top left) > Migration Wizard > Import > FingerTec Webster.


2. A Webster Migration Wizard pop-up will be displayed and you will then have to enter the Webster Database Server, Username, and Password.


3. Click login and you will now be able to start importing FingerTec device, Users, or Users Transaction Logs.


4. A notification pop-up will be displayed if you have successfully imported the data from Webster.


5. Once done, the data that has been successfully imported will be shown in Ingress / TCMS V3 software.


B: Import Data from Webster to Ingress / TCMS V3 software installed in a different server (within same network)

1. Once installed Webster in a server (within same network), a few settings will need to be done using SQLyog in the Webster Server. This needs to be carried out in order to allow Ingress (installed in other server) to import the data from the Webster database. When accessing SQLyog in Webster Server, you should be able to view the Webster Database as shown in the screenshot below.


2. Click at User Manager > Select Webster > Set the host, database password > save (Refer to the screenshot below).


3. Once configured the Webster database setting in Webster Server, you may then import the data into Ingress Server. Click at Ingress icon (top left) > Migration Wizard > Import > FingerTec Webster. Next, enter the Webster Database Server IP Address, Username, and Password.


4. Click login and you will then be able to import FingerTec Device, Users, or Users Transaction Logs.


5. Once done, the data that that has been successfully imported will be shown in Ingress / TCMS V3 software accordingly.


Note: If some of the screenshots or steps viewed here are different from the ones in the current
system, this is due to our continuous effort to improve our system from time to time. Please
notify us at info@timeteccloud.com, we will update it as soon as possible.

1 comments:

Have any questions or inquiries about FingerTec? Drop your input here.