Manage System Roles in TimeTec Claim

Monday, January 31, 2022 TimeTec 0 Comments


Introduction
TimeTec Claim offers access rights control to authorize users to manage the system roles within the organization. This article will guide you to manage the system role and add admin(s) in the TimeTec Claim efficiently.

By default, there are two types of User Roles in the system:
1. Master (System Administrator) - has full access and is responsible for setting up and maintaining the TimeTec Claim system.
2. Normal Users - can create and customize the access rights to be assigned to other admin personnel, depending on the rights given by the Admin roles.
 
Process
A. Add System Roles.
1. Go to TimeTec Claim > User > Manage System Roles & Admin
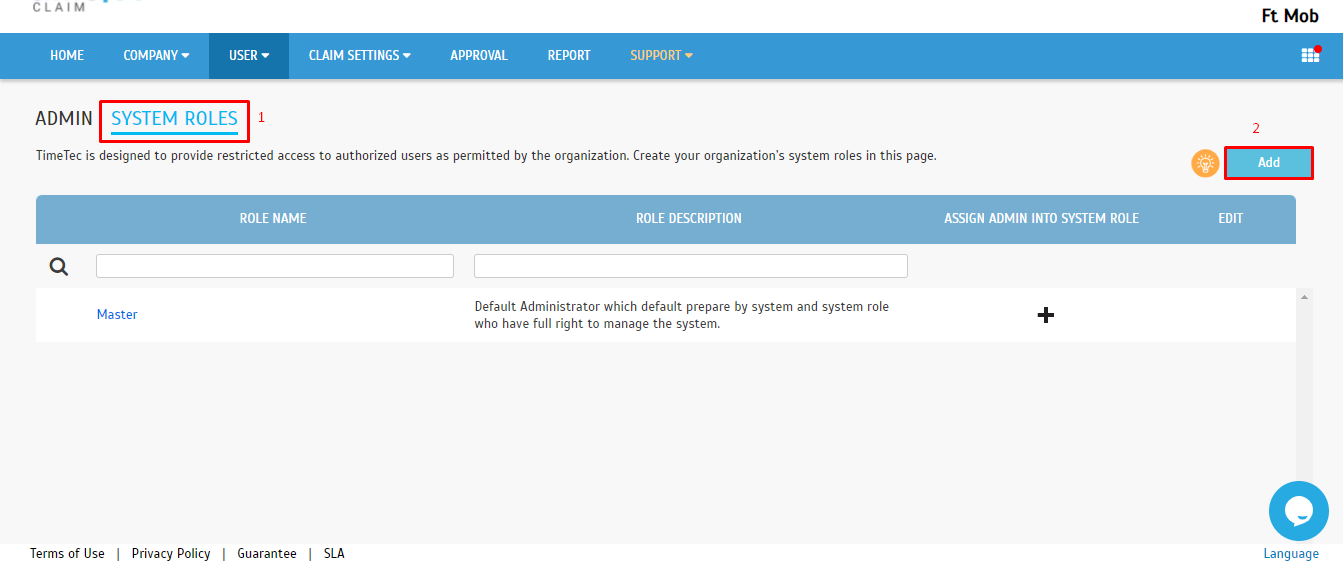
2 Click on System Roles Tab > Add.


I) At the pop-up window, there will be an option to allow users to copy the access rights from existing System Roles or edit the copied role, if necessary. A quicker process to create a new yet similar system role. Else, fill up the System Role Name and Description.
II) Copy Access Rights from - an option to allow users to copy the access rights from existing System Roles or edit the copied role, if necessary. A quicker process to create a new yet similar system role. 
III) System Roles Name :
a - Full Division: allow Admin to access all user information in the Organization Structure
b - Partial Division: allow Admin to access a limited amount of user information for selected divisions.
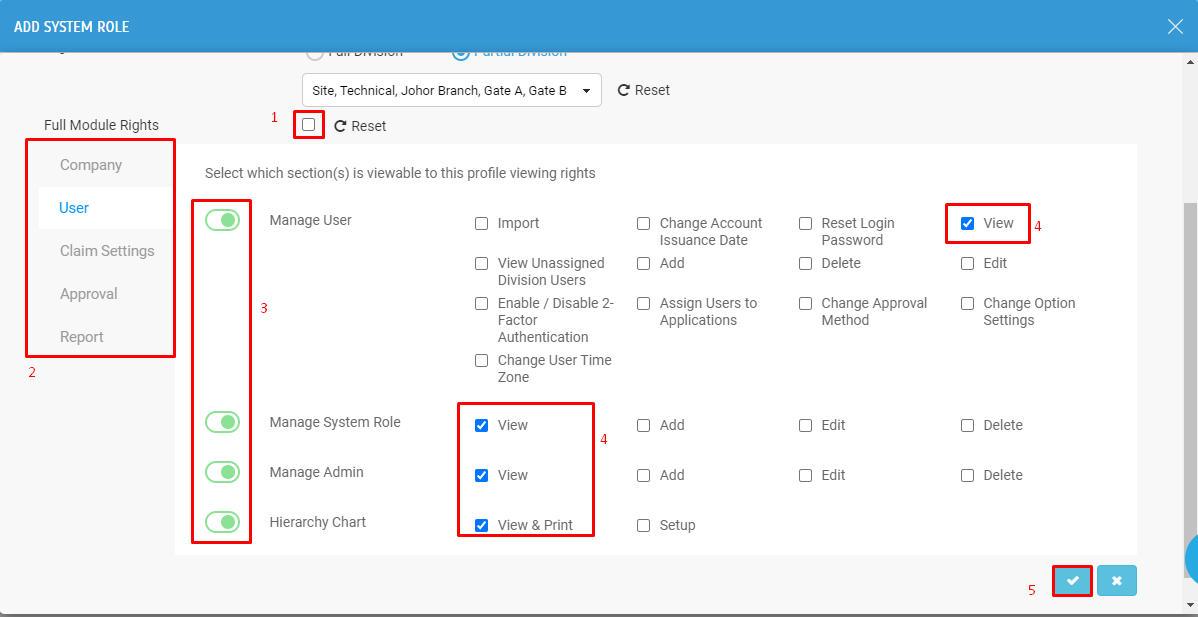
    1. Full Module Rights - Set the access rights for the System Role by ticking on the Full             
Module Rights to allow all modules access in the TimeTec Claim, while unticking it will             change the accessibility of the module for the role.

3. Unticking the Full Module Rights will allow the Master to select the required access they want to give to the user. By default, when enabling the access, the system will only allow access to View Only and for another access such as Add, Edit, Delete, Etc. The Master needs to turn on the access manually by clicking the selected box. Finish the process by clicking the Submit button.
B. Assigning Admins into the System Role
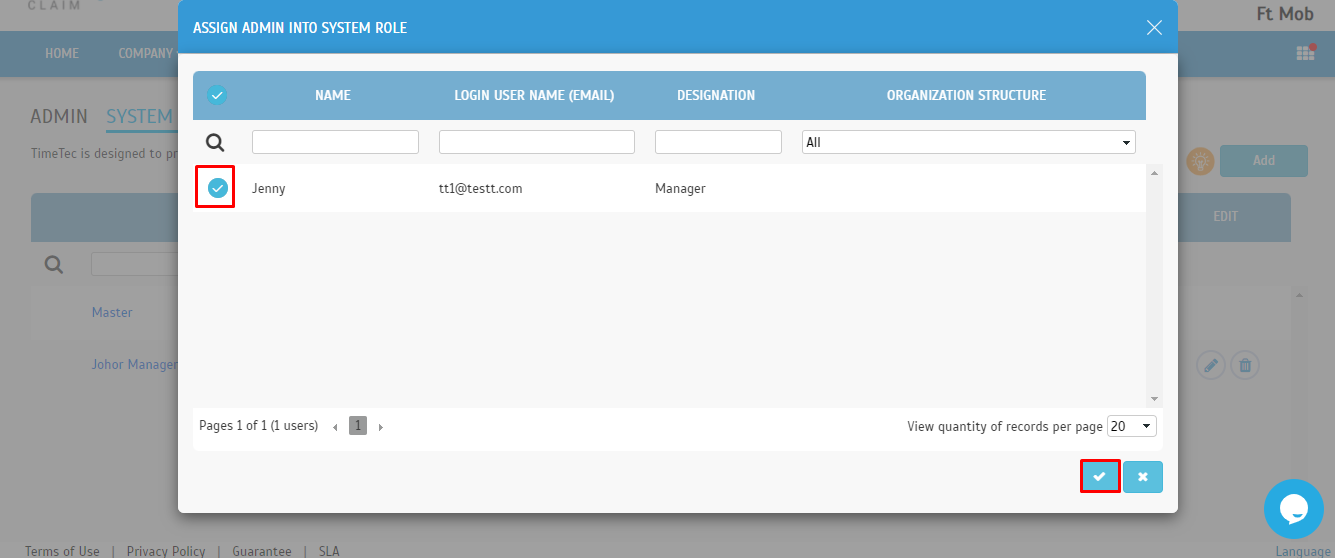
1. After setting up the System Roles, the Admin can also be easily assigned under the System Role by clicking on the ‘+’ button.

2. Select the required user > Click on Submit.
Once the + is clicked, a pop-up window will appear and a list of Admins (excluded from the role) will be displayed for selection.

C. Configuring System Role While Adding Admins Into the System
1. System Roles can also be arranged specifically while adding an Admin into the system. Click on Admin tab > Click Add. 


2. At the pop-up window, select the existing system user (based on their email) that you wish to assign as the Admin and select the relevant System Role and click on Submit. 
Remark : Default System Role is Master if the users do not wish to create any System Roles within the system.


Note: If some of the screenshots or steps viewed here are different from the ones in the current system, this is due to our continuous effort to improve our system from time to time. Please notify us at info@timeteccloud.com, we will update it as soon as possible.


0 comments:

Have any questions or inquiries about FingerTec? Drop your input here.

How to Include Additional Information in TimeTec VMS Visitation Ticket for Visitors

Monday, January 31, 2022 TimeTec 0 Comments


Introduction
TimeTec VMS can ease the registration process with multiple options of registration methods. That includes Walk-In registration, Invitation by the host, Queue Relief and Pre-registration method. Upon visitors registration submission, visitors will receive a visitation ticket to confirm the visits, including all the visitation details, easy for future reference. Aside from the given information, you may customize any relevant details or instructions or even add an attachment for visitors to download before their visit. This article will demonstrate how to configure the additional information/notes to be displayed on the visitation ticket.

Process
1. Login to TimeTec VMS as an Admin role, go to Settings > Visitation Settings.

2. In Visitation Settings, click on the Visitation Rules options from the left pane section.

3. Click on the edit button (pencil icon) on the right of the Visitation Rules section, then locate the Additional Information setting, click on the toggle button to enable it, and then click on Edit to add the text or attachment.

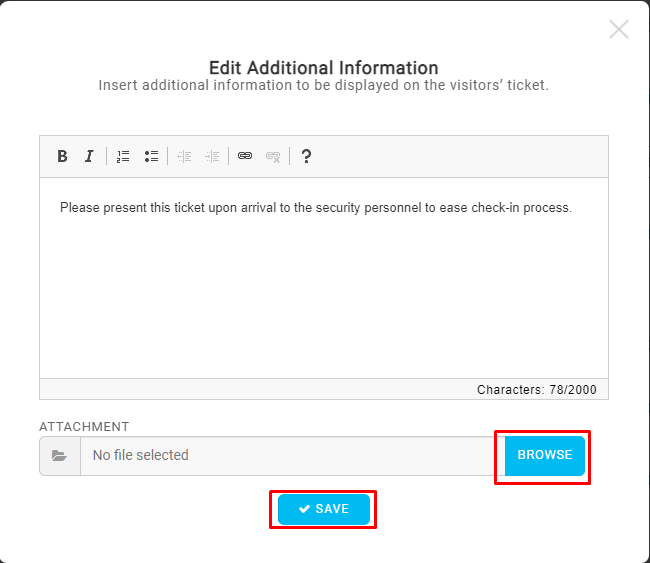
4. You may insert additional information or note on the visitation ticket for visitors’ perusal. The information could be in a standard text file, numbered or bullet list format, or you could also input a link if visitors are required to fill up any additional external form or download documents from an external source. You can also attach a document by clicking on the browse button and locating the attached file. Visitors will be able to download the file from the visitation ticket later. Click on the Save button to save.

5. Once the above is configured, the visitors will get the visitation ticket with all the relevant information sent to their email. The Notes section can view the added notes, as shown below. In addition, there will be a button to view/download the attachment if there is an attachment set.


Note: If some of the screenshots or steps viewed here are different from the ones in the current system, this is due to our continuous effort to improve our system from time to time. Please notify us at info@timeteccloud.com, we will update it as soon as possible.


0 comments:

Have any questions or inquiries about FingerTec? Drop your input here.

Manage Application Form for Season Pass on Timetec Parking

Monday, January 31, 2022 TimeTec 0 Comments


Introduction
Application forms are essential for collecting user information for Season Pass parking, especially for Private Season Pass. However, if you don't have the proper application template, it could make it difficult to get tasks done or collect the information you need.
In the Timetec Parking system, you can edit default fields or add new fields according to your organization's requirements. 

Process
Customize Data Field
1. On TimeTec Parking, go to Season Pass > Application Form > Manage Data Field > Click Add Button.


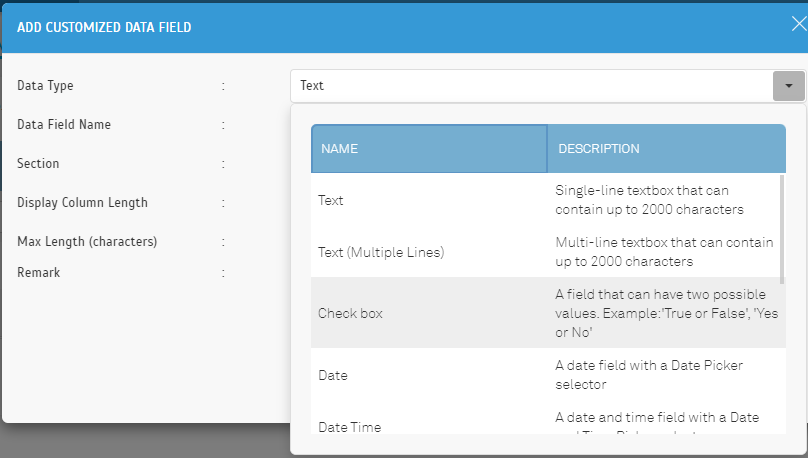
2. Select Data field type and write field name.

3. Select Section field
- Company Information is to get user’s company information for private/reserved parking
- Season Pass Holder Information is to get user’s personal information

4. Select Display Column Length and Max Character for the field. Click the Submit button to Save.

Setup Application Form
1. Click on Application Form > Click Add button

2. Write the Application Form name and select the data field to use. You can drag the field data from left to right to select or deselect the data field. You can customize whether to make it Required or Optional for each data field.

3. Click the Submit button to save the Application Form settings.


4. After done, you may click the Application Form list to check and view the created field information.


Note: If some of the screenshots or steps viewed here are different from the ones in the current system, this is due to our continuous effort to improve our system from time to time. Please notify us at info@timeteccloud.com, we will update it as soon as possible.


0 comments:

Have any questions or inquiries about FingerTec? Drop your input here.

Ingressus Metal Casing Setup

Monday, January 31, 2022 TimeTec 0 Comments


Introduction
Ingressus controllers are designed to control access for a one-door (Ingressus I), two-door (Ingressus II) and four-door environment (Ingressus IV). With Ingressus, a user needs to verify his identity at a Wiegand terminal or an RS485 reader with fingerprint, card, password or any combination of credentials during entry and exit. The Ingressus has to finalize the user’s identity before granting him access to a particular area. The transaction records will be saved into the Ingressus’s inbuilt memory and sent to the software for further processing. Multiple Ingressus installations can be centralized via IP or RS485 connection in a computer installed with the bundled Ingress software. Each Ingressus I works independently at its access point; however, the data is centralized from all Ingressus controllers to give a better and complete picture of the entire security level. 

To set up the Ingressus controller, a 12VDC power supply and backup battery are needed to operate and function well as access control. As these components are needed, the Metal casing is essential to place these components for better maintenance and safety. Therefore, FingerTec provides a specific metal casing accessory for the Ingressus Controller to ease installation. Here are steps for Ingressus metal casing setup:

                                                                                         Ingressus Metal Casing Set

Step 1 : Join the back and the front metal casing

Step 2: Join the right side of the metal casing


Step 3 : Join the top metal casing


Step 4 : Join the bottom metal casing


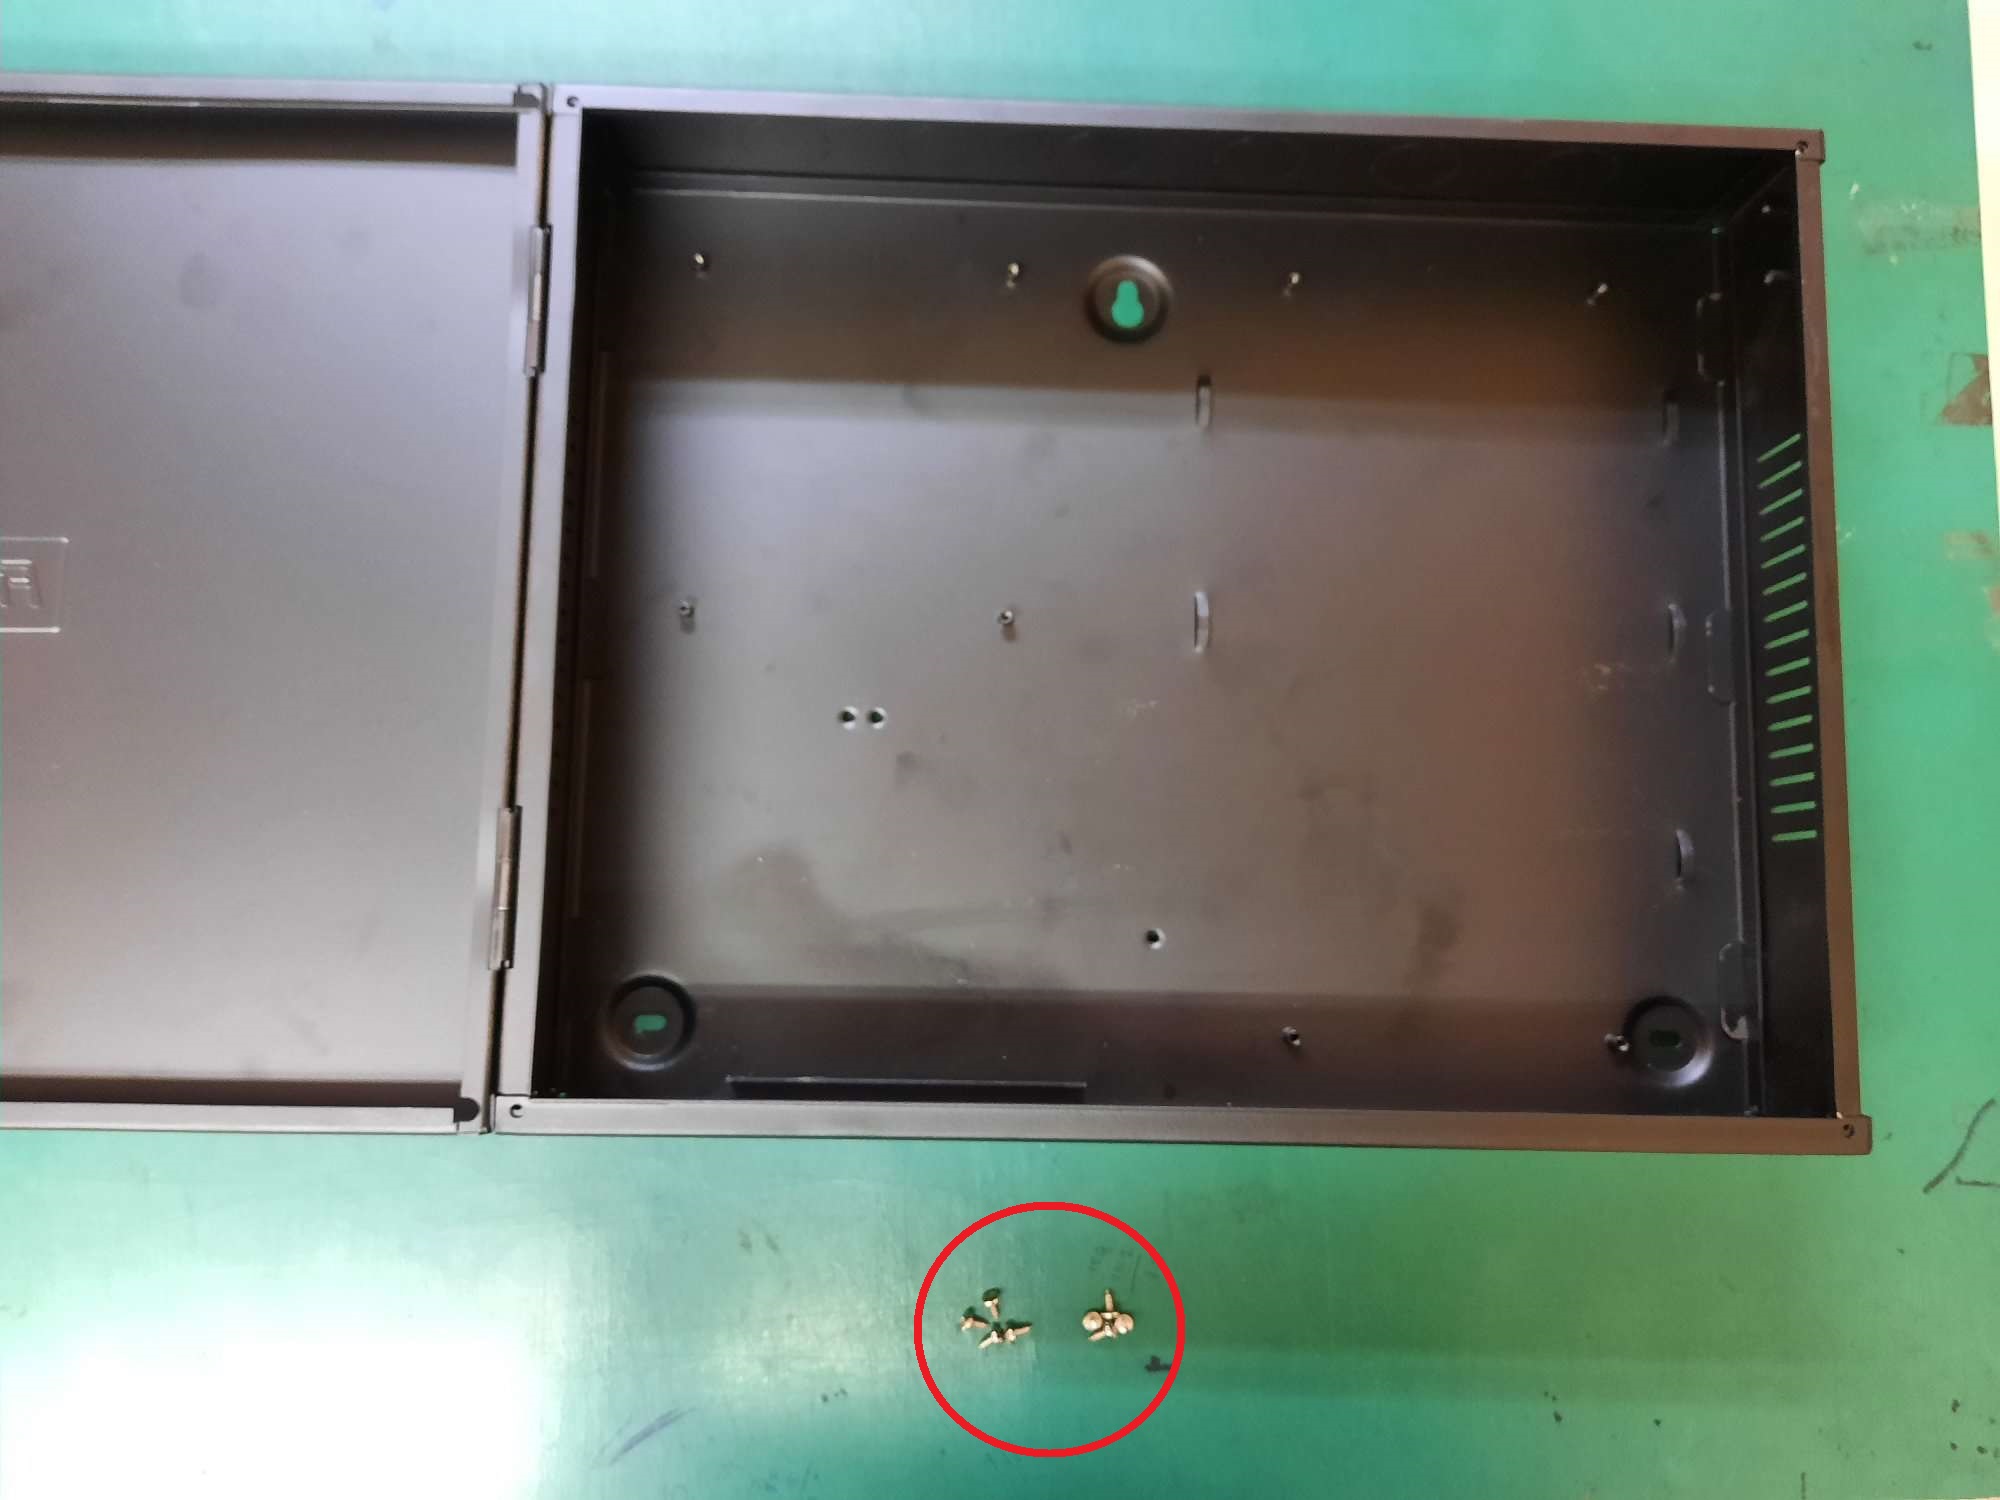
Step 5 : Prepare the 8 casing Screws


Step 6 : Screw every corner of the metal casing

Step 7 : Prepare 4 holder screws

Step 8 : Flip the power supply 

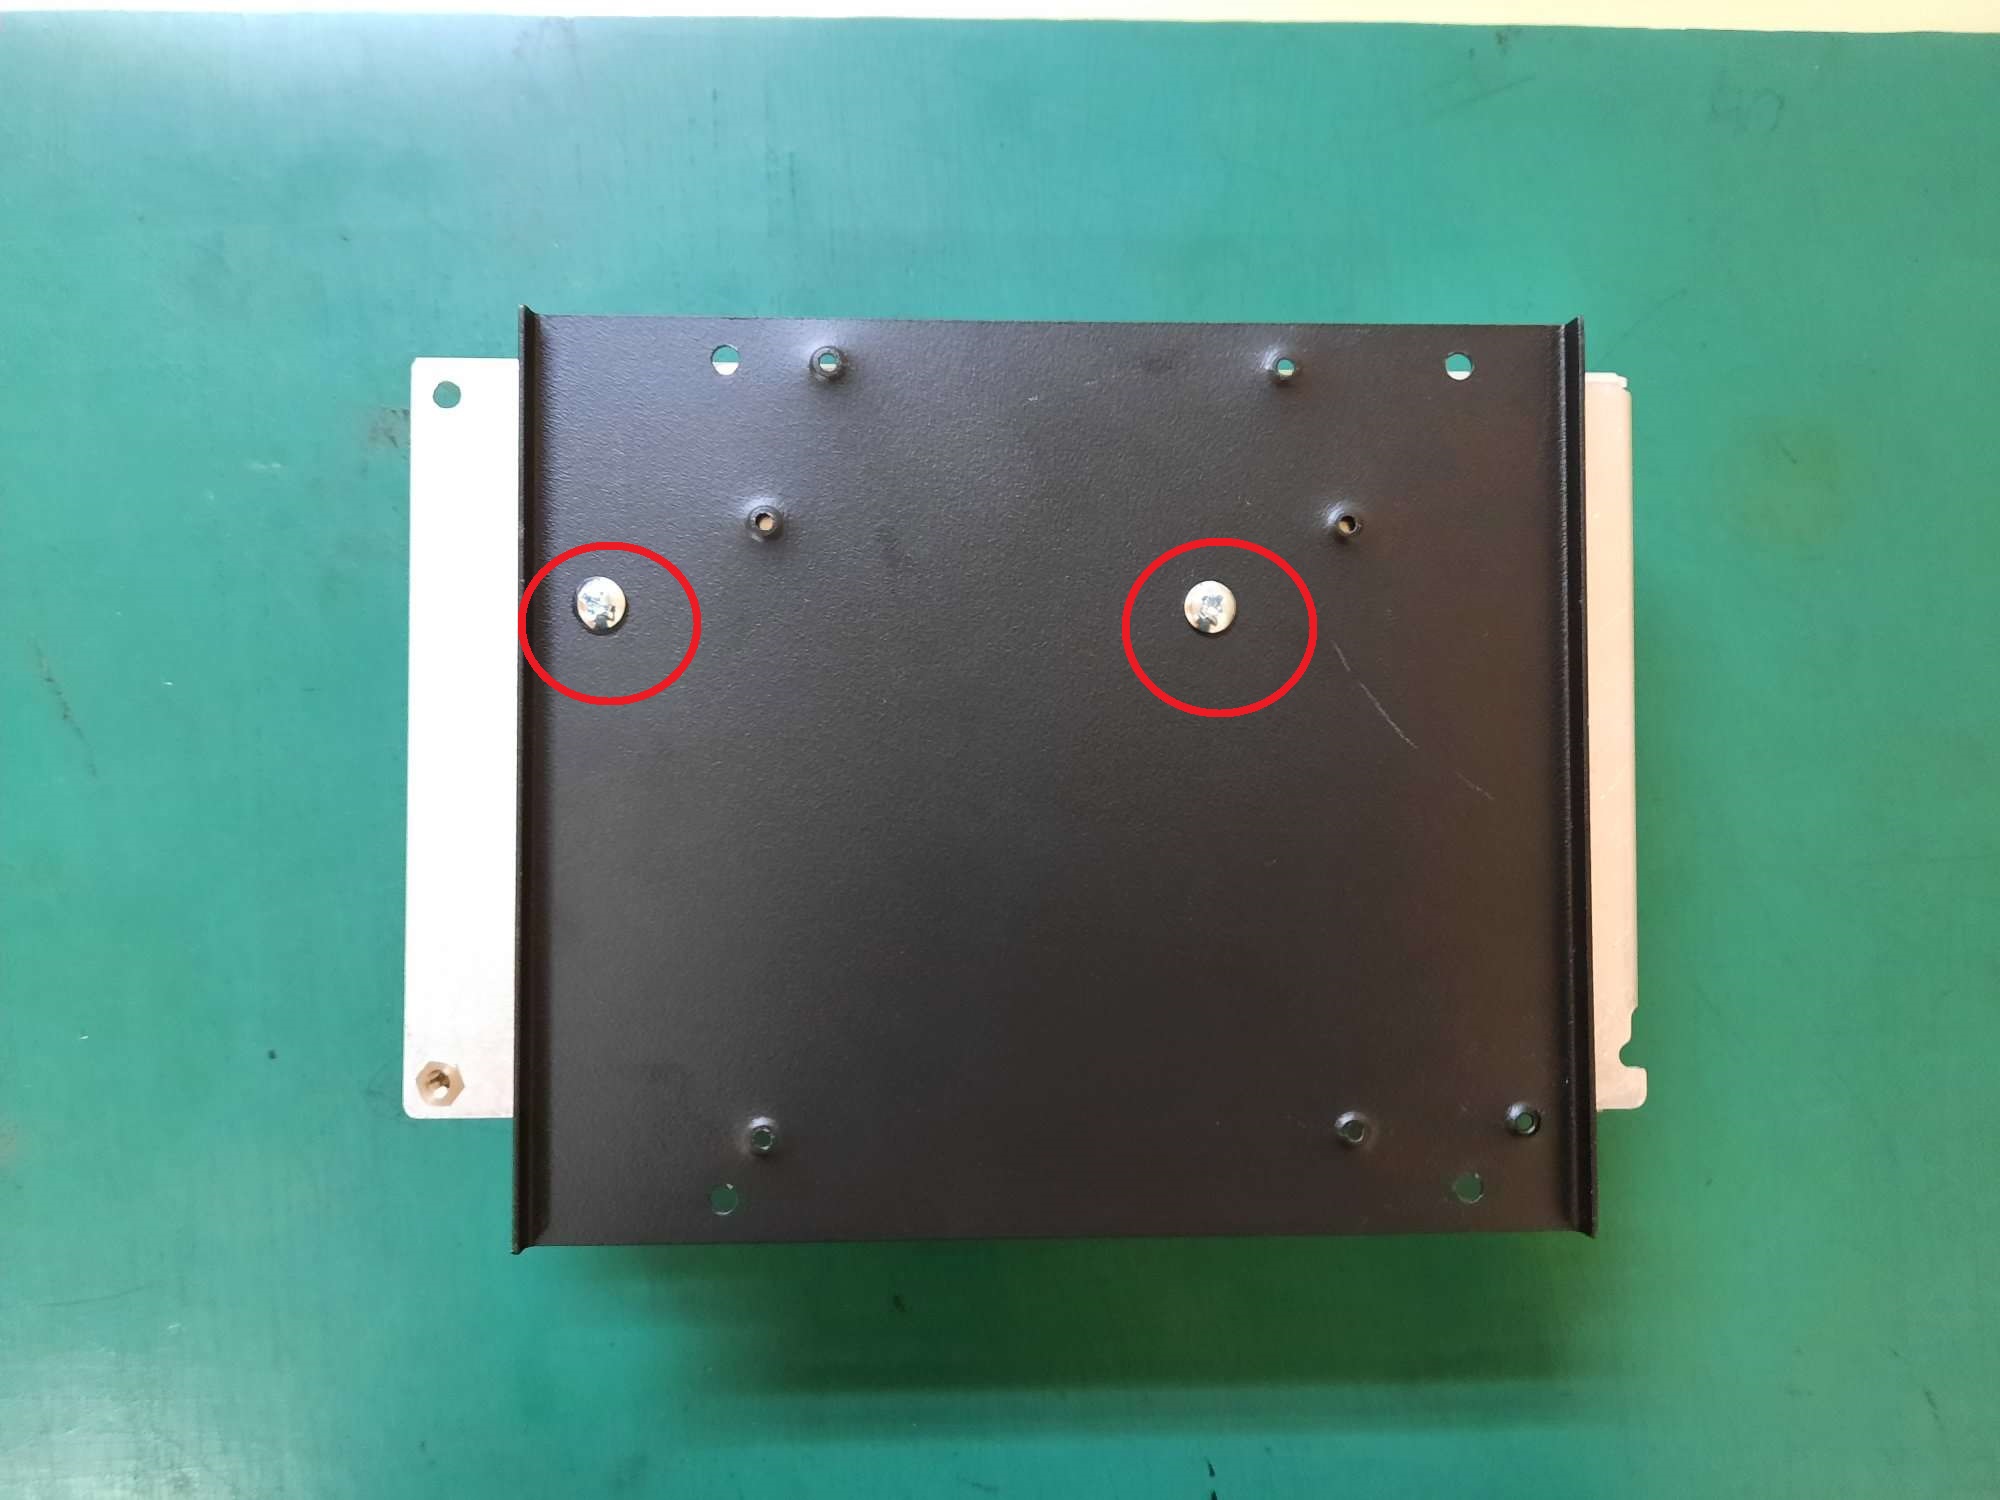
Step 9 : Align the bracket with the power supply, screw hole and screw it with 2 Holder screws

Step 10 : Screw the bracket to metal casing with 2 holder screws

Step 11 : Prepare 2 Holder screws

Step 12
: Screw Bracket at the metal casing with 2 Holder screws

Step 13 : Slot in the ingressus at the bracket where Ingressus have DIN Rail slot at the back

Step 14 : Prepare 2 Casing screws

Step 15 : Mount battery with Z bracket by screwing it with the Casing screw 

Note: If some of the screenshots or steps viewed here are different from the ones in the current system, this is due to our continuous effort to improve our system from time to time. Please notify us at info@timeteccloud.com, we will update it as soon as possible.


0 comments:

Have any questions or inquiries about FingerTec? Drop your input here.