Showing posts with label Email. Show all posts

Manage Unit - Error “Email Already Exist” Explained for i-Neighbour


Introduction
Sometimes the admin will need to change an email address, name, phone number, account code for a particular unit but when he clicks the “Save” button, the error “Email already exists” appears.


This happens because the email has already been registered in the other unit number, whether in the same neighbourhood or in other neighbourhoods subscribed with the iNeighbour system.

The change of data is usually done for these reasons: 
i) To ensure all multiple units under the same owner use the same email.
ii) Owner requests to use a new email address
iii) Wrong email address was entered
iv) Change a new account code for accounting purposes
This article provides three situations to guide the admin on how to handle this situation. 

Situation 1 - iNeighbour is still on “Pending activation” and have an account code

Steps
1. Click “Action” (Pencil Icon) > remove the account code > edit email address > Click Save

Note: For the editing of the email address. An example, the email is demoyusri@gmail.com, temporarily change it to demoyusri2@gmail.com 


2. Click “Change Unit Owner” > Insert all the correct information > Click Save


Note: For sending of the login credential selection, if you don't want the system to directly send an invitation email after clicking save, please select it as "Later".

Situation 2 - iNeighbour is still on “Pending activation” and doesn't have an account code

Steps

1. Directly click “Change Unit Owner”
2. Insert all the correct information (Account code/Name/Email address/ Phone number)
3. Click Save

Note: By default, an account code is optional. However, if you are using E-billing / i-Account, it is compulsory to add an account code.

Situation 3 - iNeighbour already been activated

For this, you need to contact iNeighbour support at support@i-neighbour.com. All you need to do is to provide all the correct information for the programmer to change it.

Note: You also can do the same steps provided in situation 1, but after clicking "Change unit owner", the owner needs to reactivate their account again. Please ensure that the owner didn't reactivate their account. Instead, the support team will forward all the information to the programmer to change it.

Note: If some of the screenshots or steps viewed here are different from the ones in the current system, this is due to our continuous effort to improve our system from time to time. Please notify us at info@timeteccloud.com, we will update it as soon as possible.


How to Set User Leave Balance Notification to Email and TimeTec Leave App


Introduction
Introduced a new function known as the User Leave Balance Notification. This function allows the Admin to send a notification to users to update them on their latest leave balances, especially if the leave has been recently adjusted. This feature will reduce the workload from the Admin to manually Email to the staff regarding their le
ave balance and by following the simple steps below, the user will automatically receive their leave balance notification thru the Email and TimeTec Leave App as well.

Process
1. Login into TimeTec Leave > Go to USER > Manage User


2. Search the user > Click Leave Setting (Gear Icon)

3. Go to BALANCE


4. For any Leave Type, click Edit (Pencil Icon)


5. Mark the checkbox for “Send notification to user” and Save


6. Repeat for all the leave types that you wish to include in the notification
7. Click the “Notify User” button at the bottom

8. The system will send email and mobile notification with the latest leave balance for leave types that you have selected earlier.

A. User Leave Balance Notification Email
1. Below is an example of User Leave Balance Notification received by the user.


B. User Leave Balance Notification Mobile Phone (TimeTec Leave App)
1. On TimeTec Leave App, go to Notification.


2. Click on the ‘Balance: Your update leave balance’


3. Below is an example of User Leave Balance Notification received by the user.


Note: If some of the screenshots or steps viewed here are different from the ones in the current system, this is due to our continuous effort to improve our system from time to time. Please notify us at info@timeteccloud.com, we will update it as soon as possible.


TimeTec TA Support Channels


Introduction
Customer support is inevitable for all service sectors and that excellent customer support is now seen as a requirement rather than ‘having nice-to-have’. Indeed, there are a ton of different options out there when it comes to supporting. However, which support channels do you actually prefer?

Process
1. Once you have login into TimeTec TA, go to Support > TimeTec Support. You may choose any Support Channel you prefer (e.g. LiveChat, TeamViewer, Email, or Skype)

Live Chat
1. Our Live Chat is powered by Tawk.to. This channel is able to contact us about your location and how you wish to resolve the problems. With Live Chat, our business can now manage and respond to all conversations coming in via this channel using just a single unified dashboard.
2. To access to our Live Chat feature, click on the Live Chat icon (the blue circle on the right bottom of the page)
3. Fill in your information details as shown below. Click ‘Start Chat’ once you have completed all the required fields.’
4. Next, your details will appear in the chatbox as shown below. A member of our support team will respond to your question the soonest possible. 

TeamViewer
1. Some technical errors may not be easily simulated by our technical support team due to different operating environments. In this case, TeamViewer will be the best solution!
2. The TeamViewer allows our technical support team to access your computer remotely and securely review the problems and fix them in the shortest time possible.
3. We can help you through TeamViewer:
- Check and fix setting errors for all TimeTec solutions.
- Check firmware configurations of the FingerTec terminals (if you are deploying TimeTec TA).
- Update firmware of the FingerTec terminals (if you are deploying TimeTec TA).
4. Download the FingerTec Remote Desktop Support Tool.
5. Contact us on Skype or email
6. Run the FingerTec Remote Desktop Support Tool.
Get the 9-digit number in Your ID column and inform the provided number in that field to the FingerTec Technical Team.
7. FingerTec Technical Support Team will connect to your computer and fix the problem.
*Note: Skip step 4 if your computer has been installed with the Remote Desktop Support Tool.

Email
1. You can send an email message anytime. The team will attempt to respond as quickly as possible. You do not have to wait, on hold, or to place yourself under an aggravating circumstance. Email support will also provide a “paper trail” for both customers and the companies, enabling you to manually track the submitted issues and refer back to the conversation. In the case of an event in which the agent is not able to resolve your issue, the email can be forwarded to another agent.
2. Once you have selected Email support, a pop-out link to a Mail account will be prompted.
3. After you have selected the Email account, kindly write your inquiry or question as details as possible.

Skype
1. Skype is another way to get closer to TimeTec Teams. Our Technical Team is available every day, 24 hours a day. You may also email us at info@timeteccloud.com (Sales) or support@timeteccloud.com (support) to receive prompt replies. At TimeTec, we always strive to make things easier for you.
2. You may also select any online agent to seek support. The system will directly connect to your skype account and initialize the conversation.
*Please ensure your PC has already installed the Skype Software before enabling this support channel.

Note: If some of the screenshots or steps viewed here are different from the ones in the current system, this is due to our continuous effort to improve our system from time to time. Please notify us at info@timeteccloud.com, we will update it as soon as possible.

TCMS V3/Ingress - How To Utilize Gmail In Report Scheduler Settings


 Introduction
In previous technical tips, (refer links below) we have explained how to configure the Report Scheduler option in Ingress and TCMS V3 software. Additionally, we will now assist and explain on how to use or configure your own Gmail account as a sender for the Report Scheduler features.

http://www.fingertectips.com/2015/06/ingress-report-scheduler-delivers_18.html
http://www.fingertectips.com/2016/12/report-scheduler-for-tcms-v3-is-now.html

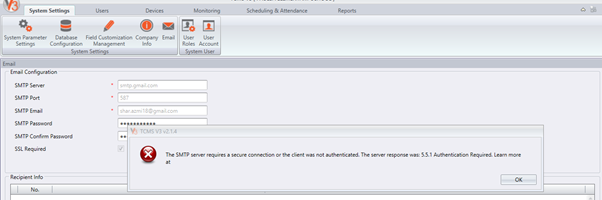
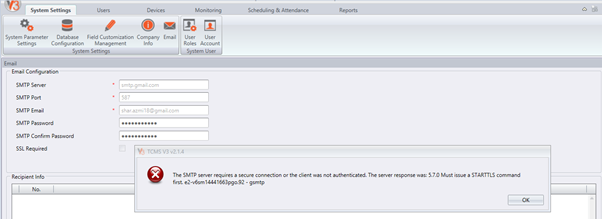
Basically, when we use and register our email account with a dedicated email provider such as Gmail, there are certain restrictions or security settings that block the software from sending email on behalf of the account owner. Hence, you will receive the following error whenever you configure your Gmail account in the Report Scheduler.


To solve this problem, we will guide you on how to change your email (Gmail account) setting and allow it to send messages from the Report Scheduler feature.

 Process and Setting
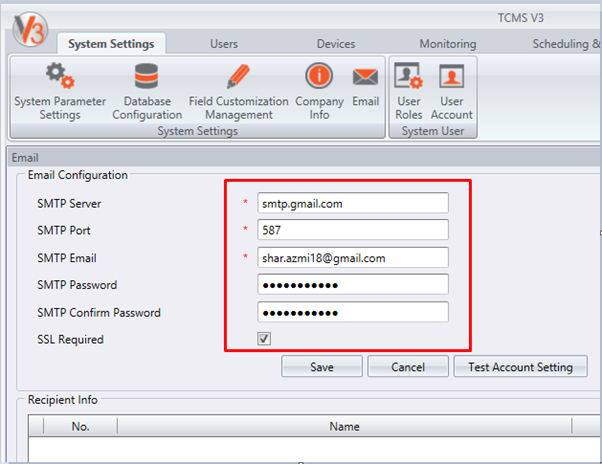
1.   Firstly, please take note to connect the Gmail account using smtp.gmail.com on port 465, if you're using Secure Socket Layers (SSL) and port 587, if you're using Transport Layer Security (TLS).

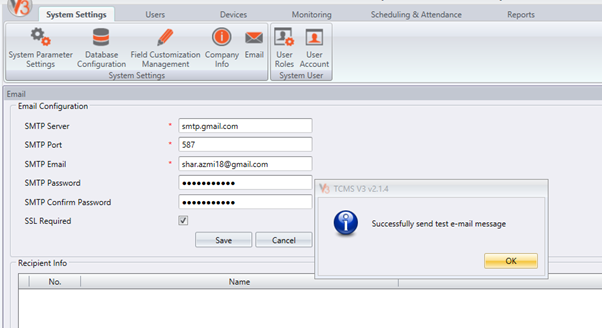
2.   Therefore in TCMS V3/Ingress, you will need to configure the SMTP Server and SMTP Port accordingly as well as tick on the SSL Required setting (as shown in the picture below).
 

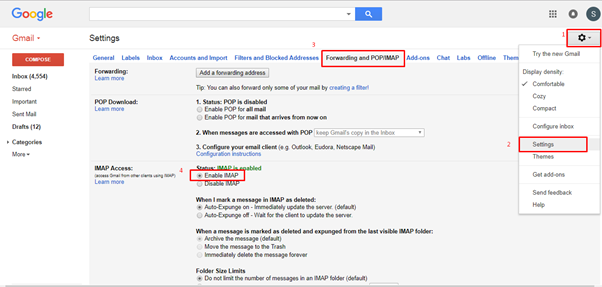
3.   Before carrying out a Test Account Setting, kindly check and change the security setting on your Gmail account by login into your account and select Setting > Forwarding and POP/IMAP > Enable IMAP > Save.
 

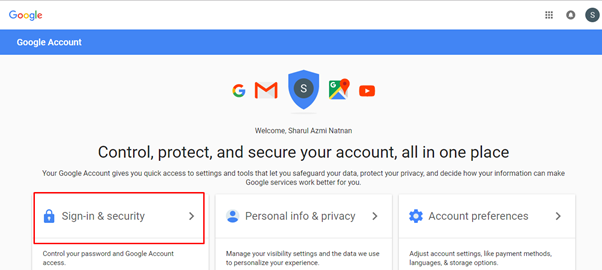
4.  Next, open your Google Account and select Sign-in & security setting.
 

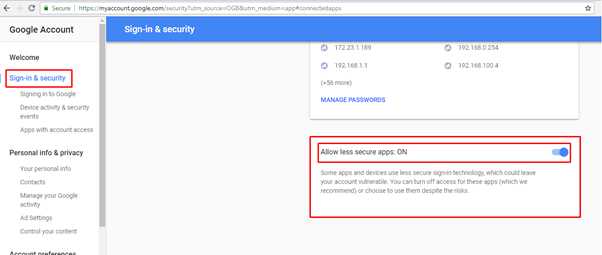
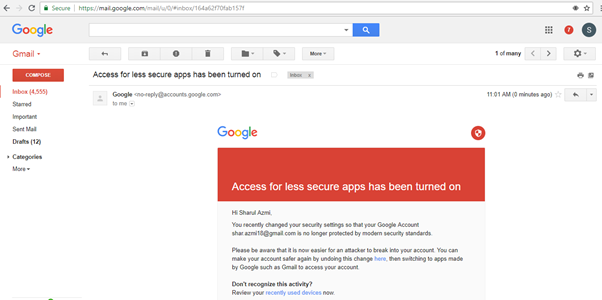
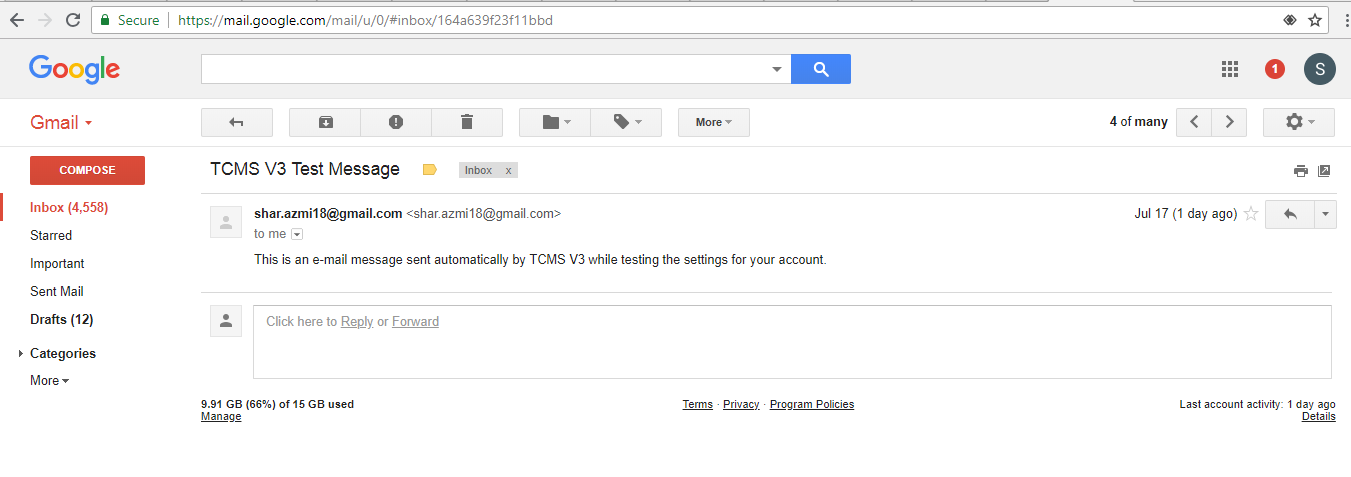
5. Under Sign-in & security setting, set the option ‘Allow less secure apps’ to ON. Once done, Gmail will automatically send you a notification email to inform that you have change this setting on your Gmail account.


6. After completing all the settings, you can now test your email configuration at Ingress or TCMS V3 software. A success message will then appear to indicate that the email has been via your account.


Finally, you can configure the Report Scheduler setting and send the email through your Gmail account.

Note: If some of the screenshots or steps viewed here are different from the ones in the current system, this is due to our continuous effort to improve our system from time to time. Please notify us at info@timeteccloud.com, we will update it as soon as possible.  

Report Scheduler for TCMS V3 is Now Ready!


Introduction
Report Scheduler is an automated interface that gives you the option to email your selected reports on a periodic basis. This feature is now available in TCMS V3 and you can set the files to be sent in various formats using Simple Mail Transfer Protocol (SMTP).

Benefits
With this feature, the report generation process has been made completely automated because you do not need to login to your account to generate the required reports. On top, instead of having to generate various reports individually, you can setup the Scheduler to generate and email the reports to you or other recipients with just one-click solution.

Process
1) Firstly, you will need to configure your email account at the TCMS V3 > System Settings > Email > Edit > Edit Email Configuration > Save > Test Account Setting.

*Remark : We strongly recommend you to use your own company mail server as SMTP domain rather than using Gmail service provider to avoid server blocking the software from sending the mail on behalf of the account owner.

 2) You will get an email similar to the below picture.


3) Go to the report tab > configure the report based on your requirements > click run. Here is one example:


4) TCMS V3 will send two reports for the first time. First report - when you click the run button. Second report – the times that you have configured in the report scheduler settings. TCMS V3  will generate the reports at the report folder before sending the email to you.
Report folder - C:\Program Files (x86)\FingerTec\FingerTec TCMS V3\TCMS V3\reports.

5) Also, you will receive the report in your email account.


Troubleshooting Tips
Report Scheduler is not working as per settings? Follow the steps below to troubleshoot.
a) Main configuration: It’s important to ensure that all services; database, attendance service, etc, are running smoothly. If the Report Scheduler is not working, it’s recommended that you restart all the services again to trigger the scheduler process properly.

Steps:
To restart TCMSv3 service: Start > Control Panel > Administrative Tools > Services > restart TCMS v3 Service

b) Once restarted, click Run in the Report Scheduler settings to trigger the scheduling process again.

Related Post:
Auto Generate Report to a Specific Path using Report Scheduler in Ingress and TCMS V3

Ingress Report Scheduler Delivers Reports Automatically to Your Email


Introduction
Report Report Scheduler is an automated interface that gives you the option to email the reports on periodic basis. This feature is available in Ingress Software and you can set the file to be sent in a variety of formats using Simple Mail Transfer Protocol (SMTP).

Benefits
Report Scheduler helps streamline the delivery of reports and optimizes the running of many reports on your network. By using the Report Scheduler in Ingress, you can create a weekly schedule, whereby the system can email you the collected data even though your Ingress server is turned off.
Process
To set the Report Scheduler in your Ingress software, please follow procedure below:  


1. Log in to Ingress Software and go to System Settings tab > Email > Configure the SMTP Server, SMTP Port, SMTP Email and SMTP Password.

*We strongly recommend you to use your own company mail server as SMTP domain rather than using Gmail service provider to avoid server blocking the software from sending the email on behalf of the account owner.


2. Add the recipient email and click Ok and save the settings.


3.     Next, configure the Report Scheduler format by selecting the Report tab > Report Scheduler > Add Report.

4.    Here you can select the type and date of report. You can also set the Report Scheduler run time, recipient email address, subject of email and message.

5.      Click Save once you are done with your settings.


6.    List of reports will appear in Report Scheduler table. Select Run to test run your Report Scheduler features in your Ingress Software.


 7.    System will automatically send the report via email based on the scheduling timing that you have set.

Troubleshooting Tips
Report Scheduler is not working as per settings? Follow the steps below to troubleshoot.

a) Main configuration: It’s important to ensure that all services; database, attendance service, etc, are running smoothly. If the Report Schedule is not working, it’s recommended that you restart all the services again to trigger the scheduler process properly.

Ingress MySQL:
To restart MySQL, Ingress service and Attendance service: Start > Control Panel > Administrative Tools > Services > restart MySQL, Ingress Services and Attendance Service

Ingress MDB:
To restart Ingress service and Attendance service: Start > Control Panel > Administrative Tools > Services > restart Ingress Services and Attendance Service

b) Once restarted, click Run in the Report Scheduler settings to trigger the scheduling process again.


Related Post: