Showing posts with label app notifications. Show all posts

How to Set User Leave Balance Notification to Email and TimeTec Leave App


Introduction
Introduced a new function known as the User Leave Balance Notification. This function allows the Admin to send a notification to users to update them on their latest leave balances, especially if the leave has been recently adjusted. This feature will reduce the workload from the Admin to manually Email to the staff regarding their le
ave balance and by following the simple steps below, the user will automatically receive their leave balance notification thru the Email and TimeTec Leave App as well.

Process
1. Login into TimeTec Leave > Go to USER > Manage User


2. Search the user > Click Leave Setting (Gear Icon)

3. Go to BALANCE


4. For any Leave Type, click Edit (Pencil Icon)


5. Mark the checkbox for “Send notification to user” and Save


6. Repeat for all the leave types that you wish to include in the notification
7. Click the “Notify User” button at the bottom

8. The system will send email and mobile notification with the latest leave balance for leave types that you have selected earlier.

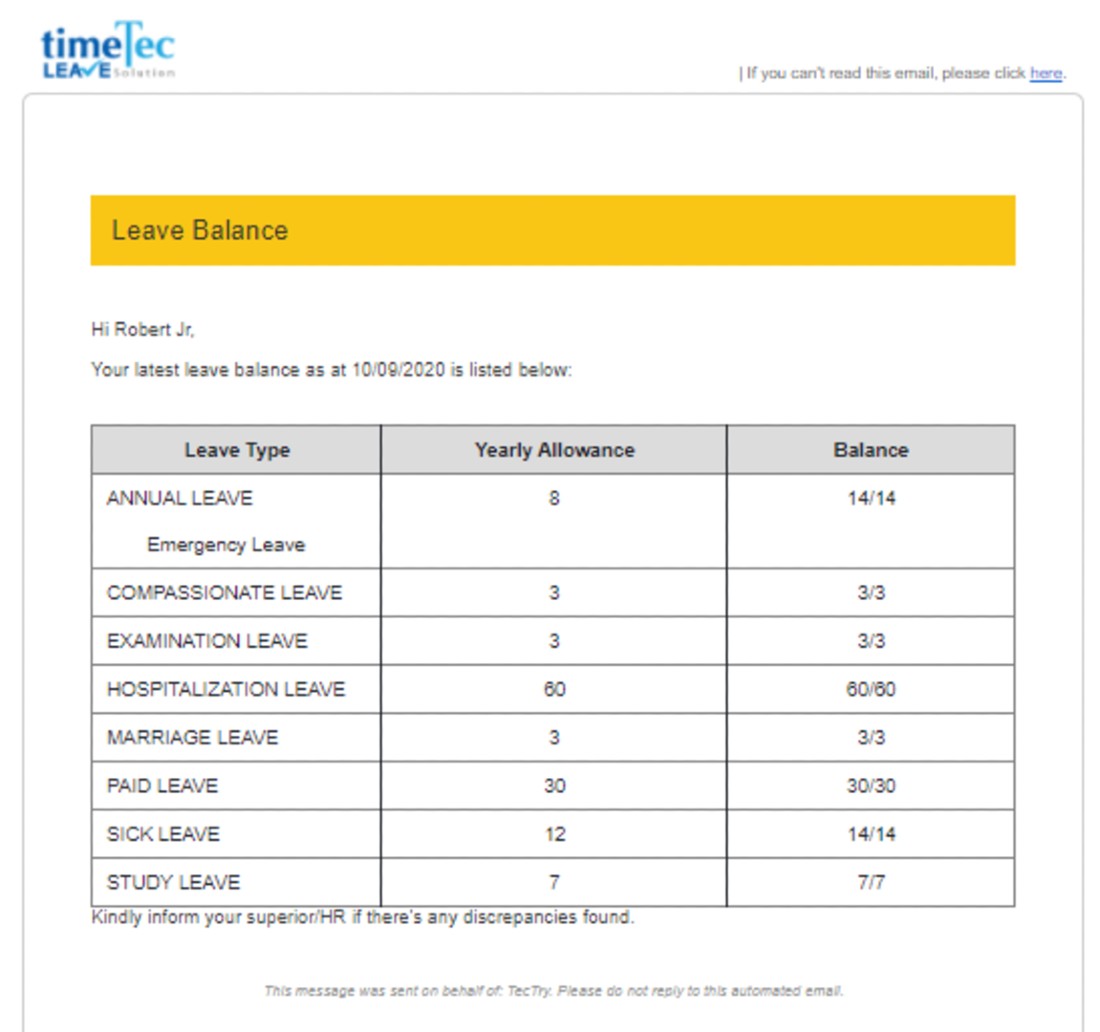
A. User Leave Balance Notification Email
1. Below is an example of User Leave Balance Notification received by the user.

B. User Leave Balance Notification Mobile Phone (TimeTec Leave App)
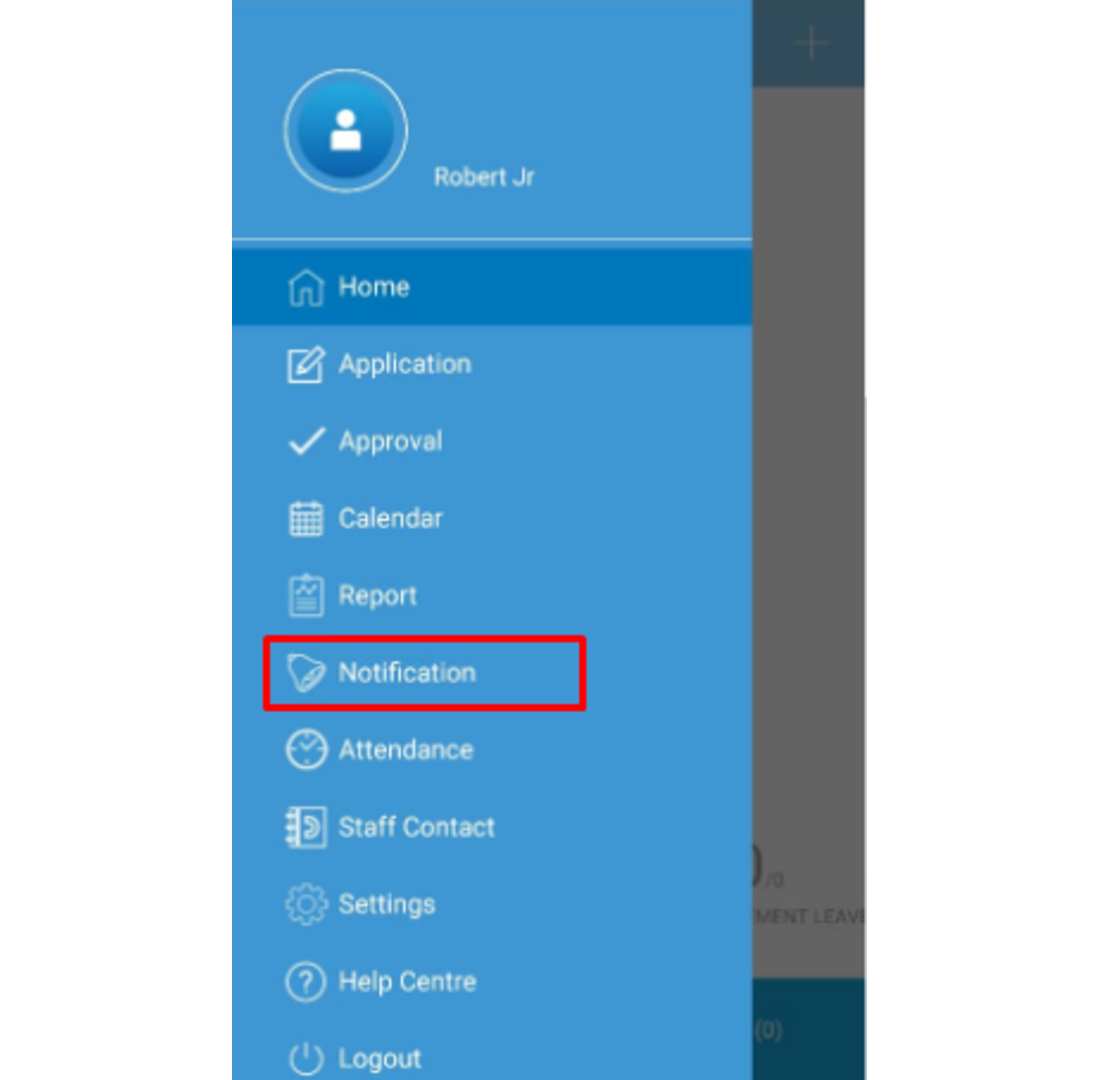
1. On TimeTec Leave App, go to Notification.

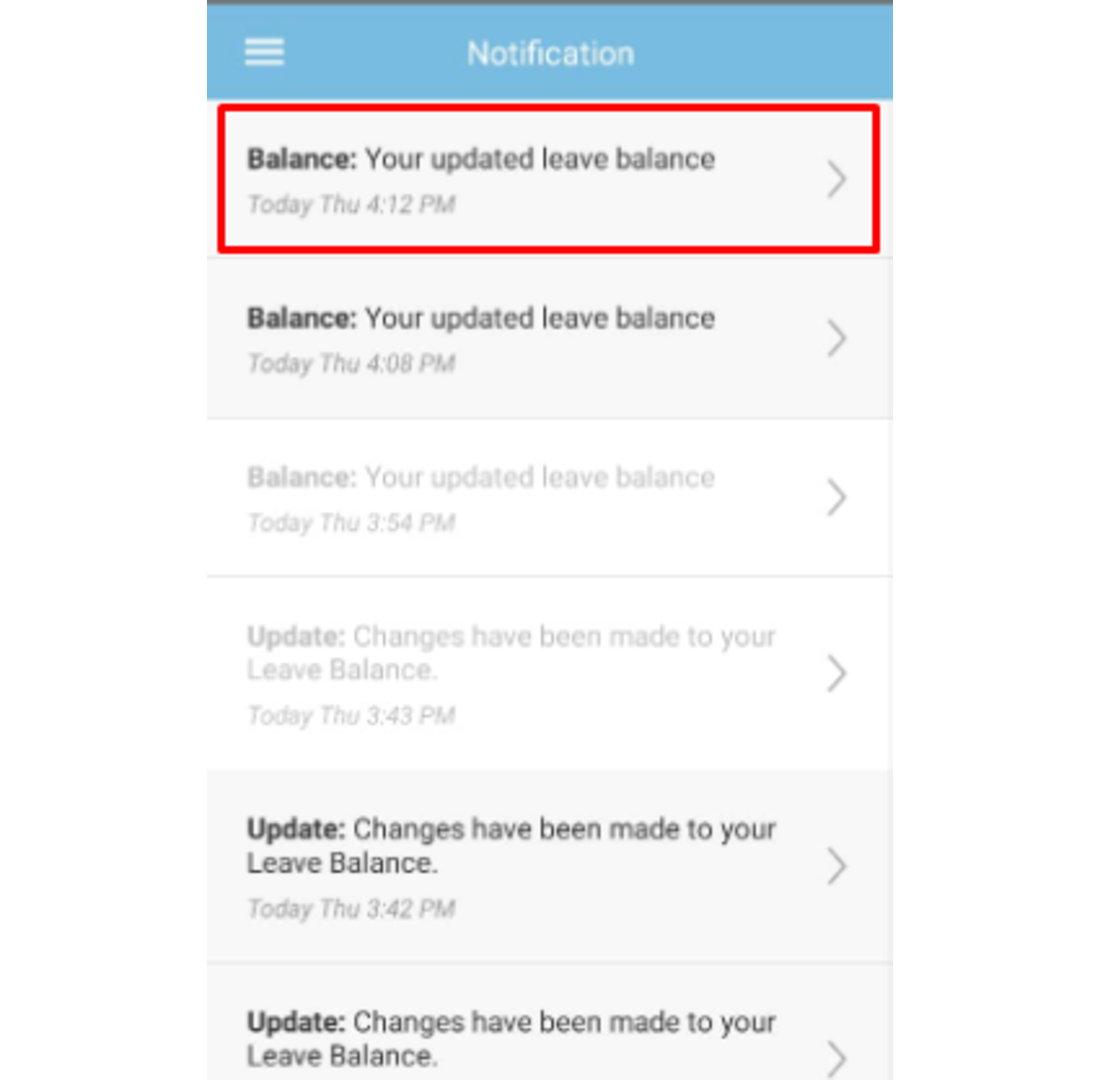
2. Click on the ‘Balance: Your update leave balance’

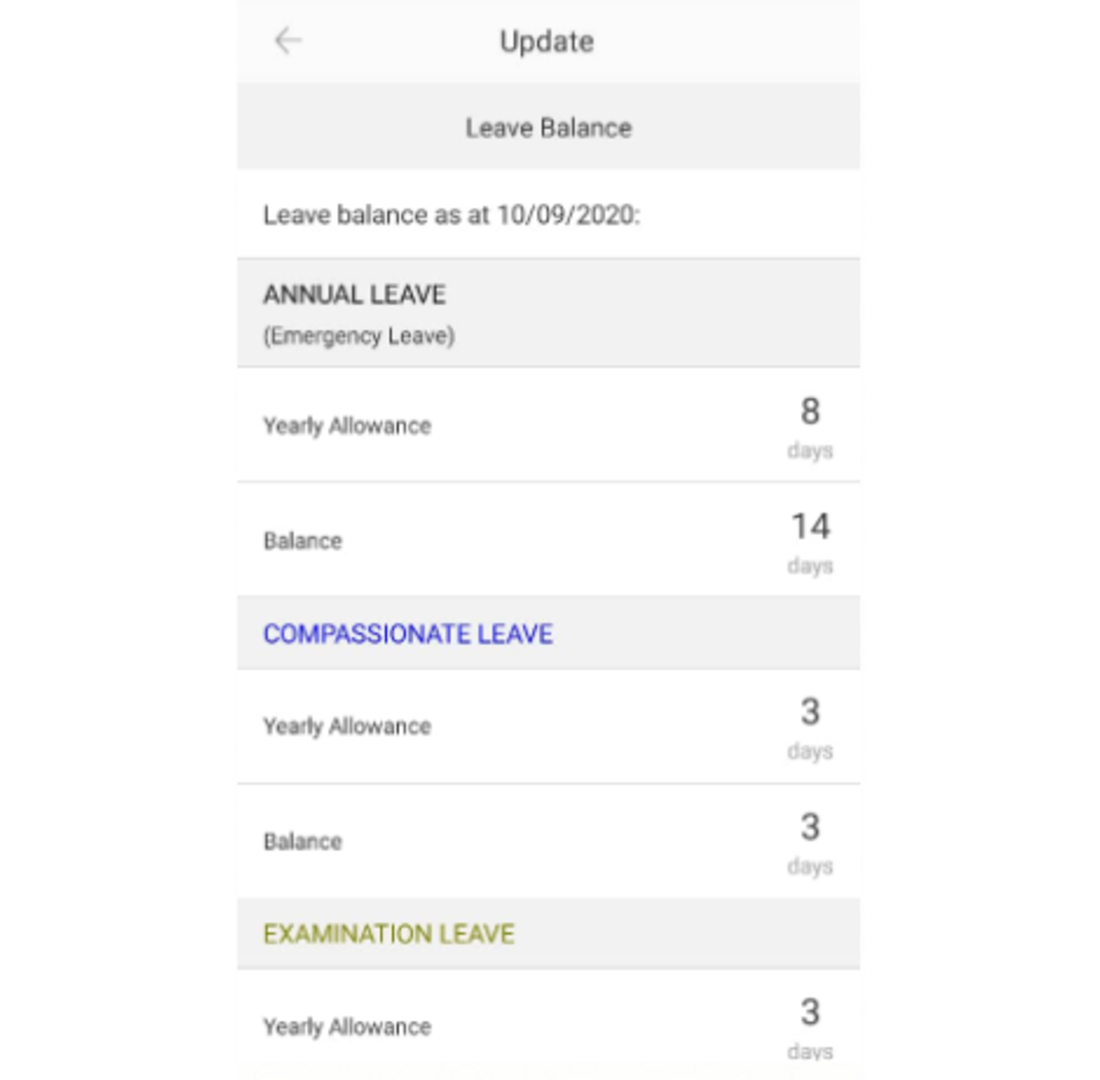
3. Below is an example of User Leave Balance Notification received by the user.

Note: If some of the screenshots or steps viewed here are different from the ones in the current system, this is due to our continuous effort to improve our system from time to time. Please notify us at info@timeteccloud.com, we will update it as soon as possible.


How to Automatically Set Birthday Greetings, Anniversary Greetings, or Welcome Message to Your TimeTec TA Users


Introduction
TimeTec TA offers a feature to automatically set birthday greetings, anniversary greetings, or
welcome message to your TimeTec TA users. Announcement notifications can be configured to notify users about the new employees who will be joining your company, all employee’s birthday, anniversary of services and etc. By having the notification feature in TimeTec TA, the company can improve the employer-employee relationship with the new employee and birthday alerts.

Process (To be done by TimeTec TA Admin)
1. Login into TimeTec TA and Go to ‘Notification’.

2. Click the ‘Gear’ icon.

3. Turn on the ‘Announcement’ feature, unmute if you wish to turn off the sound whenever a notification is received. Click the ‘Gear’ icon to proceed.

4. Select which type of greeting you wish to turn on.
‘Individual’ = notification will only receive by user
‘All Users’ = notification will receive by all users


User Module in the TimeTec TA App (Notification of Birthday and welcome greeting)
1. TimeTec TA App - Notification > Announcement. Click the ‘Arrow’ symbol to send a wish
message.
User Module in the TimeTec TA Web (Notification of Birthday and welcome greeting)

2. TimeTec TA Web - Notification > Announcement. Click on the ‘Arrow’ symbol to send a wish
Message.


Note: If some of the screenshots or steps viewed here are different from the ones in the current system, this is due to our continuous effort to improve our system from time to time. Please notify us at info@timeteccloud.com, we will update it as soon as possible.

Event Push Notification to Ingress Mobile


Introduction
To have more convenient and efficient monitoring process, Ingress software provides push notification to mobile for admins/supervisors. With this feature, the users will be able to get notification via the mobile application when there are specific events happening at the devices.

Process
1. Setting in Ingress software
You will need to select the types of incident which will trigger the push notification. Go to System Settings > Alarm > Edit > Add.


** Please be reminded that Standalone Device and Ingressus controller have different events. 
Please choose according to the device models.

Next, proceed to tick the option ‘Send Push Notification to Mobile’ and select the recipients (Ingress users). Lastly, save the settings.


2. Setting in Ingress Mobile
Next, please download and install the latest Ingress Mobile application from the Play Store or the App Store according to your mobile operating system.

Open the Ingress Mobile apps, enter the server IP address and port accordingly to connect to your Ingress server.

                                  
Upon login,  please make sure the push notification is allowed for this Ingress Mobile App.
                                         
Example:
If all the above is setup correctly, the notification should be able to be sent to recipients via this Ingress Mobile App.

For example, an event ‘Invalid ID’ and ‘Disconnected’ have been triggered. Hence, the Ingress mobile being logged in with a specific Ingress user account will receive the notification.

3. Event Triggered in Ingress software


4. Ingress Mobile Notification

                                       
Note: If some of the screenshots or steps viewed here are different from the ones in the current system, this is due to our continuous effort to improve our system from time to time. Please notify us at info@timeteccloud.com, we will update it as soon as possible.

Owner’s Notification for Visitor Check-in and Check-out


In i-Neighbour app, the guardhouse tablet that is using i-Vizit app will be integrated with the owner’s i-Neighbour app. Hence, every check-in and check-out information of visitor will be sent to the owners’ apps.

Note: If the guard chooses the wrong unit to check-in visitor, the selected unit will get the notification with the wrong visitor information.

This document explains how the owner can get a notification during the check-in and check-out of his visitors.

When a visitor has been checked-in by a security guard, the owner who is receiving this visitor will get a pop-up message to notify that he has a visitor.


If the owner did not get a notification during the visitor check-in, please adjust the notification settings by visiting the link below:
i-Neighbour App: How To Enable GPS and Notification Features

If the owner clears the notification bar without looking at who’s coming to their house or did not get the notification at all, they still can view the visitor on the app by following the steps below:
1. Launch i-Neighbour app
2. Notification

The owner can see the list of visitors who have checked-in and checked-out under his/her unit.


The owner also can view the list of his visitors who are still in his neighbourhood.
Follow the steps below:

1. Launch i-Neighbour app

2. More (bottom left)

3. Visitors

There are 3 lists of detail
1. Upcoming

2. Check-in

3. History

1.Upcoming
The visitor that has been invited by the owner using invitation features. These visitors will using the QR Codes during check-in.

2.Check-in
The visitors who are still in your neighbourhood that have registered under your unit.

3.History
All visitor data that are registered under your unit will stay in the i-Neighbour cloud for 2 years. You can check your visitor history in these features.

You can also search by name, filter by check-out, expired, declined and cancelled. You can select the date range you want to see visitors history.


If you are still having problems after completing all of the steps stated above, please contact us via support@i-neighbour.com.

Note: If some of the screenshots or steps viewed here are different from the ones in the current system, this is due to our continuous effort to improve our system from time to time. Please notify us at info@i-neighbour.com, we will update it as soon as possible.


i-Neighbour App: How To Enable GPS and Notification Features


Global Positioning System or GPS is a satellite-based radio navigation system. It basically uses radio waves between satellites and a receiver in your phone to provide information about time and location and time to any software. Your phone's GPS receiver uses the data from these signals to triangulate your location and time. 

Notification is a feature that updates users on new messages, updates, bonuses, reminders and etc.  It usually comes with an alert notification sound. 

When you are using i-Neighbour App and you disable the notification feature and/or the GPS settings, the i-Neighbour and your security guards won’t be able to receive your location when you triggered the panic button. 

Hence, if you are intend to use the panic button in the future, these are the steps to enable the notification and GPS feature for i-Neighbour on your phone. 

GPS - Steps Required: 
Settings > Installed apps > i-Neighbour > App permissions > Enable location

GPS Setting for Android                                                 
1. Go to Settings.
2. Find Installed apps.
3. Select i-Neighbour.
4. Find and select App permissions

5. Enable the Location to activate the GPS function for i-Neighbour.

GPS Settings for iOS
1. Click on Settings.
2. Select i-Neighbour.

3. Tap on Location to open the location settings.
4. Choose Always for Location Access

Notifications - Steps Required: 
Settings > Notifications & status bar > App notifications > i-Neighbour > Enable all

Notifications Setting for Android
1. Go to Setting.
2. Find Notifications & status bar.

3. Tap on the App notifications to see the apps list.
4. Search and select i-Neighbour.

5. Enable all functions to receive all notifications related to i-Neighbour.

Notifications Settings for iOS
1. Go to Settings.
2. Select Notifications.
3. Choose i-Neighbour.
4. Turn on all functions to receive all notifications from i-Neighbour.

Note: Every Android smartphone has a different user interface, hence the screenshots presented above might be different from your smartphone UI.

If you are still having problems after following the given instructions, please contact us via: support@i-neighbour.com 

Note: If some of the screenshots or steps viewed here are different from the ones in the current system, this is due to our continuous effort to improve our system from time to time. Please notify us at info@i-neighbour.com. We will update it as soon as possible.