

How to Connect TimeTec VMS with TimeTec AWDMS Software

Introduction
The TimeTec AWDMS (Auto Web-Based Database Management System) is an online application that offers an Application Programming Interface (API) allowing other applications to integrate with TimeTec terminals such as Smart AC1 series or Face ID 5 series. When AWDMS software integrates with TimeTec VMS, visitors can use the facial recognition in TimeTec Face ID 5 Series for access.
The TimeTec AWDMS (Auto Web-Based Database Management System) is an online application that offers an Application Programming Interface (API) allowing other applications to integrate with TimeTec terminals such as Smart AC1 series or Face ID 5 series. When AWDMS software integrates with TimeTec VMS, visitors can use the facial recognition in TimeTec Face ID 5 Series for access.
This article shows you how to connect AWDMS software to TimeTec VMS.
Process
1. In TimeTec VMS, using Master Admin account, go to Manage IoT > Smart Device > DDNS Connection Setup
1. In TimeTec VMS, using Master Admin account, go to Manage IoT > Smart Device > DDNS Connection Setup

2. Select AWDMS for the solution type. Next, insert the computer name and the DDNS URL of the AWDMS server. Please ensure that an external network can access the DDNS link. Next, insert Login Username for AWDMS software, in which, if remain as default, would be Admin. Finally, follow the next step to get the API login password.

3. To obtain the API login password, open the AWDMS software. Go to System Setting > Authority Management > API Authorization. Copy the Client Secret Code and paste it into the Login Password field in TimeTec VMS. Click on the Add button to add AWDMS account into TimeTec VMS account.


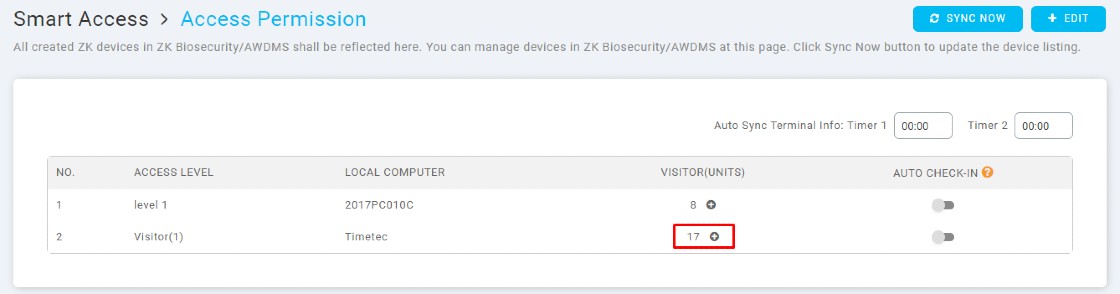
4. Once the AWDMS account has been added, go to Manage IoT > Smart Access > Manage Access Permission

5. Click on Edit to set Access Permission.

6. If multiple AWDMS accounts have been added, select the AWDMS account to set. Access levels are displayed based on the access levels set in AWDMS software. Select the access levels for visitors to use accordingly, then click Save.

7. Once the access levels have been selected, click to add the visitor unit.
8. Select unit (employee/host) that allows visitors access via the device. Visitors to the selected host can access the device that the host has given permission. Click Save when done.


9. Please note that only checked-in visitors will have access to the device. If you require any registered visitor to be checked-in manually by the front desk receptionist or security officer, please disable the Auto Check-In feature. Otherwise, the registered visitors will access and scan their face on the device after they submit their registration details.

10. During registration via the Invitation link, Queue Relief link or Pre-registration link, visitors must upload their selfie image.

11. The dashboard will display Registered visitors of TimeTec VMS. If you have disabled Auto Check-In, check in the visitor before he/she can use the facial recognition on the device to access.


12. Once checked in, the visitor can now scan his/her face on the device. The device will verify his/her face based on the uploaded selfie image and display the visitor’s name.

Note: If some of the screenshots or steps viewed here are different from the ones in the current system, this is due to our continuous effort to improve our system from time to time. Please notify us at info@fingertec.com, we will update it as soon as possible.


0 comments:
Have any questions or inquiries about FingerTec? Drop your input here.