Introduction
TimeTec Patrol offers two modes of scanning rules for patrol routes, by following a sequence or by random scanning.
1) Follow Sequence mode; the patrol session has to follow the exact sequence of each checkpoint as being set up in the Patrol Route.
2) Random Scan mode, guards can scan at any checkpoints without having to follow any specific sequence.
Having a faulty checkpoint tag in the middle of the patrol route will unable the guard to proceed to the next checkpoint, and the patrol session will get stuck at the faulty checkpoint tag. What do you do in this case?
Process
1. The faulty checkpoint cannot be removed from the Patrol Route setting if the Patrol Route has been used in the Schedule.
2. Since the checkpoint cannot be removed from Patrol Route Settings, go to Routes > Locations & Checkpoints to disable the checkpoint from there.3. Click on the Checkpoint to be removed. In the right pane, click on Edit.
4. Change the checkpoint status to inactive and Save.5. Go to Routes > Patrol Routes to check on the route settings. You will notice that the checkpoint that is set as inactive in the above step will no longer appear in the Patrol Route setting.
6. In the TimeTec Patrol mobile app, guards can tap on Start Button to proceed.
7. Tap on the Time Range.
8. When viewing a list of checkpoints, you will see that the disabled checkpoint will no longer be shown in the list and therefore, the guard can scan at all available checkpoints even if in the follow sequence scanning mode.
Note: If some of the screenshots or steps viewed here are different from the ones in the current system, this is due to our continuous effort to improve our system from time to time. Please notify us at info@fingertec.com, we will update it as soon as possible.
Steps to Activate AWDMS License (Offline mode)
1. At the login page, click Activate Now (as shown in the image below)
2. Click on Offline Activation
3. Input username: admin and password: admin, then click OK button.
4. Select No when asking for an existing license file. Then click the OK button.
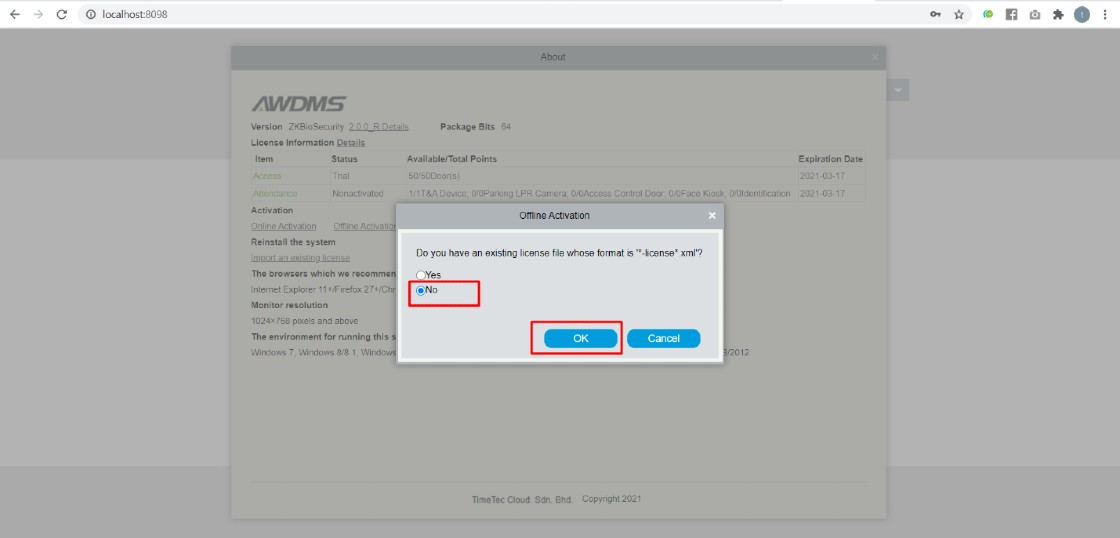
5. Input information in fields marked with red asterisk *. Then click the “Choose File” button. Please take note, at the Personnel field, just key in a number, e.g., 1.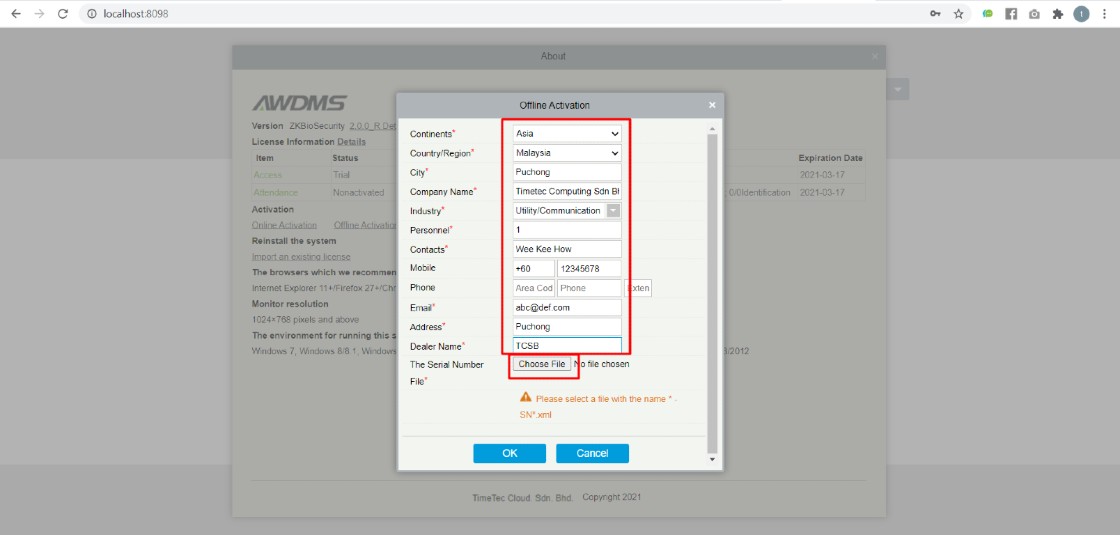
6. Select the original license file with name *-SN.xml, click the Open button followed by the OK button.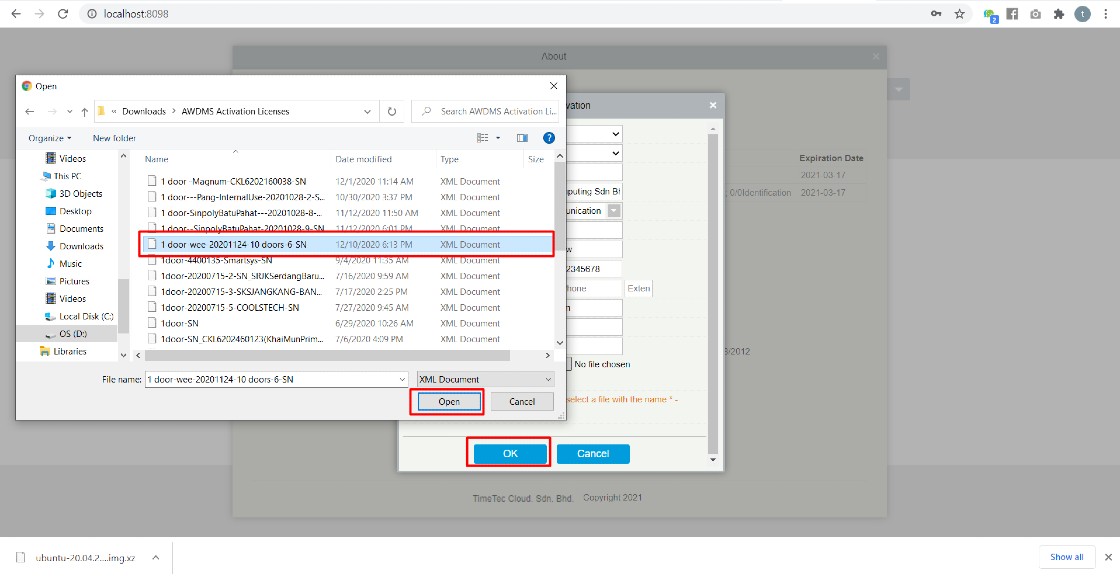
7. Click Offline activation file download. A file with a name like *_lic_upk.xml will be downloaded, sent this file, together with the original *-SN.xml file to Timetec Computing Sdn Bhd’s Sales Team to get an Offline activation license file. The filename of an offline activation is xxxxx-License.xml.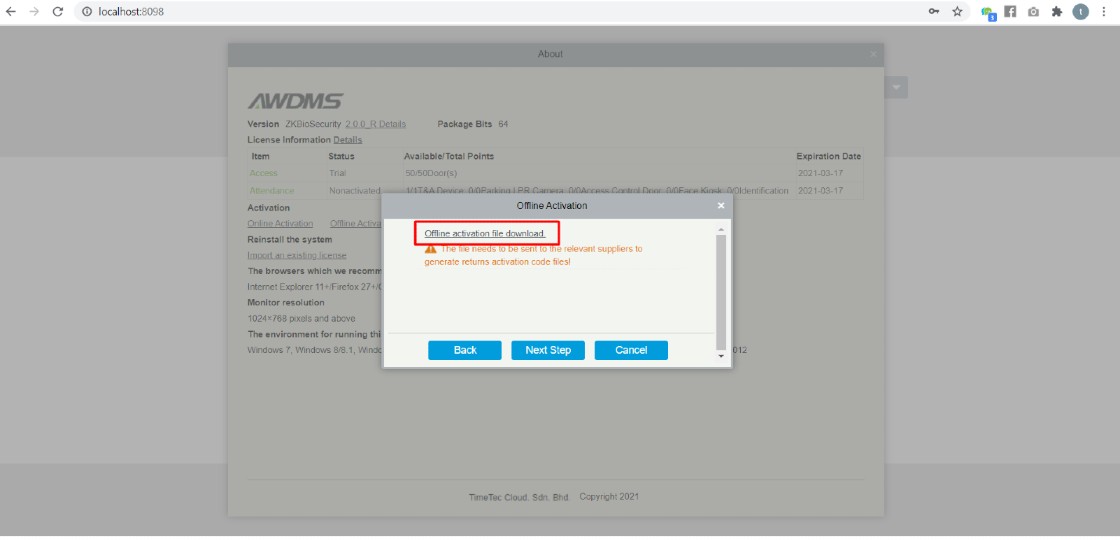
8. After receiving the offline license file. Click Offline activation on the About page again, and select Yes when asked “Do you have an existing license file whose format is *-License*.xml’, then followed by clicking on the OK button.
9. Click “Choose File”, then select the license file, click Open, followed by the OK button. The activation should be completed by now.
Note: If some of the screenshots or steps viewed here are different from the ones in the current system, this is due to our continuous effort to improve our system from time to time. Please notify us at info@fingertec.com, we will update it as soon as possible.
Introduction
In the i-Account system, one of the most basic and frequent transactions is issuance of invoice. If Admins finds it necessary to issue invoices for a new Charge item (e.g. Access Card, Rental of Facility, etc), they have to add the Charge into the system first. In the process, Admin has to assign an Item Code to the Charge and create a new General Ledger account.
The steps to add a new Charge item inside i-Account is as follows:
Process
For example, Admin may need to issue an invoice for Rental of Multipurpose Hall, a new Charge/Item.
A. Create New General Ledger Account
Step 1
First and foremost, Admin needs to create a new General Ledger (GL) account linked to the new Charge/Item and used to record invoice transactions.
Under the Accounting section, go to Banking and General Ledger > Maintenance > GL Accounts.
Step 2
Select “New Account” from the drop-down menu.
Step 3
Enter the “Account Code” and “Account Name” for the new GL account. E.g: Account Code is 10011 and Account Name is Rental of Multipurpose Hall.
Step 4
Select the Account Group from the drop button for the new GL account. In this example, the Account Group selected is “Other Income”.
Step 5
Once completed, click “Add Account” at the bottom of the page to add the new GL account.
B. Add New Charge/Item
Step 6
Next, go to Items and Inventory Module > Maintenance > Items to create a new Charge/Item.
Step 7
Select “New Item'' using the drop-down menu.
Step 8
Enter the Item Code and Item Name. E.g: Item Code is 10012 and Item Name is “Rental of Multipurpose Hall”.Step 9
Select Item Category for the new Item. The most frequent Item Category is Components and Services. However, we usually suggest setting it as “Services” for the Item Category.
The differences between Components and Services are as below:
Type | Description |
Components | Used for physical items that are purchased and Admin has to track Inventory balance and quantity. |
Service | Used when no physical item is involved. |
Step 10
Select the Unit of Measure for the new Item. For this Rental of Multipurpose Hall, we set as Each.Step 11
Select the GL Account for the new item. As we are adding this new item for billing purposes, we only need to set the Sales GL Account, i.e. the GL account that will be credited when an invoice is issued under the item.
- Therefore, for the “Sales Account”, select the GL account that was newly created.
- C.O.G.S Account setting is not applicable for debtor invoicing and can be skipped.
Step 12
Once completed, click the “Insert New Item” at the bottom of the page.
C. Invoicing
Once you have successfully created the new Item, you can view this at Property Section > Charge Setup. At this page you can set the price for the item (Unit Price). For example RM 100.00. Click “Update” at the bottom of the page to update the price. You can then proceed to Batch Invoice to generate invoices.
Alternatively, to issue a new Ad hoc invoice (bill to single debtor), go to Accounting section > Sales > Transaction > Invoices. Select the new item, i.e. Rental of Multipurpose Hall by using the drop-down menu. Enter the price and click the “+” icon at the right to add the item and proceed to issue the invoice as usual.
Note: If some of the screenshots or steps viewed here are different from the ones in the current system, this is due to our continuous effort to improve our system from time to time. Please notify us at info@timeteccloud.com, we will update it as soon as possible.
Introduction
For our users' convenience, we have included payroll features in TCMSv3 and Ingress, which allows you to transfer the details of your employees’ attendance to selected payroll software. There are 5 payroll software supported, namely
1) Sage UBS Payroll
2) WinCom v7 Payroll
3) SQL Payroll
4) Million Payroll
5) Kakitangan Payroll
Process
1) Set Malaysia as your country in the system. Go to System Settings > Company Info > Edit > Select Malaysia as country > Save
2) Select your payroll software to be the default payroll. Go to System Settings > System Parameter Settings > Attendance > Edit > Choose Default Payroll > Save
3) SAGE UBS PAYROLL
Ingress is customized to export attendance records directly into Sage UBS Payroll, whereby the arrangement of attendance records is fixed to fit the software. You must know the basic usages of Sage UBS Payroll before you proceed to the steps below.
i. Go to Attendance tab > Export Payroll > Template Configuration > Add Template and configure all data fields as per your requirement > Browse your payroll path > Save > Close
ii. Select users > Define the effective date range > Export
REMARK: Ingress will not export the attendance records directly into WinCom v7, Million, Kakitangan and SQL Payroll. You need to export all data in a file and import them manually into the payroll software. For any matters regarding template configuration that the payroll software supported you need to liaise with your payroll vendor.
Note: If some of the screenshots or steps viewed here are different from the ones in the current system, this is due to our continuous effort to improve our system from time to time. Please notify us at info@fingertec.com, we will update it as soon as possible.
This month FingerTec has released TCMSv3 software v3.1.02 which adds 7 new features and 10 bug fixes to enhance the user experience when using Ingress Software.
1.Added new date selection (Last Payroll Cycle) when generating an attendance sheet.
2. Added customized field for Export User data.
3. Added "Temperature Alert" and "Without Mask" filter options for Health Screening Report and Visitor Report.
4. Added "Show All Users" option inside the Health Screening Summary report.
5. Added new user roles for Pay Type and Pay Rate.
6. Added Issue Date, Expiry Date and Palm Vein options in the Users Column Chooser.
7. Added report logo at System Settings – Report.
Bug Fixed:
8. Fixed Last Name displayed first does not work in ETC Report when generating from Report Scheduler.
9. Fixed incorrect result displayed on ETC Report when untick show zero-hour option.
10. Fixed double punch clocking goes to the next day IN column when using the last log out time with the first rounding time range (Flexi Schedule).
11. Fixed incorrect sorting for date-time (AM/PM) in the Transaction Listing Report.
12. Fixed incorrect calculation Total OT and Diff OT when interval starts from 00:00/12:00 AM.
13. Fixed manually download cause TIMING file missing logs if remove transaction after auto-download is enabled.
14. Fixed failed to remove leave type in attendance sheet when using User Duty Planner.
15. Fixed incorrect date range display in the report if filter by "Last Month".
16. Fixed crash issue in Weekly Listing Report after Export by User Selection was clicked.
17. Fixed unable to export attendance to Sage UBS Payroll when using Employee ID.


