

How to Fix Wrongly Billed Water & Electricity Charges in i-Account

Introduction
In i-Account, invoices for Water and Electricity are issued based on meter reading values that the user adds or imports into the system. At times, a wrong meter reading value could have been added for certain units, leading to an incorrect calculation of the usage and invoice amount.
If this is only detected after the invoice is generated, certain steps can be taken to rectify the records. To make the correction, refer to the steps listed below.
Please note that we refer to “Water” in our guide below but the same steps are applicable for both Water and Electricity billing.
How to Fix Wrong Billing
If a Water meter bill is wrongly charged, there are 2 options:
I : Void the incorrect invoice > Edit the incorrect reading value > Generate a new invoice with the same reading
a) Void the incorrect invoice at System > Maintenance > Void a Transaction.
b) After voiding the incorrect invoice, you can edit the reading value at Property > Water Meter.
II : Issue Credit Note for the full amount of the invoice > Import a new reading with the correct current reading value > Generate another invoice with the newly added reading.
Option 1: Void Incorrect Invoice & Edit Reading
1. Once invoices have been generated for the water meter reading, users can view the invoices at the Water Meter page. In our example below, if the water meter reading for unit A-1-1 on 21st April 2021 is incorrect, we can void the invoice that has been generated. Check the invoice number by clicking on the view invoice icon.
1. Once invoices have been generated for the water meter reading, users can view the invoices at the Water Meter page. In our example below, if the water meter reading for unit A-1-1 on 21st April 2021 is incorrect, we can void the invoice that has been generated. Check the invoice number by clicking on the view invoice icon.

2. This is the sample of the incorrect water bill.

3. Next, go to System > Maintenance > Void a Transaction to void the incorrect invoice. For the Transaction Type menu, select the Sales Invoice option.

4. Select the incorrect invoice by clicking on the pencil icon.

5. After selecting the invoice, users will be directed to the bottom of the page, where we can enter a Memo to record why the invoice needs to be voided. Then, click on the “Void Transaction” icon to proceed with the void action.

6. This confirmation message will pop out once you click on the “Void Transaction” icon.

7. Click on the “Proceed” icon at the bottom of the page to confirm.

8. After the invoice has been voided, go to the Property > Water Meter page again to edit the meter reading. The edit icon will appear once the invoice has been successfully voided.

9. Click on the edit icon to amend the water meter reading for that particular unit and click “Update” to save the changes.

10. After entering the correct meter reading, you can now generate a new invoice for this unit at Property > Batch Invoice page using the edited reading.
Option 2: Issue Credit Note for the Whole Invoice and Import New Meter Reading
a) Issue Credit Note for the Whole Invoice
1. For the 2nd option, we will use another unit, B-1-4 as the example.
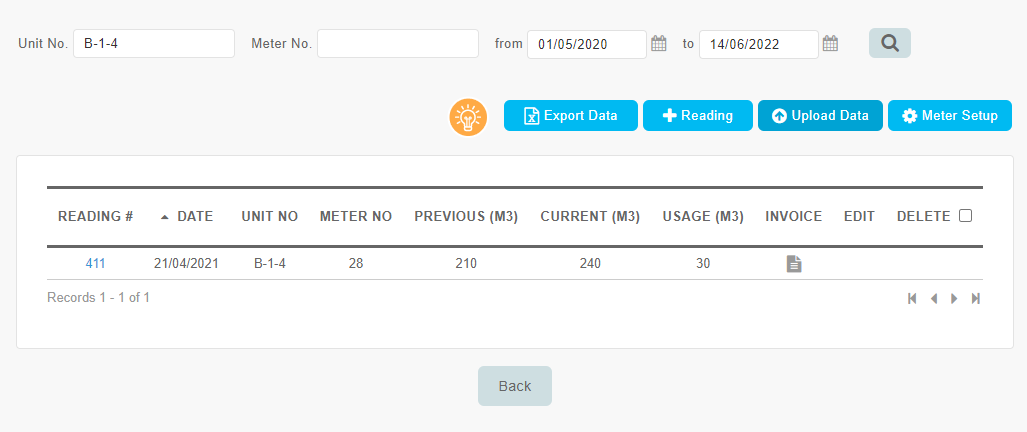
2. In this option, firstly, issue a Credit Note for the whole amount of the incorrect invoice. Go to Accounting > Sales > Transactions > Customer Credit Notes.

3. Select the owner and Credit Note Items, then enter the price based on the invoice amount for water billing. Click the (+) icon to add the item in the line.


4. Next, click on “Process Credit Note” at the bottom of the page.

5. Once the Credit Note has been issued, allocate the Credit Note against the invoice. Go to Accounting > Sales > Transactions > Allocate Customer Payments or Credit Notes to allocate the Credit Note.
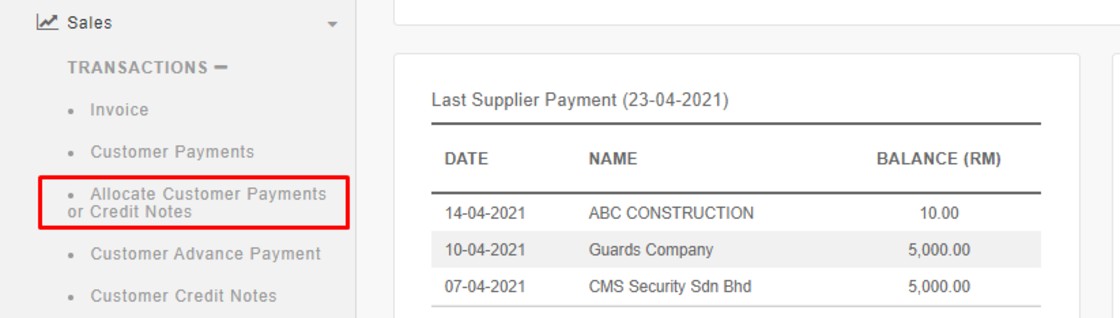
6. Select the owner’s name, for instance owner for B-1-4. System will show the Credit Note that has been issued to that particular owner.

6. Select the owner’s name, for instance owner for B-1-4. System will show the Credit Note that has been issued to that particular owner.

7. Click on the “Allocate” icon in order to do the allocation.

8. Users will be directed to the Allocate Customer Payment or Credit Note page. Allocate the amount to the water bill.


9. Click on the “Process” button to proceed with the allocation.

b) Import New Meter Reading & Generate New Invoice
Next, you need to import a new meter reading for the same reading date.
1. Go to Property > Water Meter page and click on “Upload Data” to import the new reading.

IMPORTANT NOTE:
Normally, for each unit number, the system only allows entry of one reading on each date.
To import a 2nd reading for the same date, you have to key in "edit" in the Edit column of the csv file.


4. When adding the batch, refer to the following guide:
a. Customer Group
Select the same group for this unit owner. System will check the selected customer group whether there are any unbilled readings and only generate new invoice for the new reading.
b. Reading Date
Select the date for the newly added reading (marked as “Edit”)

Maintain Previous Invoice & Fix in the Next Month
If you only notice the billing error during the following month’s billing, it is possible that Options 1 & 2 above may not suit your requirement. Especially if the owner/debtor have already paid for last month’s incorrect invoice (including gateway payment).
Both options are not applicable if you are not allowed to void last month invoices or prefer not to send 2 new invoices to the owner/debtor:
a. Correct invoice for last month
b. New invoice for this month
c. Credit Note to cancel the incorrect invoice for last month
Hence, if you prefer to directly adjust for this using this month’s invoice, you can consider Option 3 below:
- Issue Credit Note for any overcharged amount for last month
- Key in the previous reading date and correct previous reading value in the import file when importing readings for the latest bill
Note: If undercharged, you can directly key in Current Reading to charge the extra in this month's invoice.
Option 3: Issue Credit Note and Adjust in Current Month Usage Calculation
1. In order to issue a Credit Note for the overcharged amount, refer to the Option 2a section above for more guidance.
2. For example, if on 31/05/2022 for unit B-1-6, the correct reading is 35 m3 while invoice amount is supposed to be RM10.00 (RM2.00 x 5 m3) but you have wrongly invoiced at RM210.00 (RM2.00 x 105 m3), you can issue a Credit Note for RM200.00 (RM210.00 – RM10.00).

3. When you import this month’s reading (e.g., 40 m3) for instance on 30/06/2022, if you directly enter the Current Reading value without amending Previous Reading value, the usage may be calculated wrongly or even fail to be imported (if Current < Previous).
.png)
.png)
4. In order to import successfully, you need to key in the correct previous month values for this particular unit in the import file. Please take note of the following:
IMPORTANT NOTE:
In, the import file, you must key in the Previous Reading Date & Previous Reading Value (in addition to the Current Reading).
If you leave the previous reading columns blank, the system checks existing records in the system in order to calculate the usage. As the previously entered reading for this unit was incorrect, this will lead to incorrect calculation of usage/fail to be imported.
.png)
.png)
Note: If some of the screenshots or steps viewed here are different from the ones in the current system, this is due to our continuous effort to improve our system from time to time. Please notify us at info@timeteccloud.com, we will update it as soon as possible.


