Showing posts with label export. Show all posts

How to Post Attendance to Sage UBS Payroll (Malaysia only)


Introduction
For our users' convenience, we have included payroll features in TCMSv3 and Ingress, which allows you to transfer the details of your employees’ attendance to selected payroll software. There are 5 payroll software supported, namely

1) Sage UBS Payroll
2) WinCom v7 Payroll
3) SQL Payroll
4) Million Payroll
5) Kakitangan Payroll

Note: If you are using other than the above mentioned, you can use the export data audit list feature in Ingress or TCMSv3. There are 2 export types you may choose and the files can be saved in .txt, .xlsx/.xls, or .csv files. Kindly refer to the link below for the steps and guide. 

http://www.fingertectips.com/2017/11/export-scheduler-for-attendance-and.html

Process
1) Set Malaysia as your country in the system. Go to System Settings > Company Info > Edit > Select Malaysia as country > Save

2) Select your payroll software to be the default payroll. Go to System Settings > System Parameter Settings > Attendance > Edit > Choose Default Payroll > Save


3) SAGE UBS PAYROLL
Ingress is customized to export attendance records directly into Sage UBS Payroll, whereby the arrangement of attendance records is fixed to fit the software. You must know the basic usages of Sage UBS Payroll before you proceed to the steps below.

i. Go to Attendance tab > Export Payroll > Template Configuration > Add Template and configure all data fields as per your requirement > Browse your payroll path > Save > Close


ii. Select users > Define the effective date range > Export


REMARK: Ingress will not export the attendance records directly into WinCom v7, Million, Kakitangan and SQL Payroll. You need to export all data in a file and import them manually into the payroll software. For any matters regarding template configuration that the payroll software supported you need to liaise with your payroll vendor.

Note: If some of the screenshots or steps viewed here are different from the ones in the current system, this is due to our continuous effort to improve our system from time to time. Please notify us at info@fingertec.com, we will update it as soon as possible.

Exporting Leave Data: Configuring Export Templates in TimeTec Leave


Introduction
Users can export the leave data into a template and format of their preference. The leave export formats are divided into 2 general forms schema which are Detailed and Summary.

LEAVE APPLICATION SCHEMA
With the leave application schema you can export the leave details of all users. You will have to define the position arrangement and the length of certain data fields before exporting the leave data.

USER LEAVE SUMMARY SCHEMA
User Leave Summary schema exports all users’ leave summary. Define the position arrangement and the data type/size before exporting the leave data.

Process
A: Leave Application Schema Template Configuration
1. In your TimeTec Leave account, go to Leave > Export Leave> Click on Leave Application Schema.

2. The Leave Application Schema module displays the following information:
Position: Enables users to select the order of the data fields (column-by-column)
Description: name of each data field as a header.
Size: The length and the maximum number of characters needs to be carried to the export file for each data field.

For example, the order of the data for the 3rd party system is this:
1 - TimeTec User ID (9 = 9 characters max)
2 - Employment ID (15 = 15characters max)
3 - Name (30 = 30 characters max)
4 - Organization Structure (30 = 30 characters max)
5 - Group Duty Roster (5 = 5 characters max)

Therefore, in the table below you need to determine the position and the size of each data field appropriately.

3. Data Field Module
After the position and the size of the required data fields at every module is set, click “Save” to move on to the next data field module. In case you don’t want any of the data fields to be exported, leave the Position blank. Every data field has a default Size value that can be changed up to max 99.


4. When the data field Position and Size are set, press Save to be directed to the Export Leave module. From the Export Leave Module, Select the Date Range, and User ID(s), then click on the “Submit” icon, the system will generate the export file based on your choice.


B: Summary Schema Template Configuration
1) At your TimeTec Leave admin account, go to Leave > Export Leave > Click on the Summary Schema.


2) The Summary Schema contains different data field modules. However, for the data field setup and configuration, repeat steps 2 to 4 of the Leave Application Schema Configuration.

3) At the Export Leave Module click on Select then choose >select  the date range and Users > Submit.


Note: If some of the screenshots or steps viewed here are different from the ones in the current system, this is due to our continuous effort to improve our system from time to time. Please notify us at info@timeteccloud.com, we will update it as soon as possible.

How To Utilize USB Function In TimeTec TA


Introduction:
TimeTec TA has recently released a new feature to ease the experience in retrieving user data/transaction log by allowing the data to be exported from FingerTec terminal into a USB for transferring into TimeTec TA.

Basically, USB function is used when the biometric device is in Offline Mode due to having no Internet connection available and the data has to be manually transferred instead. Before proceeding, users will first need to ensure that the biometric devices are already added into TimeTec TA account (Device > FingerTec Terminal). Please refer to the steps below on how to utilize the USB function in TimeTec TA.


Process:
A. Download Users from USB -

1) After downloading the user template from FingerTec terminal, you will receive a file named user.dat as well as template.fp10.1.dat (if there is any fingerprint registered for the user).


2) Next, login to TimeTec TA and go to Device tab > FingerTec Terminal > Manage Terminal > Download Users from USB.


3) Browse your .dat file that has been downloaded from the FingerTec terminal. Please note to also select template.fp10.1 file if you want to export the user’s template into TimeTec TA account.


4) Select user(s) that you wish to upload into TimeTec TA. Here, you may also customize the user’s Issuance Date and Group Duty Roster.


5) Once done, you will receive a message indicating that the user exporting process has been successfully completed.


6) Users will now be available in the TimeTec TA user list (User tab > Manage User).


B. Download Transaction Logs from USB -

1) In Device tab > Manage Terminal > Download Transaction Logs from USB.


2) Browse attlog.dat that has been downloaded from FingerTec Terminal. Here, you may select the users to download the transaction logs from.


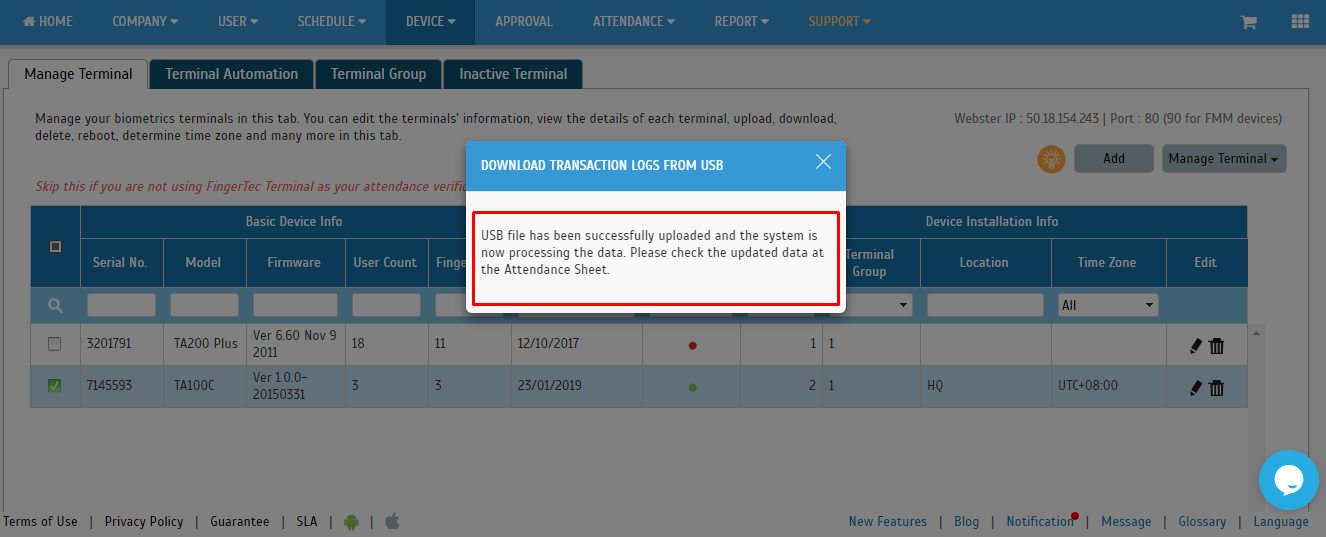
3) Once done, you will receive a successful message indicating that you have completed downloading the transaction logs from the USB.


4) Lastly, the downloaded transaction logs will thus be available in the Attendance Sheet (Attendance tab > Attendance Sheet) for the selected users.


C. Export Users to USB -

1) Please be informed that you may also export user lists that are already available in TimeTec TA account into another device. Start by proceeding to Device tab > Export User to USB .


2) Here, you may select which user that you wish to export. Please also indicate the device type: Color Screen or Black & White Screen as well as the data that needs to be exported along with the user (card, fingerprint algorithm).


3) Once complete, you will receive a compressed file for User.data in the Download section as shown in the screenshot below.


4) Extract the file and you will receive the user.dat and template.dat file which can then be uploaded into FingerTec terminal.


Note: If some of the screenshots or steps viewed here are different from the ones in the current system, this is due to our continuous effort to improve our system from time to time. Please notify us at info@timeteccloud.com, we will update it as soon as possible.

Export File to Other PCs on the Same Network Range via Ingress / TCMS V3


Introduction:
Previously, we have introduced a new feature for Ingress and TCMS V3 software, whereby you can export the Attendance and Transaction Data automatically by date or time into a dedicated folder path under Attendance Module. Therefore, we will now brief and guide you on how to export the file into other PCs that have the same network range with the main PC.

Benefits:
By choosing this option, you can export the file and manage it in other PCs automatically, whereby the system can then run the process based on the settings in the Export Scheduler option.

Process and Setting:
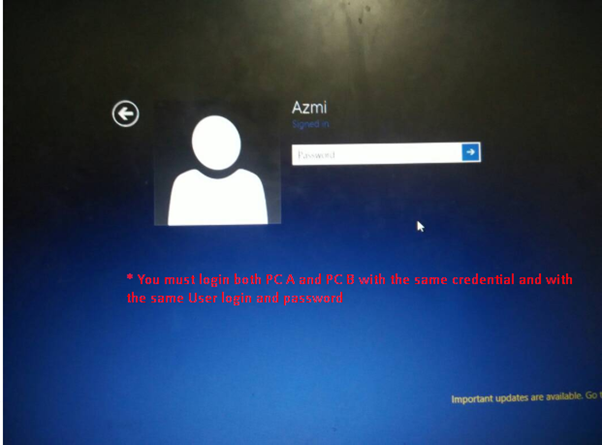
1. You must create both PCs with the same credential or same User Login and Password. For example: PC A (main PC with Ingress/TCMS V3 software) & PC B (the location where the file will be saved) must have the same credential as indicated in the picture below.
  

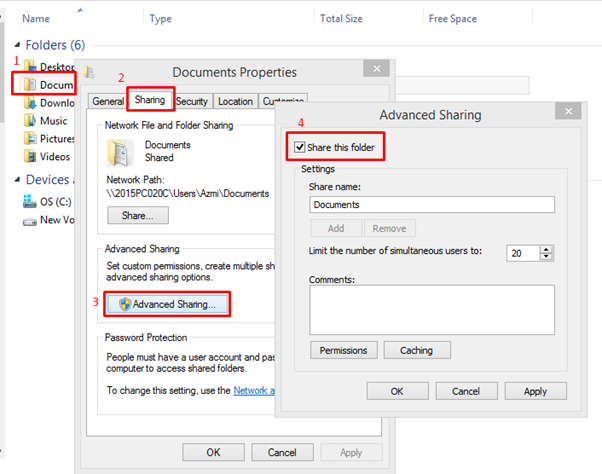
2. Configure or share the folder from PC B so that it can be accessed from PC A.
 

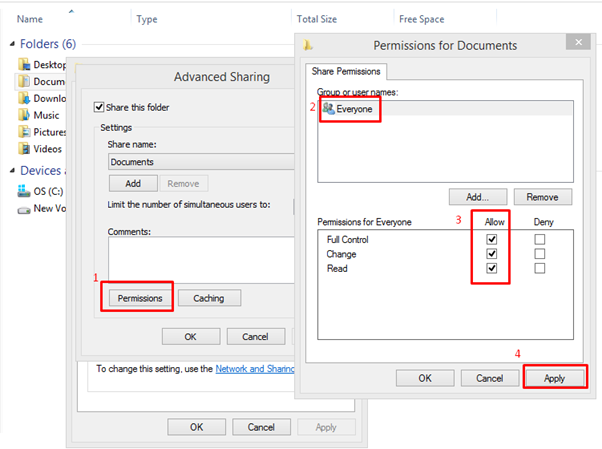
3. Then, allow the folder sharing permission to Everyone, and test whether you can access the sharing folder on PC B from PC A (Main).
 

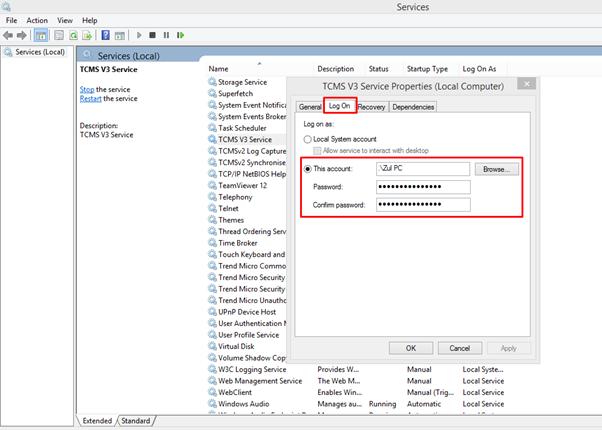
4. After finishing the sharing folder configuration, you need to login to PC A with the same PC B credential. Next, setup the Log On services for Ingress/TCMS V3 by proceeding to Control Panel > Administrator Tools > Services > Ingress/TCMS V3 Services > right click and select Properties > select Log On > select The Account and key in the Login and Password credential similar with PC B.
 

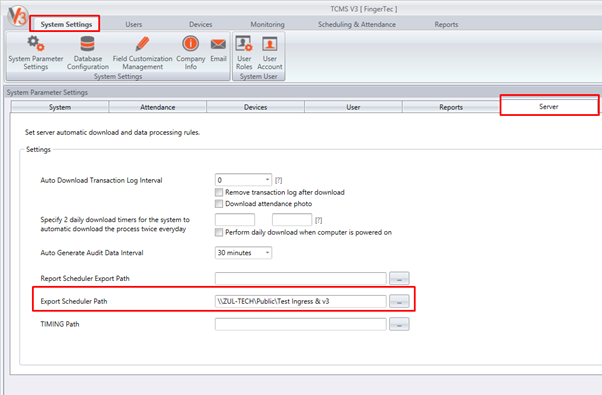
5. Moving on, start Ingress/TCMS V3 software and setup the Export Schedule Path by heading to System Setting > Server > Export Scheduler Path and choose the folder/location that you want to save the file.
 

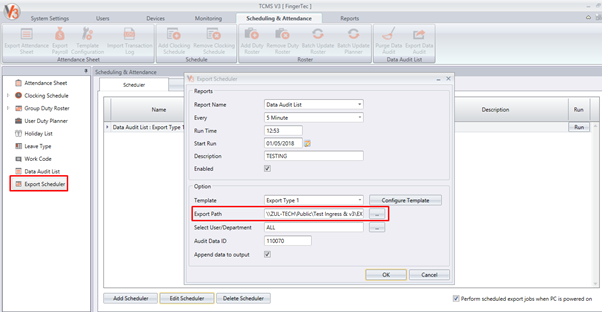
6. Configure the Export Scheduler settings from Attendance > Export Scheduler, and choose the correct Export Path on PC B. Please also refer to these tips on how to use the Export Scheduler: http://www.fingertectips.com/2017/11/export-scheduler-for-attendance-and.html
 

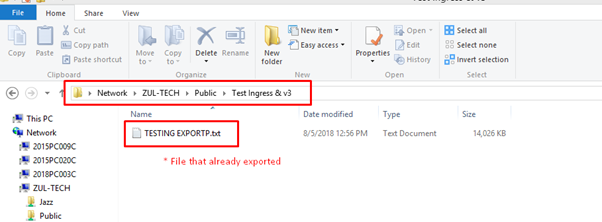
7. Lastly, check the results on PC B as to whether the file has been saved or not.
 

Note: If some of the screenshots or steps viewed here are different from the ones in the current system, this is due to our continuous effort to improve our system from time to time. Please notify us at info@timeteccloud.com, we will update it as soon as possible.

How To Enable Attendance Approval And Approve Attendances in TimeTec TA


INTRODUCTION -
TimeTec TA has introduced a new feature which enables the approval process of the user’s attendance report to be performed within the system. Therefore, users with administrator privilege could check user attendance data before deciding whether to approve or reject the attendance report. This feature is suitable for companies that require a supervisor to verify the attendance report of his/her employees. Even better, the approval function can be performed by Admins on both web and mobile platforms for added convenience.

In this article, we prepared a guide on how to enable the Attendance Approval feature and approve employees’ attendances in TimeTec TA. 

PROCESS -
Note: Only users with Administrator role in TimeTec TA could approve the user’s attendance in TimeTec TA.

1) Enable this option in System Settings - Attendance Approval allows Admin to make approval on staff attendance.

2) Go to Attendance > Attendance Approval - Admin with the special Approval rights (provided in System Role) will be able to approve attendance; Approved attendance can be unapproved.

3) Admin can also choose to notify the user once they have approved/unapproved user’s attendance. 

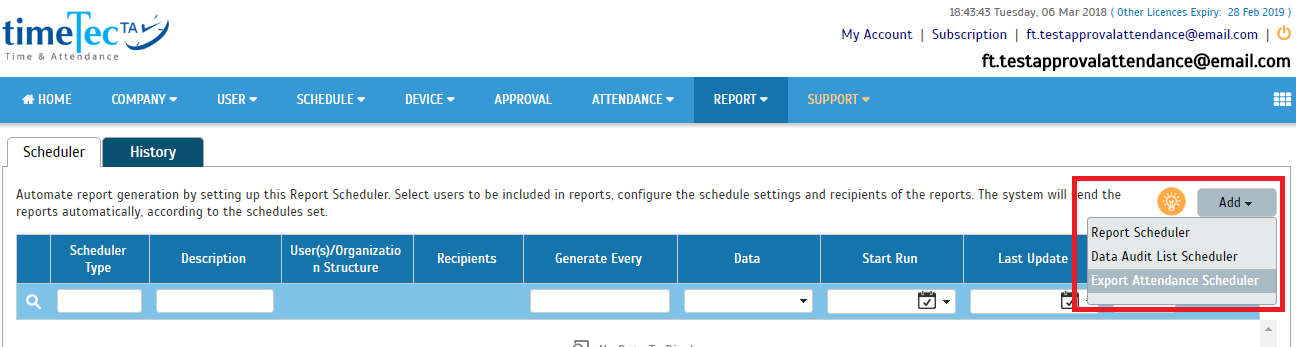
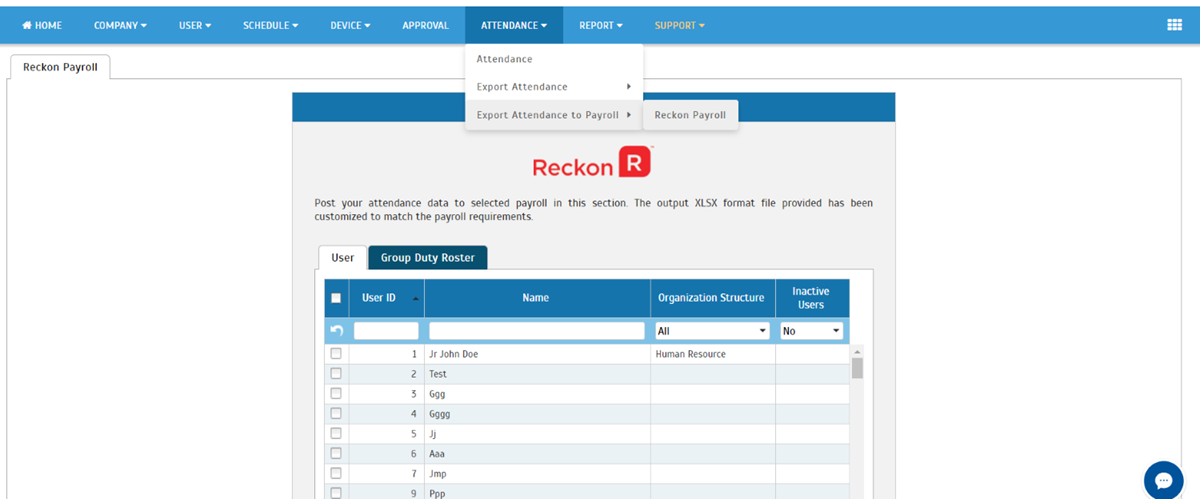
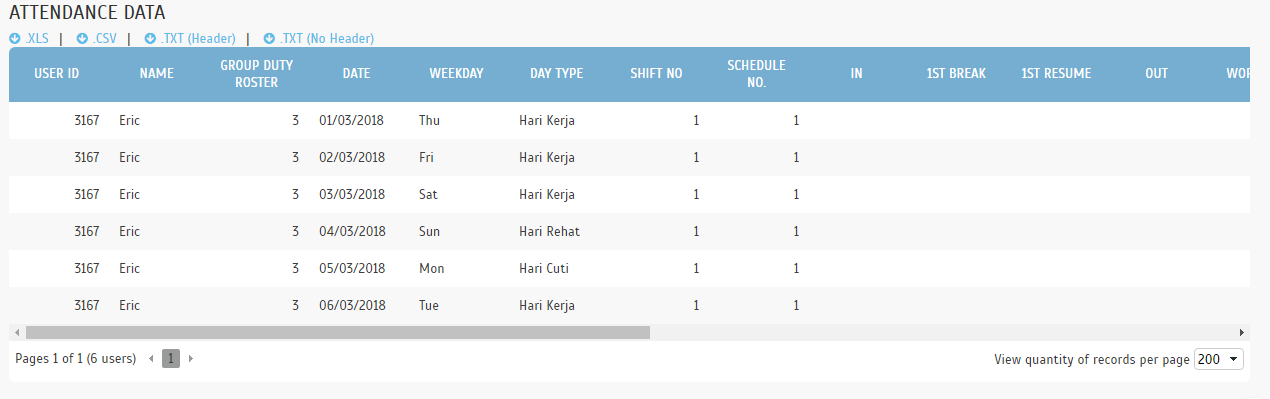
4) Only approved attendance can be exported through the Export Attendance, Export Attendance to Payroll and Export Attendance Scheduler features.  

5) Once approved, the data is not allowed to be updated by edit attendance, download data from terminal, update user’s group roster, update schedule setting, generate attendance manually and etc. 

6) To update approved attendance, users must first proceed to unapprove the attendance.

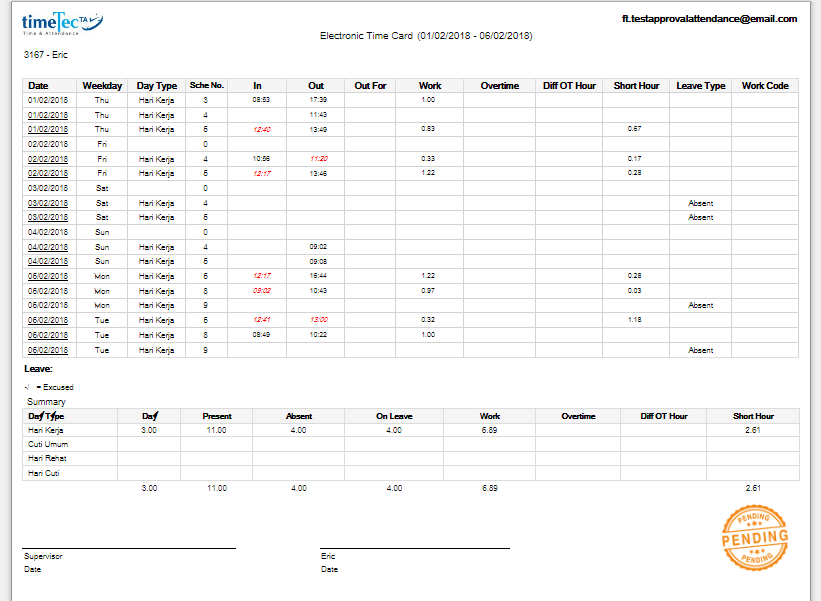
7) Electronic Time Card shows Approved/ Pending status.

For more details of what’s available with this feature, please refer to the step-by-step guide below. There are 4 sections to this topic:

A) How to Enable/ Initial Setup
B) How to Approve (Web)
C) How to Approve (Mobile app)
D) Reports & Export Attendance Data after approval    

A) How to Enable/ Initial Setup

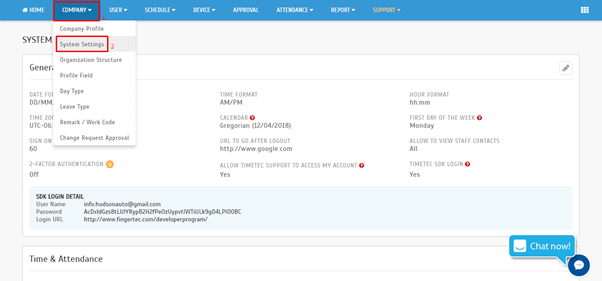
1. Login to TimeTec TA (Web) and go to Company tab > click on System Settings.


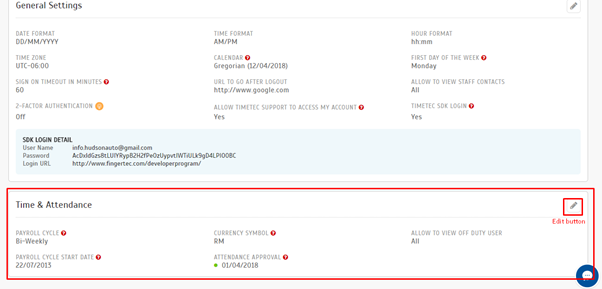
2. Next, go to Time & Attendance section and then click on Edit button.


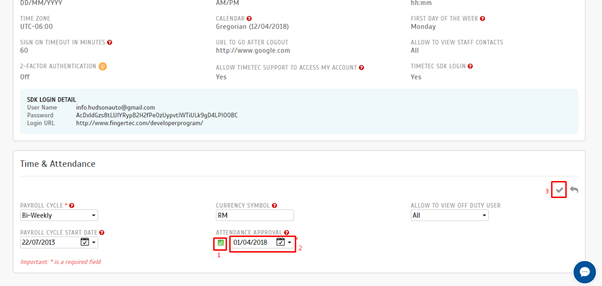
3. Tick on the Attendance Approval option and then choose a date to start enabling this option. After that, click on the Tick button to save the configuration.


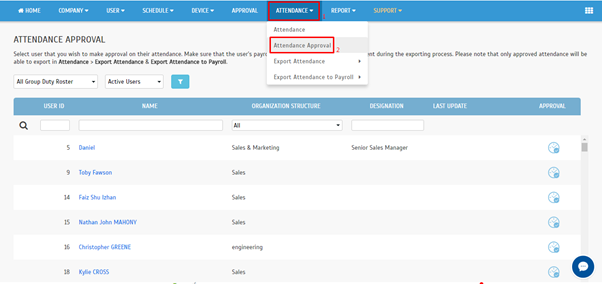
4. Once you enable this feature, you will be able to view Attendance Approval in the Menu (it’s hidden if option is not enabled).


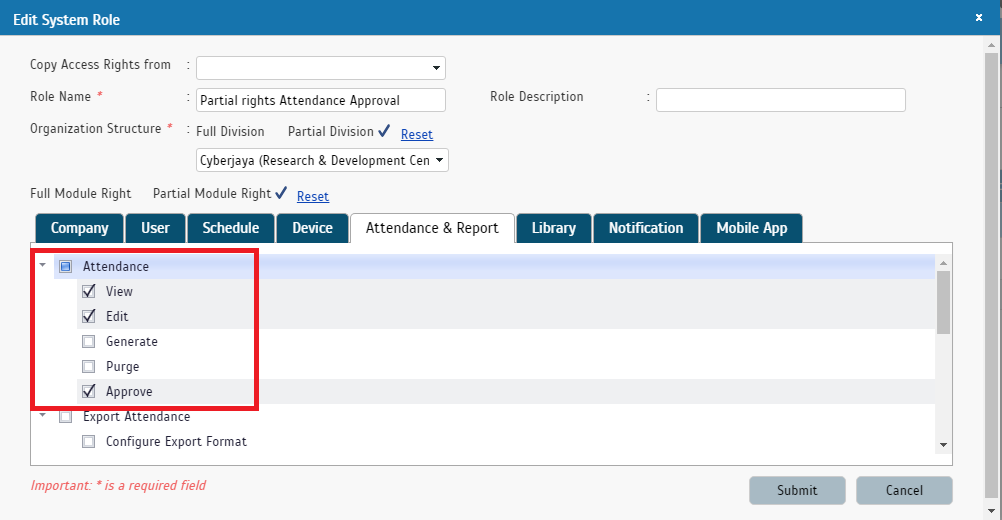
5. Next, configure the Approvers by reviewing whether Approve rights have been given to the relevant Admin roles. Go to User> Manage System Roles & Admin > System Role and select to Add/Edit.

Note: There are 2 separate rights involved, approve in Web and approve in Mobile. 

i) Admin given right to “Approve” is allowed to approve attendance in Web
cid:image003.png@01D3C51C.35DE17A0

ii) Admin given right to “Approve” is allowed to approve attendance in Mobile app

cid:image004.png@01D3C51C.35DE17A0


B) How to Approve (Web)

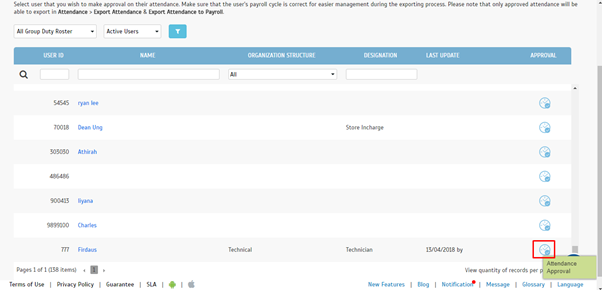
1. If you are the supervisor/manager charged with approving staff attendance, go to Attendance > Attendance Approval in the Menu (it’s hidden if this option is not enabled in the account).

cid:image002.png@01D3C51C.35DE17A0

2. At the User Listing, click on the Clock icon to view attendance details of the chosen user and to approve or unapprove attendance.


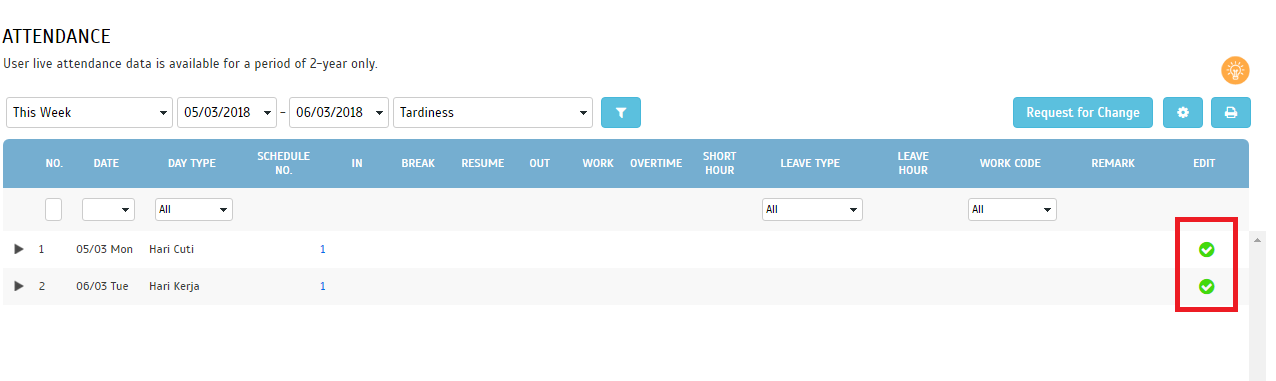
3. Next, the screen will display Attendance details. Use the filters to retrieve your relevant date range. Select/tick the relevant date(s) you wish to approve, then click “Approve”. Once a date is approved, a green tick will be shown in the Edit column. You can also repeat the steps to unapprove attendance for any date.

i) “Approve” button will be shown when all attendance is unapproved


ii) “Unapprove” button will be shown when all attendance is approved


iii) Both buttons will be shown when attendance is a mix of approved and unapproved  


4. After you have approved any date, a success message pops up. There will be an option to notify the affected user. The same notification option also appears if you subsequently choose to unapprove attendance.


5. Once done, a message will appear on the screen stating that the attendances can now be exported to payroll.


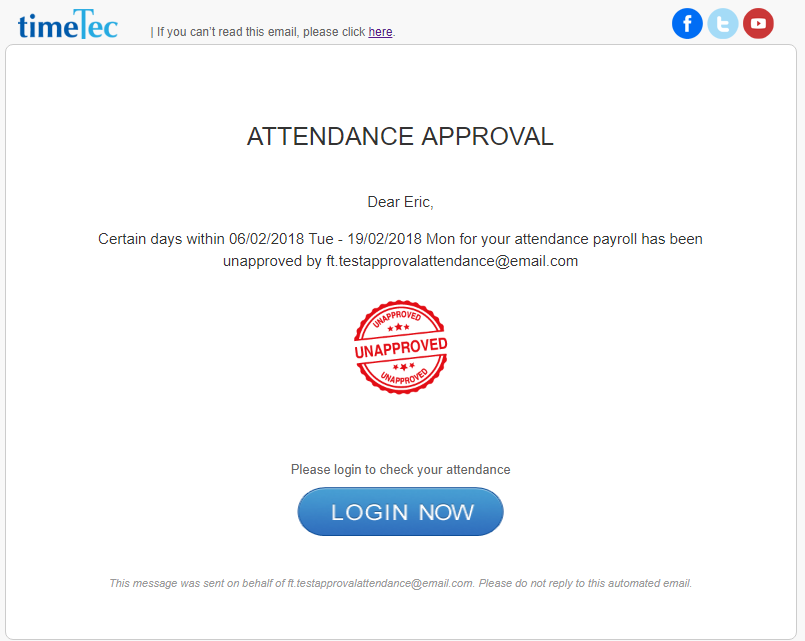
6. If you choose to notify user, system sends an Attendance Approval Email to the user.

i) Approved

cid:image009.png@01D3C51C.35DE17A0

ii) Unapproved

cid:image011.png@01D3C51C.35DE17A0

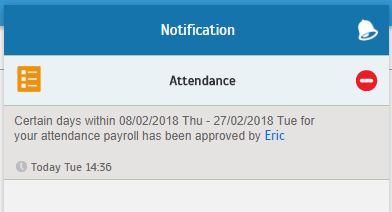
7. Additionally, if you choose to notify user, system also sends an Attendance Approval Notification to the user.

i) Approved


ii) Unapproved


8. When user login, they will also be able to see if their attendance has been approved.
cid:image023.png@01D3C51C.35DE17A0

C) How to Approve (Mobile app)

1. Login to Admin account > Menu > Attendance > select the Approval icon (Clock) on the left of User Listing.


2. Next, at the chosen user’s Attendance Approval screen > filter for your appropriate Date Range > select “Approve” icon at upper-right corner. This will approve the whole date range (use the filter if choosing individual date).

Once the dates are approved, a green vertical panel will be shown on the left. You can also repeat the steps to unapprove attendance for any date.

i. Approve Icon


ii. Approved Attendance Details > May also choose to “Unapprove” 


3. After you have approved any date, a success message pops up. There will be an option to notify the affected user. The same notification option also appears if you subsequently choose to unapprove attendance.

i. Approve- Option to notify user


ii. Unapprove- Confirmation message & Notification option


4. If you choose to notify user, system sends email & mobile notification to the user.


D) Reports & Export Attendance Data after approval    

To recap what is mentioned above:

1) Only approved attendance can be exported through Export Attendance, Export Attendance to Payroll and Export Attendance Scheduler features.  

2) Once approved, the data is not allowed to be updated by edit attendance, download data from terminal, update user’s group roster, update schedule setting, generate attendance manually and etc.
 
3) To update approved attendance, users must first proceed to unapprove the attendance.

4) Electronic Time Card shows Approved/ Pending status.

Only approved attendance will be able to be exported

i. Export Attendance


ii) Export Detail
cid:image020.png@01D3C51C.35DE17A0

iii) Export Summary

cid:image021.png@01D3C51C.35DE17A0

iv) Export Attendance Scheduler

cid:image022.png@01D3C51C.35DE17A0

v) Export Attendance to Payroll

cid:image001.png@01D3D0F0.0BA97620

Report - Electronic Time Card

i) Approved

When generating the Electronic Time Card report for users on the date that the attendance has been approved, there will be an Approved stamp on the report to prove that the attendance report has been checked and approved.


ii) Pending Approval
cid:image018.png@01D3C51C.35DE17A0