How To Use Flexi Job Costing in TimeTec TA


Introduction
Flexi Schedule is a flexible hours schedule allowing staff to work without being restricted to a specific working time so long as the total work hour is achieved. When it comes to keeping track of multiple jobs or tasks, custimer can use the Job Costing feature available for Flexi schedule. This function provides company with data about the job type and its duration to complete the job for accurate assessment and pay calculations. Examples of companies that usually use the job costing function include accounting firms, law firms, automobile servicing companies, construction companies etc. Please note that this function is only available when using the flexi schedule.

Process
A. Enable Define Work Code for Job Costing option in Clocking Schedule Setting.
1.  Open Flexi Schedule in TimeTec TA (Schedule > Clocking Schedule > Edit).

2. Click on General > Tick to Enable user define work code for job costing records > Submit.

B. Create Remark / Work Code
1. Click on Company > Remark / Work Code > Add.

2. Enter Remark > Work Code > Click Save. 

C. How to Use TimeTec TA app.
1. Open TimeTec TA app > Clocking.

2. Select Clocking Type and Work Code. 


3. Ensure location is enabled > Click on GPS icon.

D. How to Sync the Work Code in TimeTec TA with FingerTec Device.
Kindly refer to the below link on how to sync work code in TimeTec TA with FingerTec device :
Link : https://www.fingertectips.com/2019/10/sync-workcode-in-timetec-ta-and.html

E. Check and Collect Data.
I. Attendance
1. Click on Attendance > Attendance > Select Date > Select User > Filter.

2. Click Edit on the required data.


II. Report
1. Click Report > Attendance Listing > Detailed Electronic Time Card.

2. Select User > Date > Submit.

3. Select File Format > Export to download file.

4. Final Report.

Note: If some of the screenshots or steps viewed here are different from the ones in the current system, this is due to our continuous effort to improve our system from time to time. Please notify us at info@fingertec.com, we will update it as soon as possible.

Overview on how to connect Smart AC 1 Series / Proface X Series / Face ID 5 Series from the remote location to the main HQ PC via DDNS


Introduction
By centralizing the Ingress database in a specific PC, you can minimize data redundancy as all the data is stored together and not scattered across different locations. To centralize the database in one specific location, you may link all the devices from the remote locations to the main HQ PC by implementing DDNS (Port Forwarding). You can manage users and transaction logs in the main HQ PC even though the devices are installed in other branches.


Process
1. Main HQ PC
a.    You need to install the Ingress MySQL and AWDMS accordingly. Both Ingress and AWDMS MUST BE INSTALLED on the same PC. Please install Ingress MySQL Server first, followed by the AWDMS.

b.    Kindly check the PC IP address for the PC installed and the Port Number for the device to connect with the AWDMS

·         To check PC IP address:
            Go to Start Menu > Type cmd > ipconfig > check the PC IP Address

·         To check the device port number to be linked with the AWDMS:
            Go to AWDMS web browser > Device icon > click Search Device > You will be able to             view the Port Number

Remark: The default Port Number is 8088 unless you change it during the AWDMS installation process

2. Main HQ Router
Kindly note that we do not provide direct assistance regarding network support including VPN, DDNS or port forwarding configurations. As a different router requires a different network configurations, it is best to get your IT expertise or local network engineer to provide assistance on this router configuration.

a)    Configure the DDNS URL (ex:abc.ddns.org )

b)    Port Forwarding: Redirect incoming request for port 8088 to 192.168.1.102 (PC IP Address installed with Ingress and AWDMS)

Remark:
- Please make sure you allow both Incoming and Outcoming for port 8088.
- Besides port 8088, please make sure that you also do not block all the listed port numbers in your router and firewall settings.
·         3000 (Port for Ingress software)
·         3306 (Default Port for Ingres MySQL)
·         4370 (Device Port)
·         8098 (Link Ingress – AWDMS software) 

3. Remote Location
a)    Make sure that the device is connected with the Internet connection either using TCP/IP or WiFi

b)    Connect the device to the AWDMS server (Main HQ PC) by pointing it to the DDNS URL ( ex: abc.ddns.org)

To configure the AWDMS settings in the device:
Go to Menu > Cloud Server setting > Turn on “Enable Domain Name” > Set the server IP: abc.ddns.org:8088

4. Main HQ PC
a)    Upon configuring the settings above, check whether devices from the remote locations are connected to the AWDMS or not.

Go to AWDMS web browser > Device icon > click Search Device > It will list all the devices connected to the AWDMS

b)    Once successful, you may add all the remote location devices in the Ingress software and manage all the users and transaction logs accordingly.

Note: If some of the screenshots or steps viewed here are different from the ones in the current system, this is due to our continuous effort to improve our system from time to time. Please notify us at info@fingertec.com, we will update it as soon as possible.

How to Disable Unused Checkpoint in TimeTec Patrol


Introduction
TimeTec Patrol offers two modes of scanning rules for patrol routes, by following a sequence or by random scanning. 

    1) Follow Sequence mode; the patrol session has to follow the exact sequence of each               checkpoint as being set up in the Patrol Route.
    2) Random Scan mode, guards can scan at any checkpoints without having to follow any            specific sequence. 

Having a faulty checkpoint tag in the middle of the patrol route will unable the guard to proceed to the next checkpoint, and the patrol session will get stuck at the faulty checkpoint tag. What do you do in this case? 

Process
1. The faulty checkpoint cannot be removed from the Patrol Route setting if the Patrol Route has been used in the Schedule.

2.  Since the checkpoint cannot be removed from Patrol Route Settings, go to Routes > Locations & Checkpoints to disable the checkpoint from there.

3. Click on the Checkpoint to be removed. In the right pane, click on Edit.

4.   Change the checkpoint status to inactive and Save.

5.  Go to Routes > Patrol Routes to check on the route settings. You will notice that the checkpoint that is set as inactive in the above step will no longer appear in the Patrol Route setting.

6.   In the TimeTec Patrol mobile app, guards can tap on Start Button to proceed.

7.  Tap on the Time Range.

8.  When viewing a list of checkpoints, you will see that the disabled checkpoint will no longer be shown in the list and therefore,  the guard can scan at all available checkpoints even if in the follow sequence scanning mode.

Note: If some of the screenshots or steps viewed here are different from the ones in the current system, this is due to our continuous effort to improve our system from time to time. Please notify us at info@fingertec.com, we will update it as soon as possible.

How To Activate AWDMS License in an Offline Mode


Steps to Activate AWDMS License (Offline mode)

1.    At the login page, click Activate Now (as shown in the image below)

2.      Click on Offline Activation

3.     Input username: admin and password: admin, then click OK button.


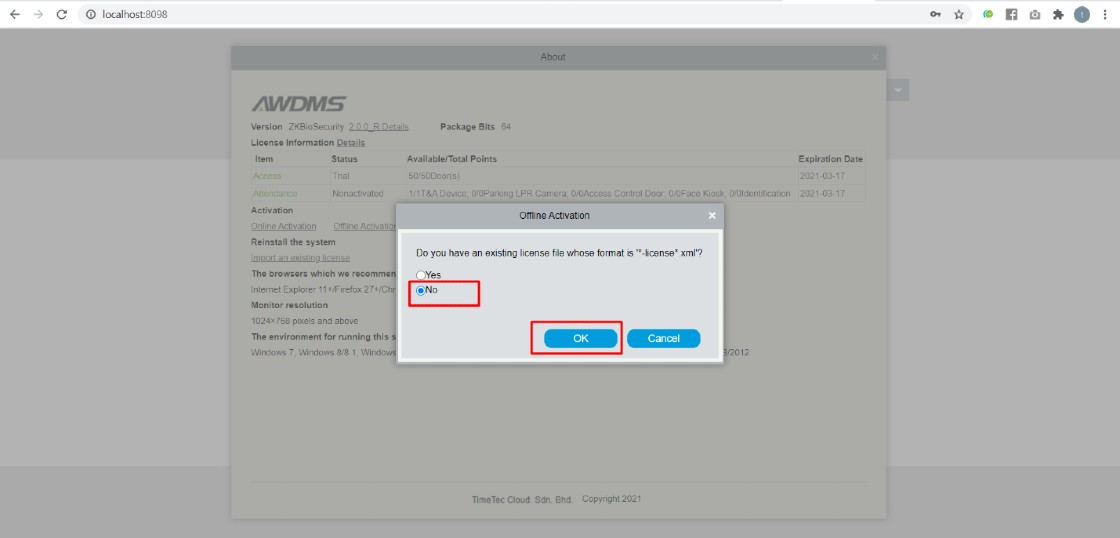
4.    Select No when asking for an existing license file. Then click the OK button.

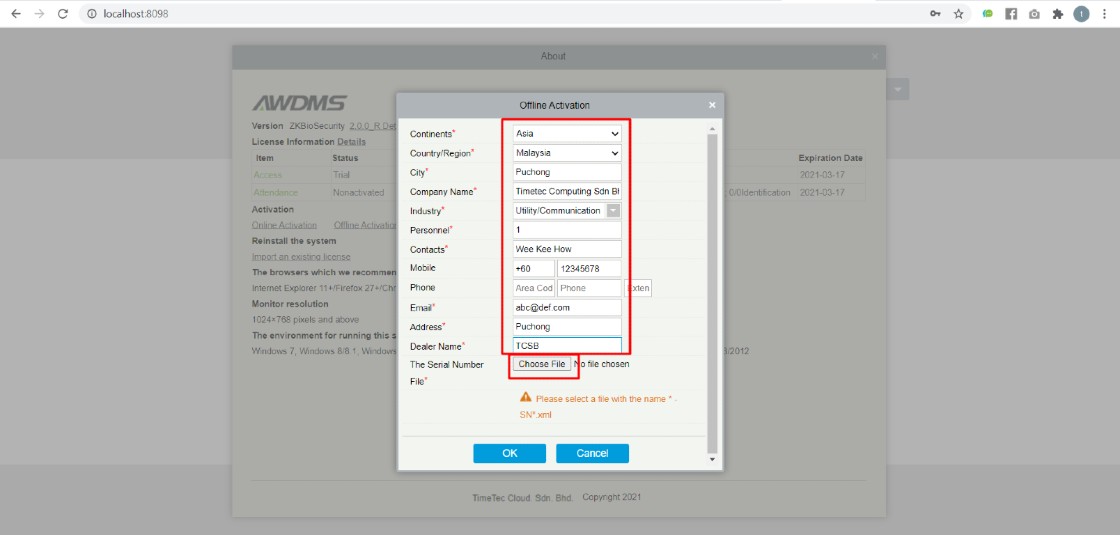
5.     Input information in fields marked with red asterisk *. Then click the “Choose File” button. Please take note, at the Personnel field, just key in a number, e.g., 1.

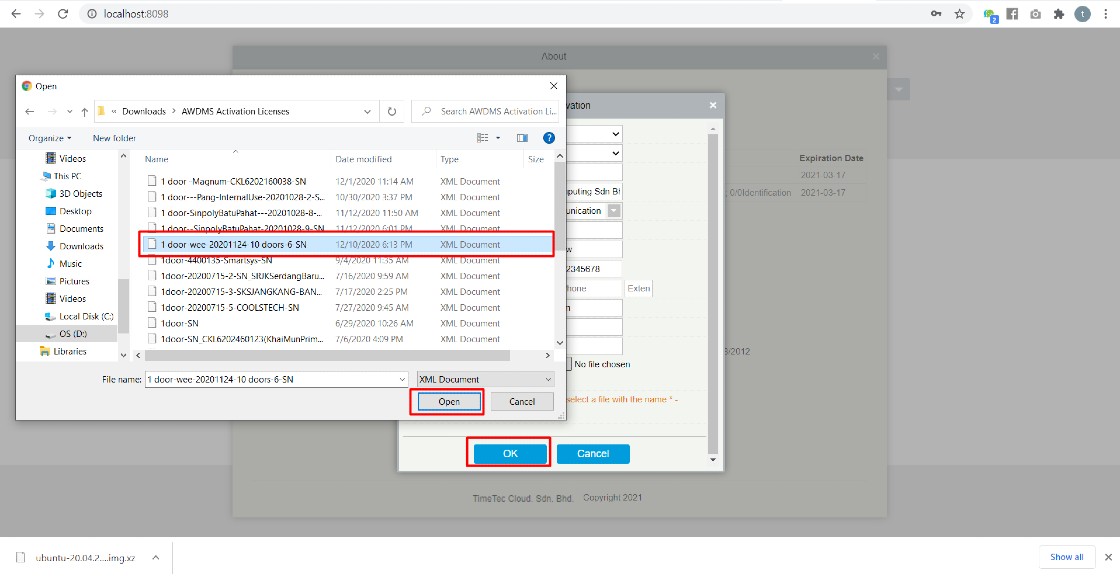
6.     Select the original license file with name *-SN.xml, click the Open button followed by the OK button.

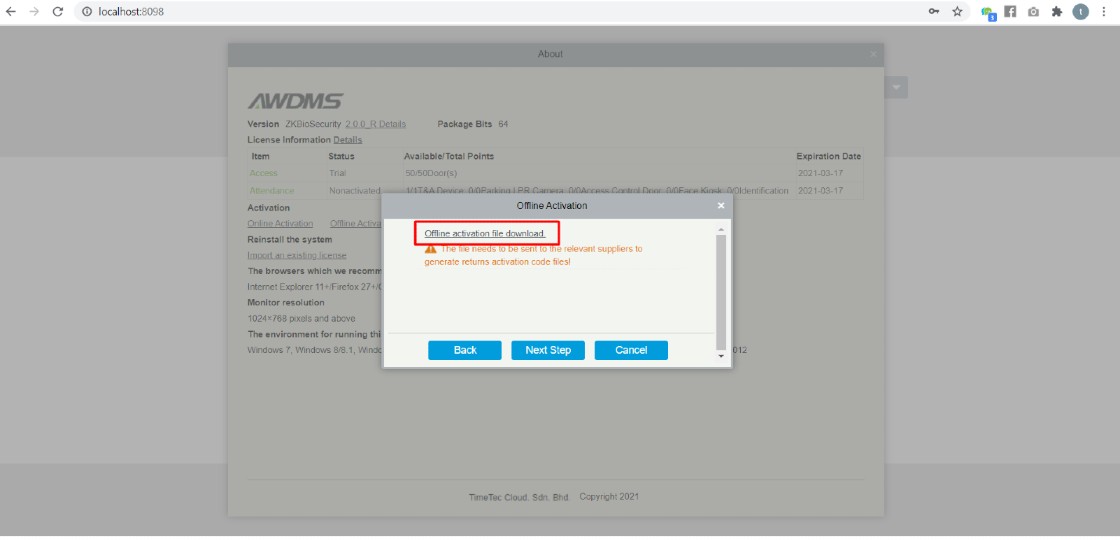
7.     Click Offline activation file download. A file with a name like *_lic_upk.xml will be downloaded, sent this file, together with the original *-SN.xml file to Timetec Computing Sdn Bhd’s Sales Team to get an Offline activation license file. The filename of an offline activation is xxxxx-License.xml.

8.     After receiving the offline license file. Click Offline activation on the About page again, and select Yes when asked “Do you have an existing license file whose format is *-License*.xml’, then followed by clicking on the OK button.

9.      Click “Choose File”, then select the license file, click Open, followed by the OK button. The activation should be completed by now.

Note: If some of the screenshots or steps viewed here are different from the ones in the current system, this is due to our continuous effort to improve our system from time to time. Please notify us at info@fingertec.com, we will update it as soon as possible.


Adding a New Charge for Billing Inside i-Account


Introduction
In the i-Account system, one of the most basic and frequent transactions is issuance of invoice. If Admins finds it necessary to issue invoices for a new Charge item (e.g. Access Card, Rental of Facility, etc), they have to add the Charge into the system first. In the process, Admin has to assign an Item Code to the Charge and create a new General Ledger account. 
The steps to add a new Charge item inside i-Account is as follows:

Process
For example, Admin may need to issue an invoice for Rental of Multipurpose Hall, a new Charge/Item. 

A. Create New General Ledger Account
Step 1
First and foremost, Admin needs to create a new General Ledger (GL) account linked to the new Charge/Item and used to record invoice transactions. 
Under the Accounting section, go to Banking and General Ledger > Maintenance > GL Accounts.


Step 2
Select “New Account” from the drop-down menu.


Step 3 
Enter the “Account Code” and “Account Name” for the new GL account. E.g:  Account Code is 10011 and Account Name is Rental of Multipurpose Hall.


Step 4 
Select the Account Group from the drop button for the new GL account. In this example, the Account Group selected is “Other Income”.


Step 5 
Once completed, click “Add Account” at the bottom of the page to add the new GL account.


B. Add New Charge/Item
Step 6
Next, go to Items and Inventory Module > Maintenance > Items to create a new Charge/Item.


Step 7
Select “New Item'' using the drop-down menu. 


Step 8
Enter the Item Code and Item Name. E.g: Item Code is 10012 and Item Name is “Rental of Multipurpose Hall”.

Step 9
Select Item Category for the new Item. The most frequent Item Category is Components and Services. However, we usually suggest setting it as “Services” for the Item Category.
The differences between Components and Services are as below:


Type 

Description

Components

Used for physical items that are purchased and Admin has to track Inventory balance and quantity. 

Service

Used when no physical item is involved.


Step 10
Select the Unit of Measure for the new Item. For this Rental of Multipurpose Hall,  we set as Each.

Step 11
Select the GL Account for the new item. As we are adding this new item for billing purposes, we only need to set the Sales GL Account, i.e. the GL account that will be credited when an invoice is issued under the item.

- Therefore, for the “Sales Account”, select the GL account that was newly created.
- C.O.G.S Account setting is not applicable for debtor invoicing and can be skipped.

Step 12
Once completed, click the “Insert New Item” at the bottom of the page.


C. Invoicing
Once you have successfully created the new Item, you can view this at Property Section > Charge Setup. At this page you can set the price for the item (Unit Price). For example RM 100.00.  Click “Update” at the bottom of the page to update the price. You can then proceed to Batch Invoice to generate invoices.

Alternatively, to issue a new Ad hoc invoice (bill to single debtor), go to Accounting section > Sales > Transaction > Invoices. Select the new item, i.e. Rental of Multipurpose Hall by using the drop-down menu. Enter the price and click the “+” icon at the right to add the item and proceed to issue the invoice as usual.


Note: If some of the screenshots or steps viewed here are different from the ones in the current system, this is due to our continuous effort to improve our system from time to time. Please notify us at info@timeteccloud.com, we will update it as soon as possible.