TimeTec – Profile Layouts and Data Fields


This post was originally published in June 2016 and was updated in Jan 2019.

Note:
Please note that the information and images below refer to TimeTec TA software. However, this particular module/ feature is also available in TimeTec Patrol and TimeTec Leave with the same rules and functionality, hence you can also use this as reference for all three abovementioned softwares.

Introduction
TimeTec TA has launched a new feature which conveniently allows the admin to add data fields in the user profile layout.  

Benefits
Some companies require different types of information. TimeTec TA System Admin will be able to customize accordingly the additional data fields to match company preconditions in the user profile layout and determine the viewing rights between admin views and normal user views.

Process
To customize the Profile Field layout, here’s what you need to do:

Step 1 > Set Data Field

Set the additional data fields you require, for example Marital Status, Insurance No., Passport No, Spouse Name, etc.

Step 1.1 > Go to Company > Profile Field > ‘Manage Data Field’ tab. Click on the Add Button


Step 1.2 > Add Customized Data Field
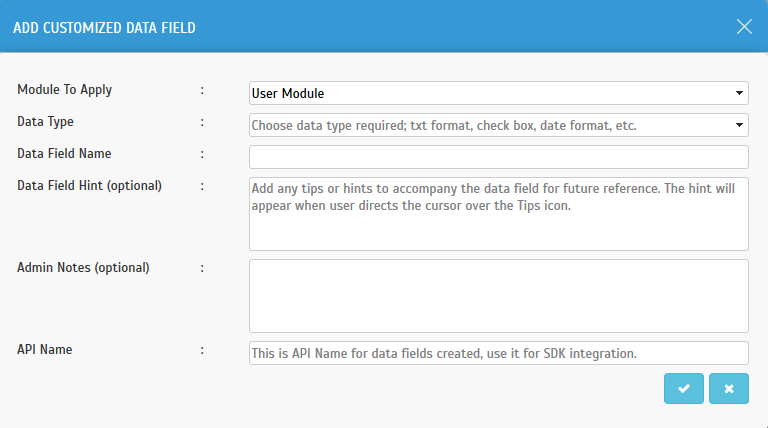


Description:
Module to Apply - User Module (This feature only supports to add customized data field in the user module)
Data Type – Users may select the data type they require
·         Text - Single line textbox that may contain up to 2000 characters
·         Text(Multiple Lines) – Multi line textbox that can contain up to 2000
           
characters
·         Check box - A field that can have two posibble values. Examples "True or False" ,
            "Yes or No"
·         Date - A date field where you can configure to suit your requisite
·         Date and Time - A date and time field with a date and time selector
·         Email - Input field that should contain an email address
·         Number - A number
·         Pick List - Selection from a list of custom values
·         Pick List (multiple selection) - Multiple selection from a list of custom values
·         Url - A Web link of which when its clicked, it navigates to the appropriate
           
page
·         Label – A bolded text used to indentify something

Step 1.3 > Data fields created will be displayed in the Profile Field to be included in the layout settings.
Step 2 > Add Data Fields into Profile Field

The data field you created should appear here. Select the data field and apply them to the Default or a new Profile Field. Once completed, you can assign users to the profile. User view will be limited to the Profile Field assigned to them respectively.

Note: One user can only be assigned to one profile field.

Step 2.1 > Click Add/Edit Button

Step 2.2 >  The Created Data Field Will Appear Here

Step 2.3 > Under the Edit Profile Field settings, you can:

·         Select Admin or User view
·         Apply data field to the Profile Field

Displayed on the right column (Circled in Red), is the default fields available in this Profile Field.

Displayed on the left column (Circled in Blue), is your Customized Data Field that can be added into the Profile Field.

> Drag and drop any required data field from the left column to the right column.

> You can also remove data fields from the right column using same method (drag and drop to the left column) or clicking on the Disabled button. 


Step 3 > You May Check the Data Field in the User Layout

Click User > Manage User > Click Edit

Download & Upload User Data and Download Transaction Data Using USB Flash Disk to Ingress


Introduction
Network and communication between FingerTec devices and software allows user to work remotely and enhance efficiency at the same time. A proper and stable network is surely an advantage for user to transfer employees and transaction logs just by a simple click. However, we understand that not all places are equipped with Internet and the terminal might need to operate on a standalone mode. In such situations the USB flash disk plays an important role to transfer data to/from terminal to/from the software for processing.

Benefits
By having this features in the hardware and software, the terminal is able to operate the device on a standalone mode without extra wiring to get data back to the software. This feature will also benefit the place that does not have Internet connection.

Process:
* Important note: All downloaded USB file (in .dat format)  must be encrypted. Files that are not encrypted wont be able to be read in Ingress software.

Download Users
1.    Go to the Users Tab > Read User from USB


2.   a)    Select the USB drive
 
b)  Click at the “From USB” button
 
c)  Double click “user.dat” and the user information will be shown at the right
      panel of the window.
 
d)  Select user to transfer to Ingress and click the “Download” button.

3.  Go to User and You Will See the New Users in the List.


Download Transaction
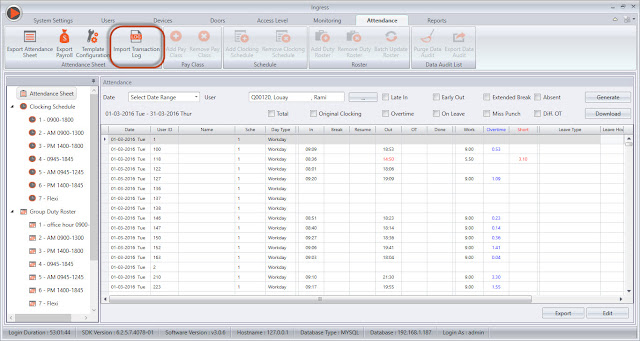
    1)   Go to the “Attendance” Tab > Import Transaction Log


   2.    a)    Select the USB drive
         
b)  Click at the “From USB” button
          
c)  Double click “attlog.dat” and the transaction log will show at the right
               panel of the window.
          d)  Click the “Download” button to download the logs to the
               software.
   3.  Go to the Audit List and You Will See the Transaction Logs in the List.


   Upload User

1.   Go to the “Users” Tab > Export User to USB

2. A Smaller Window Will be Prompted for You to Insert Some Information

3.  a)     Select the user(s) to export
     b)     Select the flash disk drive
      c)     Select the user information to export
      d)     Click the button “Export”
Now you can bring the USB Flash Disk to upload the user information to the terminal.

Troubleshoot - Unable to download transaction log from USB

1. Have you done terminal activation? Download of clocking data from the terminal is not possible without the activation process being done prior. Please activate your FingerTec terminal.

2. Is configuration of the terminal ID in software exactly the same as the device number? To check the device number, follow this instruction: Press Menu > Option > Comm. Option > Dev. Number. 

3. Have the device connection in the software (Comm Mode) been set to USB connection? If not, please do so. 

4. Please make sure the USB file downloaded from the device is in an encrypted file format [ you can open the file by using notepad to check ]. This is applicable for certain devices such as TA100C where the encryption for USB download option can be turned on or off. 

Update in November 2017:

In Ingress version v3.1.2.12 and above, we’ve added a new option to browse the path of User/Attendance USB file for importation to software. Before this, the option is only available with the USB flash disk drive location, where you need to copy the downloaded User and Attendance record from the terminal with .DAT file into the USB flash disk and plug it into the PC to read all the information.

With this new feature, you can save the user data and the transaction log (with .DAT file) that you have downloaded inside the computer itself. At the same time, you can share the .DAT file through Email, Skype or any cloud storage.


For further information, please refer to Import User and Attendance Record with USB (.dat File) from the Folder Path.


Change Port Number for TCMS V2 Viewer


Introduction

FingerTec® TCMS V2 Viewer is a web based interface for TCMS V2 administrators and users to view his/her attendance sheet on a web browser on multi-platform from anywhere. The viewer implements the basic features that are available in TCMS V2 by using the Microsoft .NET framework 2.0.

Benefit

User does not need to install any other software at the computer before using the TCMS V2 Viewer. Some of the features available are querying for a user attendance sheet data, printout of attendance sheet report from any computer through a web browser.

By default TCMS V2 Viewer is using port number 80 for a web based system. If there are other systems that uses the same port number, it might interrupt TCMS V2 Viewer application. However, you can change the port number by referring to the below steps.

Procedure

1.    By default TCMS V2 Viewer is using port number 80.

2.   To change the port number, go to the control panel > Administrative Tools > Internet
     Information Services (IIS) Manager > Default Web Site > Bindings > Choose http > Edit


3.  Change the port number > Okay > Restart.


4.  After the changes are done, you can access TCMS V2 Viewer using a new port number.


Configuring Instant Message Display of Terminals through Ingress & TCMS V3 Software


Introduction

Instant Message Display is a feature available in Ingress (ver 3.0.5 onwards) & TCMSV3 software, where it allows you to create an Instant Message to public (all users) or to set personal message in FingerTec devices to individuals.

There are two types of Instant Message, which are:
a)      Message on device: All users can see this message by pressing the shortcut key
          (View SMS) on the device.
b)      Message for user: The message will appear automatically after the specified user
      successfully verified themselves at the device.

You also can set the Start Date and End Date for the Instant Message according to your own preferences.

Before we proceed, please refer to this link for more details regarding which device supports this particular feature, SMS (Short Messaging Service): 

Benefit

This Instant Message Display feature can be used as a mean of communication, to convey important messages or news to users. This feature can also be used to send personal message to a specified user to inform him/her of any news, memos, or even a birthday wish.

Procedure
Special Note:
Please be informed that the below configurations are done on Ingress software, as shown in the accompanying images. However, this can also be applied in TCMS V3 to achieve comparable results, as the configuration is similar with only a slight difference in interface.
1.       Create a Message on Device or Message for Users by going to Devices > Instant 
            Message Display > select ‘Message on Device’ or ‘Message for Users’ > Edit > Add >
            insert Message ID, SMS and Date range > click OK and Save


2.        Upload the Instant Message to your Device(s)
            i) Click Write to Device.


3.       Erase the Message from Device(s).
          i) Go to Devices > Instant Message Display > Select ‘Message on Device’ or ‘Message
             for Users’ > Click Erase from Device


The Flexibility Ingress Gives Your Doors (Ingress Permanent Door Open Close Feature)


Introduction
Ingress, as an access control management application is not only a control panel for door monitoring, but also an easy to use remote control for doors. The remote unlocking, and access level management are two features that makes Ingress more flexible to its users.

Benefits


Permanent Door Open Close Time Zone feature of Ingress, allows you to remotely control the unlocking of your doors, up to 3 different intervals daily. Moreover, users are able to set different time zones for the holiday season, and synchronize all changes along to their FingerTec access control terminals and controllers.

Process

A: Door Setting
1)     Create a door at your Ingress software, then assign your FingerTec Access Control
          terminal to the door.

 
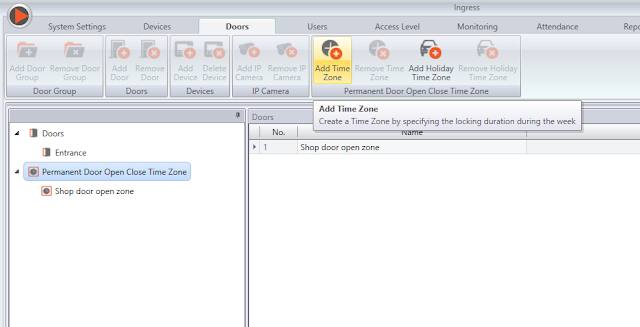
2.   Click on the Permanent Door Open Close Time Zone, then Click on Add Time Zone from
       the top menu and enter the Name and Description of your Door open close time zone
.
 

 3.   Enter the Intervals, when you need the door to be left open and save. You can choose
      
to have up to 3 intervals, at the end of which the doors will be locked.


P.S: The copy button can be used to repeat the same intervals for each day respectively.
 
B: Assign the Permanent Door Open Close to Your Doors
1)   To change the setting of your door, click on your door name and press Edit at “Details”
        setting:
       -   At the Permanent Door Open Close Time Zone, click on the drop down list
       -   Select your preferred Door Open Close Time Zone then press save and
             synchronize the changes to the device.
 
2.   To create Permanent Door Open Close Holiday Timezone, follow step A.1 and A.2,
      instructed above, save the changes and synchronize the changes to your device. 


TCMS V2 Database Management and Housekeeping


Introduction

Any unmaintained database will be accumulating problems in one or more areas, which can eventually lead to poor application performance or even downtime, data loss and file corruption.

When referring to computer program, housekeeping is a term used to describe the optimization of database. It commonly involves removing old or unused files and data, backing up, or running disk utilities such as a ScanDisk, Defrag, or simply an antivirus scan.

Benefit

In this article, we will explain how to maintain the database and demonstrate some simple ways to manage and do housekeeping on TCMS V2’s database to keep the system organized and to ensure that it runs properly. It is advised for this routine to be performed at least six months once.

 
Process

1.   First of all, before you make any changes on the database and system, it is
       recommended to backup the database file. In TCMS V2 software you can backup
       the database at System Setting > Backup/Restore Database > select Backup > Apply.
       You can also refer to the article in the link here.

2.   Once you are done with the backup process, close the program and open the TCMS V2
      folder file. By default the TCMS V2 folder are located in C:\Program Files (x86)\
      FingerTec Worldwide\TCMS V2. Delete all the .CDX file and remove database file
      named Attend.DBF, History.DBF, Clkdata.DBF, and Fptaudit.DBF to another folder.


3.   Replace a new fptaudit.dbf from here into the TCMSv2 folder.


4.   Go to C:\\ Program Files > FingerTec Worldwide > TCMSv2 > etcom and copy the
       _etcom file. Then paste the _etcom file into the remote
      folder inside the TCMSv2 folder. Start up the TCMSv2 software, go to Attendance and
      click Download.

      The system will download the raw clocking data from the _etcom file. After the
      process is completed, the system will delete the file that you paste in the remote
      folder.


5.   Go to Employee tab and delete the user or employee who has resigned from the
       company.


6.   Last step is to proceed to the Attendance tab and generate new Attendance record
       based on the current transaction log and employee data. Perform the
       database backup again after you finish generate.
Kindly take note, by following these housekeeping steps, you can minimize the database size. If you need to view the transaction log that has been deleted, you can restore back the database file and retrieve User record and Transaction log by using the Restore Option features.

1.   To retrieve User or Employee Record, you can select Employee > tick on User  Record
       and Employee Management > select Employee you want to restore > Apply.


2.   To restore Transaction Log, you can select Devices > tick on Terminal Data Audit List >
       select the Date Range > select All terminal > Apply


3.   After you done this two step, please re generate the record at Attendance > Generate
      to view all the transaction log again.