Showing posts with label Attendance. Show all posts

How to manage new user ID when downloading attendance logs if the user ID does not exist in Ingress/TCMSv3


Introduction
By configuring this option, the management can automatically create a new user ID that does not exist in the user tab when downloading the attendance logs. It eases the management to keep track of the new user downloaded from the device.

Process 
(Example shown for Ingress but applicable for TCMSv3 as well)
Download Attendance (Manual)
1. Go to Attendance tab > Attendance Sheet > click Download 

2. Select a device > Tick Create user if a user does not exist in Ingress > Ok 


Download Logs (Automatic – Auto-create new user ID only available in the latest Ingress version v4.0.2.3 / TCMSv3 v3.0.2.5 and above )
1.  Go to System Setting > System Parameter Settings > Server > configure the auto-download logs either opt for “Server Download Audit Data Interval or Specify 2 daily download timer. You may also refer to the link provided for further details in regards to auto-downloading the attendance logs given below.

http://www.fingertectips.com/2017/01/automatically-download-generate.html
2. Then, tick Create user if a user does not exist in Ingress > click Save

 
User Tab
The system will only create the user ID in the software. Thus, you need to manually download the users’ details via the software.


1) Go to the User > click Download user > click on your preferred device


2) Choose the newly created user ID > tick your preferred data to be download > configure the issuance date: 1/1/2020 > select the Group Duty Roster > click Download


Attendance Sheet
Go to Attendance Sheet > click Generate > select the user ID and date range > Ok 


Note: If some of the screenshots or steps viewed here are different from the ones in the current system, this is due to our continuous effort to improve our system from time to time. Please notify us at info@fingertec.com, we will update it as soon as possible.

How to manage Attendance Photo in the TCMSV3 or Ingress for Face ID FMM platform


Introduction
By configuring this feature, the management can monitor the staff by verifying the attendance at the device. Apart from that, they will also be able to check if any unauthorized staff did attempt to verify without granted permission. In this case, the device will capture all the false logs data along with the attendance photo. 

Process
Download Attendance Photo (Manual)
1.Go to the Attendance tab > Attendance Sheet > click Download 


2.Select the device > Tick Download Attendance Photo > Ok 


Download Attendance Photo (Automatic)
1.  Go to System Setting > System Parameter Settings > Server > kindly configure the auto download logs to either opt for “Server Download Audit Data Interval or Specify 2 daily download timer. You may also refer to the link provided for further details in regards to auto downloading the attendance logs.
http://www.fingertectips.com/2017/01/automatically-download-generate.html

2. Then, tick Download Attendance Photo > click Save 

Delete Attendance Photo (Manual)
Go to the Attendance tab > Attendance Sheet > Click Download > Select the device > Tick Download Attendance and Remove Attendance Photo After Download option > Ok

Delete Attendance Photo (Auto)
1.  Go to System Setting > System Parameter Settings > Server > Kindly configure the auto download logs to either opt for “Server Download Audit Data Interval or Specify 2 daily download timer. You may also refer to the link provided for further details in regards to auto downloading attendance logs:

2. Then, tick Download Attendance Photo and tick Remove Attendance Photo after download > click Save

Remark: If the total attendance photos stored in the device are to a great extent, it will take slightly longer to redownload it. Hence, we highly suggest our client to perform up-to-date maintenance in order to reduce the overall time to download the attendance photo into the software. This can be done through either manual or automatic process. 

View the Attendance Photo
Upon the completion of the downloading attendance photo process, you may view it either in the Data Audit List or Attendance Sheet 

Audit List
Go to Attendance Sheet tab > Data Audit List > select the date range and user ID > click Search. You may tick Display Attendance Photo in Data Grid 


Attendance Sheet
Go to Attendance Sheet > right click on the time allocated in the respective column in order to view the Attendance Photo > click Show Attendance Photo

Note: If some of the screenshots or steps viewed here are different from the ones in the current system, this is due to our continuous effort to improve our system from time to time. Please notify us at info@timeteccloud.com, we will update it as soon as possible.


How to Enable Attendance Record from Selected Device in TCMS V3 and Ingress


Introduction
When dealing with many devices such as Time Attendance and Door Access, TCMS V3/ Ingress software will record every clocking activity of the staff involved. But certain companies want the system to capture the clocking time for attendance from certain devices only.

In order to accomplish that, TCMS V3/ Ingress software provides an option for users to take no account of the clocking activities from other devices that are not set up as the time attendance devices. When you set this option, the attendance sheet will only capture the clocking activities from the selected devices and store in the attendance record.

Process
Therefore, we have prepared a guide for users to enable the attendance record from the selected device. Please follow the quick steps below:

1) Go to Scheduling & Attendance > Clocking Schedule > Add Clocking Schedule > Key in the Schedule ID > Name > Select Work Schedule (Weekly/Flexi/Daily).


2) Set the clocking time for the schedule (In, Break, Resume, Out, OT and Done).


3) Go to Clocking Range > Enable the attendance record from selected devices only > Tick the device name that you want the attendance record to be captured for each column. Please make sure you already add and activate the device in order for the device to appear in the list.


Note: If some of the screenshots or steps viewed here are different from the ones in the current system, this is due to our continuous effort to improve our system from time to time. Please notify us at info@timeteccloud.com, we will update it as soon as possible.

How To Troubleshoot Missing Attendance Record via TimeTec TA


Introduction
Attendance plays an important role for HR staff to calculate staff payroll and determine staff performance in the industry. Hence, it is crucial if there is a missing attendance record in the system when the staff claimed that they have been presented to work, as it will be unprofitable for the staff.

In this tip, there will be a guidance for the TimeTec TA user to do troubleshooting if there is a missing attendance record in the system.

Steps
A : CHECK DEVICE CONNECTION
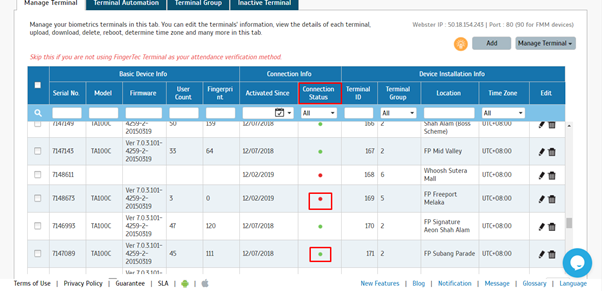
In this tab, you can manage your biometric terminals by edit the terminals' information, view the details of each terminal, upload, download, delete, reboot and determine the time zone.

1. Go to DEVICE > Fingertec Terminal.
 

2. This tab will allows you to see all device connection status. The green and red color in the connection status allow you to determine whether the device has connected to the system or not. Green means the device is connected and red means disconnected.


3. If it shows red color, you need to check with the staff that available at the device location to check the device connection or to reset the device.
4. If the device connection status shows that the device still connected to the system, you can proceed with the steps shown below.

B : STAFF MOVEMENT ANALYSIS REPORT
Track staff clocking record with STAFF MOVEMENT ANALYSIS REPORT.
The Staff Movement Analysis report is a list of every attendance transaction based on the date & time selected by the user. This report is to determine the movements of the users during working hours.

1. Go to REPORT > Device Analysis > Staff Movement Analysis


2. Select the user that you want to see their record. Then, select the Date & Time.


3. The record will show you every clocking details that the user has done during working hours.
4. Now you can see the staff movement record, whether the he/she do the clock-in or not.


C: DATA AUDIT LIST
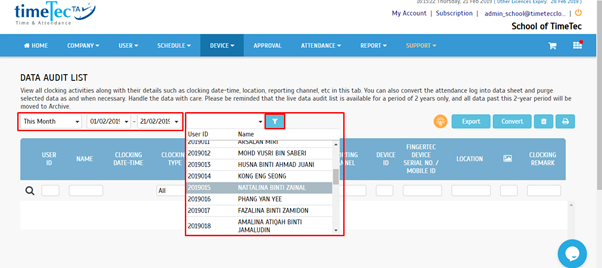
The Data Audit List allows you to view all clocking activities along with the details such as clocking date-time, location, reporting channel, etc.

1. In TimeTec TA, Go to DEVICE > Data Audit List


2. Fill in all the  information you need in the column given and you can search the user by ID/Username.
3. Once done, click on the filter icon next to the ID/Username column to continue.


4. The result will show you all the clocking record done by the user.
5. In the Data Audit List you can see the type of reporting channel used by the staff.


D : GENERATE ATTENDANCE
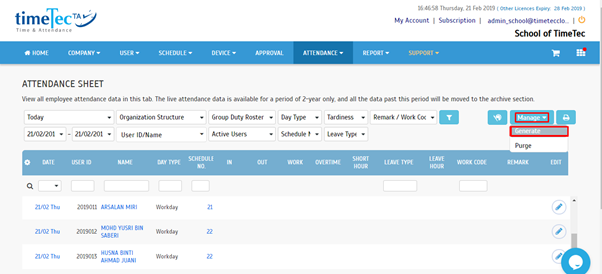
This step allows you to view employees live attendance data. However, the live attendance data is available for a period of 2 years only, and all the data past this period will be moved to the archive section.

1. In TimeTec TA, go to ATTENDANCE > Attendance.


2. Click on Manage > Generate


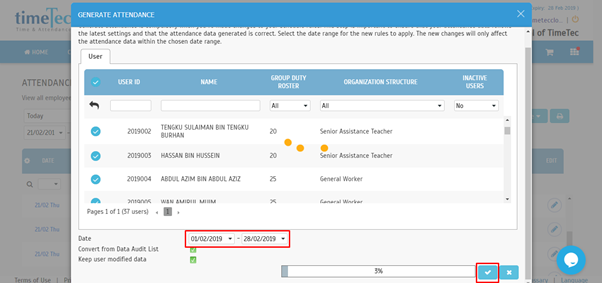
3. Select a user, choose the date and click on “OK” button to start generating the attendance report for the user.
4. Once the attendance generating process is done, please check the staff record again.


If none of the above steps give the info that you need, please visit the link below:

Note: If any of the screenshots or steps in this manual are different from the current system, it is due to our continuous effort to improve our system from time to time. Please notify us at info@timeteccloud.com. We will update it as soon as possible.

How To Configure Holiday Setting and New Year Roster Via TCMS V3/Ingress


Introduction
New Year’s Eve may sounds exciting to all of us. But sincerely, there are some of our beloved customers are worried about the Duty Roster and also the Holiday settings in the software since there might be some changes or reschedule of work that need to be done for the upcoming New Year.

This manual is created to help you to have a better idea on how to configure the New Year Duty Roster and also to import the Holiday list from the previous years to make sure you can celebrate your New Year’s Eve with joy!

Process 
A. Group Duty Roster for New Year
If there’s no setting for the Group Duty Roster for the New Year, the downloaded clocking data will not be generated into the Attendance sheet due to no schedule can be referred to by the system.

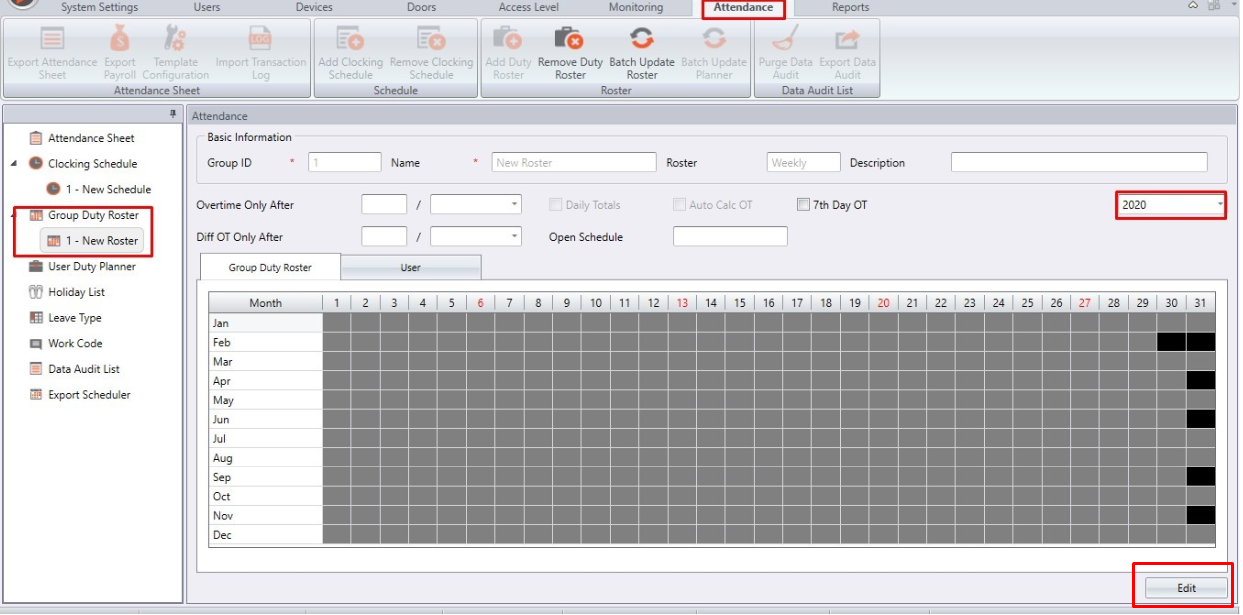
To set the Group Duty Roster for New Year, go to Attendance > Group Duty Roster, then select the desired year at the top right of the window.


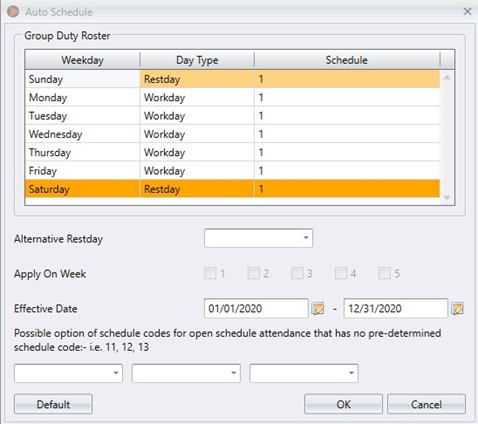
Proceed to click on Edit button. The following screen will be prompted. Here, you can choose to import the roster or create the new Group Duty Roster by the assistance of the Auto Schedule functions. If the settings of the year that you have selected earlier are similar to the previous year, you may open the previous year’s settings as your reference.

Press ‘OK’ to proceed. The New Year Roster is now ready with the proper schedule that has been arranged according to how you set in the previous steps. 

Please double check the roster setting of the New Year and then, save it.


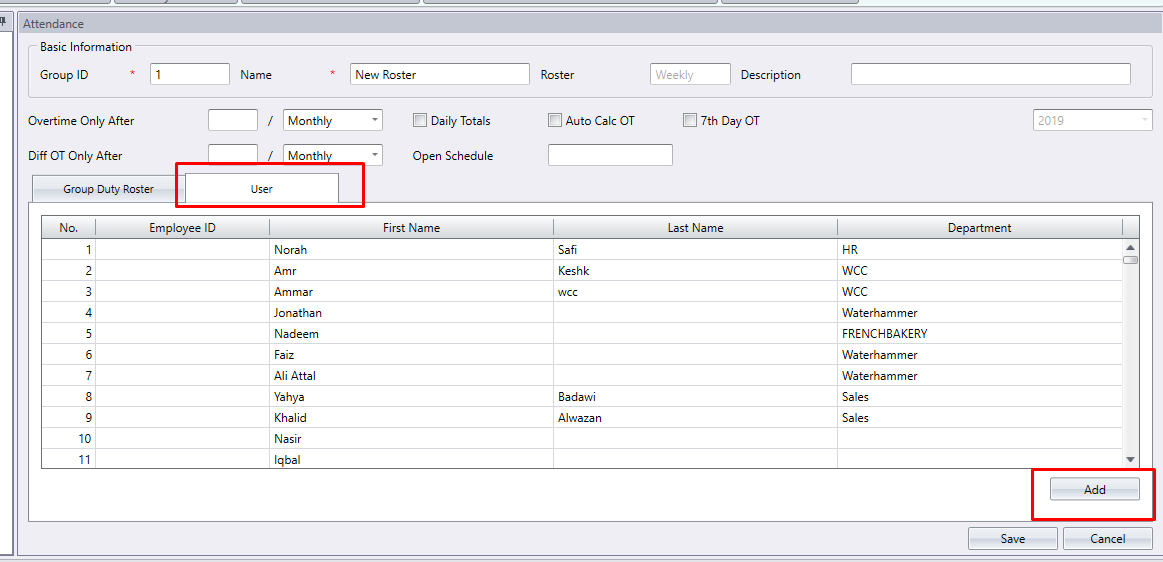
Finally, DO NOT forget to add users that belong to this Duty Roster.

You are now can generate and view the New Year attendance in the Attendance Sheet as usual.

B. Holiday Setting for New Year
For Holiday setting, the TCMS V3 and Ingress software will allow you to import the holiday list from the previous years to the current year/next year calendar. This is to ease the users so that any redundant works are not required since there are public holidays that will fall on the same date every single year like New Year and Christmas.

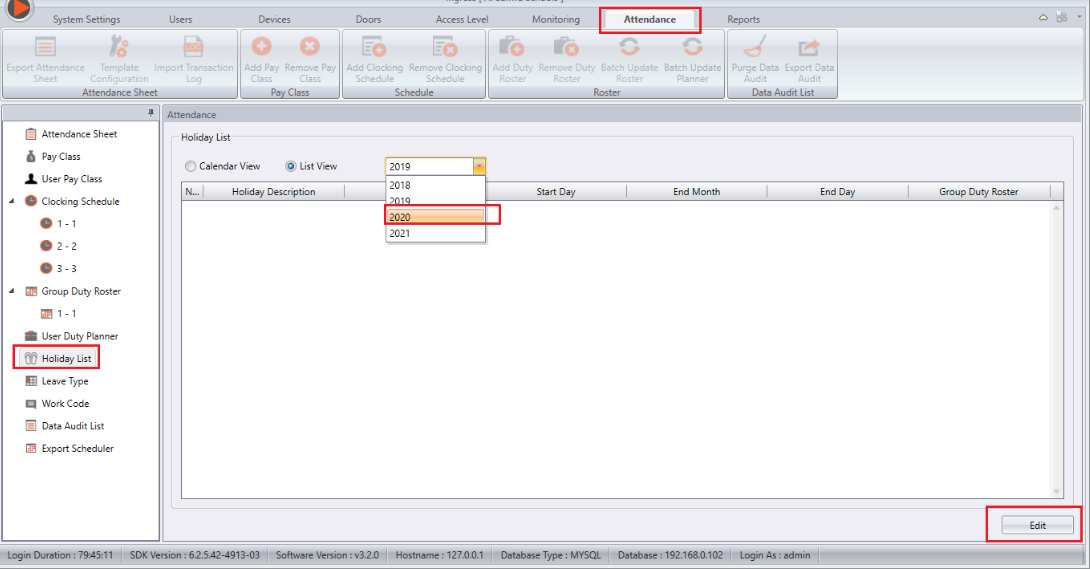
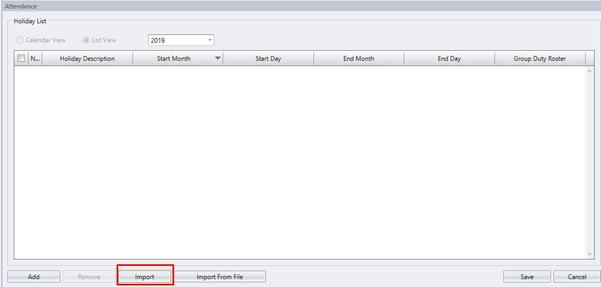
Go to Attendance > Holiday List > List View, select the year that you wish to import the holiday list.


Click on Edit button, then select Import.


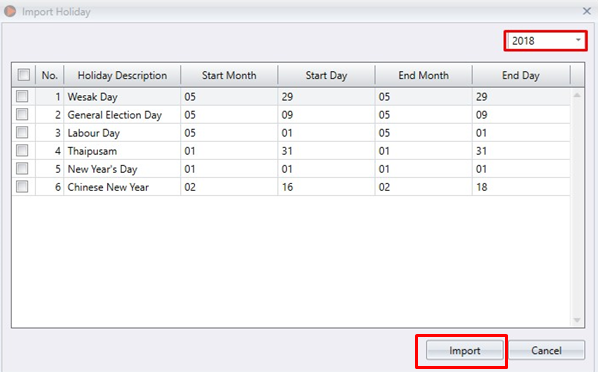
In this ‘Import Holiday’ pop up window, you can choose the desired year and all types of holidays on that selected year will be listed. Tick any of the holidays you wish to import and click on Import button.


The selected holidays are now imported to the new year calendar. Click Save once you have checked that all settings are correct.


Note: If any of the screenshots or steps in this manual are different from the current system, it is due to our continuous effort to improve our system from time to time. Please notify us at info@timeteccloud.com. We will update it as soon as possible. 

How To Configure Rounding Feature In TCMS V3 And Ingress Software


Introduction: 
Rounding is a feature in FingerTec TCMS V3 and Ingress software, whereby users can determine the clocking time and attendance record within the Clocking Schedule to be rounded into the nearest minutes as specified in the field (based on the rounding rules).

Benefits:
By using the Rounding feature in TCMS V3 and Ingress software, Admin can set various rounding rules for all employees, i.e. specific punch, total worked time, or a specific rounding range; hence, when an employee clocks in/out within that range, the system will in turn round the data according to what has been configured.

Process:
Therefore, in this article, we will be guiding you on how to configure the Rounding feature in TCMS V3 and Ingress software. There is 2 option for Rounding in TCMS V3 and Ingress software that you can use to manage your Attendance Sheet Record for each employee.

1. Rounding the clocking time for each column in Clocking Schedule
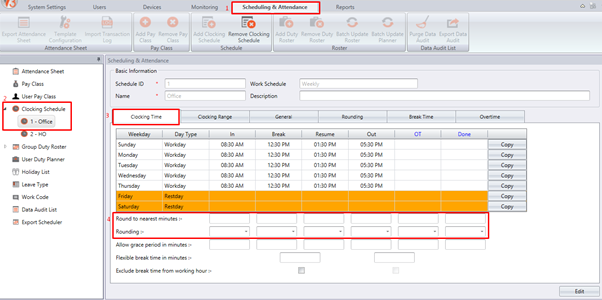
 With this option, you can round your clocking time for Check In, Break, Resume, Check Out, OT and Done to the nearest minutes. Please refer to the screenshot below to start setting the rule for rounding the punch data to a specific time.

Figure 1

There are 3 types of Rounding that users can select which is Round Up, Round Down and Midpoint. Below is a brief description:

· Round Up: If Round Up is selected and set at 15 minutes, i.e. when an employee clocks-in fo work at 9:06AM, his/her IN time will be recorded as 9:15AM.
· Round Down: If Round Down is selected and set at 15 minutes, i.e. when an employee clocks-in for work at 9:06AM, his/her IN time will be recorded as 9:00AM.
· Round Midpoint: If Midpoint is selected and set at 15 minutes, when an employee clocks-in at 9:06AM, his/her IN time will be recorded as 9:07AM.

Here is an example of the Attendance record when using the Rounding option for each Clocking Time column.
 
Attendance Record Without Rounding Setting 

· In this example, we will be setting the Round Up feature for Check In and Resume time at 15 min while Round Down for Break and Check Out time at 15 min. (Refer to screenshot below)
 

· Once configured the Rounding setting, the system will thus generate the Attendance Record as shown below.


2. Rounding Rules for Attendance Sheet
 This Rounding option is to determine the “rounding of minutes” rules allowed in the Clocking Schedule as well as the rules that will determine the presentation of time within the attendance sheet. Please refer to the screenshot below to start setting the rule.
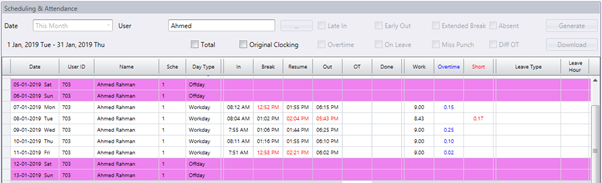
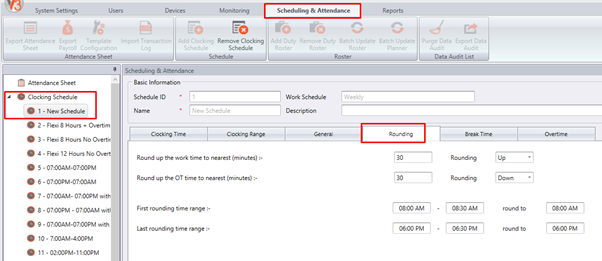
Figure 2

· Round up the work time to nearest minutes:
This option allows you to set a rounding rule for the total Work time per day. As shown in Figure 2, whereby the ‘Round up the work time to nearest minutes’ is set at 30; the system will thus generate the data as shown in the screenshot below.


 · Round up the OT time to nearest minutes:
This option allows you to set a rounding rule for the total Overtime per day. As shown in Figure 2, whereby the ‘Round up the OT time to nearest minutes’ is set at 30; the system will thus generate the data as shown in the screenshot below.


· First rounding time range and Last rounding time range:
These options will allow you to set a rule for a specific range that if any employees clock in or out in that period, the system will automatically round the punch time according to the setting. This rule is mainly used if you do not wish to take into account for employees clocking in early and clocking out late. As configured in Figure 2, any IN punch made between 8.00AM to 8.30AM will automatically round to 8.00AM and any OUT punch made between 6.00PM to 6.30PM will automatically round to 6.30PM as shown in the screenshot below.


However, if there are any timings that are not in the rounding range, the system in turn will not calculate or generate that timing as per setting.

*Please be informed that once the Rounding Rules are configured in the clocking schedule, you will need to Save the setting and regenerate the Attendance Sheet before you can obtain the updated result.

Note: If some of the screenshots or steps viewed here are different from the ones in the current system, this is due to our continuous effort to improve our system from time to time. Please notify us at info@timeteccloud.com, we will update it as soon as possible.