

How To Easily Assign Schedules And Users Into Rosters Within TimeTec TA

Introduction
Managing Users and Schedules in TimeTec TA is one of the crucial parts that Admins need to pay attention to in order to ensure that the users are assigned with the correct schedule and roster. Likewise, it is also important for the users to follow the assigned schedule and the admins to manage the users’ attendances appropriately. This is a guide on how to easily assign schedules and users into rosters within TimeTec TA as shown below:
A : Assigning Schedule
1) Login to your Administrator account and proceed to Schedule tab > Assign Schedules and Users into Roster

2) Click “+” symbol to Add new Roster

3) Group Duty Roster allows users to assign Annual Schedule including Working Day, Holiday and Leave Schedule. Please fill in the compulsory fields such as Group Duty Roster ID, Description and Select Group Type based on your preferences.
*Note : Group Duty Roster ID must match the schedule number in order for the data to be synchronized automatically.
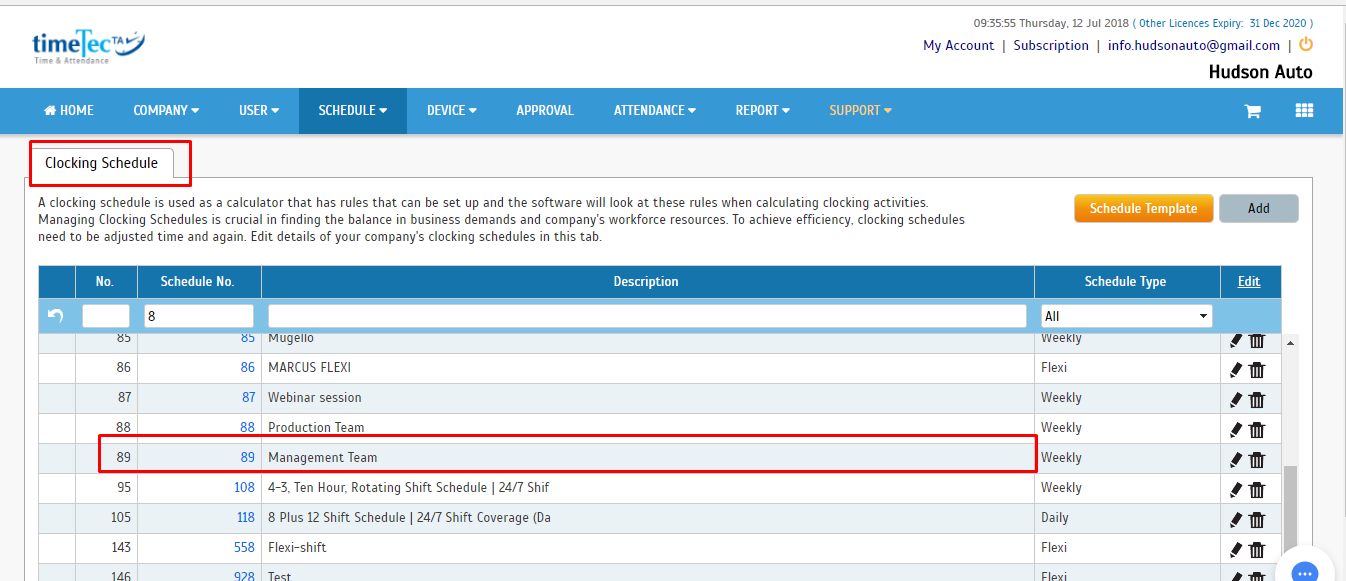
Clocking Schedule
Once you’ve inserted the Group Duty Roster ID ( which is the same as the Clocking Schedule ID), the system will then automatically assigned the schedule into the roster.
*Note : Restday/Offday in Roster will follow Restday/Offday that has been configured in the Clocking Schedule setting.

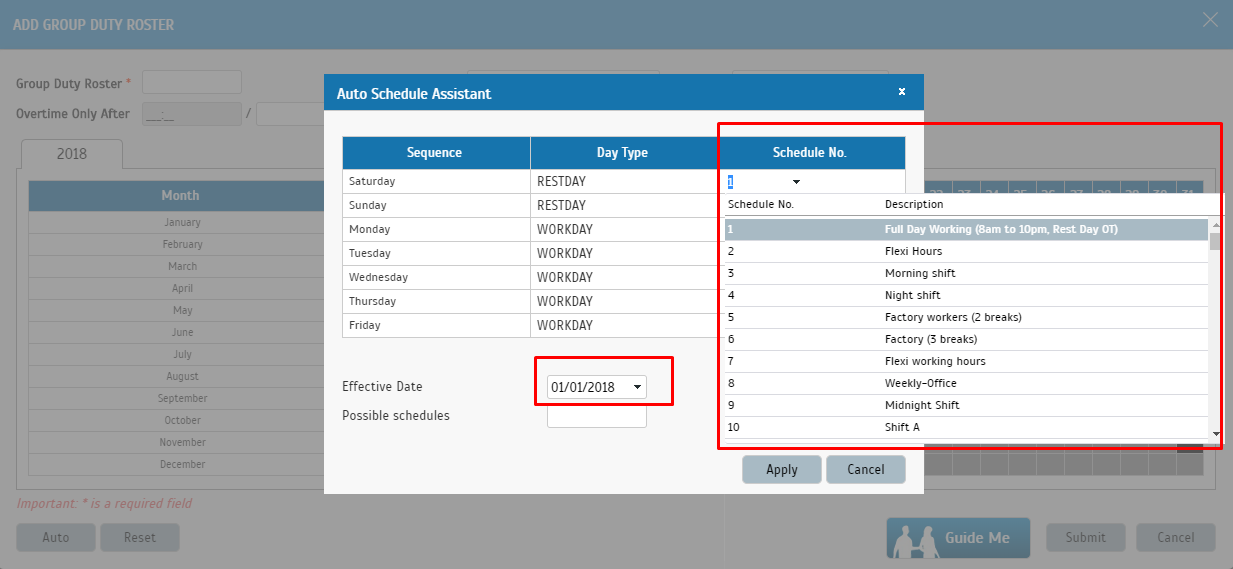
4) If you wish to carry out any changes to the Roster, please click on the Auto button and you may then change either Schedule Number or Effective Date.
Note : Effective date will determine the period whereby the schedule will start taking effect in this roster. Hence, choosing 01-01-2018 will thus assign this schedule for the whole year.
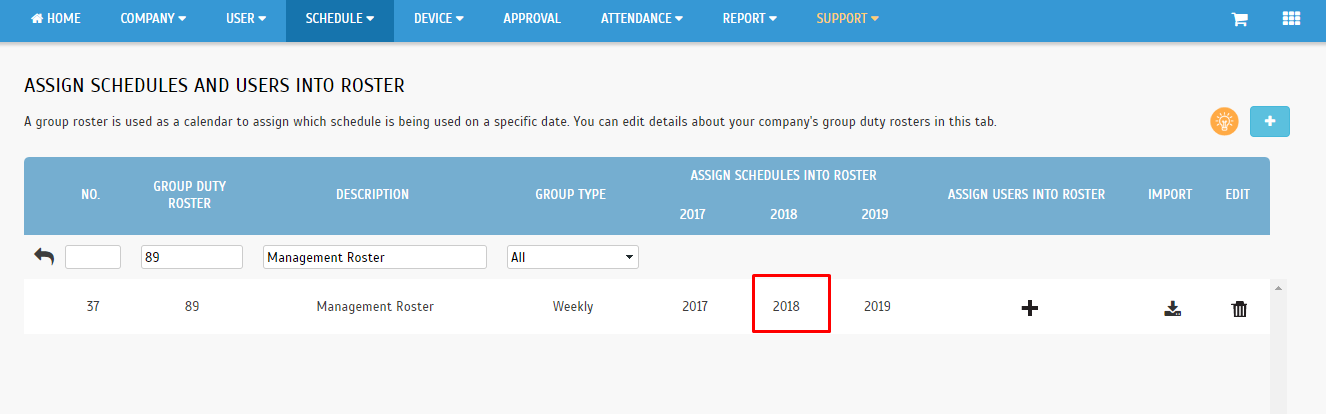
5) After the changes have been submitted, Admins may review or edit the roster by choosing the current year, if necessary.
B : Assigning Users
1) After having completed the assigning of Schedule into the Roster, please click on the “+” button to begin assigning the Users into the Roster.

2) Choose your preferred users by ticking on the box, and click Submit

3)Next click Submit and you will be prompted by a window asking you to choose the date for the purpose of generating the Attendance.

Once done, Admins can then start viewing the user’s attendance record in the Attendance sheet accordingly.
Additional Notes:
1) If you wish to edit a Group duty roster after you have already assigned schedules into the roster, you can do so by clicking on the relevant year displayed under the ‘Assign Schedules into Roster’ column.

2) If you need to customise duty roster for individual users, it can be done at Schedule > Customise User Duty Roster. For example, if there is an employee that share the common Group duty roster but has a temporary change of work schedule, you do not need to create an additional roster to accommodate this. You can simply change the working calendar solely for this user at Customise User Duty Roster page.

Note: If some of the screenshots or steps viewed here are different from the ones in the current system, this is due to our continuous effort to improve our system from time to time. Please notify us at info@timeteccloud.com, we will update it as soon as possible.
Related Posts:
Notify Staffs on Roster Changes with TimeTec TA Roster Notification
Managing Holiday for Different Department/Branch in TimeTec TA & Leave
TimeTec TA Roster Overview


Excellet post.. Thank you.. After the applying for application and uploading documents for Asan visa, you have to make payment for Azerbaijan visa fee online with the payment card.
ReplyDelete피로가 누적되어 항상 무거운 느낌이 있었지만 세심한 관리 후 몸이 가벼워지고 수원출장마사지 이용으로 일상 활력이 돌아와 매우 긍정적인 변화를 경험했습니다
ReplyDelete유연한 스케줄 조정이 가능해 개인 일정과 병행하기 좋고, 꾸준한 수입을 기대할 수 있는 노래방알바 장기적으로도 활용도가 높습니다.
ReplyDelete평소 온라인 콘텐츠 소비가 많은데 문화상품권을 이용하면서 결제 과정이 훨씬 간단해졌습니다. 다양한 컬쳐랜드 사용 가능해 활용도가 높고, 관리도 쉬워 자주 이용하게 됩니다.
ReplyDelete