Showing posts with label Administrator. Show all posts

How To Send/Resend i-Neighbour Login Credentials Code (for Admin)


Introduction
During the i-Neighbour setup process, login credential code can be set to "Later" until the system admin confirms to send the codes to all residents. This article explains how admin can send and resend the login credentials code to the residents. However, the codes can only be sent to owners with email addresses only.

Process
Step 1: Go to Neighbourhood > Manage Unit. 

Step 2: At the Manage Unit tab, click Pending Activation.


Step 3: Tick the first box to select all.

Or tick the selected owner.


Step 4: Click ‘Send Login Credential’ to send an activation email.


Once done, the login credential sent time will be updated to the latest sent time.

If you are still having problems after completing all of the steps stated above, please contact us via support@i-neighbour.com.

Note: If some of the screenshots or steps viewed here are different from the ones in the current system, this is due to our continuous effort to improve our system from time to time. Please notify us at info@i-neighbour.com, we will update it as soon as possible.

How To Customize User Privileges For Face ID 2 FMM


Introduction:
FingerTec Face ID 2 FMM terminal consists of a few types of privileges such as User, Enroller, Admin and Super Admin. As such, each of the privilege has a different authority and access into the terminal. In this article, we will thus be showing how you can customize the User Privileges in Face ID 2 FMM. Please refer to the process below to get started:

Process:
User Role
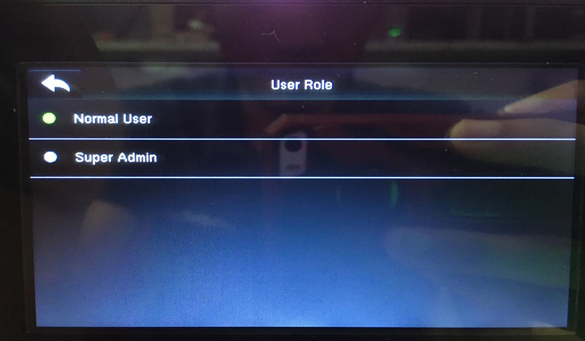
By default, whenever enrolling a new user into Face ID 2 FMM, the user roles that are available for selection will be listed as Normal User and Super Admin.


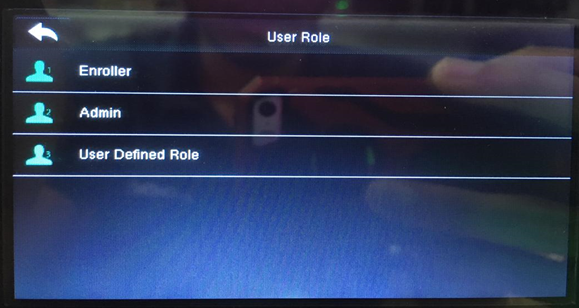
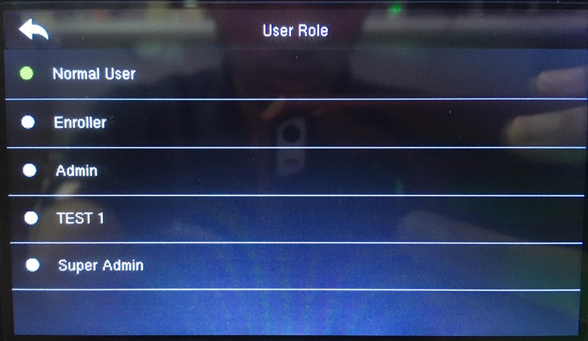
However, by selecting the User Role menu, note that there are 3 other roles that can be enabled for the device:

1. Enroller
2. Admin
3. User Defined Role


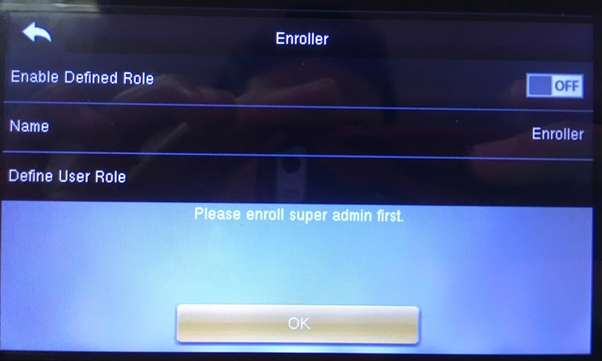
Before proceeding further, it is important that you first enroll at least one Super Admin before enrolling any other users. This is because without Super Admin, the system will prevent you from enabling a user role that you required.


Customizing User Role


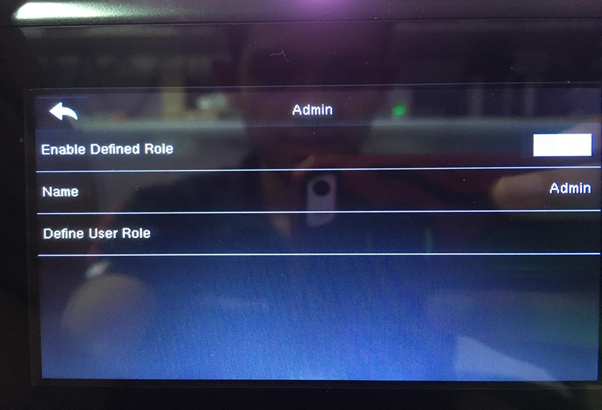
Once added the Super Admin, you can now proceed to customising your preferred User Role. In doing so, you will be presented with these 3 options:

i. Enable Defined Role - Set on/off to enable/disable your User Role.
ii. Name - This field allows you to assign a name for the User Role.
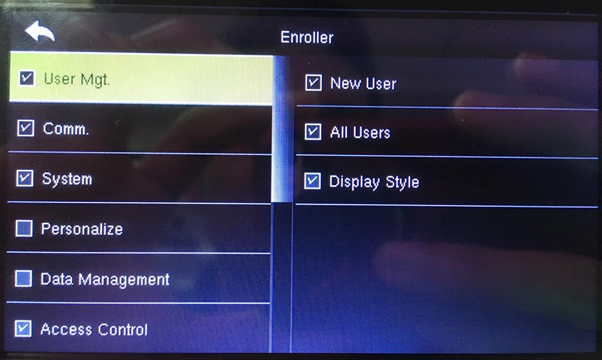
iii. Define User Role - In this field, you are given the choice to select any function that can be accessed by this User Role. Please tick the function that you wish to enable access or vice versa as shown in the screenshot below.


After enabling the User Role being configured, you will now able to select the customized User Role during the enrollment process.


That’s it, you’re all set and ready to start your very own customization process.

Note: If some of the screenshots or steps viewed here are different from the ones in the current system, this is due to our continuous effort to improve our system from time to time. Please notify us at info@timeteccloud.com, we will update it as soon as possible.

TimeTec TA - How to Assign Division in Clocking Schedule


Introduction
Recently, we released a new function in TimeTec TA that affects access rights to clocking schedules. Prior to this, all clocking schedules are not assigned to/owned by specific divisions no matter which Admin originally created the schedule. Edit rights for Admin are also blanket rights, meaning either you are allowed to edit all the available schedules or you are not allowed to edit any. This means there’s a chance of another Admin accidentally altering the schedule you’ve tailored for your division.

To address this, we added Division Access Right control in the Clocking Schedule module. With this, when you create a schedule, you can set restrictions by assigning divisions that are allowed to share access to it. Subsequently, only Partial Admins with rights for the ‘Assigned Divisions’ will be able to edit or delete this particular schedule.

Note: Full Admin (Admin with Full Division rights) will still have unrestricted access. 

Process

The basic details are as follows:

i. Firstly, Master Admin/ Full Admin needs to enable the ‘Assign Divisions’ right in System Role > Module rights > Schedule > Clocking schedule tab to use this function.

ii. Next, for the Partial Division Admin (Partial Admin), once you have added a schedule, click on Assign Division icon. In the Organization Structure, tick to select the allowed division. If you are a Partial Admin with rights to only one (1) division, you can only assign this one division for the schedule.

iii. Once a clocking schedule is assigned to a division, only Admin for that division will be able to edit and delete the schedule (Full Admin also have unrestricted access). Admin for other divisions are not allowed to edit but can still view the schedule for reference.

iv. All clocking schedules without at least one Assigned Division are free for all Admins to edit and delete.

For more details on how to use this feature, please refer to the step-by-step guide below.

Steps

Setup for Master Admin/ Full Admin
1. Login to Master Admin/ Full Admin account. Go to Manage System Roles and Admin > System Roles > Edit System Role > Module rights > Schedule > Clocking Schedule. Tick to enable ‘Assign Divisions’ > Save.

Note: 
i. It is recommended to synchronise the right for ‘Assign Divisions’ with rights for ‘Add’, ‘Delete’ and ‘Edit’ (i.e. enable all 4 of the rights together) since the aim here is to control Admins’ edit and delete rights. If the Admin in question do not have any responsibility for clocking schedules, you can choose to enable ‘View’ only.

2. Repeat Step 1 for another System role, where necessary. Assign these roles to the appropriate Admin. In the example we are using, there are two Admins, “Head of Division 1” and “Head of Division 2”. Both of these users have been designated as Partial Admin with rights over their own division only.

Assign Division at Clocking Schedule (Partial Admin’s View)
1. Continuing with the example, we login to a Partial Admin’s account, e.g. “Head of Division 1”. At Clocking Schedule, click ‘Add’ to create and configure your schedule. 

Note: 
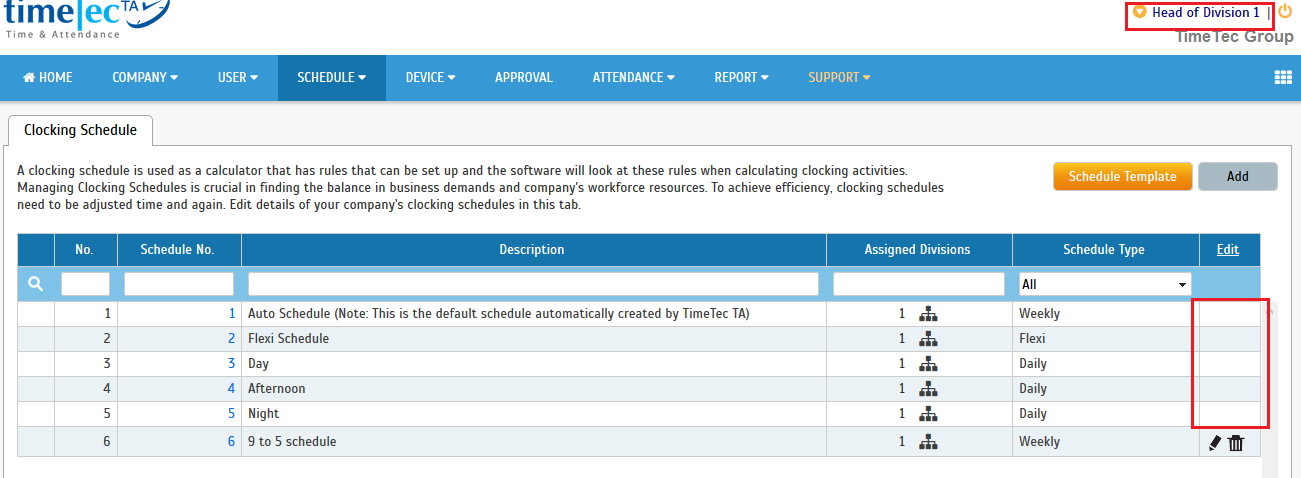
i. In the following image, there are no Assigned divisions yet for all the available clocking schedules, which means these are currently free for all Admins to edit and delete.

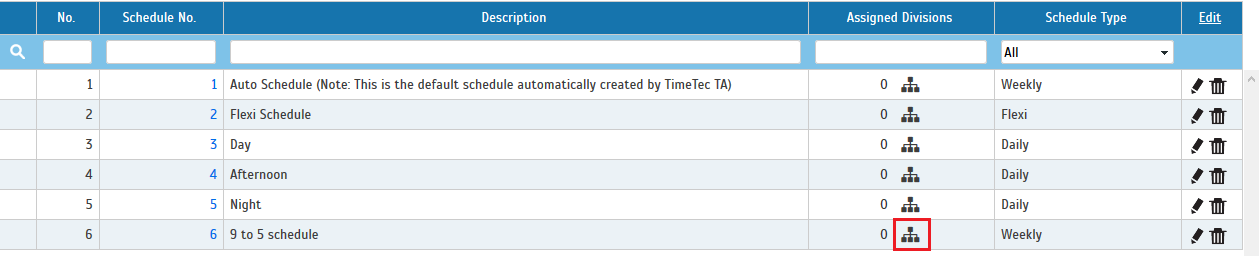
2. Once you have added a schedule, e.g. Schedule No.6 , click on the ‘Assign Division’ icon.

3. In the Organization Structure, select the allowed division, e.g. ‘Division 1’. If you are a Partial Admin with rights to only one (1) division, only one checkbox will be enabled and you can only assign this one division for the schedule.

Note: 
i. For the Full Admins, all checkboxes will be enabled and they can assign any division (one or more) to the schedule.

4. Once a clocking schedule is assigned to a division, only Admin for that division will be able to edit and delete the schedule (Full Admin also have unrestricted access). Admin for other divisions are not allowed to edit but can still view the schedule for reference.

Partial Admin View- “Head of Division 1”

Partial Admin View- “Head of Division 2”

5. Taking the example further, if we assign all the other clocking schedules (Schedule No.1 to 5) to ‘Division 2’, notice that “Head of Division 1” will no longer be allowed to edit and delete these schedules. 

Partial Admin View- “Head of Division 1”


Note: If some of the screenshots or steps viewed here are different from the ones in the current system, this is due to our continuous effort to improve our system from time to time. Please notify us at info@timeteccloud.com, we will update it as soon as possible.

How To Configure System Roles and Admin Module


NOTE: 
Please note that the information and images below refer to TimeTec TA software. However, this particular module/ feature is also available in TimeTec Patrol and TimeTec Leave with the same rules and functionality, hence you can also use this as reference for all three abovementioned softwares.

Introduction:
In view of security concerns, TimeTec TA offers control of access rights to authorized users as permitted by the organization. By default, there are two types of User Role:

1. Master (System Administrator) who have full access and responsible for setting up and maintaining the TimeTec TA system
2. Normal User - TimeTec TA allows customer to create and customize the access rights that are given to the Admin roles which are then assigned to select employees. 

In our goal to improve the system for better user experience, we’ve prepared some tips on how users can now manage the System Roles and Admin module more efficiently and effortlessly. Below are some quick tips that show how this can be done:

Add System Role:
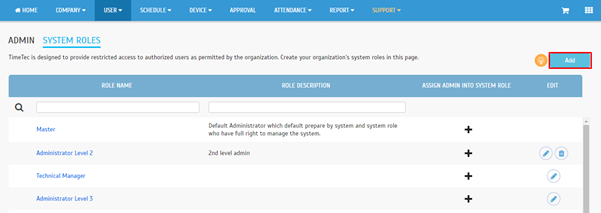
At the System Role tab, users can create a new System Role with specific access rights by clicking on the Add button.
 

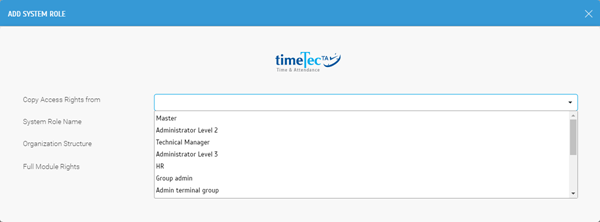
In the pop-up window, there is an option that allows user to copy the access rights from existing System Role or even edit the copied role if necessary. This is to fasten the process when the user is creating a new system role with major similarity to other existing roles. Next, please fill up the System Role Name and Description.


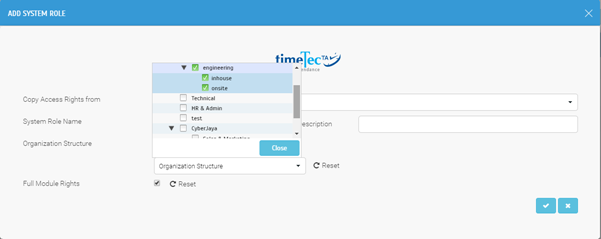
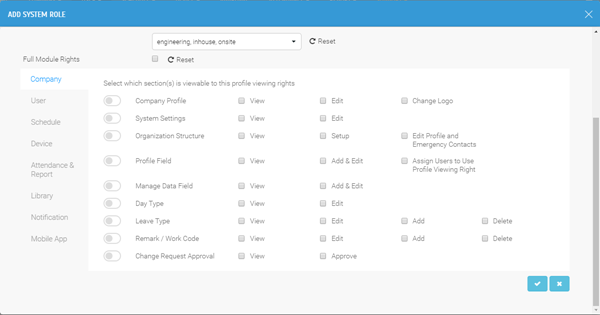
Moving on, selecting Full Division will allow the Admin to access all users in the Organization Structure while Partial Division will only allow Admin to access certain users based on the structure.


Subsequently, set the access rights for the System Role by ticking Full Module Rights to allow all modules access in TimeTec TA while unticking it allows users to select which module is accessible for the role.
 

Assigning Admins Into System Role:
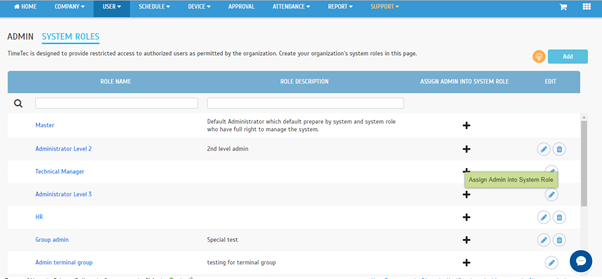
After setting up the System Roles, the Admin can also be easily assigned under the System Role by clicking on the ‘+’ button.
 

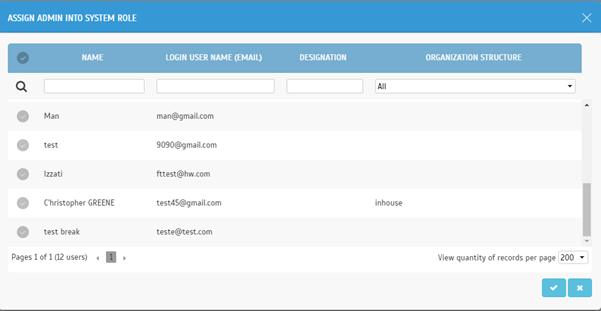
Once clicked on, a pop-up window will appear and a list of Admins (excluded from the role) will be displayed for the users to select.


Configuring System Role While Adding Admins Into the System:
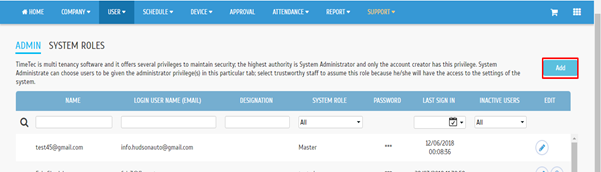
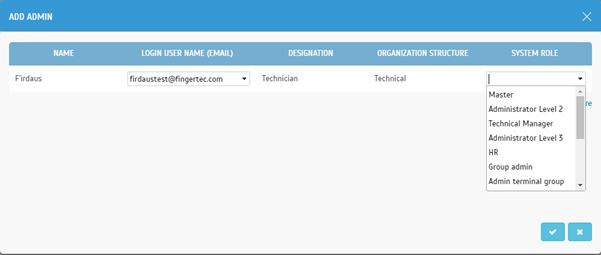
On the other hand, System Roles can also be specified while adding an Admin into the system. To add an Admin into the system, please click on the Add button under the Admin tab.
 

In the pop-up window, select the existing system user that you wish to assign as Admin and select the System Role. Note that the default System Role is Master if users do not create any System Roles within the system.


For further enquiries about TimeTec TA, feel free to contact our Support Team by sending an email to support@fingertec.com

Note: If some of the screenshots or steps viewed here are different from the ones in the current system, this is due to our continuous effort to improve our system from time to time. Please notify us at info@timeteccloud.com, we will update it as soon as possible.  

Related  Posts:
Boss Mode - A System Role for Bosses to Monitor Workforce Performance

Adding Billing Admin in TimeTec


NOTE:
Please note that the information and images below refer to TimeTec TA software. However, this particular module/ feature is also available in TimeTec Patrol and TimeTec Leave with the same rules and functionality, hence you can also use this as reference for all three abovementioned softwares.

In many organizations, the finance department is in charge of billing and service subscriptions, and more often than not the process is kept private from the other employees. Definitely there are advantages to this method but one apparent disadvantage for cloud subscription like TimeTec TA is the lack of accessibility to the system’s billing and this would create bureaucracy and adds process time for the person in charge of the account to communicate with the finance department.

In TimeTec TA, we have made it flexible by allowing the Account Owner to add Billing Admin to handle subscription purchase. The role of Billing Admin in TimeTec TA can be assigned to an existing user or outside personnel that handles TimeTec license purchase. This feature is optional and would not affect the current system if your organization insists of having the finance personnel to take care of service subscription purchases.

To Add a Billing Admin

1. Go to My Account > Company > Billing Admin or click at the Billing Admin icon at the main page.


2. Click Add Billing Admin to add.


3. Fill in the New User or choose Existing Users to assign Billing Admin


The newly added Billing Admin will receive an email that explains his/her role. If this person is not an existing TimeTec user, he needs to activate his account to login to TimeTec. The accessibility of Billing Admin without TimeTec license will be limited to modules available in My Account only, where as TimeTec users who have been assigned as Billing Admin will have access to both My Account and the applications.

Ingress System Admin Access Password Retrieval

In an event where you have forgotten your administrator password to login into your Ingress software you need to contact our support team at support@fingertec.com. We can help you generate a temporary password to login to your software. However this feature is only available after you upgrade your Ingress version to Ingress v3.0.1 and above.

Let’s Get Started:
Locate the 5-digit code display at the left lower corner of your login screen in Ingress. This is a very important number, which you need to email to us to request for the new password.  Once you have sent the number to us, do not enter any password or turn off this screen because this random code changes every time you restart the software or fill in the wrong one.


We will provide you with a one-time-use password that is valid for only one login session to  Ingress. 


Insert “admin” into the User Name column and the provided password into the Password field and click Login.

The system will automatically request a password change after the login. Create and confirm your new password here.


Note: This password retrieval option will only work with the System administrator password but not for the Ingress client login password. In case your staff has forgotten their Ingress client login password, the administrator will need to generate a new password on their behalf under System Settings > User Role. 

Password Management for Administrators and Other Users in Ingress

In FingerTec's integrated access control management application, Ingress, an administrator holds the authority to not only set or change his own password, but also for those of other users. This enables the administrator to manage other users' passwords in emergency cases such as forgetting your password. Read below for the step-by-step guide to change the passwords for both the administrator and other users. 

To Change the Administrator Password

1. Click on the Ingress icon and click on Change Password.


2. Insert the details of the old and new passwords in the relevant boxes before clicking Update


3. Click the OK button. Voila! You have now changed the password for the administrator. 


To Change Other Users' Passwords

1. Go to System Settings and click on User Account


2. Select the user account which you wish to change its password to. Click Edit Account to proceed. 


3. Insert the new password in Password and Confirm Password. Click the OK button to proceed. Voila! You have successfully changed the user's password. 


Clearing Terminal Administrator Privilege from Ingress

Ingress is an integrated access control management application that runs on the familiar MS Windows operating environment. On top of its other functions, Ingress can also manage your device's administrator privileges. To clear a terminal's administrator privilege, follow the simple steps below.

Step 1 - Click Devices > Click at the terminal which you wish to remove its device administrator privilege.


Step 2 - Click at Other > Click Clear Admin Privilege.


Step 3 - Click Yes button for confirmation.


Step 4 - You will get the below message when the process is complete. Click the OK button.
All users with administrator privilege in the terminal will be changed to user privilege when the process is complete.


And now you're done!

Initiated & written by: Zul