i-Neighbour: Group Registration for Visitors (Contractor) [for Admin & Security Guard]
Introduction
Some neighbourhoods do require every visitor, including the contractors to register at the guard house before admitting into the neighborhood. It is common to have the contractors walk in in a big group and often, the security guard will only register all contractors under one same vehicle car plate number and one same house number. Some places might even register only the driver.
In the previous version of i-Vizit, the security guards had to enter the vehicle information and the home numbers manually and repetitively. For example, when a group of four contractors approach the guardhouse for registration, the security guard will have to go through the same process four times.
Normal Check-in (Per visitor):
(Enter vehicle number> select street name / home number> host phone for verification> scan ID / license (OCR)> Press the "check in" button
However, in the latest version of i-Vizit, the security guards will only need to enter their vehicle information and home number once. Scan each ID / license per visitor (OCR) and once the "check in" button has been pressed, all contractors will be registered under the same vehicle number and the same house number.
After activating the Group Registration:
(enter vehicle number> select street name / home number> call host for verification> scan ID / license (OCR)> scan ID / license (OCR) for other visitors in the same group> Press the "sign in" button
Benefit
- Speed up the process of registering visitors who come in groups (especially Groups of contractors)
- Security guards can now register all the visitors under the same group and with all their records kept in the i-Vizit system.
A) How to activate group registration [By Admin and Security Guard]
Step 1 - [Admin Only] - Activate the group registration in the i-Neighbour Web
Neighbourhood > Setting > Visitor Setting > Rules > Edit > Enable “Required Group Registration For Visitor”
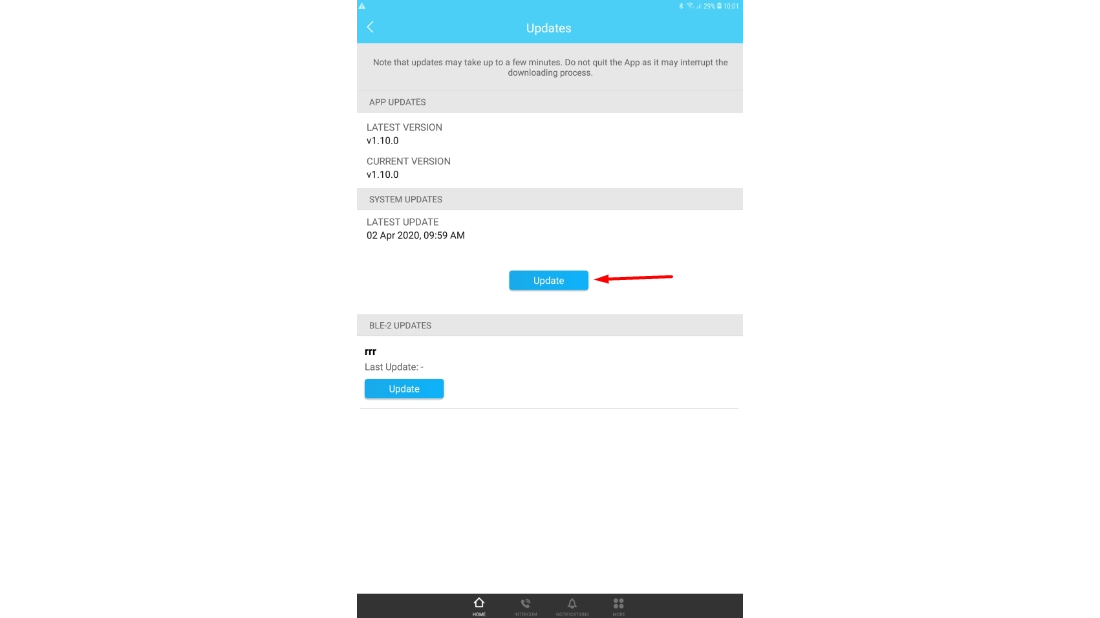
Step 2 - [Security Guard] - Click the Update button to Synchronize/update i-Vizit.
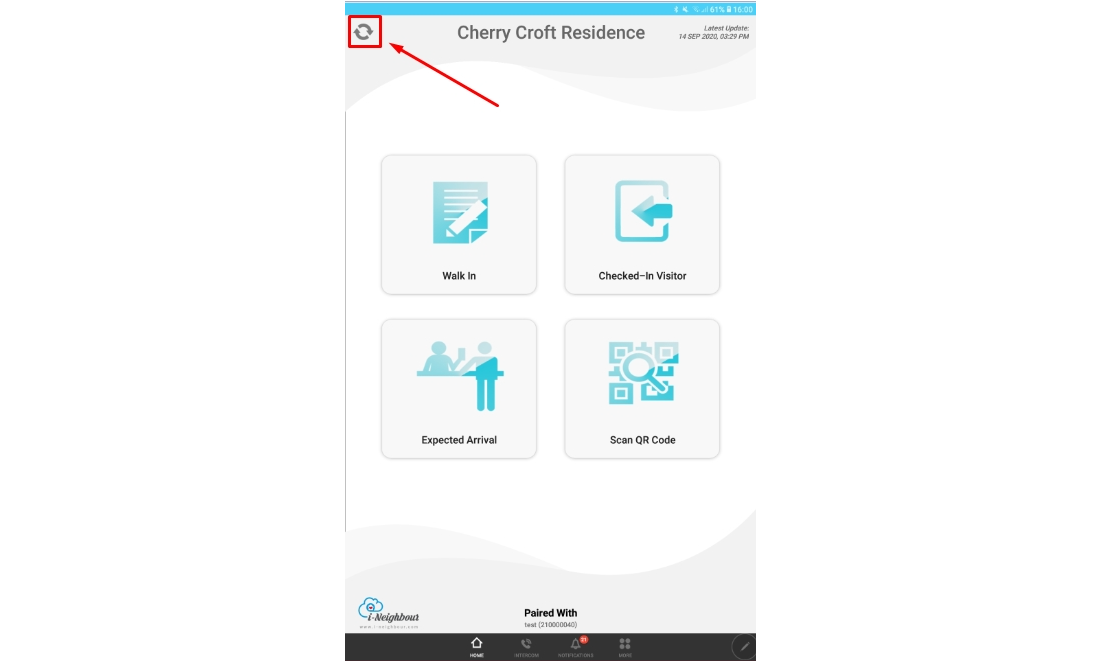
Security guard must press the update button in i-Vizit to load all new data and new settings which has been done by the admin : Homepage > Synchronize icon > Press update button > * Please ensure that the date and time is up to date.


B) How to Register/Check-in visitor (Group registration) using i-Vizit [By Security Guard]
Step 1 - Press “Walk In” > Select Drive-In or Walk in > Press “Next”
Step 1 - Press “Walk In” > Select Drive-In or Walk in > Press “Next”
For Drive-in - Please fill in Car Plate number
For Walk in - Please fill in ID/Driving license number
For Walk in - Please fill in ID/Driving license number
Step 2 - Resident Information
Select Purpose of visit > Select block/street > Select unit number > Select resident name
Select Purpose of visit > Select block/street > Select unit number > Select resident name
Step 3 [Optional] - Intercom to seek approval from unit/house owner
Press owner name > Choose App as “Phone” > Get approval > press “Proceed to Check-in”
Press owner name > Choose App as “Phone” > Get approval > press “Proceed to Check-in”
Step 4 - Visitor personal Information
(For example, a group of contractors come in with 2 person)
Snap OCR photo (1st person) > The system will automatically detect the name of the visitor, ID number and the visitor’s ID photo > select visitor pass > Press “Add more visitor” > Click “OK” to register the next visitor to allocate them under the same group > Repeat the steps for the rest of the visitors.
Once you have selected the visitor pass for the last visitors > Press “Check in” > Click “DONE” > All the visitor names will then appear under the “Checked-in visitor”.
(For 1 visitor only)
Snap OCR photo > The system will automatically detect the name of the visitor, ID number and visitor’s ID photo > select visitor pass > Press “Check in” > Click “DONE” > The name of the visitor will then appear under the “Checked-in visitor”.

C) How to Check-Out visitor (Group registration) using i-Vizit [By Security Guard]
Check-out all visitor in the same group
Step 1 - On the homepage, press “Check-in Visitor”
Check-out all visitor in the same group
Step 1 - On the homepage, press “Check-in Visitor”
Step 3 - Tick/select all visitor name > Press “Check Out”
Step 4 - Click “Yes” to check out visitor
2. Check-out several visitor in the same group
Step 1 - On the homepage, press “Check-in Visitor”
Step 1 - On the homepage, press “Check-in Visitor”
Step 2 - Press “Check-out” icon
Step 3 - Tick/select several visitor name > Press “Check Out”
Step 3 - Tick/select several visitor name > Press “Check Out”
Step 4 - Click “Yes” to check out visitor
Note: If some of the screenshots or steps viewed here are different from the ones in the current system, this is due to our continuous effort to improve our system from time to time. Please notify us at info@i-neighbour.com, we will update it as soon as possible.


0 comments:
Have any questions or inquiries about FingerTec? Drop your input here.