TimeTec Parking - How to Setup a Reserved/Private Parking Lot for Season Pass


Introduction
Season pass parking is a parking system where vehicle owners can park vehicles regularly near their homes or workplaces at a fixed monthly rate. The season parking module of the TimeTec Parking Management System by far is providing the most comprehensive features that the market has ever offered. Through TimeTec Parking apps, users can purchase and select the available parking lot.

Process
1. Go to Parking Rule tab > Parking Lots

2. Click Add button to add a new Location.


3. Setup the Parking lot by Add Building > Add Zone > Add Floor


4. Click on Parking Zone > click the Edit button to add Season Pass Group and Charge Rate.
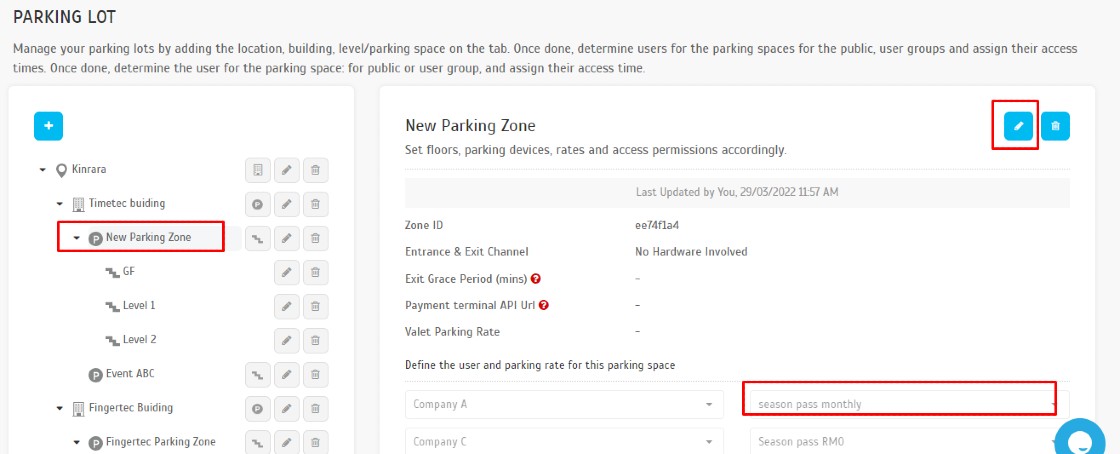
- Refer here to add the Season pass group client guide
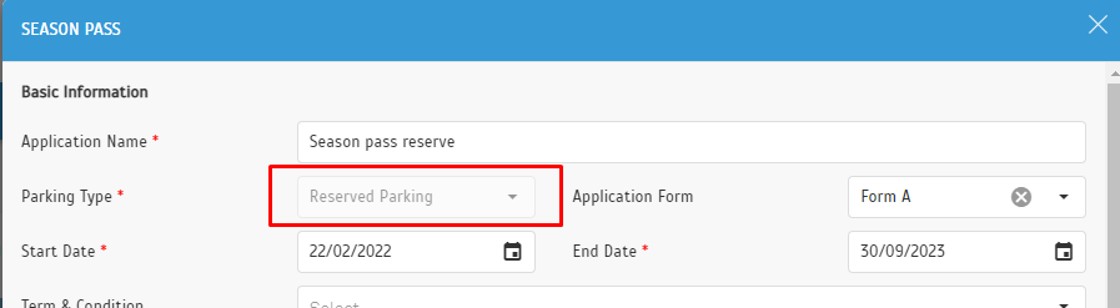
- Refer here for the setup Season pass Charge Rate guide. Make sure the Parking type is set to ‘Reserved’.

5. Next, click on Floor view > click Upload Floor Plan


6. On Floor view > click Manage Parking Bay to set up the parking bay id. Click Add button to create the bay id icon.

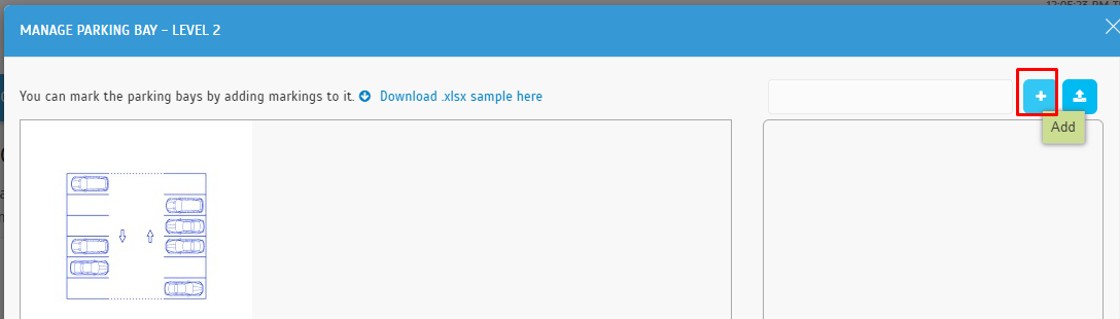


7. You may pull and move the bay id icon to correct bay id based on Floor Plan.


8. Next, on the Parking Floor view, click the Edit button > set the parking lot space
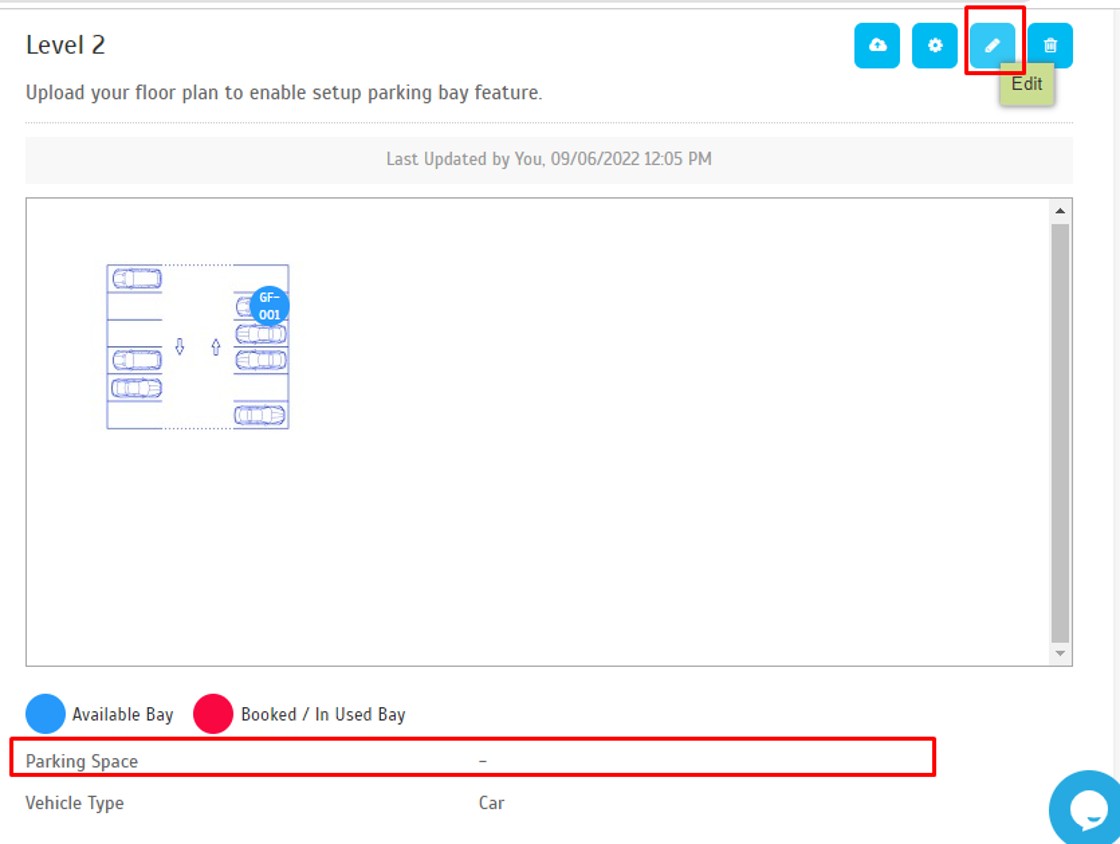


9. With the above setting, users can see the Parking Floor Plan on TimeTec Parking apps and select their desired Bay ID to purchase it. 

 
Note: If some of the screenshots or steps viewed here are different from the ones in the current system, this is due to our continuous effort to improve our system from time to time. Please notify us at info@timeteccloud.com, we will update it as soon as possible.


Email Address Validation In TimeTec


Introduction
It is compulsory for the user to verify their email address in order to receive an email notification from TimeTec. The email validation is a process for the system to validate the email for the security of the system.

TimeTec TA Verification Process
There are two ways to validate email for the TimeTec system, one from the solution website which is TimeTec TA, TimeTec Leave, TimeTec Claim etc. For this guideline, we will use TimeTec TA and TimeTec Cloud as examples to validate user email addresses. 

Step 1: Log in to the solution URL https://www.timetecta.com/

Step 2: Next, click on the verify icon to Verify your email address for the solution.

TimeTeccloud Verification Process
Step 1: Using the username email and password, log in to https://www.timeteccloud.com/

Step 2: Next, click on the “CLICK HERE TO VERIFY YOUR EMAIL” to verify your email address in the TimeTec Cloud system.

After the process is completed, the user will be able to receive an email or update from the TimeTec site without having any errors. If an issue occurs where the user is unable to receive any emails from TimeTec after email validation, you may contact the TimeTec support team at support@timeccloud.com. 


Export and Import User to excel / text / CSV file for TCMSv3 & Ingress


Introduction
Some organizations have many workers and when they are shifting from manual labour to automation, it will require lots of documentation and data entries from the admin.
To ease this process, FingerTec allows users to simply import user records from excel, text or CSV files into the TCMSv3 or Ingress software. In addition, users also may export the user record from TCMSv3/Ingress software to excel, text or CSV files to be utilized by third-party software (eg: payroll or accounting software).

Process
I- Creating file - Excel ( click here to download sample file )

II- Creating File - Text ( click here to download sample file )

III- Creating File - CSV ( click here to download sample file )

Import User
1. Go to User tab > Click Import from File

2. Click ‘Browse”, select the right file type and choose the file you need to import.

3. Click Next, and you will see ‘Parse Successful’ prompted if the file format follows the recommendation as a sample file.


4. Click Next and select the required options for the user to be read into the software.

5. Once done, you will be prompted with a successful message as follows: 


Export User
1. Click Export User > Select User > Select Field that you require by dragging the list to the right.

2. Click ‘Export’ once confirmed on the selection and choose the path to save the exported file.


Note: If some of the screenshots or steps viewed here are different from the ones in the current system, this is due to our continuous effort to improve our system from time to time. Please notify us at info@timeteccloud.com, we will update it as soon as possible.


Fire Alarm System Integration with FingerTec Terminal Wiring Diagram


Introduction
Exit routes for emergencies are important for every building when there are fires or other incidents. Regarding fire safety, most buildings have a fire alarm system as part of a full security system. With a Fire Alarm System, doors with a Door Access System can be commanded to unlock thus enabling safe passage to the evacuation assembly point.

For example, below is the link on how Fire Alarm Systems are integrated with FingerTec Terminals :
For multiple doors use the Door Access system, below are examples of a Fire Alarm System integrated with the FingeTec Terminal System.
 
Diagram 1
 

*Wiring Diagram shows Fire Alarm System Panel that uses Volt Free contact (Dry contact) output which requires an external power supply to power up the relay coil for it to properly function.

*External power supply voltage varies depending on what power supply is in operation for the relay coil (make sure current output is sufficient to power up relay coil).

*If the Fire Alarm System Panel uses Volt Contact of 24V or 12V (wet contact), make sure the Current output of contact is sufficient to power up multiple usages of relays.

*Wiring diagram shows Relay MY2N type which has 2 channel contacts as a recommended type of relay as its easy to acquire on the market

To control specific Door Access Systems for Exit Routes
In this case, Ingressus I, II or IV controller (depending on how many doors need to be controlled) need to be used as the Ingressus controller can be configured using Ingress software to specify which doors need to be opened when the signal from the Fire Alarm System is triggered (to be connected to AUX IN at Ingressus controller which requires Dry Contact signal from Fire Alarm System)

Below is an example of a wiring diagram for Ingressus II with 4 Fingertec terminals for the Fire Alarm Door release
 
Diagram 2
 
Here are the links with tips on how to configure Ingress software for door release.
 
Note: If some of the screenshots or steps viewed here are different from the ones in the current system, this is due to our continuous effort to improve our system from time to time. Please notify us at info@timeteccloud.com, we will update it as soon as possible.


How to Enable Vaccination Record in Visitor Registration Form for TimeTec VMS


Introduction
TimeTec VMS has introduced the Health Screening Feature as one of the latest updates for our “Back to Work Safely” series. The Health Screening Feature contains vital health inquiry questions which include body temperature, travel history and quarantine status. This information is compulsory for visitors to furnish during the pre-registration and check-in process. This feature is available on TimeTec VMS as a precautionary measure to reduce the risk of Covid-19 transmission inside a business premise. In addition to the Health Screening Feature in TimeTec VMS, visitor may now input their vaccination records and attach their vaccination status or swab test result as well during the registration. We will demonstrate how to enable the vaccination status in the Health Screening questionnaire in this article.

Process
1. In TimeTec VMS, when logged in as Admin, go to Settings > Visitation Settings.

2. In Settings page, click on Health Screening option from the left pane, then once Health Screening Details page appear on the right pane, click on the Edit button (Pencil icon)

3. Scroll down until the Vaccination Records section as below. Click to enable the question in the Visitor Registration form. If visitors are required to attach the vaccination certificate or the swab test result as well, you may enable the Attachment option.

4. Once enabled in the Health Screening Details, visitors will need to update their vaccination records status and attach together their swab test result or screenshot of vaccination certificate (if enabled as well) during filling up visitor registration form either from the invitation link, queue relief link or pre-registration link. Vaccination records may need to be entered by security personnel if using walk-in registration via web registration or i-Vizit tablet.


 Note: If some of the screenshots or steps viewed here are different from the ones in the current system, this is due to our continuous effort to improve our system from time to time. Please notify us at info@timeteccloud.com, we will update it as soon as possible.


Manage Cost Center in TimeTec Claim


Introduction
Cost centers help management utilize resources in smarter ways by having a greater understanding of how they are being used. Timetec Claim do have option to add different cost center for claim process. This will help the management to monitor and manage the claim process in their company. Here, we will guide on Managing Cost Center in Timetec Claim.

Process
A. Setting (Website)
1. Go to Company > System Settings.

2. Go to  Claim Management > Click Edit (Pencil Icon).

3. Click + ADD MORE to add new Cost Center.
    i: Edit (Pencil Icon) - Use to Rename the Cost Center
    ii: Delete (Bin Icon) - Use to Delete the Cost Center
    iii: Add ( + Icon) - Use to Add New Cost Center

4. Fill Up Cost Center Name > Save > Click Submit.

5. Click Save > Total Cost Center will change and update based on setup done.

B. Selection of Cost Center
1. Website
i: Go to Home > Click + for New Claim Application.

ii. New Cost Center will appear for selection.

2. Mobile Application (Timetec Office).
i: Go to Home Application > Click Add (+ icon).

ii: New Cost Centre will appear for selection.

Note: If some of the screenshots or steps viewed here are different from the ones in the current system, this is due to our continuous effort to improve our system from time to time. Please notify us at info@timeteccloud.com, we will update it as soon as possible.