How To Enable Attendance Approval And Approve Attendances in TimeTec TA


INTRODUCTION -
TimeTec TA has introduced a new feature which enables the approval process of the user’s attendance report to be performed within the system. Therefore, users with administrator privilege could check user attendance data before deciding whether to approve or reject the attendance report. This feature is suitable for companies that require a supervisor to verify the attendance report of his/her employees. Even better, the approval function can be performed by Admins on both web and mobile platforms for added convenience.

In this article, we prepared a guide on how to enable the Attendance Approval feature and approve employees’ attendances in TimeTec TA. 

PROCESS -
Note: Only users with Administrator role in TimeTec TA could approve the user’s attendance in TimeTec TA.

1) Enable this option in System Settings - Attendance Approval allows Admin to make approval on staff attendance.

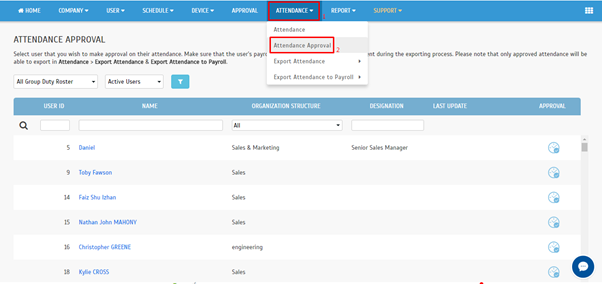
2) Go to Attendance > Attendance Approval - Admin with the special Approval rights (provided in System Role) will be able to approve attendance; Approved attendance can be unapproved.

3) Admin can also choose to notify the user once they have approved/unapproved user’s attendance. 

4) Only approved attendance can be exported through the Export Attendance, Export Attendance to Payroll and Export Attendance Scheduler features.  

5) Once approved, the data is not allowed to be updated by edit attendance, download data from terminal, update user’s group roster, update schedule setting, generate attendance manually and etc. 

6) To update approved attendance, users must first proceed to unapprove the attendance.

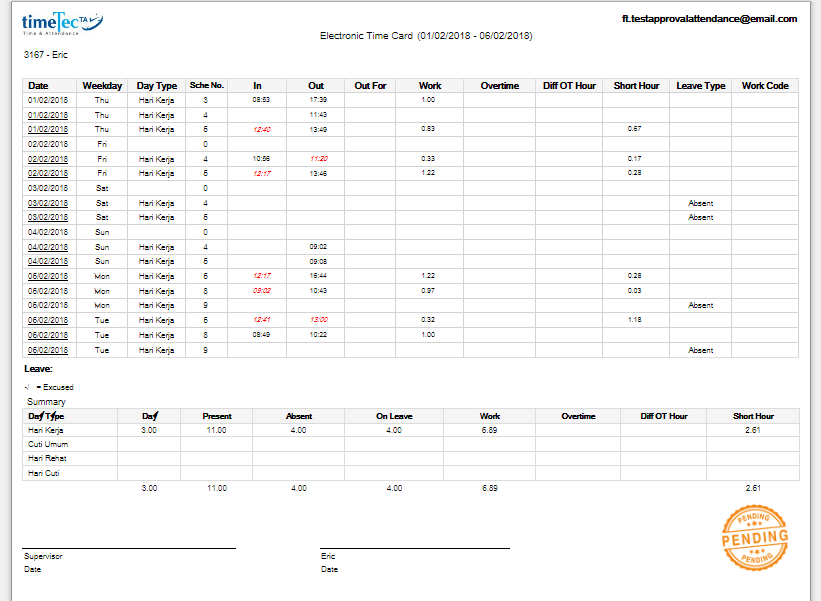
7) Electronic Time Card shows Approved/ Pending status.

For more details of what’s available with this feature, please refer to the step-by-step guide below. There are 4 sections to this topic:

A) How to Enable/ Initial Setup
B) How to Approve (Web)
C) How to Approve (Mobile app)
D) Reports & Export Attendance Data after approval    

A) How to Enable/ Initial Setup

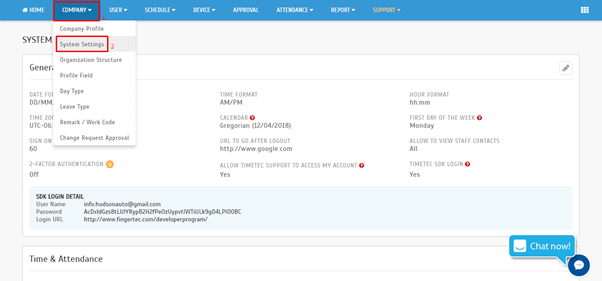
1. Login to TimeTec TA (Web) and go to Company tab > click on System Settings.


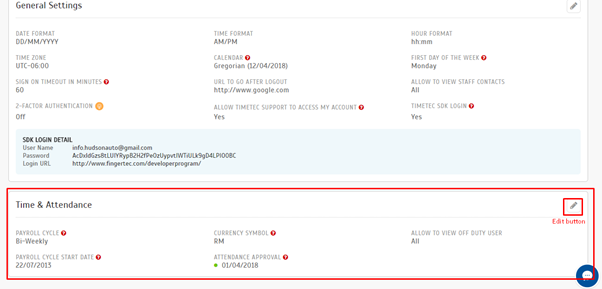
2. Next, go to Time & Attendance section and then click on Edit button.


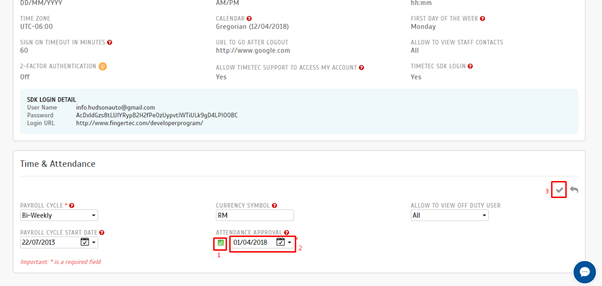
3. Tick on the Attendance Approval option and then choose a date to start enabling this option. After that, click on the Tick button to save the configuration.


4. Once you enable this feature, you will be able to view Attendance Approval in the Menu (it’s hidden if option is not enabled).


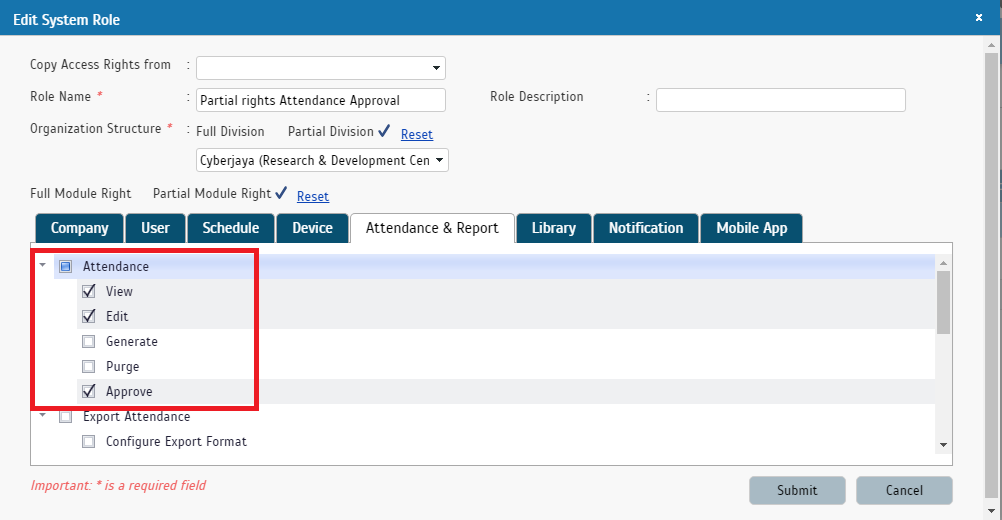
5. Next, configure the Approvers by reviewing whether Approve rights have been given to the relevant Admin roles. Go to User> Manage System Roles & Admin > System Role and select to Add/Edit.

Note: There are 2 separate rights involved, approve in Web and approve in Mobile. 

i) Admin given right to “Approve” is allowed to approve attendance in Web
cid:image003.png@01D3C51C.35DE17A0

ii) Admin given right to “Approve” is allowed to approve attendance in Mobile app

cid:image004.png@01D3C51C.35DE17A0


B) How to Approve (Web)

1. If you are the supervisor/manager charged with approving staff attendance, go to Attendance > Attendance Approval in the Menu (it’s hidden if this option is not enabled in the account).

cid:image002.png@01D3C51C.35DE17A0

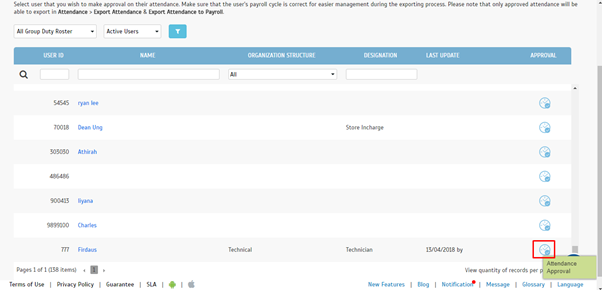
2. At the User Listing, click on the Clock icon to view attendance details of the chosen user and to approve or unapprove attendance.


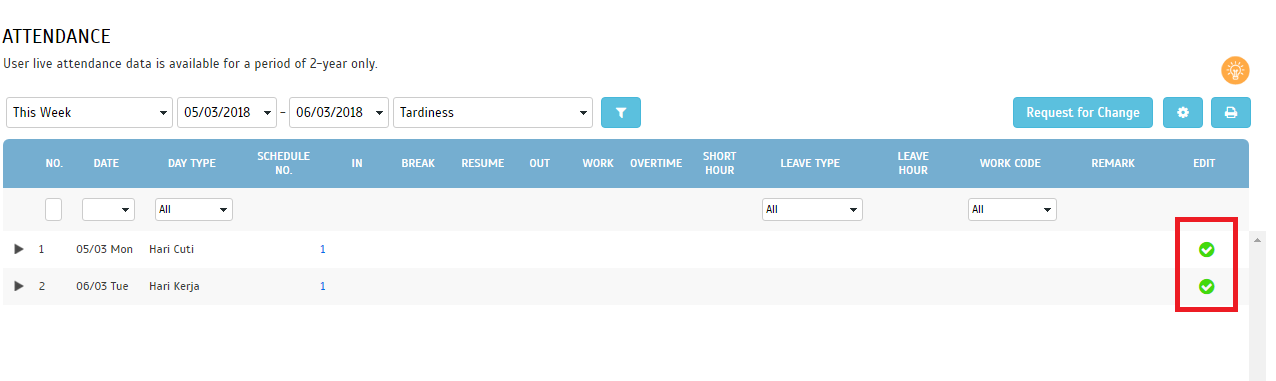
3. Next, the screen will display Attendance details. Use the filters to retrieve your relevant date range. Select/tick the relevant date(s) you wish to approve, then click “Approve”. Once a date is approved, a green tick will be shown in the Edit column. You can also repeat the steps to unapprove attendance for any date.

i) “Approve” button will be shown when all attendance is unapproved


ii) “Unapprove” button will be shown when all attendance is approved


iii) Both buttons will be shown when attendance is a mix of approved and unapproved  


4. After you have approved any date, a success message pops up. There will be an option to notify the affected user. The same notification option also appears if you subsequently choose to unapprove attendance.


5. Once done, a message will appear on the screen stating that the attendances can now be exported to payroll.


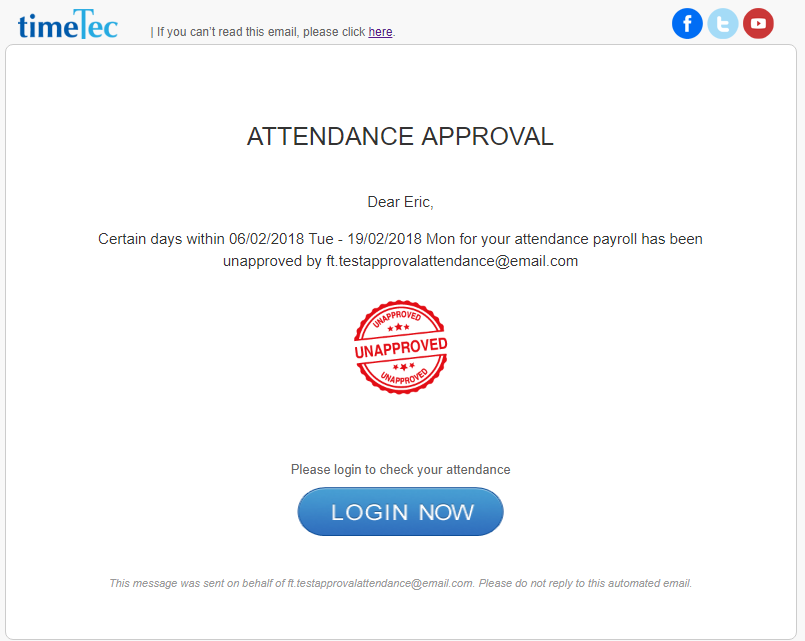
6. If you choose to notify user, system sends an Attendance Approval Email to the user.

i) Approved

cid:image009.png@01D3C51C.35DE17A0

ii) Unapproved

cid:image011.png@01D3C51C.35DE17A0

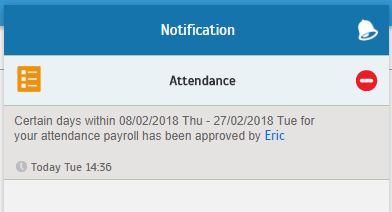
7. Additionally, if you choose to notify user, system also sends an Attendance Approval Notification to the user.

i) Approved


ii) Unapproved


8. When user login, they will also be able to see if their attendance has been approved.
cid:image023.png@01D3C51C.35DE17A0

C) How to Approve (Mobile app)

1. Login to Admin account > Menu > Attendance > select the Approval icon (Clock) on the left of User Listing.


2. Next, at the chosen user’s Attendance Approval screen > filter for your appropriate Date Range > select “Approve” icon at upper-right corner. This will approve the whole date range (use the filter if choosing individual date).

Once the dates are approved, a green vertical panel will be shown on the left. You can also repeat the steps to unapprove attendance for any date.

i. Approve Icon


ii. Approved Attendance Details > May also choose to “Unapprove” 


3. After you have approved any date, a success message pops up. There will be an option to notify the affected user. The same notification option also appears if you subsequently choose to unapprove attendance.

i. Approve- Option to notify user


ii. Unapprove- Confirmation message & Notification option


4. If you choose to notify user, system sends email & mobile notification to the user.


D) Reports & Export Attendance Data after approval    

To recap what is mentioned above:

1) Only approved attendance can be exported through Export Attendance, Export Attendance to Payroll and Export Attendance Scheduler features.  

2) Once approved, the data is not allowed to be updated by edit attendance, download data from terminal, update user’s group roster, update schedule setting, generate attendance manually and etc.
 
3) To update approved attendance, users must first proceed to unapprove the attendance.

4) Electronic Time Card shows Approved/ Pending status.

Only approved attendance will be able to be exported

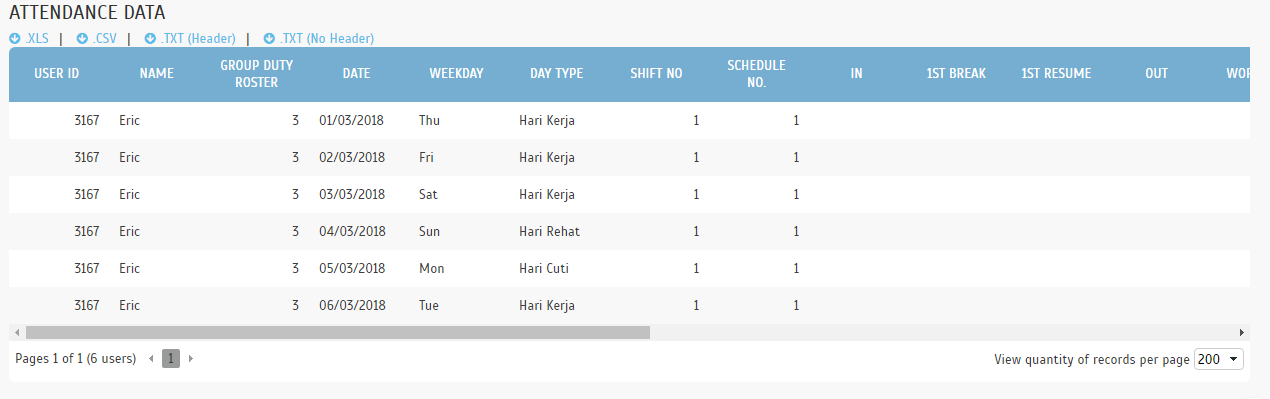
i. Export Attendance


ii) Export Detail

cid:image020.png@01D3C51C.35DE17A0

iii) Export Summary

cid:image021.png@01D3C51C.35DE17A0

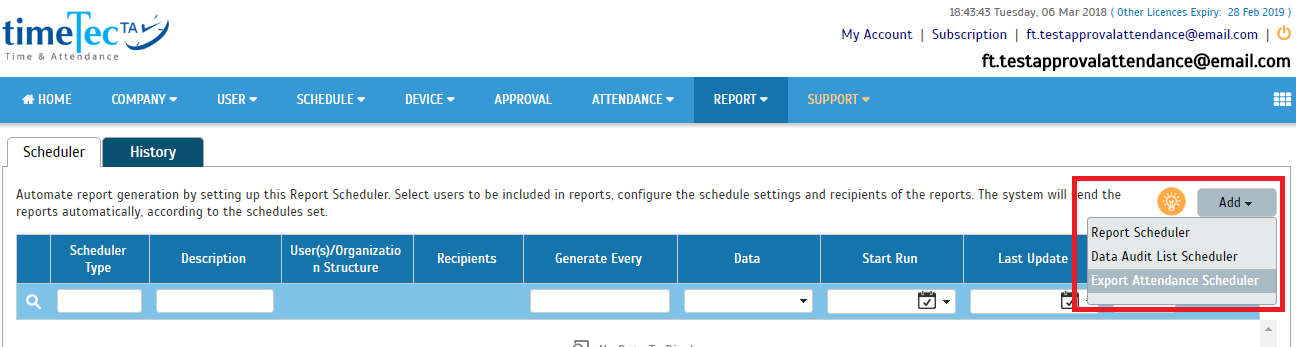
iv) Export Attendance Scheduler

cid:image022.png@01D3C51C.35DE17A0

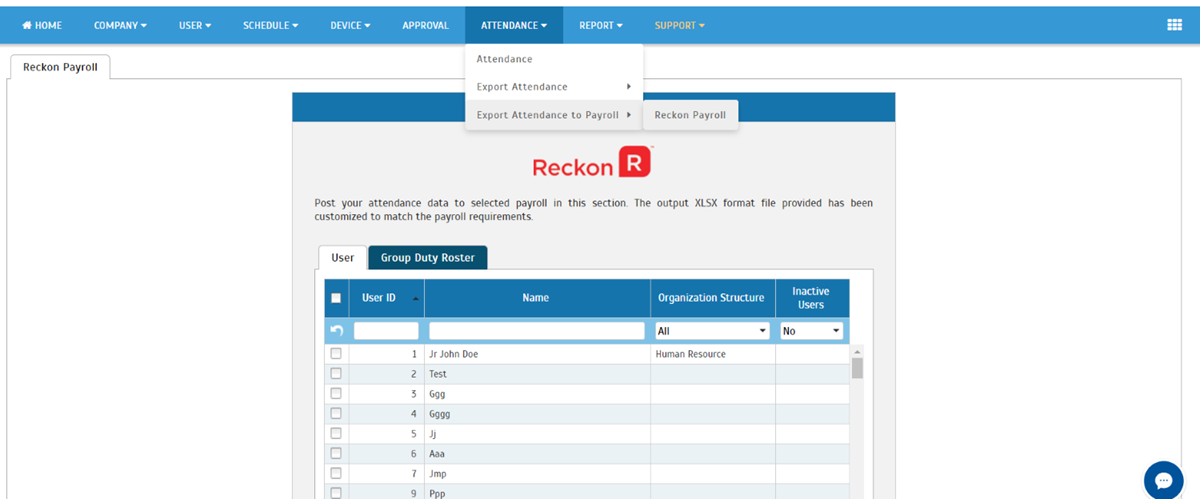
v) Export Attendance to Payroll

cid:image001.png@01D3D0F0.0BA97620

Report - Electronic Time Card

i) Approved

When generating the Electronic Time Card report for users on the date that the attendance has been approved, there will be an Approved stamp on the report to prove that the attendance report has been checked and approved.


ii) Pending Approval

cid:image018.png@01D3C51C.35DE17A0


How To Configure Ingressus To Trigger Alarm For Doors That Remained Ajar in Ingress


INTRODUCTION
To increase your security while using Ingressus controller in controlling the doors, you can configure it via Ingress Software to trigger an alarm if the door stays ajar for a specific time, say for example 10 second. Therefore, if the door is left open for 10 second without closing, the system will trigger an alarm to alert people. To setup this feature, please follow the simple steps below:

PROCESS -
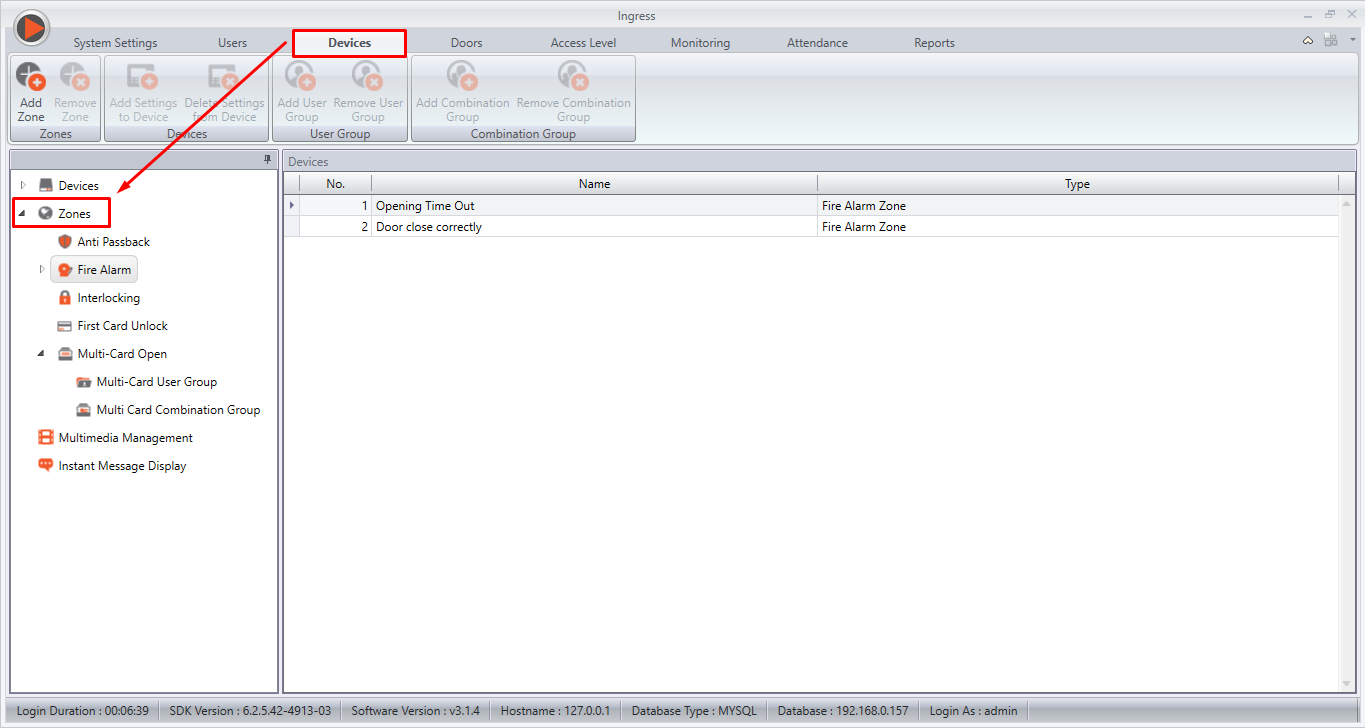
Go to the Devices tab > select Zones > select Fire Alarm > add new Zone > add setting to device > select device > select the Trigger Condition to “Opening Timeout”. Refer to the screenshots below for more information.
(Figure 1)

(Figure 2)

(Figure 3)

(Figure 4)

(Figure 5)

For the last option, which is “Stop alarm once door is closed”, please tick it so that if the door is closed, Ingressus will deactivate the alarm automatically. However, this option will only take effect if Ingressus is connected to the Ingress server.

If the controller is not connected to the Ingress server, you have 2 options to deactivate the alarm:
1)  Restart the controller.
2)  Configure the settings from Ingress and upload it to the controller.

For the second option, please follow the steps below:
Go to the Devices tab > select Zone > select Fire alarm > add new Zone > add setting to device > select device > select the Trigger Condition to “Door Closed Correctly”. Refer to the screenshots below for more information.
(Figure 1)

(Figure 2)

(Figure 3)

(Figure 4)

(Figure 5) 

For the best configuration, please upload both settings discussed above in order for your controller to work perfectly regardless whether the Ingressus controller is connected or not connected to the Ingress server.

Once completed, the display should have 2 options under the fire alarm zone as shown in the image below.


That’s it, you’re all set and you can now utilize this alarm feature to increase your office security.

How To Fix Crash During Migration of Data from TCMS V2 to TCMS V3/Ingress


INTRODUCTION -
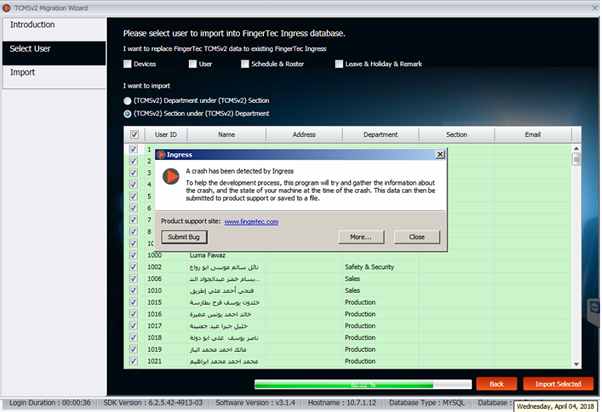
Lately, we have been receiving feedback from some TCMS V3/Ingress Software users, whereby their PCs suddenly crash during the migration process and inadvertently cause the data to not be fully migrated from TCMS V2 database into TCMS V3/Ingress Software.

Example: From the below picture, you can see that the loading bar is still not complete and is prompting the error/crash message.
 

Therefore, we prepared a guide for users to be able to solve the Software Crash when migrating data from TCMS V2 database into TCMS V3/Ingress. Please follow the quick steps below:

PROCESS -
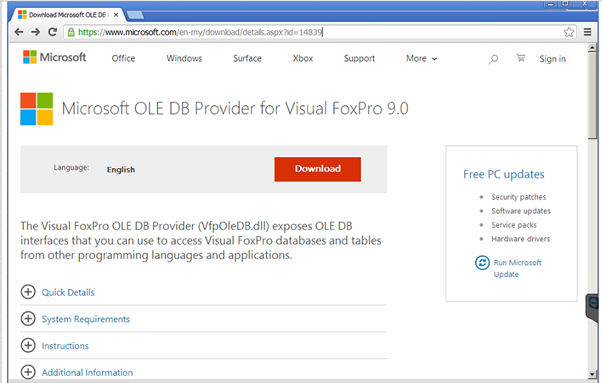
1. Click HERE to Download “Microsoft OLE DB Provider for Visual FoxPro 9.0 “.


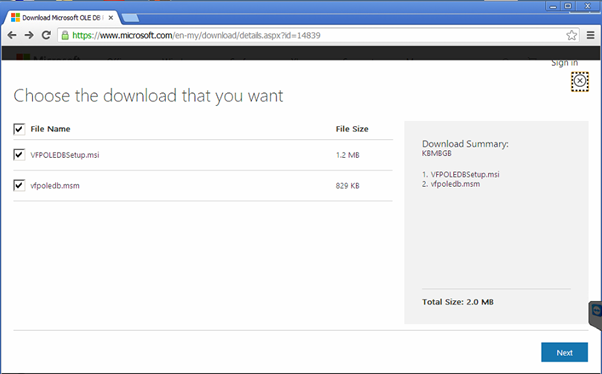
2. Choose the download – please select both files to download.


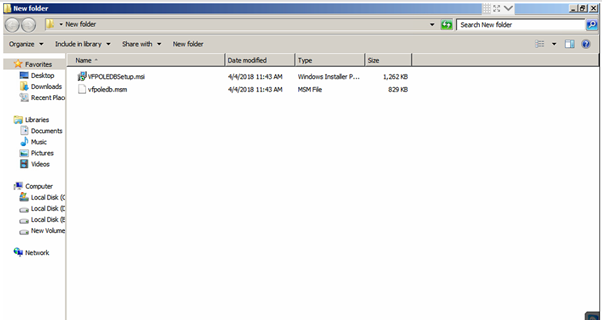
3. Please run the msi files and restart the PC.


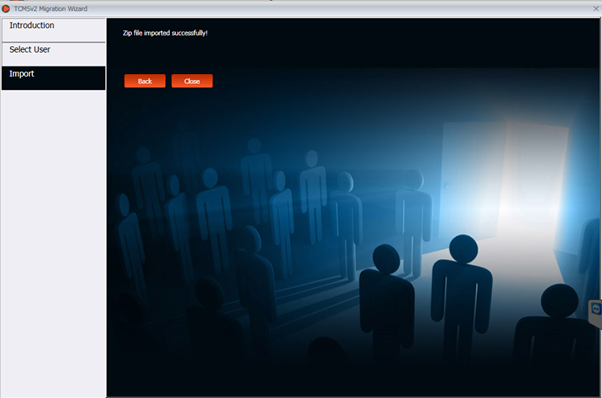
4. Migrate the database again. You can see “Zip file imported successfully” message after the Migration Process is done.


5. Once everything is completed, press the “Close” button and activate your device in TCMS V3/Ingress Software.

How To Generate QR Code In Ingress Software


Introduction -
QR110 is the latest product from FingerTec that comes with a new verification method: Scanning QR Code. This tip will show you the steps to generate the QR code in Ingress Software for access.

Process -
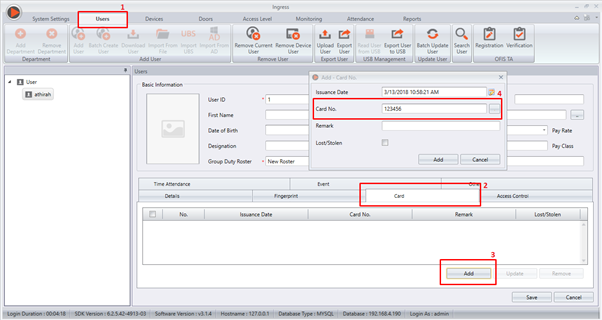
1. In Ingress Software, go to the Users Tab > Select Card > Select Add > and proceed to insert the Card No.
 

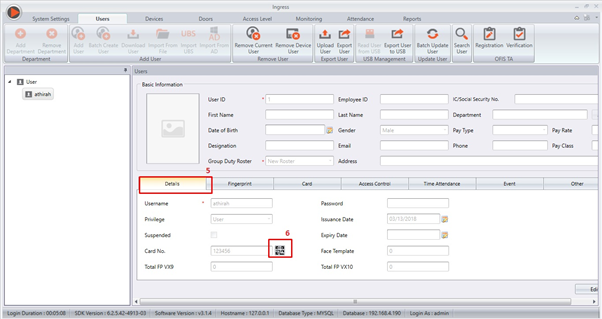
2. After completing the first step, please head to the Details sections and check the QR Code that was generated by the Ingress Software. Please double click at the QR Code logo (6) under the Card No. Section.
 

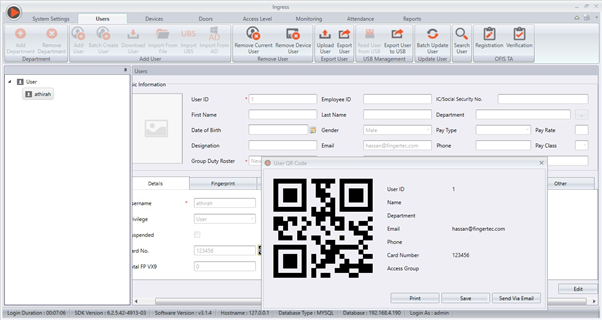
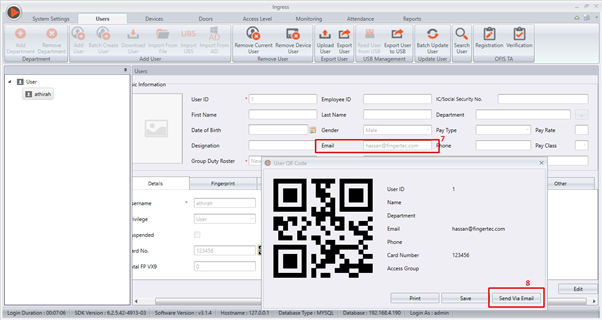
3. After double clicking it, the system will display a pop-up as shown below:


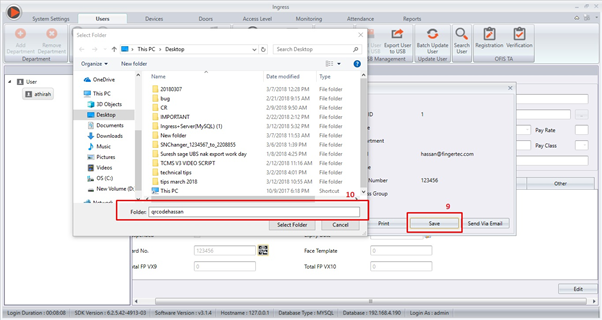
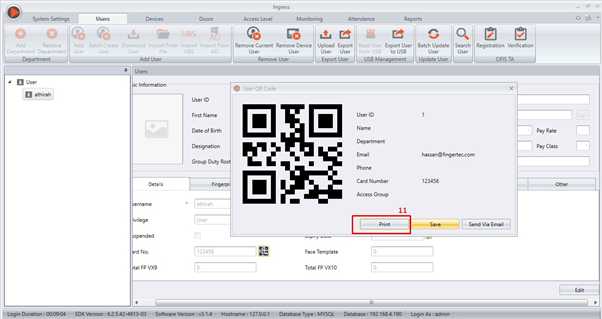
4. Once the QR Code has been generated, you can then save it to the PC by clicking the Save button and proceed to select folder or file destination in which you wish to save the QR Code.


5. Otherwise, you can also send it to the User’s Email by clicking on the Send Via Email button. Note: please don’t forget to insert the User’s Email Address first before proceeding.


6. Last but not least, you can even print out the QR code by clicking on the Print Button.


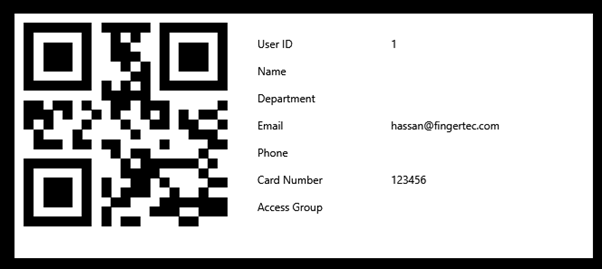
The output result will be as shown in the image below:


That’s it, you all done. Once received the generated QR Code, you can start to verify your employees’ identification via the latest FingerTec QR110.

Kadex & R2(FEM565) Latest Firmware And Feature Explained


FingerTec has updated Kadex and R2(FEM 565) firmware from the previous version 3544-05 to the latest version 5114-07 which now includes the new feature to support 99 Access Groups.

Feature Description
Previously, the maximum Access Group that is allowed for 3544-05 firmware is limited to 5 access groups. Hence to further benefit users, the updated firmware now allows the users to include up to 99 access groups. This improvement is perfectly suitable for big companies that have a huge number of employees as well as intend to restrict their employees’ access into certain areas within certain time zones.

Example:
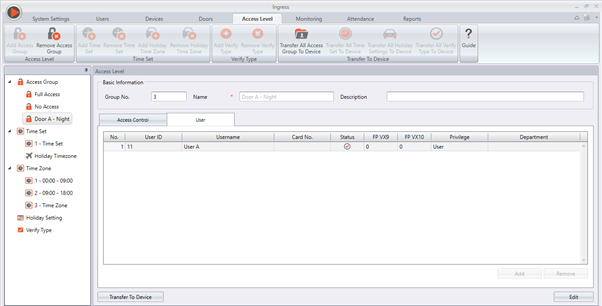
During Weekdays, Door A in a company can be accessed by User A within 12.00 am to 09.00 am and User B within 09.00 am to 6.00 pm. In this case, Admins can create 2 different access groups with 2 different Access Level settings as shown below:

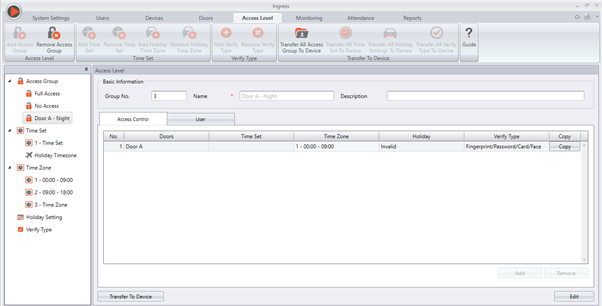
Access Group 1: Door A, Night (12.00 am to 09.00 am), User A
Access Group 2: Door B, Morning (09.00 am to 6.00 pm), User B

Feature Settings
Configuration of Access Group can be done in Ingress software, at Access Level module. You can download the latest Ingress software from the link provided below:

To configure the settings under Access Level, please first ensure that the terminal is connected with Ingress and added as a device to the door.
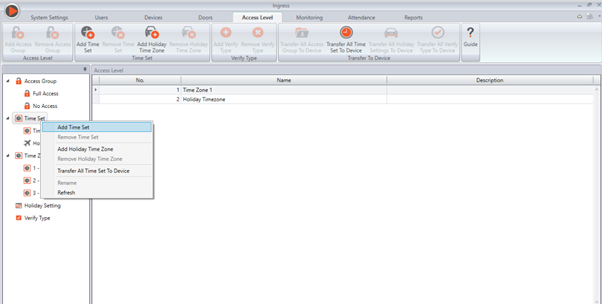
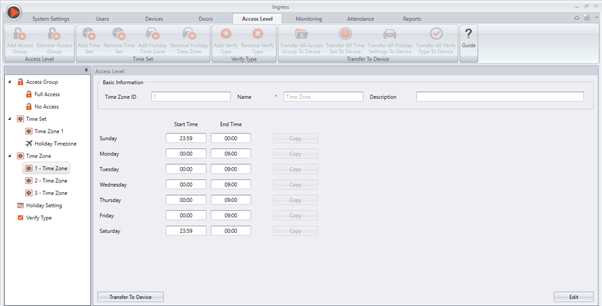
Next, add Time Set. When Time Set is added, 3 Time Zones will be created. In Time Set 1, first interval represents Time Zone 1, second interval represents Time Zone 2 and third interval represents Time Zone 3. The same goes for other Time Set when it is created.

Edit the Access Time in the Time Zone accordingly.
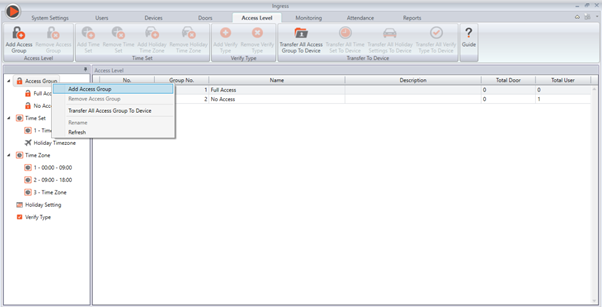
Add Access Group under Access Level.

After creating a new Access Group, select the Time Zone with the appropriate timing. Users can also be added into the Access Group under the User tab.


Remarks: 1 User can ONLY be added into 1 Access Group.

FingerTec Authorized Reseller can now login and download the latest firmware at http://tips.fingertec.com/tips-download-firmware.php. For end users, please contact your local reseller or FingerTec Support Team to acquire this latest firmware update.