Showing posts with label approval. Show all posts

APPROVAL: How to Setup & Apply for Outstation in TimeTec TA


Introduction
TimeTec TA has a new approval feature that allows you to set rules for users to apply for outstation work and be automatically remarked in the system and the attendance roster history.

Approval Process
Set the criteria that will initiate the approval process. The approval process will only start when the following requirements are met.
1. To manage the approval for outstation requests, login into your TimeTec account..
(www.timetecta.com)

2. Go to User > Manage Approval Rules > click Add (Outstation Setting) and fill up the information and approvers accordingly.


Application Process
1. Login to TimeTec TA application > Go to Approval > Outstation.

2. Click on the “+” icon to apply for Outstation


3. Fill up the required information i.e. travel location(s) and remark. 

4. After all the information submitted > click on the submit icon on the top right of the application page to submit the request.


5. To approve the request, go to Approval > Approve the application


Remark in Attendance
6. Once the application is approved, go to Menu > Roster > All to check the outstation remark.


Note: If some of the screenshots or steps viewed here are different from the ones in the current system, this is due to our continuous effort to improve our system from time to time. Please notify us at info@timeteccloud.com, we will update it as soon as possible.


[Admin Guide] How To Set Approval For Facility Booking in iNeighbour


Introduction
The Facility Booking feature in iNeighbour allows Admin to set manual approval for the booking. For the approval, the management can control the number of admins that can manage the booking. This article shows how to set approval for facilities booking.

Process
1. Go to Admin Page > Community > Manage Facility

2. Click the Settings icon at the top right.


3. Select the Approver names and enable the function ‘Allow Admin to add remark for facility booking slot’ to allow admin to add remarks. 


4. Once the setting is done, the Admin can now approve or decline the booking. All bookings can be managed at Management > Facility Booking.


If you are still having problems after completing all of the steps stated above, please contact us via support@i-neighbour.com. 
 
Note: If some of the screenshots or steps viewed here are different from the ones in the current system, this is due to our continuous effort to improve our system from time to time. Please notify us at info@i-neighbour.com, we will update it as soon as possible.


TimeTec Leave - How to Set a User as a Leave Approver


Introduction
TimeTec Leave is a solution that provides convenient employee leave management for various types of companies. Using TimeTec Leave, you need to start by assigning approvers directly to every User and subsequently, determine the type of approval you need, i.e., immediate supervisor, specific sequences or random for each User, before everybody can start using the solution. There are two options for the approver to approve; leave application and replacement credit.

Process
1) Assign User as an approver for leave application
2) Assign User as an approver for a replacement credit application
3) Report to check the approvers for all users

ASSIGN USER AS APPROVER FOR LEAVE APPLICATION
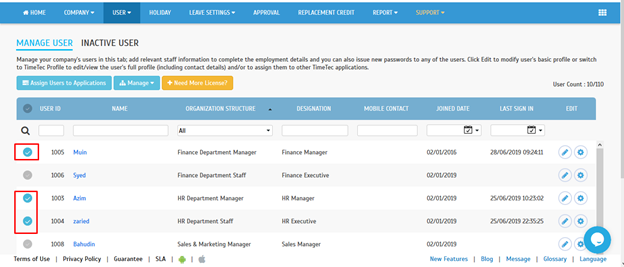
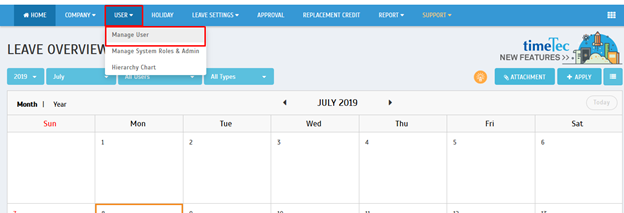
Login into TimeTec Leave. At the homepage, choose User> click Manage User.


Tick or Select user/staff. You may have multiple selections of user/staff under one approver.

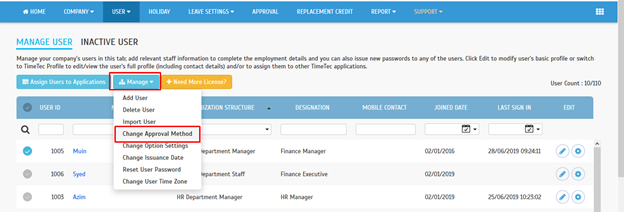
After done selecting user/staff, click Manage button > choose Change Approval Method


At the new window, you may choose an option of an approver which are  Any admin, Immediate supervisor, Specific sequence & Any (X) approver.


NOTE*

ANY ADMIN - This approval method assigns all Admin in the system as the approver, and only ONE Admin needs to approve the leave application. Note that all Admins receive the leave application notifications.

IMMEDIATE SUPERVISOR - This approval method automatically assigns Immediate Supervisors as Approvers according to the Hierarchy Chart. Therefore, set your Hierarchy Chart before you proceed. Any user not assigned to the Hierarchy Chart is an Approver. To assign all users under the same approver, please select Specific Sequence.

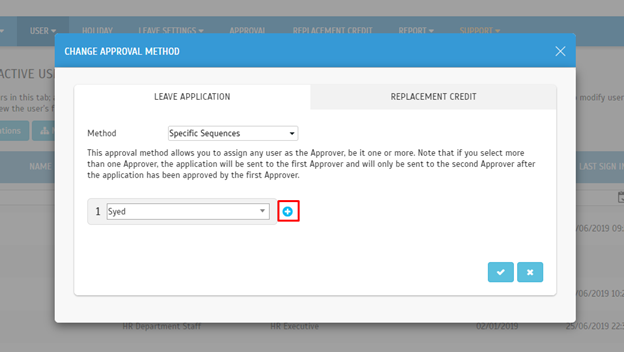
SPECIFIC SEQUENCE - This approval method allows you to assign any users as the approver, be it one or more.  If you select more than one approvers, the first approver gets the application, and only after he approves the application, the second approver gets to approve.

ANY (x) APPROVER - This approval method allows you to select multiple approvers for the User's application. Note that it requires [x] number of approvers for the approval.

If you select specific sequence > you may choose user/staff as an approver for the selected staff before.


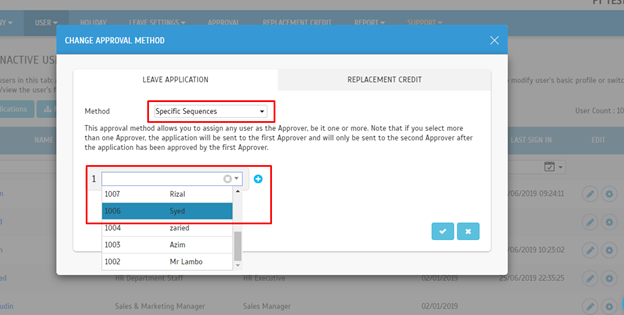
If a leave application needs more than one approver, you may click '+' button and select user/staff to become an approver.


After done configuring, click save/submit button.


To verify the settings, click User> Manage User > tick/select User you want to check > click 'gear icon' Leave setting


 At a new window, click Approval Method


These are the settings that we configured before.


ASSIGN USER AS APPROVER FOR REPLACEMENT CREDIT
Login into TimeTec Leave > at the homepage, click User> choose Manage User
Tick or select user/staff. You may have multiple selections of user/staff under one approver.


Tick or select user/staff. You may have multiple selections of user/staff under one approver.


After done selecting user/staff, click Manage button > choose Change approval method


At a new window, click Replacement credit


After done configuring, click save/submit button.


To verify the settings, click User> Manage user > tick/select User you want to check > click 'gear icon' Leave settings


At a new window, click Approval Method


Click Replacement credit. These are the settings that we configured before.


REPORT TO CHECK APPROVER FOR ALL USERS
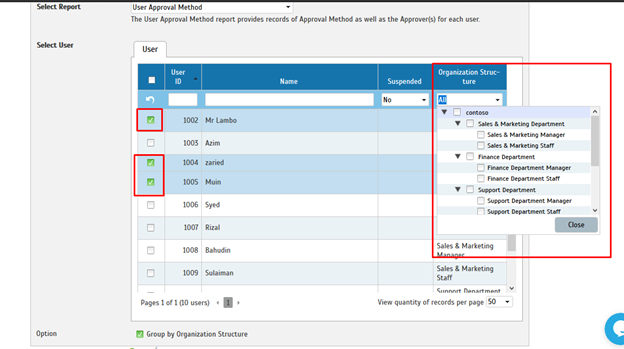
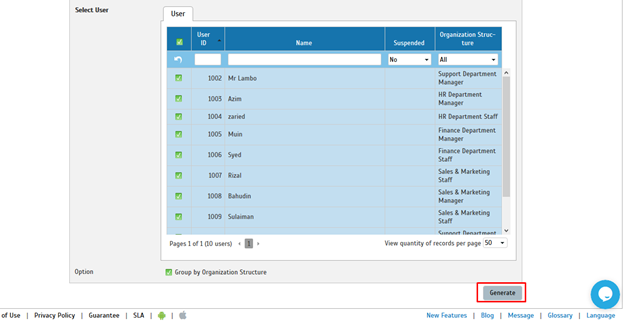
Login into TimeTec Leave > at the homepage, click Report > choose User approval method


Tick / Select User or you can select multiple users. You can filter by organization structure.


After done configuring the settings, click Generate.


This is an example report for User Approval Method.


Note: If some of the screenshots or steps viewed here are different from the ones in the current system, this is due to our continuous effort to improve our system from time to time. Please notify us at info@timeteccloud.com, we update it as soon as possible.

How to configure Email Notification for Approved Leave and Holiday in TimeTec Leave


Introduction:
Reminder plays an important role in most systems especially for a leave management system such as TimeTec Leave as it helps ensures that companies’ operations are running accordingly. Therefore, we’ve prepared a quick guide on how to send out an email reminder for Holiday and Approved Leave prior to the upcoming dates throughout the entire organization.

Process:
1) Login to TimeTec Leave > go to Reminder.
 

2) There are 2 listed options that you will need to select here in order for the reminder to be sent out via email:

i. Select the Reminder either for Leave or Holiday.
Leave - You may configure a reminder on the Approved Leaves prior to the leave dates.
Holiday – You may configure a reminder for Holiday prior to the holiday dates.
 

ii.  Select the organization or department that you wish to assign for the Leave or Holiday under Organization Structure > click the Drop-down Option > Filter.
 

A) Reminder for Leave
After selecting reminder for leave and the specified department > Click Filter > Click Add, you will then need to configure the 4 listed options as shown below:


i. Leave Type – You need to choose the leave type from the dropdown option.
ii. Recipient – You may select the recipient for the reminder, i.e. system administrator, admin or user. Note that you may also include other recipient emails into this option.
iii. Occurrence – Frequency of the event to be sent out before the upcoming leave.
iv. Enable – Enable this option for the email notification.

Leave Reminder (System Admin or Admin)
 
Leave Reminder (User)


B) Reminder for Holiday
Remark: Please ensure that you have already configured all the holiday setting at the Holiday tab.


After selecting the reminder for holiday and the specified department > Click Filter > Click Add, you will then need to configure the 3 listed options as shown below:


i. Recipient – You may select the recipient for the reminder, i.e. system administrator, admin or user. Note that you may also include other recipient emails into this option.
ii. Occurrence – Frequency of the event to be sent out before the upcoming holiday.
iii. Enable – Enable this option for the email notification.

Holiday Reminder
 

Note: If some of the screenshots or steps viewed here are different from the ones in the current system, this is due to our continuous effort to improve our system from time to time. Please notify us at info@timeteccloud.com, we will update it as soon as possible.