The new core board version of TA100C FMM allows adding of expiration rule to a user. This feature is important for organizations that have many temporary workers or contract workers on site(s). The administrator can set the expiration rules for each worker and the system will stop taking transactions from these staff’s credentials when the expiration rules are met. The expiration rule can be set based on date, entry or both.
To proceed, enable this option in the new TA100C terminal by following the below steps:
Enabling User Expiration on TA100C
Press Menu > System > Attendance > Expiration Rule > Select “On”
Select Expiration Rule Options
Once the Expiration Rule has been enabled, select the action for the system to execute once the rule qualifies. Please refer below steps to select the expiration rule:
Press Menu > System > Attendance > Expiration Rule Options
There are several options to choose from, which are:
1. Keep user, no audit future punch - The system will continue to keep the user’s data including the fingerprints and will block future clocking activities from the specific ID.
2. Keep user and audit future punch – The system will continue to keep the user’s data including the fingerprints and as well as the future clocking activities of the specific ID.
3. Delete user – The system will delete the user once the expiration date is reached for that specific ID.
Adding Expiration Rules to A New User
After the configuration has been completed, the system is now ready to accept users for the rules, refer to the below steps on how to add expiration rule to a user:
Press Menu > User Mgt > New User > Select Expiration Rule> Expiration Rule Options > Select Rule
There are several options available to be added to a user, select one:
1. None: No expiration rule.
2. Expired date: Select a specific expired date to a user.
3. Entries: Select a number of entries provided to a user before the access expired.
4. Expired date and entries: Select a range of date and number of entries for a user.
Adding Expiration Rules to Existing User
Refer to the below steps to add expiration rule to the existing user in the terminal:
Press Menu > User Mgt > All Users > Select User > Edit> Select Expiration Rule > Expiration Rule Options > Select Rule
Once the configuration and settings are completed, users will be imposed with expiration rule which will take effect once the rules are met. Use this feature to control and manage your temporary workers, contract workers, contractors, etc.
1)
Backup your TCMSv2 software database from
version v2.1.1 or v2.1.2
2)
Un-install that version of TCMSv2 Software at
the control panel.
3)
Rename the TCMSv2 folder to TCMSv2 old data 1
a.
C:\Program Files (x86)\FingerTec\TCMSv2 rename the folder to
b.
C:\Program Files (x86)\FingerTec\TCMSv2 old data
1
4)
Install the TCMSv2 software version 2.1.2q. You
can download the setup file here.
5)
Activate your terminal and restore the old
database into the 2.1.2q version.
6)
Backup the database one more time.
7)
Un-install the TCMSv2 Software version 2.1.2q at
the control panel.
8)
Rename the TCMSv2 folder to TCMSv2 old data 2
a.
C:\Program Files (x86)\FingerTec\TCMSv2 rename the folder to
b.
C:\Program Files (x86)\FingerTec\TCMSv2 old data
2
9)
Restart PC.
10)
Install the latest version TCMSv2 software
version 2.2.027. You can download the setup file
here.
11)
Activate your terminal and restore the old data
2 database into the latest TCMS V2 version.
In Ingress, all data captured by all devices can be used for door access as well as attendance
calculations and reports. For example, in a factory
environment that installs one R2 terminal (Access control product) and one TA200Plus (Time and attendance product), activities in these two devices will
be many in a day. So, how do you sort out the data to be used solely for
attendance and those that are dedicated for access control? Likewise, in TCMSV3, if you have multiple terminals across many areas, how can you restrict employees to report attendance at specific devices only (e.g. users in Group A may only clock In at Terminal 1 and clock Out at Terminal 2)?
In Ingress and TCMS V3 software, under Clocking Schedule, there is a feature termed “Enable Attendance Records from Selected Devices only”. This feature will allow you to retrieve attendance logs from a specific device for a specific clocking slot.
Referring to the previous factory example, by default, records from both devices will contribute
to attendance and access calculations and reports. However, to dedicate a
certain device specifically for attendance calculations only, management can
set Ingress to capture records from TA200 Plus for example, solely for this
purpose, while records from R2 will only be used for movement analysis,
targeted for pure access control activities. When this is accomplished, the
company must communicate to all staff the difference of the devices and their
functions for them to comply. For example, the TA200 Plus installed at the front gate and the TA100C at the side gate shall be used for attendance activities. Meanwhile, R2 devices at room A, B, C are only meant for door access activities.
Procedure
Note:
The configuration below is done on Ingress software, as shown in the accompanying image but similar steps can be applied in TCMS V3.
Go to
Attendance > Clocking Schedule > Select a Schedule > Click Clocking
Range.
On the
Attendance tab under the Clocking Range, you can see the “Enable Attendance
records from selected device only” option at the bottom of every time slot. Select
the specific terminal that you want to capture records to treat as attendance for
the particular time slot.
In an event where you have forgotten your
administrator password to login into your Ingress software you need to contact
our support team at support@fingertec.com. We can help you generate a temporary password to login to your
software. However this feature is only available after you upgrade your Ingress
version to Ingress v3.0.1 and above.
Let’s Get Started:
Locate the 5-digit code display at the left lower corner
of your login screen in Ingress. This is a very important number, which you
need to email to us to request for the new password. Once you have sent the number to us, do not
enter any password or turn off this screen because this random code changes
every time you restart the software or fill in the wrong one.
We will provide you with a one-time-use password that
is valid for only one login session to Ingress.
Insert “admin” into the User Name column and the
provided password into the Password field and click Login.
The system will automatically request a password change
after the login. Create and confirm your new password here.
Note: This password retrieval option will only work
with the System administrator password but not for the Ingress client login
password. In case your staff has forgotten their Ingress client login password,
the administrator will need to generate a new password on their behalf under
System Settings > User Role.
Important Note: This tip is crucial as tampering with the Ingress/ TCMS V3 software system by deleting the expiry date from the database can cause the system to not work properly. The tip below will explain to you in detail the crucial role of the expiry date in generating the attendance of your employees.
In FingerTec Ingress/ TCMS V3 Software, one can add users into the software via one of the 5 ways:
1. By Adding User Manually
2. Creating User by Batch
3. Downloading Users from the terminal
4. Importing Users from a text or Excel file
5. Importing Users from USB Payroll System.
Note:
The images below are from Ingress software, however it also applies to TCMSV3 which has a slightly different interface.
Regardless of the way you choose to add user into the software, the system will define an expiry date for each user created. However, the predefined value will not be shown in the software as it is automatically generated at the back-end process whenever a new user is added into the software.

Ingress and TCMS V3 software are designed in a way that it requires an ISSUE AND EXPIRY DATE for each employee in order to recognize this employee as an active employee before attendance can be generated.
Within the software itself, the expiry date can be edited to suit your company preference if there is a need for that. If you assign an expiry date for a particular user, clocking activities will not appear in the attendance sheet for the user after his/her expiry date. The transaction will appear only in the terminal data audit list. Therefore, please be careful when configuring the expiry date of the user.
Most importantly, we discourage users from changing or modifying this expiry date directly in the database. Do take note that if the expiry date is removed from the database, e.g. using any SQL manager tools from the Ingress database (or similarly for TCMS V3) the attendance of the employees will NOT be generated as the employee’s status will be changed into an inactive user.
Ingress Software Installation
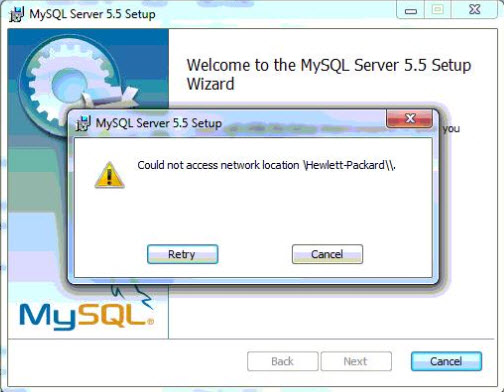
Error message appears when installing MySQL, could not access network
location Hewlett-Packard
Error When Installing MySQL:
During Ingress Software installation, the system will directly Install
MySQL .
However during the MySQL installation, the process suddenly stops and
you will be prompted with the error message below:
“COULD NOT ACCESS NETWORK
LOCATION \HEWLETT-PACKARD\\ “
The Solution:
Follow the steps shown below to rectify the
error.
1. Click START > Run...
2. Type: regedit and press OK to open the Registration Editor.
3. Browse the following folder:
32bit
operating systems:
HKEY_LOCAL_MACHINE\SOFTWARE\Microsoft\Windows\CurrentVersion\Uninstall
64bit
operating systems: HKEY_LOCAL_MACHINE\SOFTWARE\Wow6432Node\Microsoft\Windows\CurrentVersion\Uninstall
4. Look for a value named InstallLocation
containing the string \Hewlett-Packard\\ and delete this
value.
5. Close the Registration Editor.
6. Start the installation again.