Introduction
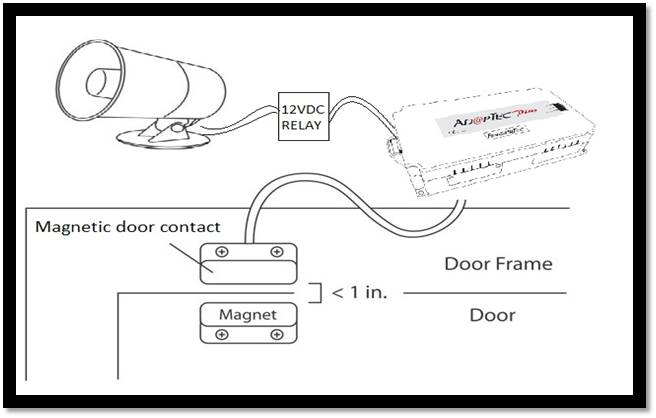
AdapTec Plus and AdapTec X has a siren function to pair with a master device to enhance the alarm sound signal from a master device. This siren will go off when a master device sends a signal such as a door open, a device broken, etc (depends on types of master) to AdapTec Plus and Adaptec X.
Process
FingerTec Remote Control Door Switch has two channels to mute the triggered alarm at AdapTec Plus and AdapTec X Siren and Exit Switch. Exit Switch using Remote Control Door Switch is easier for users because they can control door access remotely without needing long wiring for the exit button. Hence, receptionists can open the door for authorized people remotely.
Connection above is for internal siren for AdapTec Plus or Adaptec X only. For more sound coverage, an additional external siren 12VDC can be added.
Note: If some of the screenshots or steps viewed here are different from the ones in the current system, this is due to our continuous effort to improve our system from time to time. Please notify us at info@fingertec.com, we will update it as soon as possible.
Introduction
FingerTec’s Face
ID 4d Terminal can be customized to support External Schedule which is useful
in alerting employees to change shift or clocking status. However, take note that upon enabling this option, the
Door Access feature of this device will be disabled.
Benefits
By
using the external bell function, you can increase the volume of the alert bell
so it can be heard from a distance. This is suitable for industrial working
environment, such as factories.
Process
1. Update the firmware of the device.
You can download the customized firmware from here.
**Note: By updating this firmware, Door Access feature of
this device will be disabled
- Run the FTFaceID4.exe > Insert
Device’s IP Address > Connect > Update > Restart
2.
Set the Schedule Bell on Face ID 4D, select External.
Go to Menu > Date/Time > Bell >
Select Schedule Bell >
Insert your bell trigger date and time followed by the trigger period.
3.
Connect the device to the external siren as shown in the wiring
diagram below:
And you are ready
to test it! Make sure you are not too close to the siren to avoid damage to
your ears.
Introduction
The TA100C (FMM) is a
biometric terminal for time attendance that includes an internal siren and
allows the connection of external sirens for an effective alarm system. This
system can also be scheduled to signal events within the working schedule such
as starting work time or end of break. The two types of sirens that can be
connected to the TA100C (FMM) are:
- 12Vdc for small
industries or office use
- 240Vac for big
factories with a noisy environment
To compensate for the
additional power required for the external sirens, the Adaptec TA can be used
as a power supply and backup in case of power failures, ensuring that your
alarm system is always running.
Benefits
Connecting your terminals to
the Adaptec TA ensures a stable and reliable power source for your system to
operate at optimum capacity. By connecting the terminal and external siren to the
Adaptec TA, the internal relay of the terminal will be protected from the high
voltage. If the voltage is too high, the fuse in Adaptec will break the
circuit, thus protecting the internal components of the terminal.
Adaptec TA has 2 power sources, 5VDC and 12VDC and you can
connect any of FingerTec terminals to Adaptec TA by selecting the correct
voltage. It also comes with a backup power in case of power failure.
Process
To connect the external siren to the terminal, follow the
steps below.
1. Open
the back casing of the TA100C (FMM) terminal.
2. Plug
in the connector of the external siren into the MCU Board.
3. Follow
the wiring diagram to connect the terminal to Adaptec TA.
4. Change
the External Bell Relay settings in the terminal device itself.
Go to Menu > Personalize > Bell Schedule
> Options > External Bell Relay > NC2
5. To
add a new bell schedule, go to Menu > Personalize > Bell Schedules >
New Bell Schedule > Set
the option accordingly:
·
Bell
Status: To turn the bell on or off.
·
Bell
Time: Set the time for the bell to ring automatically.
·
Repeat:
Set the bell to repeat on certain days or every day.
·
Bell
Type: You can set for the bell to be triggered from the internal bell or from
an
external bell that is wired to the device.
·
Ring
Tone: Select your preferred ringtone that will emit from the bell.
·
Internal
Bell Relay: Specifies the time duration for the alarm to ring (ranges from 1s
to999s).
·
External
Bell Relay: Specifies the time duration for the alarm to ring (ranges from 1s
to999s).
Because A Mere Second Could Pose Danger
to Your Property
Security is an important aspect in every organization nowadays.
Improper security measures may cause bigger problems such as robbery, data
theft or even endanger the safety of a person. Even with the proper access
control products installed, the security of a building may be compromised if
the door is not closed properly after a person has entered the premises. Hence,
it is an advantage when the access control device triggers the siren when the
door is not shut properly.
As we all know, Fingertec’s standalone access-control devices are
equipped with the function to trigger the internal or external alarm siren when
the door is not closed within the pre-defined time. However, not many know that the same can be
done for Ingressus, via the Ingress software. Simply follow the steps below to
activate the external siren for during the exit delay period.
Alarm System Requirements
The requirement for this setup is a door, which has been installed
with Ingressus that is paired with any of Fingertec’s slave devices and a door
sensor.
Connect and Power Up
The External Siren
First of all, you must connect an external siren to the
Auxiliary output port at Ingressus.
Please note that Ingressus does not supply the power to the
siren, hence an external power source will be needed to power-up the siren. The
siren must be connected to NO and COM port of AUX output at Ingressus. Refer to
below image for clarification.
Configuring the Door
Sensor Type and Delay Time
Next, you will have to configure the door sensor type and
delay time, so that the siren will be triggered when the door is not closed
within the defined time. Simply follow these steps below in Ingress software
Doors > Select
door name > Click “Edit” > Set “Lock Open Duration” to desired time >
Set “Door Sensor Type” to “Normal Close” > Set “Door Sensor Delay” to
desired time > Save > Sync to device
Setting Up The Fire
Alarm Zone
After setting up the door, you will need to configure the
Fire Alarm zone to trigger the Auxillary Output when Ingressus detects that the
door has been left open exceeding the “Door Sensor Delay” time. Follow these
steps below to configure the Fire Alarm Zone:
Zone (Ingressus) >
Fire Alarm > Right Click > Add Zone > Rename to desired name >
Right Click > Select device (Ingressus) > Click at device name > Click
“Edit” > Tick at “Fire Alarm” > Set “Trigger Condition” to “Opening
Timeout” > Set “Input Point Address” > Tick the desired output at “Output
Point Address” > Set “Action Type” to “Open” > Set the “Delay” to desired
value (The amount of time the siren triggers) > Tick “Stop alarm once door
is closed” > Save > Sync to Device