Showing posts with label Data Management. Show all posts

Manage Access Group in TimeTec Access


Introduction
The Ins and Outs access to the buildings is crucial in ensuring safety, in particular, to protect employees and companies from encountering assets lost. One of the best ways to reduce the risk is by limiting the building access. For employee access, the Access Time can be restricted to those who work at a designated time period. For example, if the building has a standard operation hour, the weekday access time of the building can be set from 8.00am to 6.00pm. However, if a public holiday falls on the weekdays, the building can still be accessed despite it being a holiday. To better address this concern, the Holiday Access Time is designed to satisfy a higher security requirement of the building access.

Access Group configuration helps users to secure their system because they can set different access levels for each authorized user according to the Access Time. With this feature, you can limit the access of your employees to specific times in the Access Group, enhancing the security of your premises. By configuring the Access Group in TimeTec Access, the security mechanism for your premises will be tightened in avoiding all unnecessary invasion by unauthorized individuals.

Process
Step 1 - Set up the Access Point by going to the Access Point > Manage Access Point. Add a location and assign buildings for that location. You can then create floors, upload floor plans and add access points to the respective building. Once this is completed, you are ready to assign devices to which you’ve connected to the specific access points and configure the access settings for each access point.

Step 2 - Set Access Time by going to the Access tab > Access Time > click Add button. Set different time intervals to restrict user's access via the Access Point for different holidays. 
* The access time configured is only applicable when you are using TimeTec BLE-5/BLE-2 with TimeTec Access Mobile App. These settings are NOT APPLICABLE when using FingerTec Terminals.

Step 3 - Setup Access Time
a. You may select a preset Access Time template or customize the time interval. The users can only access during these intervals prefixed in the Access Time.

b. To customize the time interval,  choose the block for a particular day. Set the start and end of the desired time intervals and click Update Block to save the settings.

c. Or drag up or down the block to set the time intervals. 
- Drag up or down to multiple select blocks
- Double click to select 1 block
- Drag left or right to deselect block

Step 4 - Set up the Access Group
a. Go to Access tab > Access Group > click Add button. Create an access group and set up access rules by determining the access point and access time.

b. Label the Access Group name and description for easier future reference. Assign users into access groups. Each user can only be assigned to one access group. Click the Next button when you have done selecting Users.

c. Select Access Point to be added to the Access Group.

d. Select Access Time rule for the Access Group. Users in this Access Group will only have access to the selected Access Point(Door) during the selected Access Time.

e. Add another Access Point and Access Time to the same Access Group. Click the Save button when the settings have completed.

Note: If some of the screenshots or steps viewed here are different from the ones in the current system, this is due to our continuous effort to improve our system from time to time. Please notify us at info@timeteccloud.com, we will update it as soon as possible.


How to Manage New Users in FingerTec Terminal & TimeTec TA


Introduction
With TimeTec TA, an administrator in a company can manage the new user/staff systematically by depending on the reliable data of time attendance management solution. Below is the process to manage the new user/staff in the FingerTec Terminal and TimeTec TA.

Process Part 1: FingerTec Terminal Enrollment of user
Normal user can use the terminal for identity verification, and he does not have any other authorities to access the system. To add a normal user, follow the steps shown below :


Fingerprint Verification

Part 2: TimeTec TA Download user(s) from a terminal
Go to Device > FingerTec Terminal > Manage Terminal.


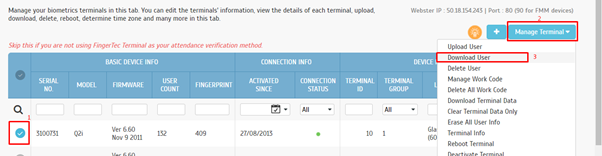
Select the device that you wish to download its users. Click on Manage Terminal and from the drop-down menu, select Download User.


From the Window below, a Sync option is available to ensure that the list of Terminal Users is updated. You can check the Last Updated date beside the Sync button. If the list is outdated, click on Sync to update the terminal users into TimeTec system.

You can check or uncheck your preferences on the users’ information as well as the users that you wish to download into the server. Then, click on Submit to proceed.


After submitting your confirmation, the users are now downloaded from the terminal into the server.

Update user information
Go to User > Manage User


A user list displays User ID, Name, Organization Structure, Designation, Mobile Contact, Account Issuance Date, and Last Sign In time.

Under the Edit column, select the Edit button.


A Window shows the general account information and information of the selected users.

By selecting the Edit button, you can edit the user’s details
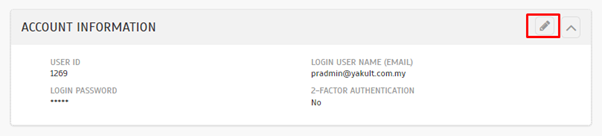
(1) To upload User Photo, (2) Deactivate button - To deactivate user if the user resigned, terminated, or suspended from the company. Once the user deactivated, the user moves into an Inactive Tab (3) Pencil Icon - To edit User Name, Joined Date, Organization Structure, Designation, etc.


On the bottom part, it is compulsory to fill in the User ID of the user and the User ID cannot be duplicated to other users. Login user name (Email) is optional if the user wants to log in their account through Apps/Web. Login Password is the temporary password, and Login password can be reset by admin any time in case the user has forgotten their password.


Assign Users into Organization Structure
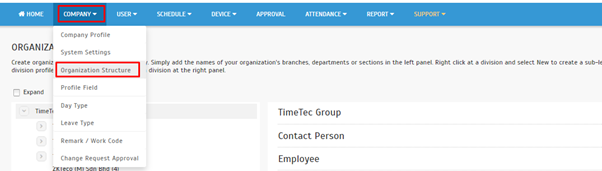
Go to Company > Organization structure


Select the department/group.  Assign User into the structure by clicking the button.


Select the user and submit


Assign user(s) into Roster
Go to Schedule > Assign Schedules and Users into Roster


Select the Add button at the roster that you wish to assign user(s) into.


After assigning user(s) into the Group Duty Roster, you need to specify the effective date of the new roster assigned. Determine the Start Date and the End Date at which the new roster takes effect, and the attendance of the user generates according to the date.


Select your preferences on the attendance sheet then Submit your configuration by clicking on the Tick button.


Assign Users to Device
Go to Device > Assign Users to Device.


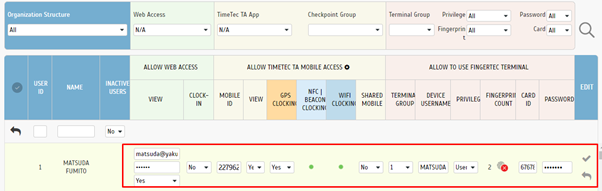
You can view a list of users along with their settings, which cover Web Access, TimeTec TA App, Checkpoint Group, and Terminal Group. Select the users that you wish to perform changes on their clocking devices and click on the Edit option.


You are now able to edit permission on the clocking devices.


Under Allow To Use FingerTec Terminal column, you can determine the Terminal Group, Device Username, Privilege ( User, Enroller, Admin, Super Admin ), Card ID and Password of the selected user. You can also adjust the users' access rights at the terminal under this setting.

Terminal Group - A terminal group assigned to the users on TimeTec TA
Device Username  - A username assigned to the device
Fingerprint Count - The number of fingerprints that the users have enrolled at the terminal
Privilege - Access rights as assigned in the System Role
Password - Password set by users for access purposes
Card ID - Smart Card number used by users for access purposes
Mobile ID - Unique mobile ID assigns to the mobile phone, and TimeTec TA stores this particular mobile ID

After configuration, save the changes by selecting the Update icon.

How To Enable/Disable GPS & Web Clocking In TimeTec TA:
Click on ‘Edit’ icon at User’s tab and Set Web Clocking to ‘Yes/No’ to Enable/Disable.


To Enable/Disable GPS Clocking, Set the GPS Clocking option to Yes/No. Next, click Update/Cancel to save the changes.


Note: If some of the screenshots or steps viewed here are different from the ones in the current system, this is due to our continuous effort to improve our system from time to time. Please notify us at info@timeteccloud.com, we update it as soon as possible.

Step-By-Step Guide for Admin On How to Manage The Defect Reports From the Unit


Introduction
This article is a guide for an Admin to configure and manage the Defect Report module. The Defect Report module centralizes all the defect reports lodged by the Unit Owners, and it manages the report tickets efficiently for the management team. .
Note: All Defect Report settings are available in the i-Neighbour web platform, and it is not available in the App.

How To Configure the Defect Report Settings in the Web:
Step 1: Go to Defect Report and navigate to Settings (the Cog icon is next to the Ticket Closed button).


Step 2: At the ‘Defect Type’ tab, the Admin can add different types of defects/items. Once you select all items, click the Save button. All added defect types are available in the unit owner’s Defect Report form.

Example: 
1) Select type: Door
2) Enter item type: Frame
3) Code: E2

Step 3: At the Auto Mailer tab, customize your mailer by editing the email subject and text message. Click on the Edit button to amend the Auto Mailer. When a unit owner submits a defect report, he receives a mailer as a proof or a copy of their submission.


Step 4: Next, under the Setting tab, configure the settings for Defect Report module such as Alert Message, Joint Inspection, Person-in-charge, Ticket Prefix, etc.
Step 5: Go to the Defect Eligibility tab to view or edit the defect report eligibility status of each of the unit owner. Click on any of the Edit icons for which the user wants to edit or view the eligibility status of the selected unit owner.


Step 6: Choose the Start and End date of the validity period for the unit owner to lodge any of the defect reports.

Step 7: Enable the Defect Report Eligibility button. The user may disable this button if necessary. Once disabled, the unit owner cannot submit a defect report — Click Submit button to save the changes.


How to View and Update A Defect Report on the Web:
Step 1: Go to Defect Report, and you can view all lodged defect tickets. The number of days the tickets submitted determines the category of the defect tickets; 1 - 10 days, 11 - 20 day and more. Find the particular defect ticket and click on “View” to view the defect details.


Step 2: Click on the Checked button next to each of the defect item to update the ticket status to “In-Progress” and click on “Repairs Completed,” if the issue resolved.


Step 3: Continue by proposing a few Joint Inspection dates to the unit owner, and the unit owner needs to confirm on either one of the proposed dates or reschedule a new inspection date.


Step 4: Once the Unit Owner confirmed the schedule, the Admin can proceed for an inspection with the owner.


Note: If the Unit Owner did not choose a schedule or absent for 3 times, CRM could close the ticket by themselves.

Step 5: Once the inspection completes, the unit owner can close the ticket.


Note: If some of the screenshots or steps viewed here are different from the ones in the current system, this is due to our continuous effort to improve our system from time to time. Please notify us at info@i-neighbour.com, we will update it as soon as possible.

Keeping Your Team Together with TimeTec Profile


Remember that stack of paper detailing employee profile that you have to keep? When did you last update them? I bet you can’t quite recall. Well, it’s about time to forget about your paper records for employee profile and use TimeTec Profile for a change. It’ll save you time and free you from headache, we promise.

So, what exactly is TimeTec Profile? TimeTec Profile is a tool for HR personnel to centralize all employees’ information in one place, accessible at anytime, from anywhere. You can input default details such as name, birthdate, staff photo, mailing address, into TimeTec Profile and additionally, you can also input other customized details unique to your company into the mix to serve the business better such as trainings, certificates, and many more. This amazing tool secures employee information with multi-level authorization on a cloud server and this information can be applied across all TimeTec solutions such as TimeTec TA, TimeTec Patrol and TimeTec Leave, without having to input the same information repeatedly risking errors in the process. 

If cost is your concern, you should learn that you can get TimeTec Profile for free when you sign up and use any one of TimeTec solutions. So long as the TimeTec account is active, TimeTec Profile comes complimentary. Nevertheless, if you are not ready to sign up for any of TimeTec solutions yet, you can also use TimeTec Profile at a trifling cost of USD1.20 per year. Yes, we repeat, per year. For TimeTec existing users, TimeTec Profile is available when they login.

Let’s look at what’s available in TimeTec Profile.

1. Menu
Click on the button located at the right end of Menu to display an App change window. From here, user can switch between TimeTec Profile and other TimeTec solutions available in the company’s account.

cid:image001.png@01D346AE.8718CE40

2. Home ( System Admin)

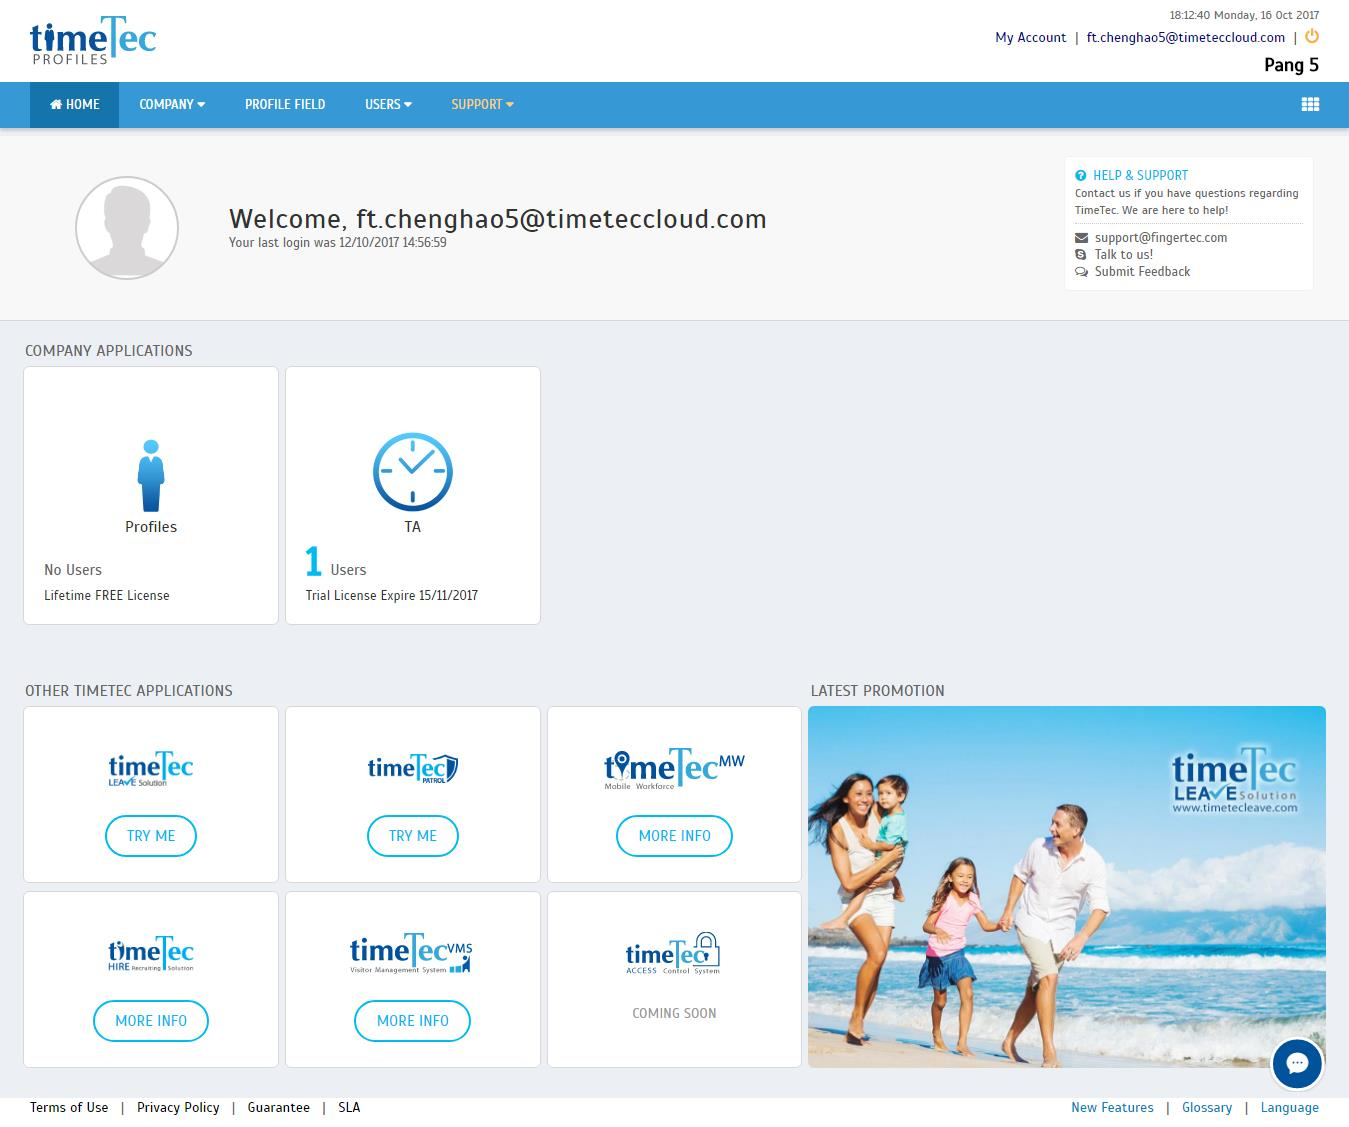
Home page is where you’ll find all TimeTec solutions and please get your free trial to gauge whether the application(s) can be beneficial for your company. If you keen to try any, just click on “Try Me” at any time to get your free trial.
a) COMPANY APPLICATIONS: TimeTec applications that your company have activated
b) OTHER TIMETEC APPLICATIONS: Other available and upcoming applications by TimeTec
c) LATEST PROMOTION: TimeTec's latest promotion(s).

cid:image002.png@01D346AE.8718CE40

3. Profile Field
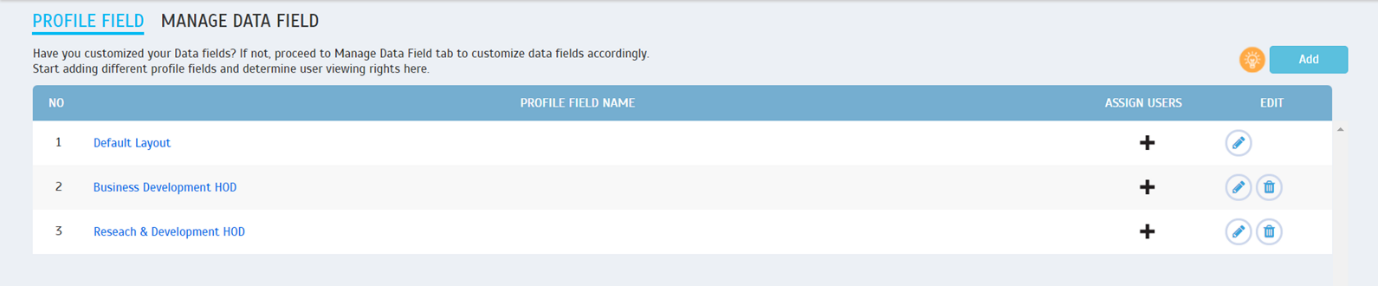
Profile Field is where you can pick and choose the fields you require for your company’s user profiles. ‘Default Layout’ template is available for you to use and it includes a comprehensive list of fields but if you prefer a different layout, you can customize the fields to suit your company or apply on different users. You can either edit the default or create another Profile Field template and just add/remove data fields. Once you’re done, you can assign users to the profile field.

a) Listing

cid:image004.png@01D346AE.8718CE40
             
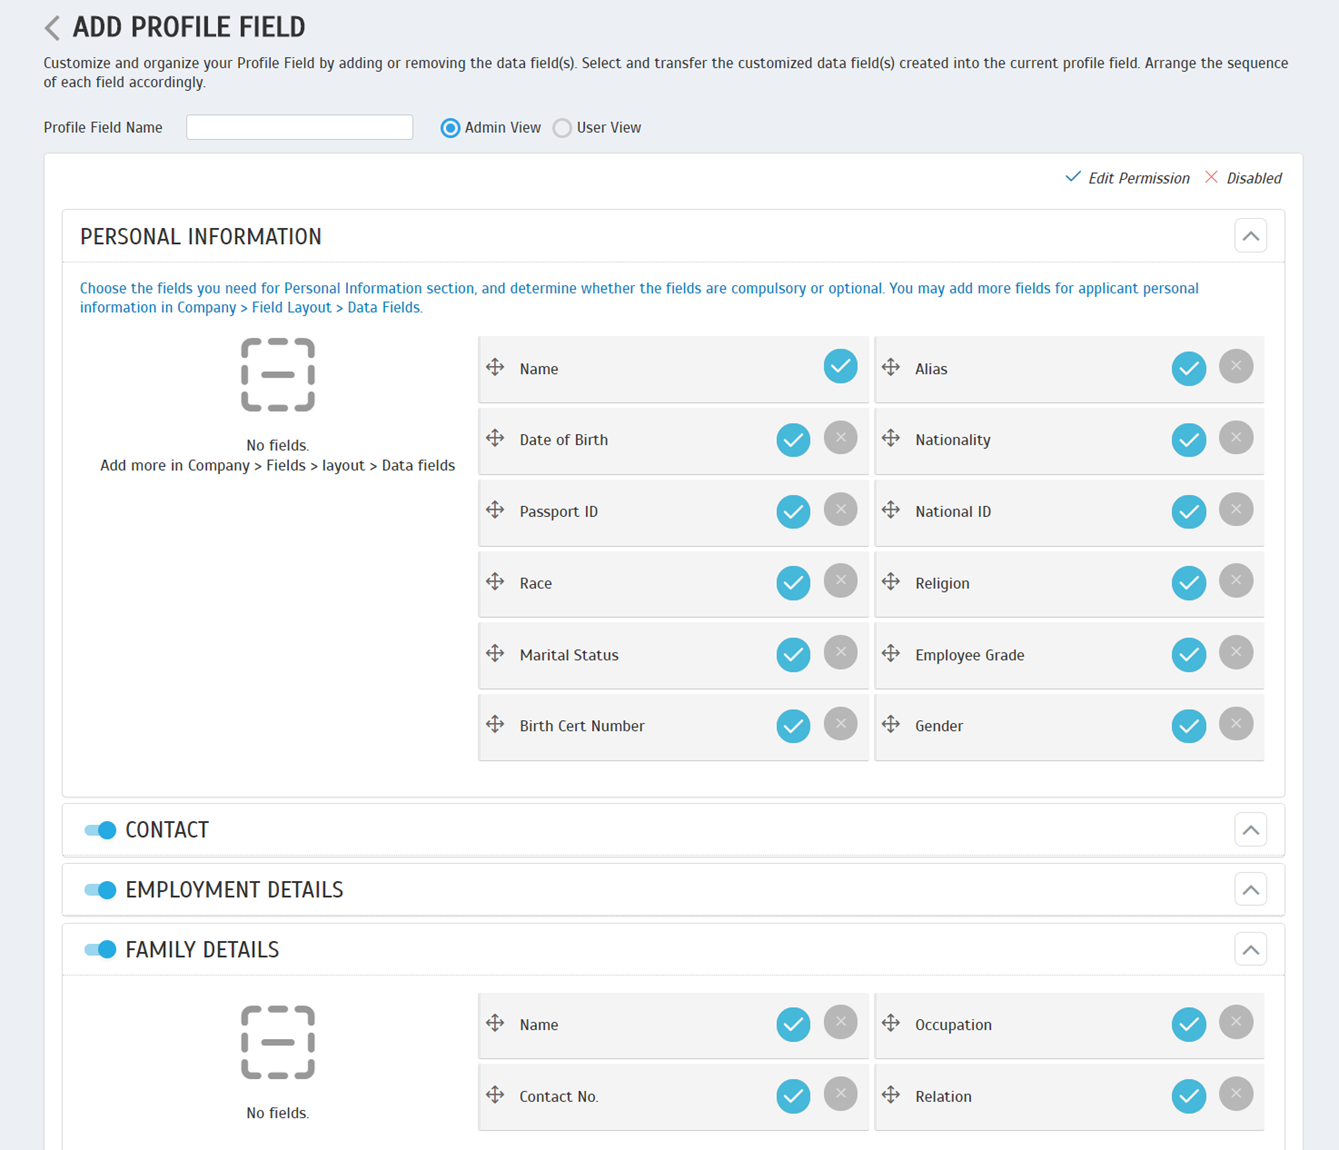
b) Add Profile Field
Insert the Profile Field Name and determine whether this profile field is created for Admin or User view. Next, drag and drop the field you need. Drag to the left to remove a field and drag to the right to add a field. Once done, click at the Edit Permission/Disabled option to allow Admin/user to edit the profile information.

cid:image005.png@01D346AE.8718CE40

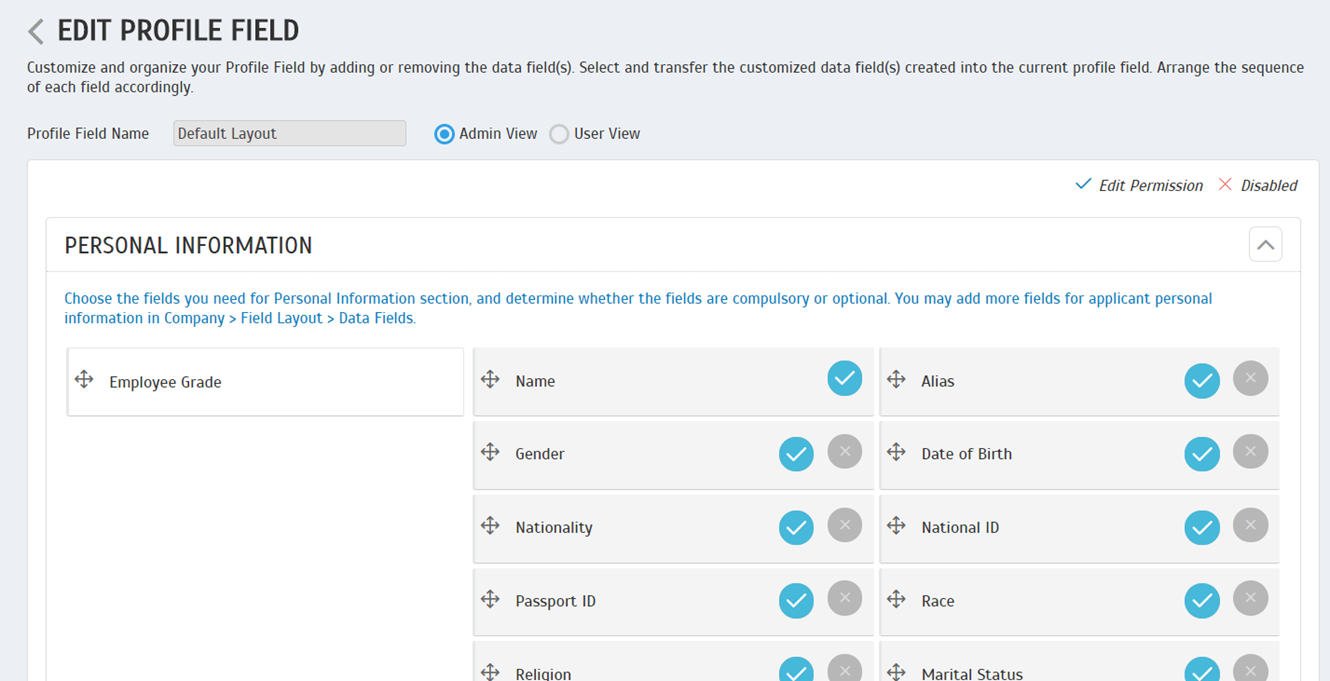
c) Edit Profile Field
Edit the settings from the Default Layout according to your company’s requirements.

cid:image006.png@01D346AE.8718CE40

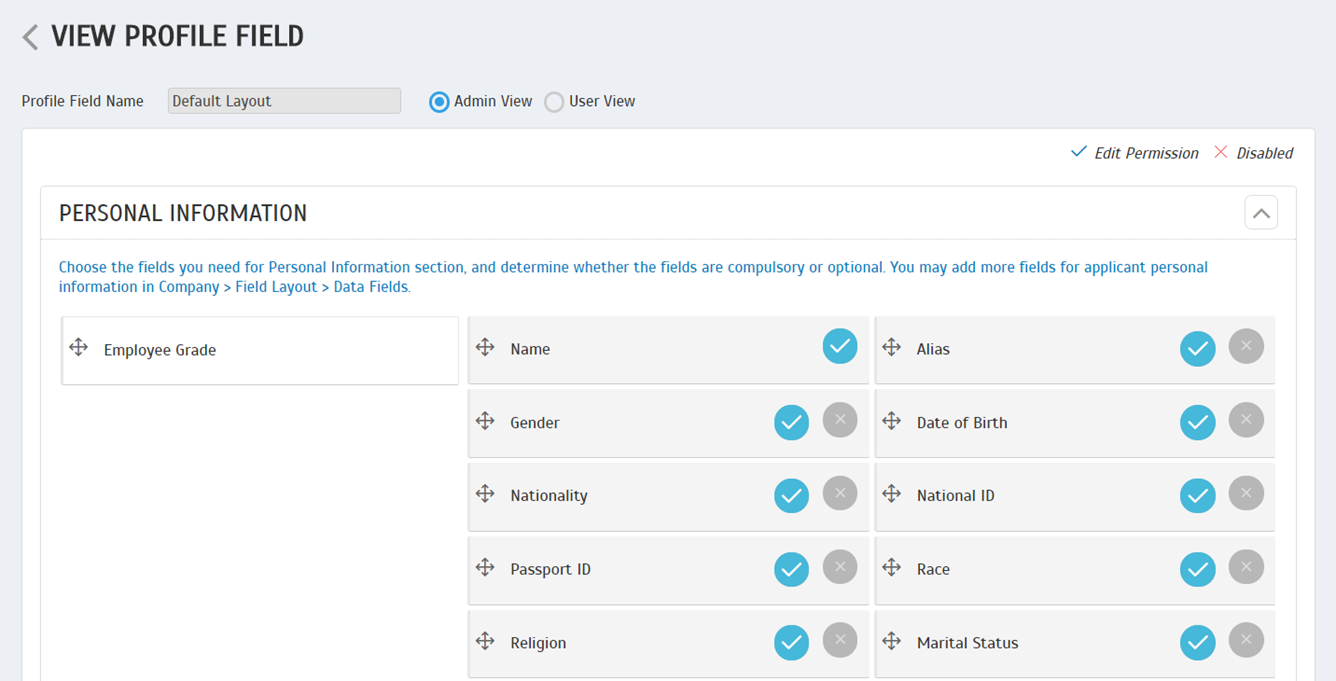
d) View Profile Field
Click at the Profile Field name from the listing to view a specific Profile Field.

cid:image007.png@01D346AE.8718CE40

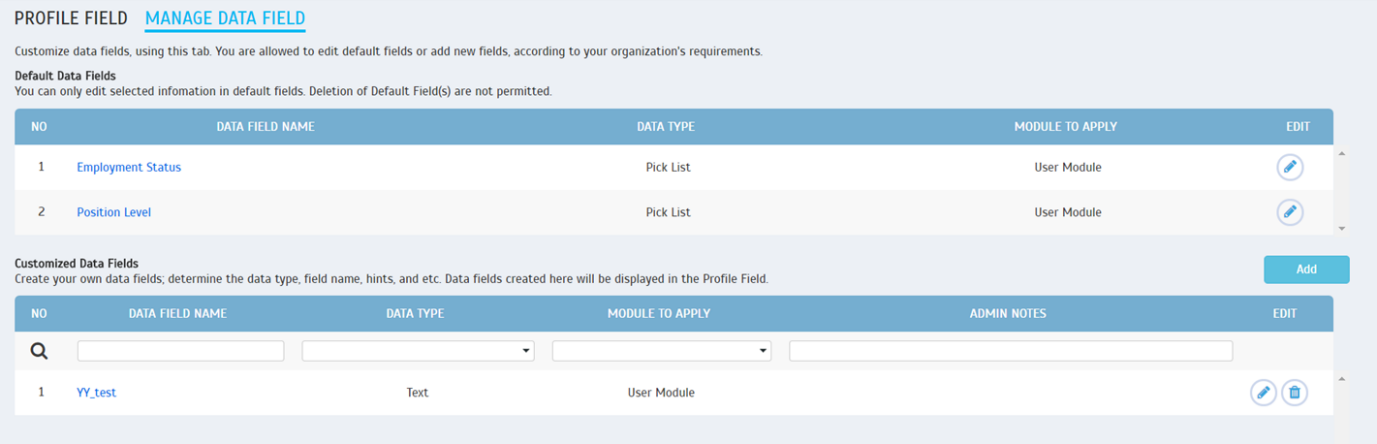
4. Profile Field – Manage Data Field

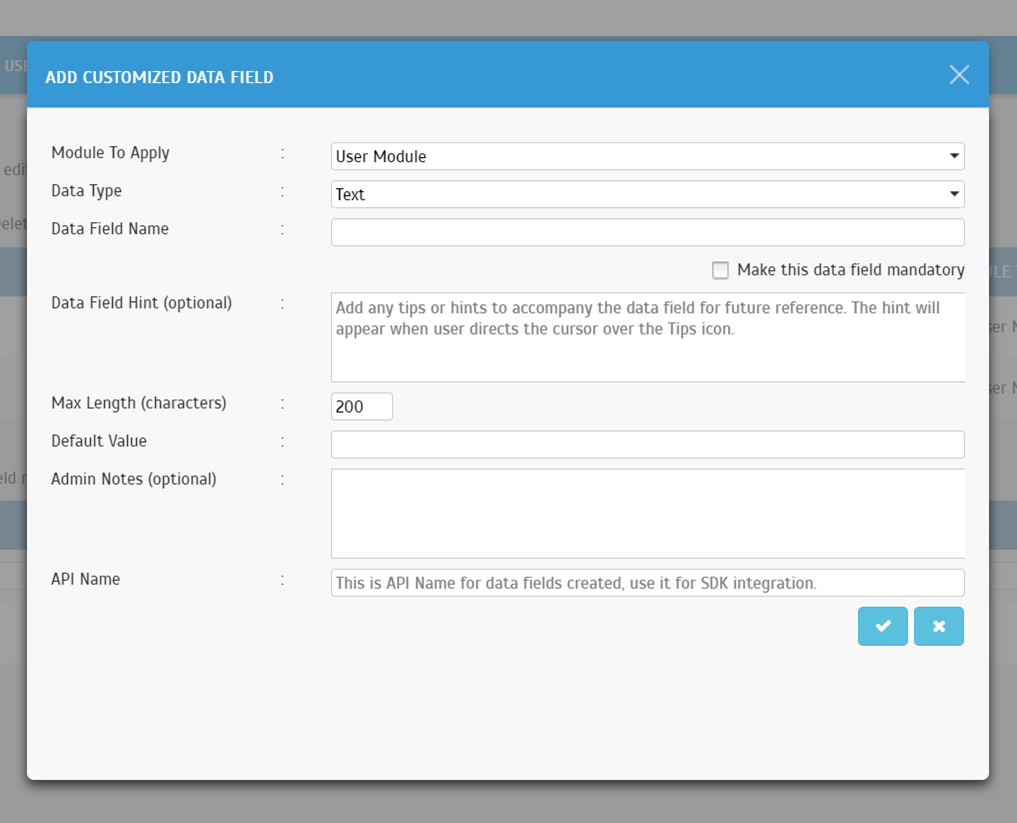
When you need a field that is not in the default list, go to Manage Data Field to add it in. Currently, additional data fields can only be added to Personal Information category.

a) Listing

cid:image008.png@01D346AE.8718CE40
b) Add Data Field
cid:image009.png@01D346AE.8718CE40

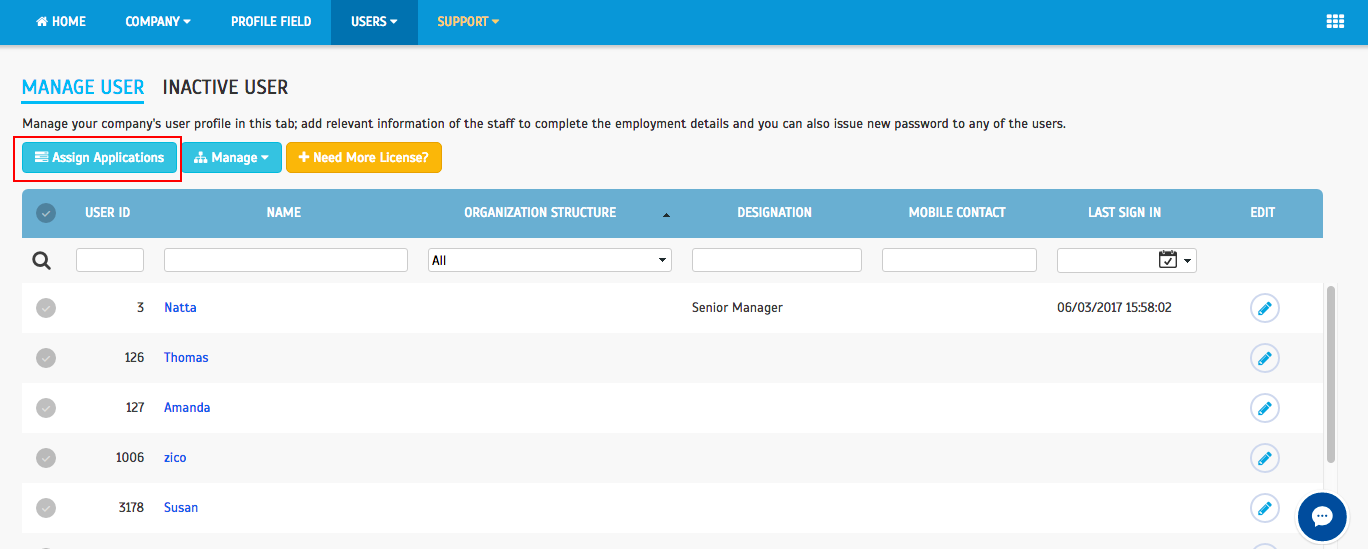
5. Manage User 

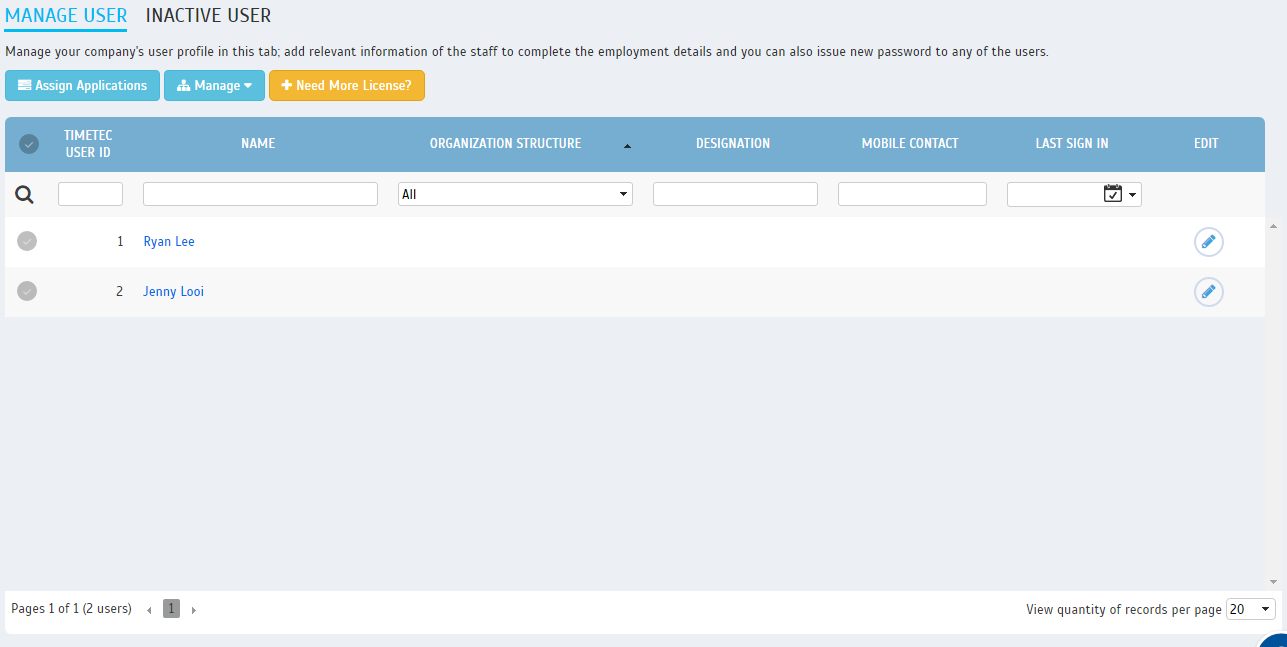
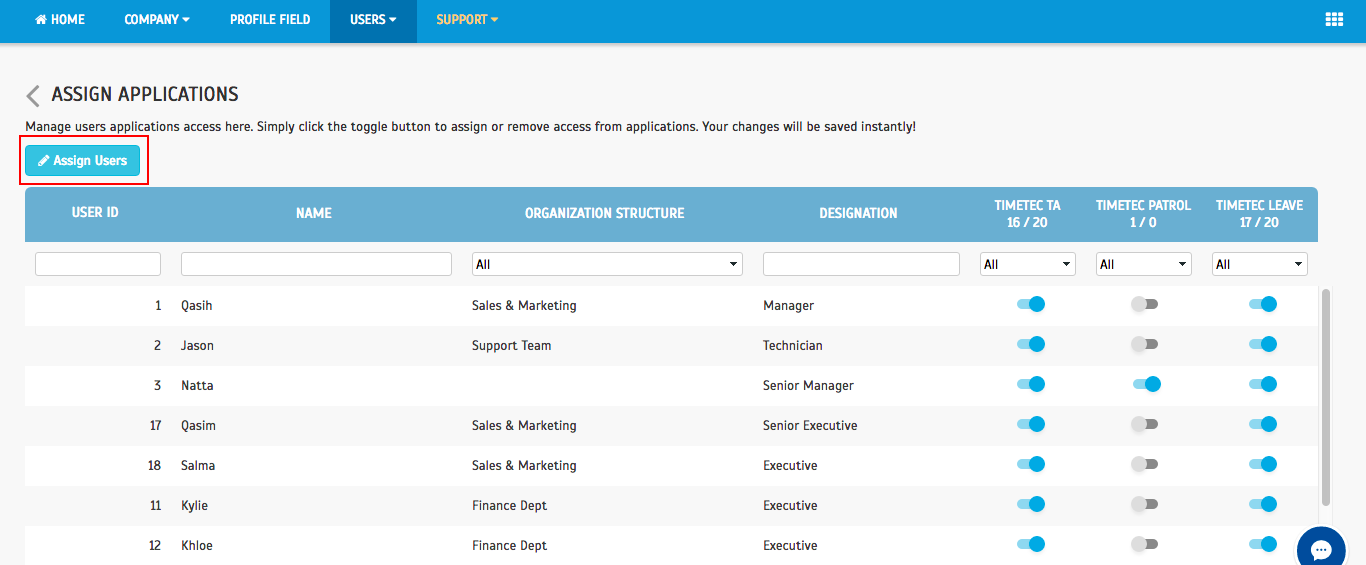
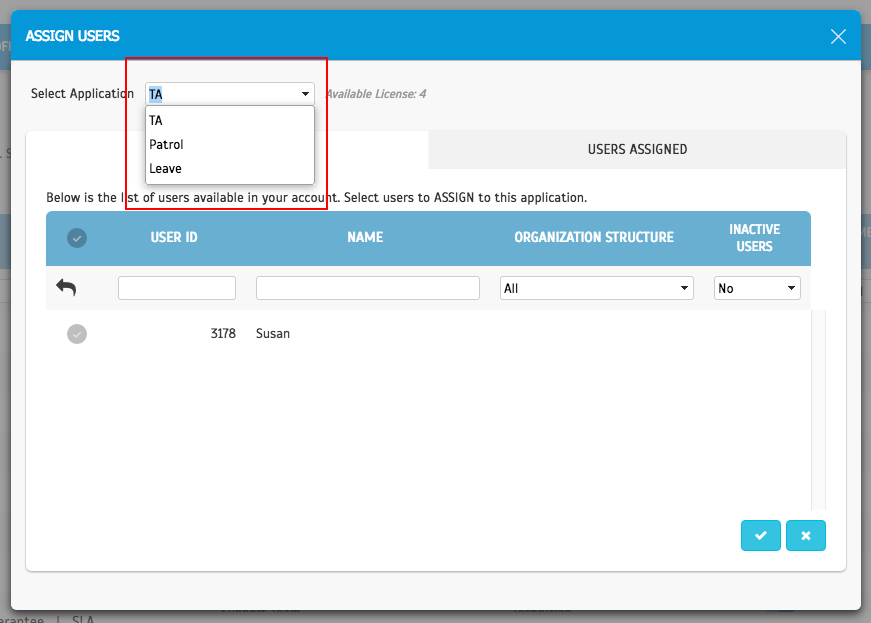
With TimeTec Profile you can add users into any TimeTec application via two ways. The first method is going to Manage User module within the respective application and the second method,  you can do it in TimeTec Profile and subsequently assign user to the preferred solution.

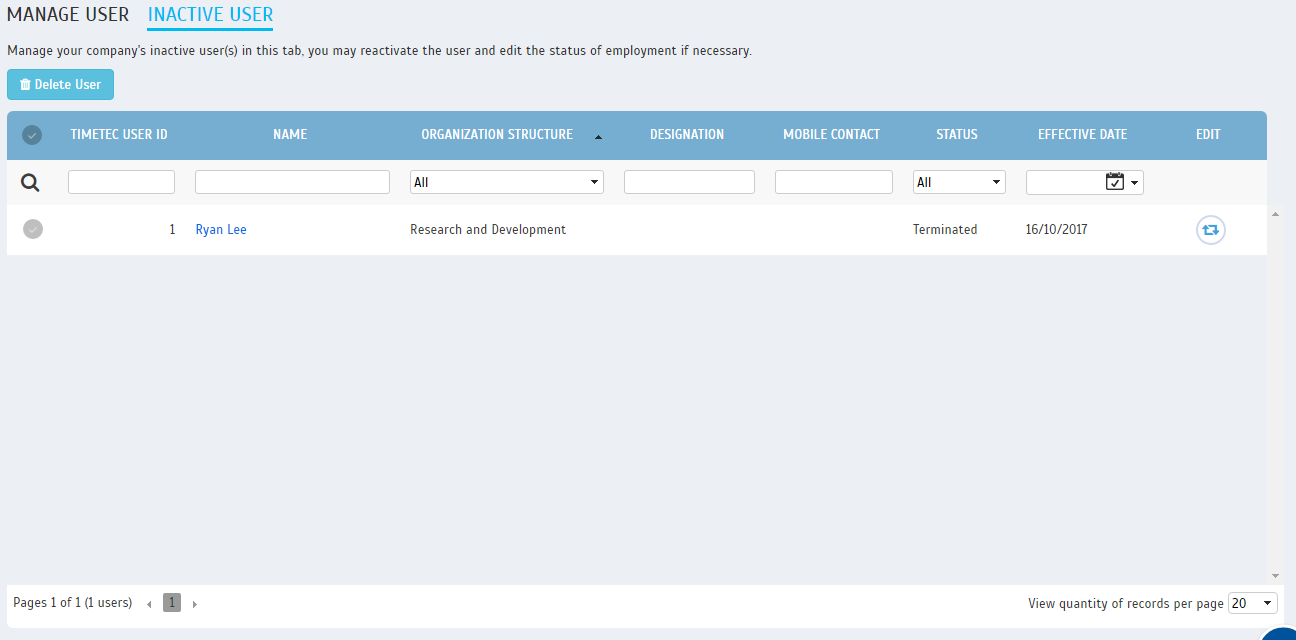
a) Manage User (Active User) & Inactive User

cid:image023.png@01D346AB.7E463A80

cid:image024.png@01D346AB.7E463A80

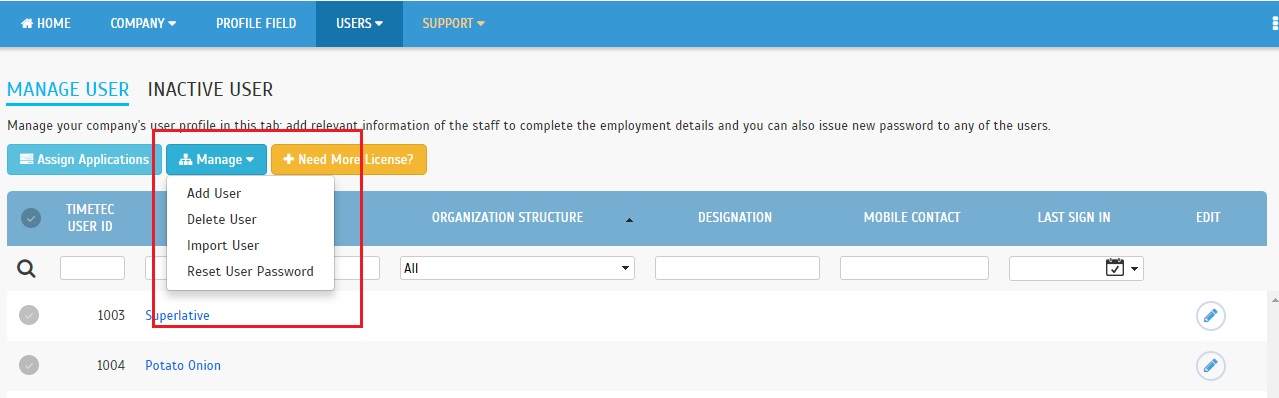
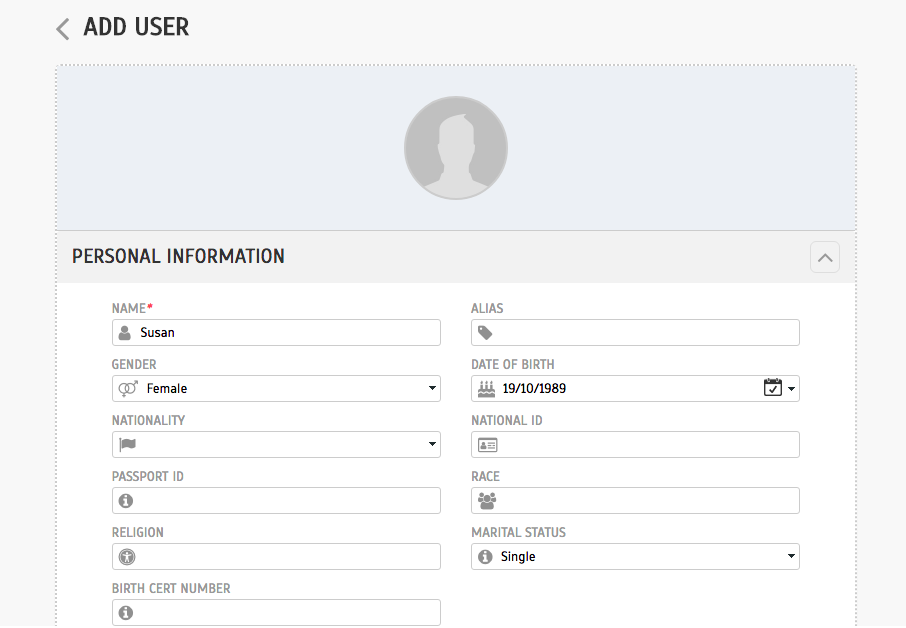
b) Add New User & Assign User to Application
You can add new user individually or in bulk directly from TimeTec Profile. Once added, you can assign the users to the application.



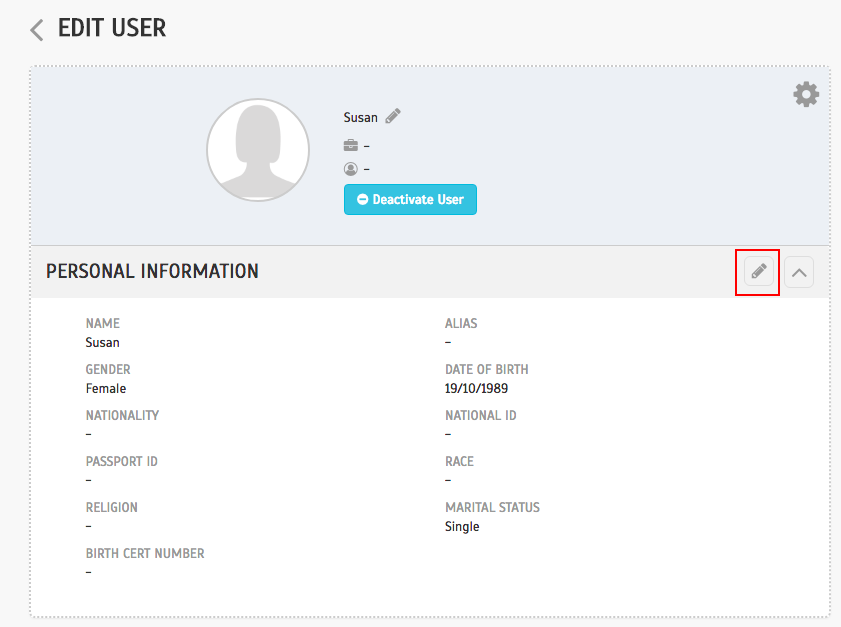
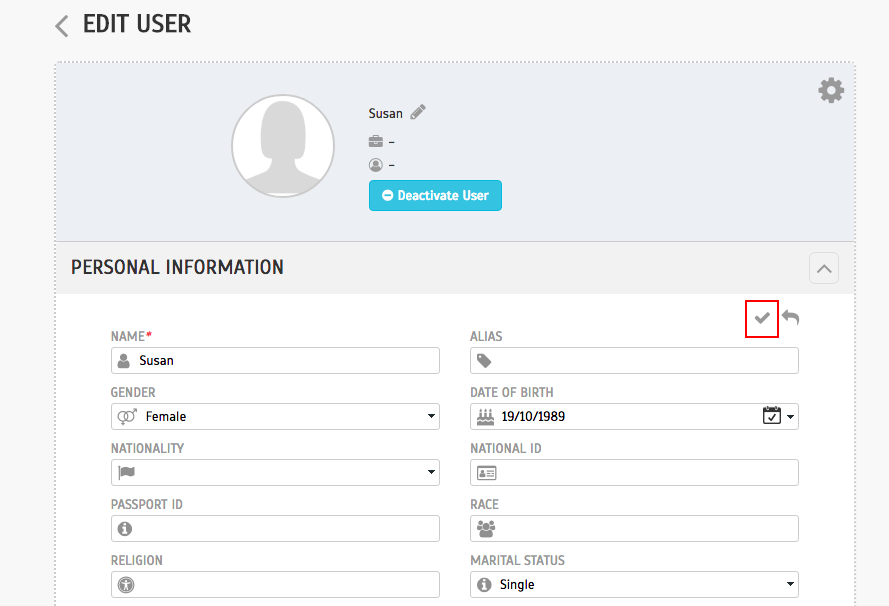
c) Edit User


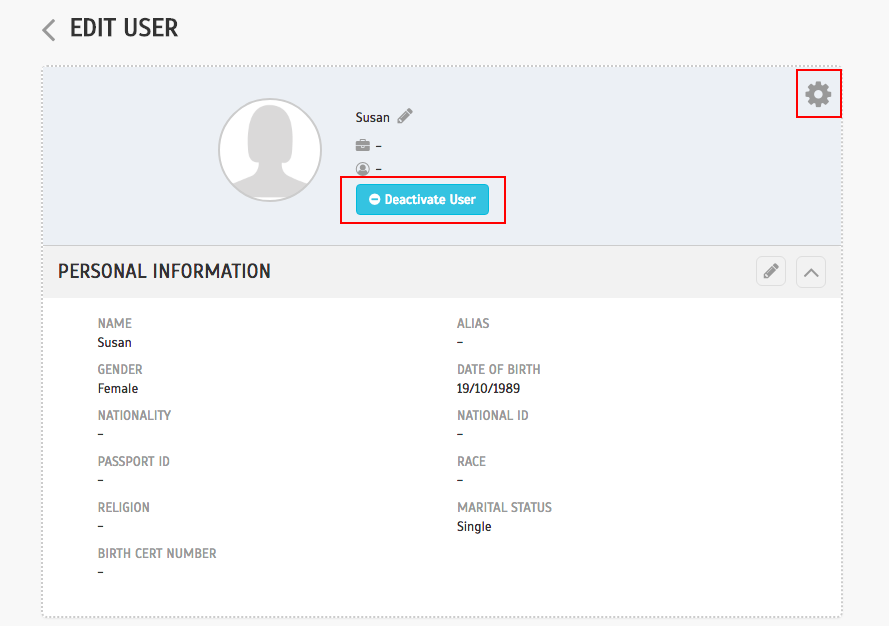
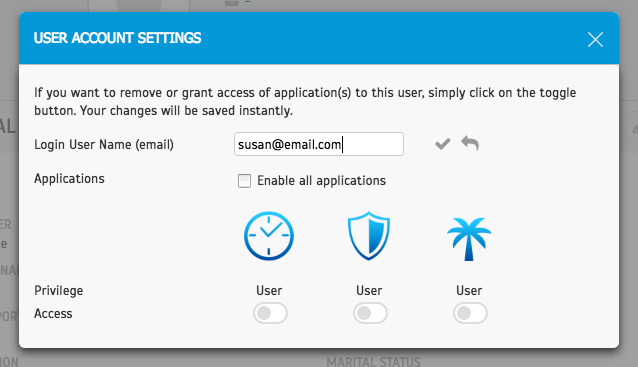
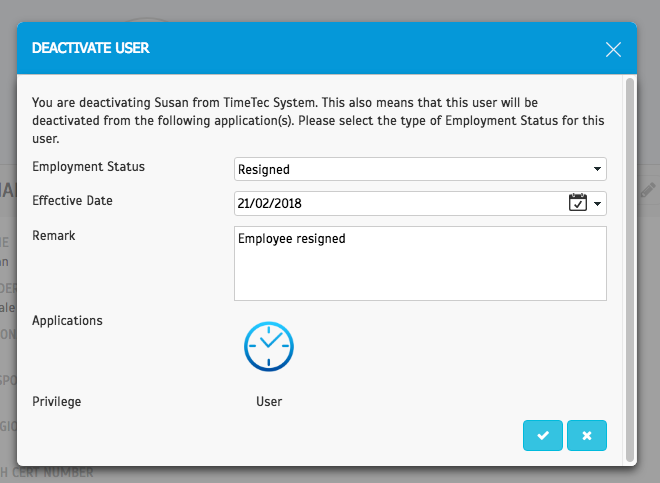
d) User Account Settings & Deactivate User


6. Manage System Roles & Admin

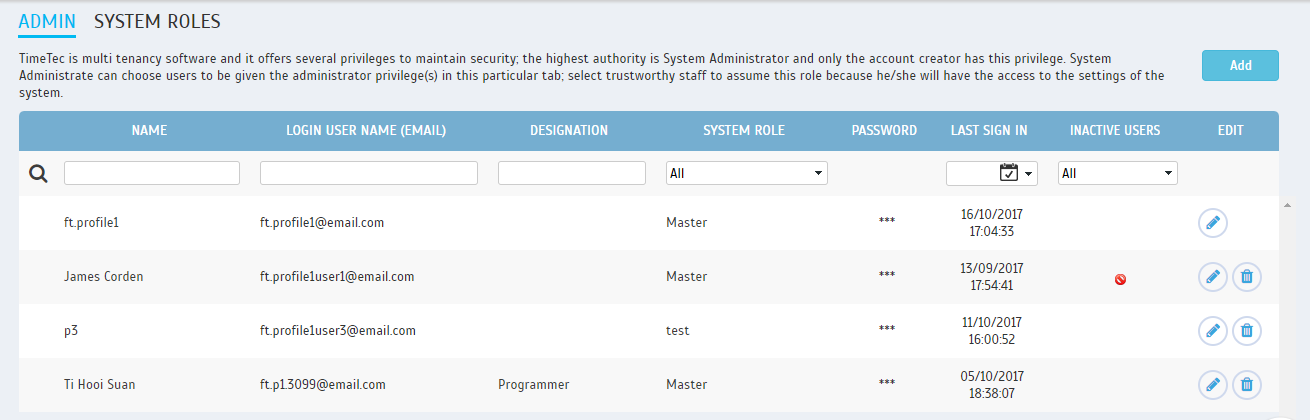
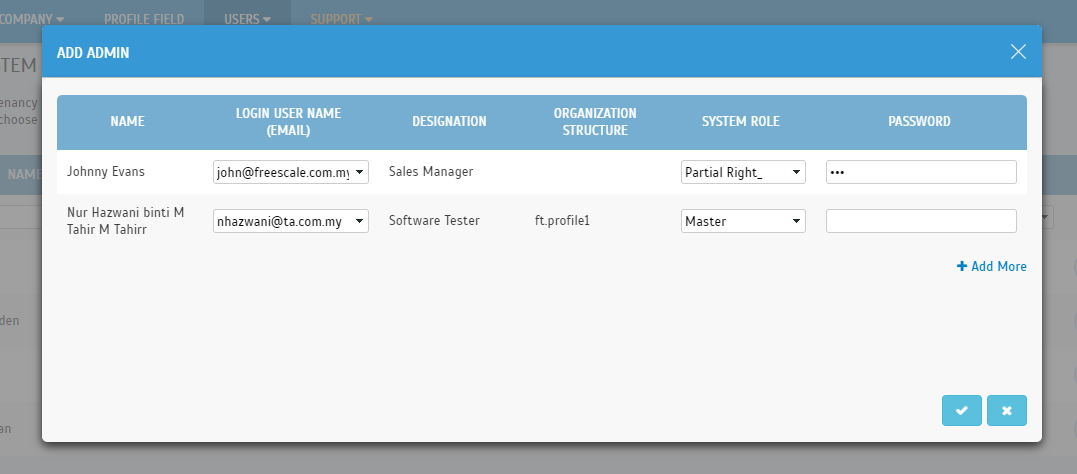
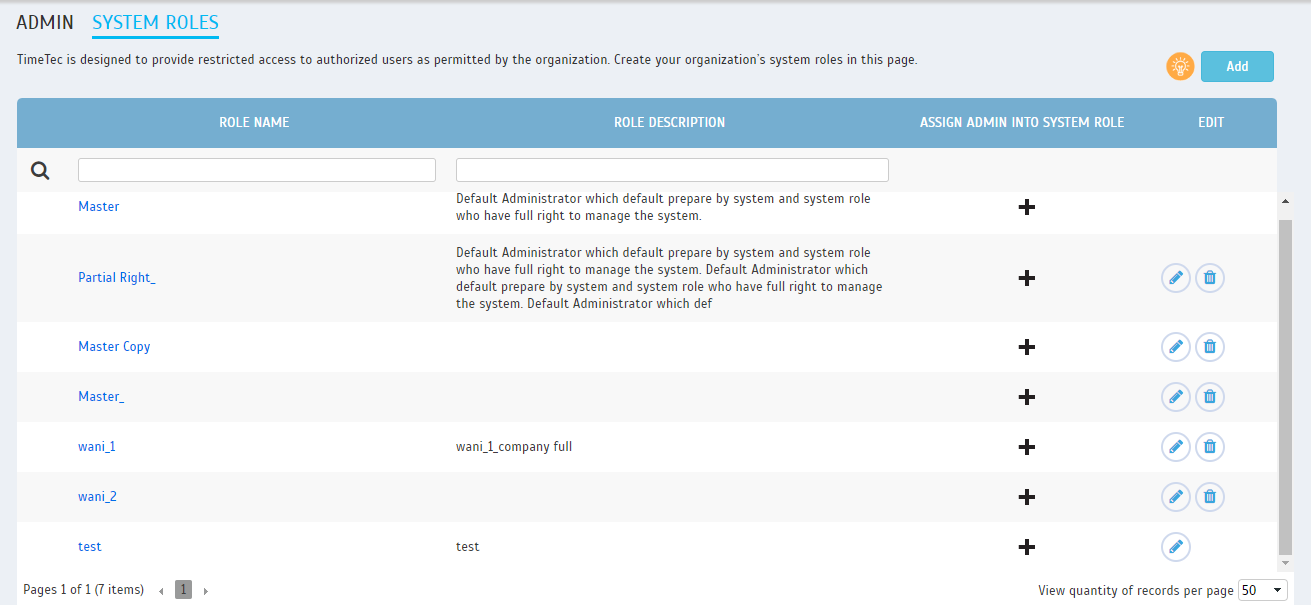
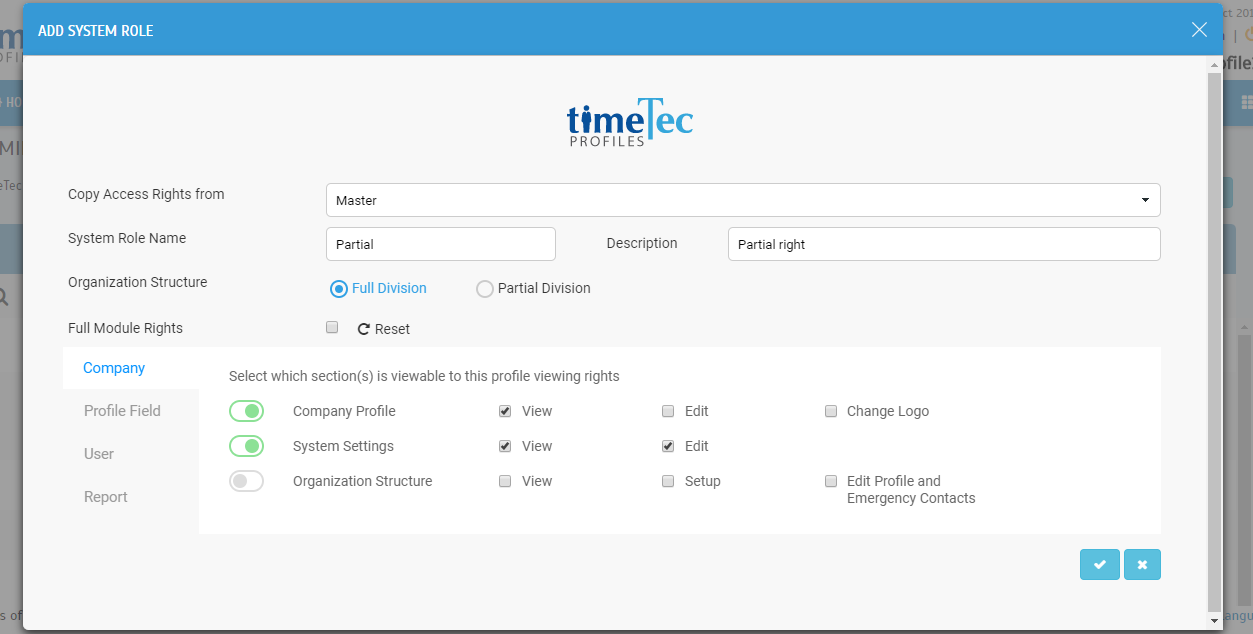
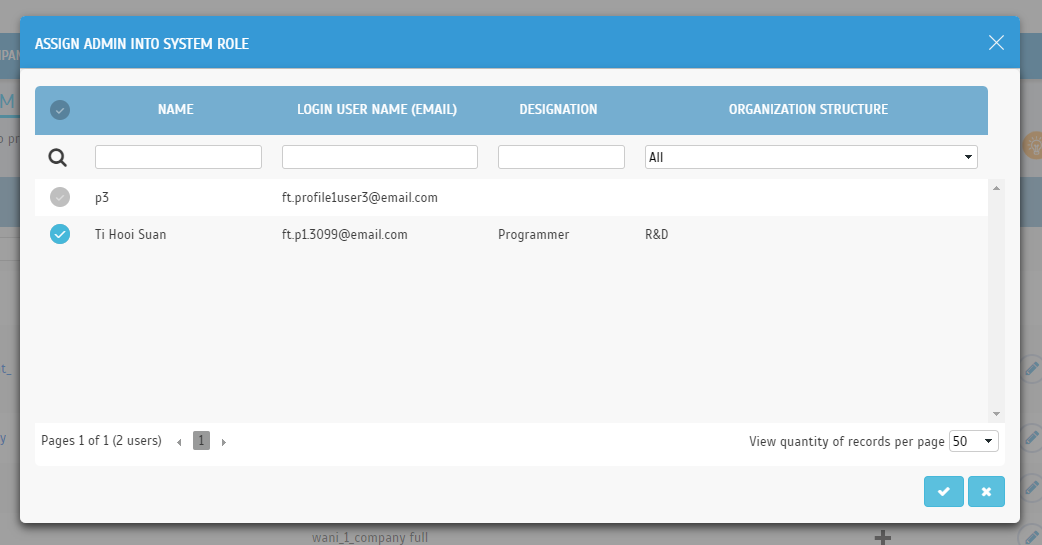
Through this module you can create any number of System Roles with customized rights and privileges to edit/view information in specific application. For example, if you have 5 branches under different managers and you want them to only access profiles of their own subordinates, you have to create 5 different roles with rights over their own Partial Division. After that, each manager can be added as Admin paired with the appropriate role.

a) Manage Admin
i) Listing
cid:image034.png@01D346AD.2BD5E140
ii) Add Admin
cid:image035.png@01D346AD.2BD5E140

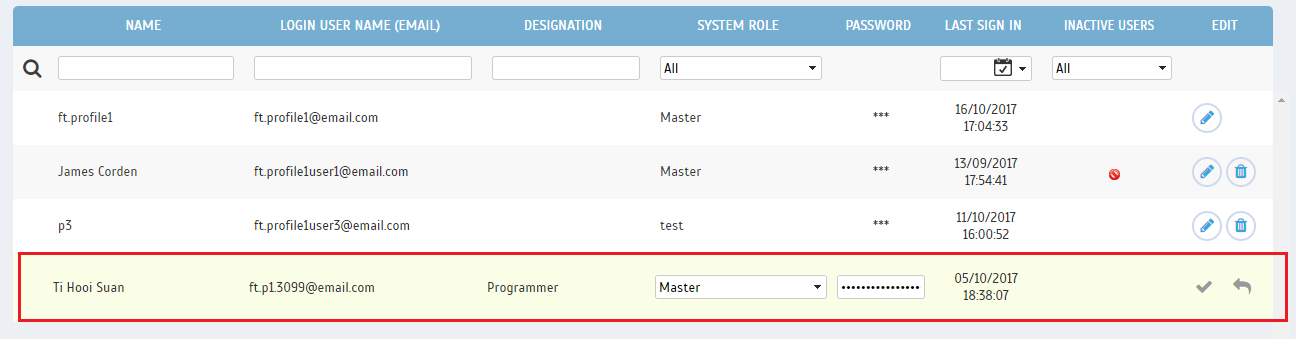
iii) Edit Admin


b) Manage System Role
i) Listing
cid:image037.png@01D346AD.2BD5E140 
ii) Add/Edit System Role
cid:image038.png@01D346AD.2BD5E140 
iii) Assign Admin to System Role
cid:image039.png@01D346AD.2BD5E140

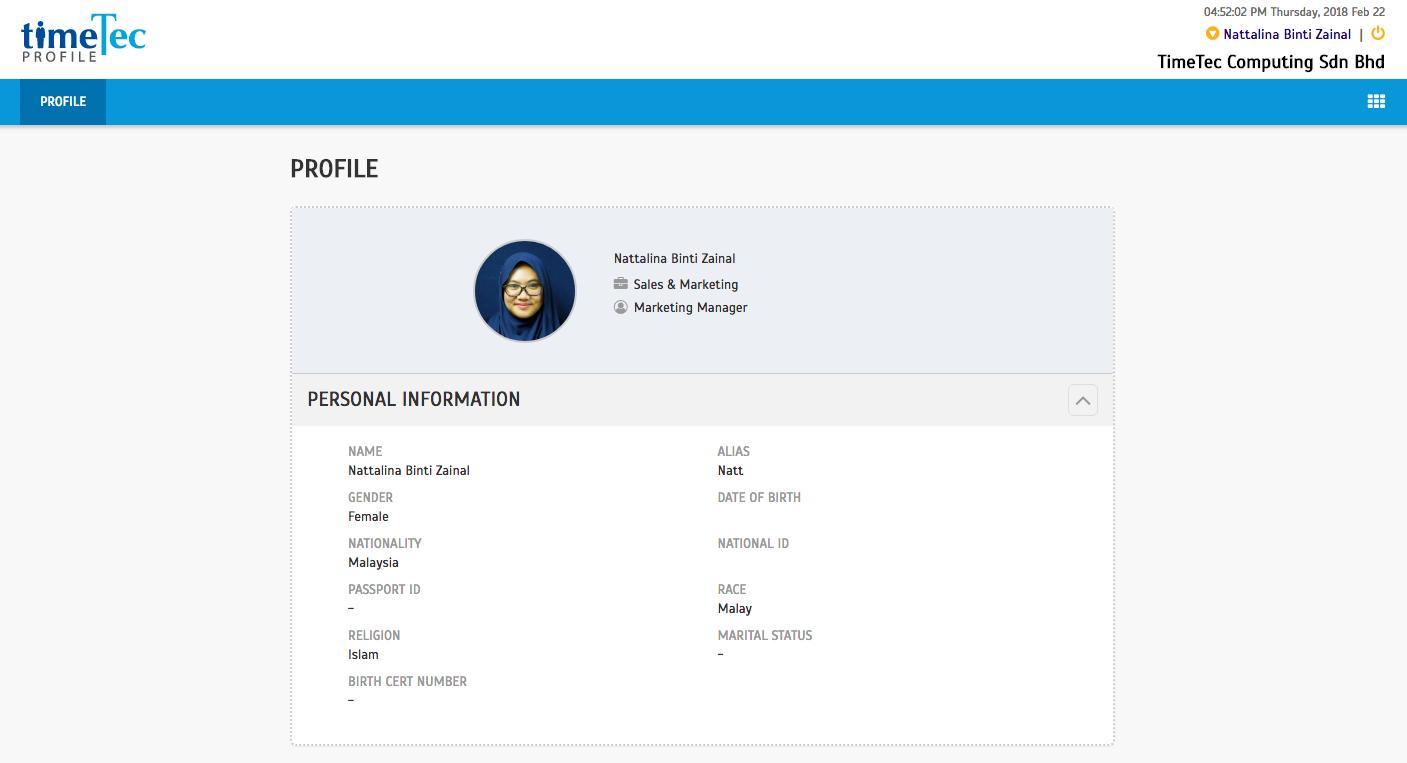
7. Home (User View)


Information that you can keep in TimeTec Profile is not limited to personal information only. You can add employment information, family details, job experience, and etc so you can have a complete information of your employees, accessible when you need it.

What are you waiting for?  Do away with paper records and try TimeTec Profile today to improve your Employee Data Management.