Introduction
Sometimes there is a need to assign existing users as admin roles in the devices.
This article covers how to assign the existing user to new roles and change it to the device via the web.
There are two ways to change user roles via TimeTec TA web
A) Through “Manage User” module
B) Through “Assign User To The Device” module
Change user role through TimeTec TA web
Steps
A) Change user roles through the Manage User module
1. Log in to your TimeTec account (www.timetecta.com) > Go to User > Manage User
2. Search for the user > Click on the user “Settings” button.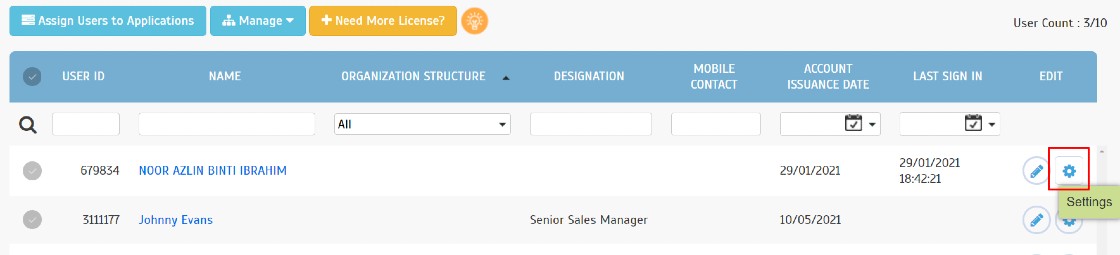
3. Go to “FingerTec Terminal” and update user information
Note: Please make sure that the user Fingerprint/Card ID/Password is filled.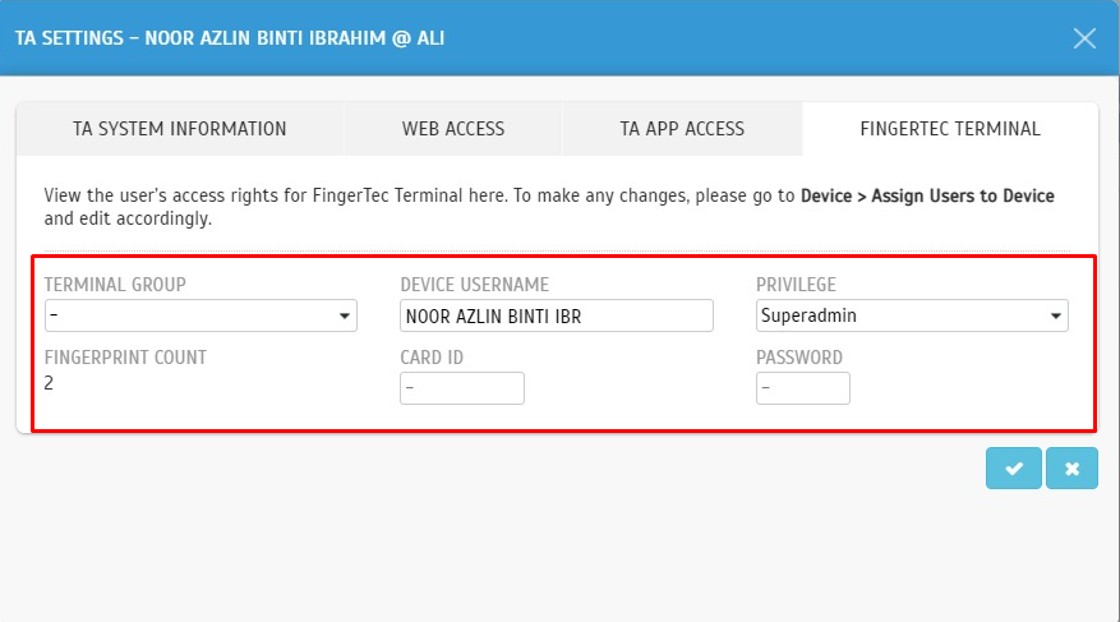
B) Change user roles through the Assign User To The Device Module
1. Go to Device > Assign User To The Device
2. Search for the user > Click on the “Edit” button
Note: Please make sure that the user Fingerprint/Card ID/Password is filled.
3. Change the user role > click on the Submit button.
Steps to re-upload user to the devices
1. Go to the Device> Terminal
2. Select the device you want to upload > Manage Terminal > Upload User.
Note: Please make sure that the device is connected to upload the user.
Green Icon - Connected
Red Icon - Disconnected

3. Select the user > Submit.
Note: If some of the screenshots or steps viewed here are different from the ones in the current system, this is due to our continuous effort to improve our system from time to time. Please notify us at info@timeteccloud.com, we will update it as soon as possible.
Introduction
Global Positioning System (GPS) clocking uses a device such as a smartphone or a tablet to pinpoint a location. For example, with the GPS clocking method, a company can identify who got to work on time and who haven't turned up. This article explains how to set the location as compulsory for clocking via GPS for a company to monitor the staff's whereabouts.
Process
1. Go to Device > Assign Users to Device.
2. Click on Setting (Gear Icon) > Select Optional / Compulsory > Click OK.
Remark: This setting will affect users who are on GPS or NFC clocking methods. Users who are assigned for the Geofence Location option will not be affected.
a. Optional: Users can clock without turning on the phone location.
b. Compulsory: Users cannot clock if the phone location is off, and they must open the
location for clocking.
3. Application.
A. Optional.
- Users can clock even when the location is disabled, and the ‘’without location’’ remark will appear in the Success clocking notification.
B. Compulsory.
-A notification will appear to show the phone location is turned off > The user needs to click Yes. The system will automatically go to Location Setting > Turn on the Location.
-The location will appear after the setting is turned on, and the user can clock as usual.Note: If some of the screenshots or steps viewed here are different from the ones in the current system, this is due to our continuous effort to improve our system from time to time. Please notify us at info@timeteccloud.com, we will update it as soon as possible.
Introduction
TimeTec TA offers a few clocking options, such as using WiFi, Beacon, NFC, GPS etc. Some of the staff might have limitations on the clocking options, and they might have only one option available. The access to clocking options depends on the Admin setting in the system.
This article discusses how to enable/disable GPS & Web Clocking in TimeTec TA.
Process
1. Go to Device > Assign Users to Device.
3. Turn On Web Access > Check Clocking.

4. Turn on Mobile Access > Check Clocking > Submit (OK).
5. A green dot will appear at Web Clocking and GPS Clocking as an indicator that changes are successful.
Batch Update
A. To enable.
1. Select User > Batch Update.
2. Turn On Web Access > Check Clocking.
3. Turn On Mobile Access > Check Clocking > Submit (OK).
4. Green dots will appear at Web Clocking and GPS Clocking to all selected users.
B. To Disable.
1. Select User > Batch Update.
2. Turn On Web Access > Uncheck Clocking.
3. Turn On Mobile Access > Uncheck Clocking > Submit (OK).
4. No green dots will appear at Web Clocking and GPS Clocking to all selected users.
Note: If some of the screenshots or steps viewed here are different from the ones in the current system, this is due to our continuous effort to improve our system from time to time. Please notify us at info@timeteccloud.com, we will update it as soon as possible.
Introduction
TimeTec TA is cloud-based software; therefore, changing the user ID option is not easily available. This article demonstrates steps to change a User ID in TimeTec TA without having to add an additional user license.
The Main Process as illustrated below:
Remove Current User’s Fingerprints from All Devices
1. Go to Device > Assign Users to Device
2. Search for the old user ID. Click the ‘X’ icon on the ‘Fingerprint Count’ column to remove the fingerprint.3. Click the check symbol to confirm
4. Go to ‘Device’ > ‘Terminal’
5. Select all terminals > Manage > Upload User
6. Select the user and please make sure there is no fingerprint count displayed on that particular user. Unselect ‘Do not overwrite user's information if no fingerprint is uploaded’. Click the check button to submit
7. Go to ‘Support’ > ‘Terminal Command Queue’ to check the upload status
8. The Delete Fingerprint process takes around 5-15 minutes to be completed on an online device. Once completed, you may proceed with registration of a new ID and enroll of fingerprint on the device.
Register New ID and Enroll Fingerprint
1. Register the new user ID in TimeTec and upload it to all devices.
2. Once the uploading process is complete, go to the device to proceed with the fingerprint enrolment of the new user ID.
Download User and Fingerprint to TimeTec
1. Go to ‘Device’ > Terminal
2. Select the device that you have enrolled the fingerprint to > Manage > Download User
3. Unselect ‘Display new users only’ > Select the new user ID (please make sure the fingerprint count is stated. Otherwise you need to click the ‘sync’ button to refresh the data) > click select button to submit
Upload the New User with Fingerprint to All Devices
1. Select all terminals > Manage Terminal > Upload User2. Select the new User ID > click ‘select’ to submit
Deactivate the Old User ID
1. Go to User > Manage User > search the old User ID > Click ‘Pencil’ icon > Click ‘Deactivate User’
2. Select the Employment status > Submit
Note: If some of the screenshots or steps viewed here are different from the ones in the current system, this is due to our continuous effort to improve our system from time to time. Please notify us at info@timeteccloud.com, we will update it as soon as possible.


