All the FingerTec terminals are equipped with a flash memory to store
transaction data, fingerprint templates, face templates, etc. The flash memory
is a permanent (non-volatile) storage and it can store data even without the
power supply. The FingerTec terminals’ memory capacity varies for each model.
Time attendance only terminals have far less transaction storage capacity
compared to the multimedia models.
When you perform a successful verification, the
terminal will store a transaction log into its memory. The transaction will be
stored in the terminal until it is downloaded into our TCMSv2 software, or
manually deleted. If you do not download or delete the transaction data after a
period of time, the memory’s storage will reach its maximum capacity and the
terminal will cease to work or function properly. If you are using a USB flash
disk to manage the transaction records, click here for further instructions. If you are only using the FingerTec terminal
for door access purposes and do not need the transaction data, it is
recommended that you perform a housekeeping to ensure that the terminals to
continue to work in a tip top condition.
You can set a reminder at the terminal before
its memory reaches the maximum capacity. If the configured figure is 99, the
terminal will alert users when it reaches its last 99 transaction
storage.
Fo terminals AC100, TA100, AC900, R2,
Kadex: Press Menu
> Options > Log Opt > Alm SuperLog / Alm Attlog
Alm SuperLog: to
notify users if the operational log storage is less than the configured figure.
The default figure is 99.
Alm AttLog: to
notify users if the transaction storage is less than the configured figure. The
default figure is 99.
For AC100C, TA100C, TA200 Plus, Q2i,
I-Kiosk 100, R3, and TA500: Press Menu > System > System > Log
Alert
For AC100C, TA100C (FMM100): Press Menu > System > Attendance
> Attendance Log Alert
For Face ID Series (Face ID2, Face ID3, Face ID4, Face ID4d): Press Menu > System > Log Setting > Log Alert
For I-kiosk 100 Plus: Press Menu > System > Param Setup
> Log Alert
Log Alert: To
instruct the terminal to alert user if the transaction storage is less than the
configured figure. The default figure is 99.
Introduction
Ingressus can be integrated with
multiple auxiliary inputs and outputs. One of the main safety features of
Ingressus is that it can be combined with smoke sensors in an event of fire to
trigger alarm alert and to open all doors of your premise(s) simultaneously.
Benefits
By tapping on this
configuration, Ingressus will open selected doors when the fire alarm is triggered
either from the first Ingressus or from the second Ingressus. It is crucial to
get the people affected clearing the areas when the controllers detect smoke.
Process:
1. The
Ingressus must be activated first before the “Zones” feature appears in
“Device” tab.
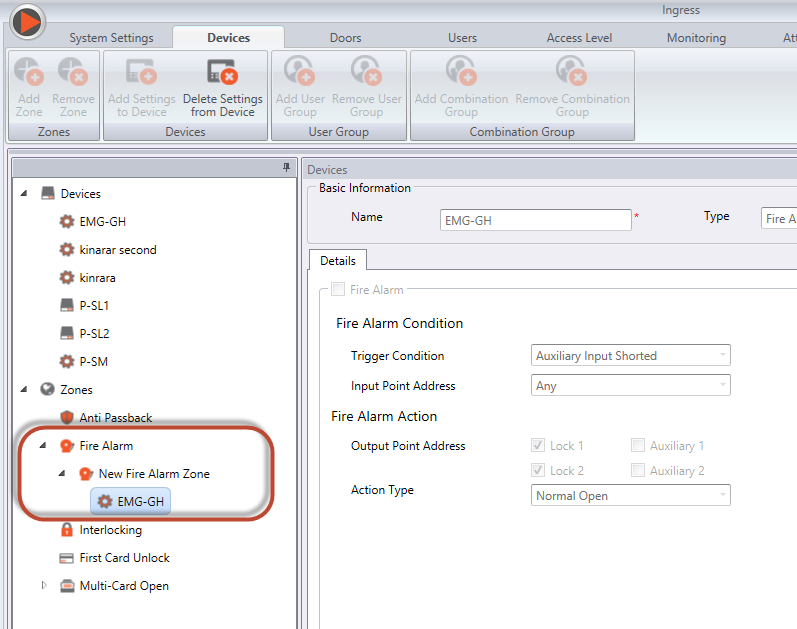
2. Add
both Ingressus into the Zones by selecting the “Fire Alarm” options >
Add Zone > Add
Settings to Device.
3. Configure
both Ingressus in Fire Alarm feature and make sure the Fire Alarm Action is
set
correctly. Auxiliary 1 and Auxiliary 2 must be selected as the Output
Point Address. The Lock
1 and Lock 2 must also be selected in order for
the system to open doors when the fire
alarm is triggered.
4. After
configuring the Fire Alarm, the settings must be saved and synced to the
Ingressus for
the changes to be reflected.
5. You can refer to the wiring
diagram for both the Ingressus with its Auxiliary input and Output
below.
Introduction
There
are companies that allow their employees to take overtime on off days and rest
days on flexible schedules, which mean that they will only be paid for overtime
based on their total work hours taken of the off or rest days.
Benefits
By
creating a new schedule for this flexible overtime, you can later add this
schedule into the existing group duty roster without having to create a new group
duty roster to cater for this overtime work on weekend. With this additional
schedule, the admin can easily calculate the work hours and the data is
compatible to payroll software of choice.
Process
Note:
Please be informed that the below configurations are done on Ingress software, as shown in the accompanying images. However, this can also be applied in TCMSV3 to achieve comparable results, as the configuration is similar with only a slight difference in the interface.
1. Create a Weekly Schedule. Key in the times for workdays only. Do not fill in the times for the off days/rest days.
2. Create a new Flexi Schedule, select Day type as Restday or Offday for the weekend.
3. On the Flexi Schedule > Go to General tab, select maximum IN OUT pair (this depends on the Weekday Schedule that you have set, if only IN and OUT is used, select maximum pair as 1). Insert time range in Double Punch to prevent double transactions within the minutes defined here.
4. Go to Overtime tab > check the box for ‘Work treat as OT’ for Restday and Offday
5. Go to Group Duty Roster > Edit > Auto Schedule, select new Flexi Schedule for Weekend.
6. With the above settings, you can see the worktime of the employee being calculated as overtime in the Attendance Sheet if they come to work on their off days or rest days.
Ingress version v3.0.4 has been released loaded with 7 major updates and 6 bug fixes for better performance. This version is now available for download here and online update straight from the software.
Update 1: Facelift and rearrangement of the Ribbon Bar Menu for improved user experience
Ingress has undergone some cosmetic changes along with rearrangements of its ribbon bar menu to provide users with improved user experience.
Update 2: Rearrangement of Report Settings position in Company Info tab
A simple repositioning of the Report Settings provides users with convenience in handling watermark in reports.
Update 3: Zone (Ingressus Only) tab is hidden from Ribbon Menu
If you are using Ingressus, zone installations can be set for a more secure access control via Ingress. However, if Ingressus is not used, as default the tab will be hidden.
Update 4: Dealer Information in Company Info tab is now optional
Now users are given the option to input information about their dealer in Ingress, it used to be a compulsory field.
Update 5: Hints are available in System Settings tab
Hints are useful for some users who need hand holding in setting up of the software. Ingress is now filled with hints and we’ll keep improving to serve our customers with better user experience.
Update 6: Added default homepage option
Not all pages are created equals and one person prioritizes one page more than the other pages. Now, admins can decide which page to be displayed once they login the Ingress software.
Update 7: No more notification Window pop-up when you closes it
Prior to this version, each time a user cancels the notification window, the window will re-appear after a couple of seconds to remind user that there are changes that has yet to be synced to the device. Now, the window will not re-appear when a user closes it, until the next changes are being saved. We do think of ways to reduce your stress level.
6 Errors Fixed:
1. Fixed failed to remove user from access group
2. Fixed inaccurate date range for tardiness report when using report scheduler
3. Fixed access group issue where not able to select unassigned user
4. Fixed leave type, leave in hour, leave in days not exported when exporting attendance
5. Fixed Users import from file issue where username not update properly
6. Fixed wrong payroll cycle displayed if date is on the last day of the payroll
Introduction
Setting up of a new system can be cumbersome when it involves a lot of staff, departments, different working hours and conditions, and other variables. In view of this, FingerTec has created a wizard that can migrate database from TCMSv2 into Ingress without any hitch. This process will definitely simplify system admin work because they don’t need to set up Ingress from scratch.
This Migration wizard in Ingress will ease the admin’s job and give them the flexibility to either keep the existing data such as User, Devices, Schedules & Rosters, Leaves & Holidays, etc, or replace it with the data from TCMSv2.
Process:
Important note : Kindly make sure to use the latest version software of TCMSv2 (v2.2.027) and Ingress to enable a successful migration process! Get latest version of TCMSv2 and Ingress software here.
The screenshot below shows the data that has been downloaded into TCMSv2 on 13th October 2015, causing the Ingress software to only have data up to 12th October 2015.
TCMSv2 data audit list
Ingress Data Audit List
To solve the issue, you can re-migrate the TCMSv2 database into Ingress Software by following the steps below:
1. Backup the database for both TCMSv2 Software and Ingress Software.
2. In Ingress Software > Click on the Ingress Icon > Select Migration Wizard > Select TCMSv2 backup > Click Upload
3. Un-tick "I want to replace FingerTec TCMSv2 data to existing FingerTec Ingress” > Select all users > Click "Import Selected" to proceed with data migration.
4. After the migration process is completed, click on the Attendance tab > Data Audit List and you can check that the clocking data on 13/10/2015 has been successfully migrated from TCMSv2 into Ingress without replacing the existing data in Ingress.
5. Re-generate the attendance sheet for all users and the attendance sheet is complete without any missing data.
After Newly Migrating to Ingress
1. Please ensure you activate your device in Ingress
so that you will have full access to all tabs. Before activating any device,
only these selected tabs: System Settings, Users and Devices are accessible. Doors, Access Levels, Monitoring, Attendance and Reports are initially disabled.
2. Go to Devices, select the device > click Activate Device. System will automatically activate the old device with the
Ingress software through online activation.
3. However, if you need to activate the device
manually (Activate
Device > select Offline) you can always retrieve the
Ingress key from the following link:
4. TCMS V2’s and Ingress’s license keys are
different, so you will not be able to use the previous activation key.
5. It is advisable for users to disconnect device
from TCMS v2 once you successfully migrate database and connect device to
Ingress software. Once you have downloaded data into TCMS v2 software, it will
automatically delete transaction data from the device and you will not be able
to download that data into Ingress.
6. If you are testing attendance and reports after
the migration, firstly, please generate attendance for all users to ensure
relevant data enters the attendance sheet (Attendance > Attendance Sheet > Generate > Select User ID and Date range> Ok). Also, check user Issuance
Date and ensure that it is prior to the date selected for generating
attendance.
Related Post:
INTRODUCTION
The absence of payroll software in
SME companies might cause difficulty for such companies to calculate wages of
their employees. In some companies, they might have a combination of salaried
employees as well as hourly employees. Hourly employees are paid based on hour
and the pay for an hourly employee is usually calculated as total work hours multiply
by the pay rate.
BENEFIT
In
Ingress software, there are more than 30 types of report available to cater for
the requirements and the report to calculate the staff’s pay is the Gross Wages
report. By using Ingress, the hourly
employees are also eligible for overtime but some settings need to be
configured as the steps given below.
PROCESS:
Follow
the steps below to generate a gross wages report.
1.
Select pay rate
a.
Ingress software > User Tab
> Select User ID > Configure the Pay Rate
2.
Configure wages
a.
Ingress software > System
Settings Tab > System Parameter Settings > Day Type >
Configure the
wages for
i.
Workday / Holiday / Restday /
Offday
ii.
Work time / Overtime / Different
Overtime
3.
Create the clocking schedule
a.
Clocking tab
i.
Monday – Friday as Workday from
0900 – 1800
ii.
Saturday as Offday from 0900 –
1800
iii.
Sunday as Restday from 0900 –
1800
b.
Overtime tab
i.
Define time IN and OUT to treat
as special OT from 2000 – 2300
4.
Generate the attendance sheet to
apply new setting
5.
Preview Gross Wages Report
a.
Ingress software > Report
> Attendance Analysis > Gross Wages Report > Tick option
Rate per Hour.
The
report will provide you with all the hours observed which you can calculate
based on the
hourly rate to get the total of the amount in monetary value.