How to Enable Attendance Record from Selected Device in TCMS V3 and Ingress


Introduction
When dealing with many devices such as Time Attendance and Door Access, TCMS V3/ Ingress software will record every clocking activity of the staff involved. But certain companies want the system to capture the clocking time for attendance from certain devices only.

In order to accomplish that, TCMS V3/ Ingress software provides an option for users to take no account of the clocking activities from other devices that are not set up as the time attendance devices. When you set this option, the attendance sheet will only capture the clocking activities from the selected devices and store in the attendance record.

Process
Therefore, we have prepared a guide for users to enable the attendance record from the selected device. Please follow the quick steps below:

1) Go to Scheduling & Attendance > Clocking Schedule > Add Clocking Schedule > Key in the Schedule ID > Name > Select Work Schedule (Weekly/Flexi/Daily).


2) Set the clocking time for the schedule (In, Break, Resume, Out, OT and Done).


3) Go to Clocking Range > Enable the attendance record from selected devices only > Tick the device name that you want the attendance record to be captured for each column. Please make sure you already add and activate the device in order for the device to appear in the list.


Note: If some of the screenshots or steps viewed here are different from the ones in the current system, this is due to our continuous effort to improve our system from time to time. Please notify us at info@timeteccloud.com, we will update it as soon as possible.

Timetec Patrol - How to create the incident list and assign notification recipients to incident


Introduction
Unexpected occasions happen all the time. This happens more frequently to on-duty guards who are assigned to ensure the security of areas of premises. Incidents must be reported to keep a proof of record. Timetec Patrol offers a function for guards to report incidents to the authorities instantaneously and efficiently, attached with photographic evidence, sound recording and more.

Create Incident List
To create a Timetec Patrol incident list, you need to log on into Timetec Patrol > click Routes > click Incidents & Notifications.

Click Incident List > Click the add icon to create incident list

Fill in the name of the incident and decide on the priority incident from low, moderate and high.

After configuration is completed, click on the Update icon to save the settings.

Assign notification recipients to incident 
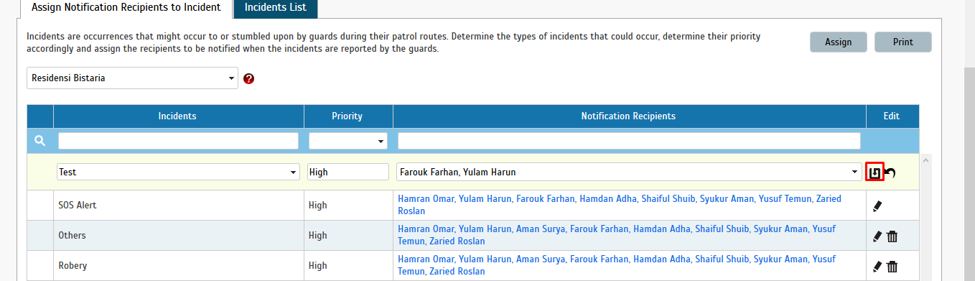
Click on the Assign Notifications Recipients to Incident tab

Click on the Assign button

Click on the incident created earlier and select which user(s) will receive the notification by ticking the checkbox. Multiple users can be selected.

After configuration is completed, click on the Update button.


Note: If some of the screenshots or steps viewed here are different from the ones in the current system, this is due to our continuous effort to improve our system from time to time. Please notify us at info@timeteccloud.com, we will update it as soon as possible.

Weekly-Schedule Configuration for Double Break Time in Ingress or TCMSV3


Introduction
There are many companies that practice double break time and some of their administrators are not familiar on how to configure this schedule in Ingress or TCMSv3. So in this tips, we will provide you the steps that are required to configure it.
Note: For this configuration, the system will begin to calculate overtime immediately after the OUT time. You won’t be able to set the OT to start at a specific time.

Process
1) In the weekly clocking schedule, go to General tab > Edit > Set the “Work time recorded into OT and Done column considered as” option as Work Time > Save.

2) Create the clocking schedule in the Clocking Time tab. If you want to exclude the break time from working hours, tick the “Exclude break time from working hour” option.
Example:
IN - 8:00 AM
1st BREAK - 12:00 PM to 12:45 PM
2nd BREAK - 3:30 PM to 3:45 PM
OUT - 5:30 PM

3) Generate the Attendance Sheet to apply the setting.

Note: If some of the screenshots or steps viewed here are different from the ones in the current system, this is due to our continuous effort to improve our system from time to time. Please notify us at info@timeteccloud.com, we will update it as soon as possible.


i-Neighbour / i-Vizit - Blacklist Visitor


Are visitors creating a mess in your neighbourhood? You can report directly to the security guard or the management office for blacklisting. This action can ensure that the same person will not be permitted into the premises when he or she re-attempts to re-enter your neighbourhood.

However, please do ensure a reasonable excuse is submitted for this action. This is to prevent misunderstandings between visitors, homeowners and the management offices.

A. Who can blacklist a visitor?
Only i-Neighbour system admin have the right to blacklist a visitor. However, the security guard(s) is also eligible to file a report of misbehave visitor(s) using the guardhouse tablet. Upon submission, the system will automatically seek for an approval from the i-neighbour system administrator.

B. How does the system detect if a visitor has been blacklisted?
When the visitor registers at the guardhouse, the security guard will note down the car plate number, the visitor ID and the name. The system will directly recognize a blacklisted visitor based on these details and the security guard will no longer be able to proceed the registration process (Here is a sample of a pop up message indicating that the visitor has been Blacklisted).

C. Can the administrator whitelist the blacklisted visitor?
Yes, as an administrator, he or she can whitelist the blacklisted visitor, depending on the reason given by the security guard when they report a misbehaved visitor. The blacklisted visitor can also go directly to the management office (Accompanied by the security guards) to make a declaration.

D . Steps to blacklist a visitor manually (Admin)
Step 1 - Click Visitor > Blacklisted visitor > Click + Blacklist visitor

Step 2 - Add Name , ID number , Car plate number and the reason for blacklisting.

Step 3 - Blacklisted visitor will be listed here


E. Steps to blacklist a visitor from Visitor Listing / Visitor History Listing (by Admin)
Step 1 - Click Visitor > Visitor Listing > Click tab Visitor Listing or History > Select the person to blacklist > Click View

Step 2 - Click Report Visitor

Step 3 - Add a reason to blacklist > Click report

Step 4 - Click Visitor > Blacklist visitor > View a new added on the list of blacklisted visitor

F. Steps to report misbehaved visitor (by Security guard and approve by Administrator)
Step 1 (Security Guard) - Log into i-Vizit , Click Checked-In Visitor > Select visitor from the current check-in visitor list or from the history list.

Step 2 (Security Guard) - Select the name (click on the visitor name) > Scroll down and click “blacklist”

Step 3 (Security Guard) - Add a reason to complete the blacklisting process > Click Yes after completed

Step 4 (Security Guard) - Successful submitted the blacklist visitor form to the management team

Step 5 (Security Guard) - Click “More” > Select the “Blacklisted” icon to view the pending blacklisted visitors

Step 6 (Administrator) - On the webpage, Click visitor > Blacklisted visitor > A new row of visitor details will be shown on the page with a pending blacklist status

Step 7 (Administrator) - Click View to view the reason and all visitation details

Step 8 (Administrator) - Admin can click on the pending blacklist visitor to make approval or reject to blacklist the report submitted by the security guard

G. Administrator whitelist blacklisted visitor
Step 1 - Click Visitor > Blacklisted visitor

Step 2 - Click View button > Click whitelist

Step 3 - Click Yes to confirm > Done


Note: If some of the screenshots or steps viewed here are different from the ones in the current system, this is due to our continuous effort to improve our system from time to time. Please notify us at info@i-neighbour.com, we will update it as soon as possible.

How to create E-Polling in i-Neighbour


Electronic voting (also known as E-Polling) is voting that uses electronic means to either aid or take care of casting and counting votes. E-Polling is a platform that is physically supervised by representatives of Community or independent electoral authorities (e.g. electronic voting machines located at polling stations);

The management team or admin can employ this E-Polling feature to generate a polling session to get an agreement and consensus from residents (if necessary).

1. Login i-Neighbour > Management > E-Polling

2. Click “Create Poll”

3. Fill up the details to create a poll:
       a. Poll Title
       b. Description (optional)
       c. Question 1
       d. Option A, B = Answer

4. Admin can add more questions and answers by clicking the words in blue, as stated in the picture below. Click “Next” once the settings have been completed.

5. The second page is a sample of the poll preview page from the residents’ view. Once the selections are confirmed, click “Next”.

6. Select the Poll Expiry Date, the type of participants, minimum participants required and the minimum percentage to win the poll. The management can select who to join the polling. They can select Admin, Committee, Resident and Unit Owner.
Note: 
The minimum period is 3 days and the maximum period is 3 months.
Click upload.
Resident: All resident including family members and tenant
Unit Owner: Only master owner


7. The poll has been successfully created.

8. The management will be able to see the voting result by clicking on the “Result” button on the day of polling expiration.

9. The management can see the voting result in percentage style.

If you are still having problems after completing all of the steps stated above, please contact us via support@i-neighbour.com.

Note: If some of the screenshots or steps viewed here are different from the ones in the current system, this is due to our continuous effort to improve our system from time to time. Please notify us at info@i-neighbour.com, we will update it as soon as possible.

How to use TimeTec TA with Ingress/TCMSv3 Software Concurrently


Introduction
Running multiple systems usually costs too much to the organization. However if you can have the opportunity to run two Time Attendance management system with only 1 cost, you should not miss this.

Depending on the individual purpose, some prefer to use the common way, which is to manage the door access control via Windows PC using Ingress software, and some users would love to experience new technology, accessing time attendance management from cloud based software, TimeTec TA.

Having said that, in this article, we will share on how to utilize TimeTec TA application along with the software Ingress/TCMSv3 concurrently.

Steps
A: Registration TimeTec TA account and installing Ingress/TCMSv3 software

TimeTec TA is the cloud application where user can access it via web browser or mobile apps to capture time attendance and retrieve real-time information from anywhere across the world as long as there is an internet connection. To use it, you must first register your own account and subscribe with minimum cost from below address :
https://www.timetecta.com

Meanwhile, Ingress or TCMSv3 software is a Windows based software that is designed to centralize, store and manage all data extracted from FingerTec terminals. It is free and you can download the Installer file from our Fingertec website below.
https://www.fingertec.com/software/index.html

So once you register TimeTec TA account and installing Ingress/TCMSv3 software, you can follow below process and rule on how to manage these two system on your environment.

Process and Configuration

1. Add and activate the device - First of all please add your FingerTec device on both TimeTec TA application and Ingress/TCMSv3 software. You can refer below guide on how to add your device on both systems.

TimeTec TA
http://www.fingertectips.com/2015/06/connect-fingertec-terminal-to-timetec.html

Ingress/TCMSv3: Refer page 14-16
https://www.fingertec.com/customer/download/postsales/SUM-TCMSV3-E.pdf

2. Register User - Once you add the device, you can start to register the user information such as the User ID, Name and verification type (fingerprint, card or password) from the FingerTec terminal. Once complete, you can download all the user information into TimeTec TA and Ingress/TCMSv3 software.

Note: You can also register the User data from TimeTec TA and Ingress/TCMSv3 software, then upload back into the FingerTec terminal.

3. Configure Schedule and Roster – Inside both systems you can start to configure and setup the Clocking Schedule and Group Duty roster for each staff based on your requirement.

4. Download Transaction Log – This is an important step that you need to pay attention. By right, TimeTec TA application will automatically download the transaction log from the terminal in real time basis while for Ingress/TCMSv3 software, you can download the log manually or automatically by configuring the auto download setting (System Setting > System Parameter Setting > Server).

So to ensure you can get all the original log from the terminal on both system, please make sure you do not remove or delete the transaction log inside the terminal unless you have confirmed all the log have been downloaded successfully on both systems.

For TimeTec TA application, DO NOT select option ‘Clear terminal data only’ under Device > Manage Terminal. Refer below picture.


For Ingress/TCMSv3 software DO NOT select option ‘Remove transaction log after download’ when you download the log manually. Refer below picture


If you configure the Ingress/TCMSv3 software with auto download, please DO NOT select option ‘Remove transaction log after download’. Refer below picture.


5. Finally, if you already download all data and transaction log on both system successfully, you can manage your Time Attendance record and generate the Report needed accordingly.

Note: If some of the screenshots or steps viewed here are different from the ones in the current system, this is due to our continuous effort to improve our system from time to time. Please notify us at info@timeteccloud.com, we will update it as soon as possible.