Automatically Download & Generate Attendance Record in Ingress and TCMS V3


Introduction
Ingress and TCMS V3 are FingerTec’s complementary software serving different purposes. Ingress software are generally used with access control devices like R2, Kadex and Q2i and TCMS V3 is for time attendance readers such as TA100C, AC100C and TA500. For detailed comparison between these software, refer to http://www.fingertec.com/comparison/tcmsVSingress/

In Ingress and TCMS V3, there is an option to automatically download the transactions from the terminals and generate the attendance record straight in the software. This article will discuss and elaborate about this settings and on how to configure Ingress and TCMS V3 with auto download transaction.

Benefits
To view the transaction data, the process is to download the transaction data from the terminal into the software and generate its attendance data, in-out records and reports. It can be done manually or automatically via TCP/IP connection or by using USB flash disk if there is no network connection available.
With the automatic download interval function, you can configure the software to download the transaction automatically. You can determine the preferred time and the time interval for the downloads. With this option, you can view your daily report directly in Report option or send the report using Report Scheduler without having to wait for the download process to complete and generate the transaction log manually.

Process
You can find this option on both Ingress and TCMS V3 at System Settings > System Parameter Settings > Server tab.
In TCMS V3:


In Ingress: 

Basically, there are 3 main options you can set to use this function:
1. Server Download Transaction Log Interval:
Set the time interval to download transaction logs from devices automatically. The administrator can set the download process duration to repeat; for example every 15 minutes during the peak time. To disable this option, you need to set it to 00:00.

2. Specify daily download timer for system to activate the automatic download process every day: 
Set up to a maximum of 2 daily timers to run auto-download transaction logs from the devices. An example, if you set the time of download at 10:30 and 16:00, the software will perform the download process at exactly 10:30am and 4:00pm every day.

3. Server Generate Audit Data Interval: 
Set the time interval for TCMS V3 and Ingress  to generate the raw data to be updated into Attendance Sheet accordingly.


If you wish to delete the data after the download process, there is an option to do just that and as for new features, user may choose to "Download Attendance photo" during auto download is running.

Also, when you activate the ‘Perform daily download when PC is powered on’ option, the transaction data in the terminal will download accordingly through the automatic download interval time as long as the computer is powered on. In other words, even if the TCMS V3 or Ingress is not running, the transaction data will still be downloaded into the database.

NOTE:
The most important thing when user configure automatic download in the software is to always ensure Ingress/TCMSv3 service is always running ( Control Panel > Administrative Tools > Services ) as these 2 services play an important part to make sure automatic download is running.

Suspend Users Feature Simplifies User Management


Introduction
Ingress and TCMS V3 offer an option to suspend users who are no longer valid in a system due to termination, suspension or resignation.

Benefit
This feature is another option for administrators to manage users in FingerTec device via Ingress or TCMS V3, where you can control user access through the software. Once the user is suspended, access for that user will permanently be barred until the active status reinstated.

Process
1) Open your Ingress/TCMS V3 software > go to User tab

2) Double click on the user that you want to suspend > Tick “Suspended” > Click Save


 3) Once the changes sync, the suspension will take effect immediately and FingerTec device(s) will deny the user’s access. When the suspended user performs verification at the device, a message “user disabled” will be displayed.
4) If you wished to remove the user from the suspended list, untick the ‘Suspended’ option and follow steps 1 – 3.

Field Customization Management to Add User Details


Introduction
In TCMS V3, we have provided a set of default fields for general user information under User Tab. But your company might want to add certain information that is not readily available in the software. We have just the solution you need.
With Field Customization Management, you can add more user fields in TCMS V3.

Benefits

This feature offers flexibility to create your own data.

Process
1) Go to System Settings > Field Customization Field > Edit > Add


2) A pop-up will appear. Insert the item name, choose the item type and fill up the details accordingly.
There are 4 Item Types available:

a)  Text Box
Users can key in the data input inside the box. For example: Age, Height and Weight.

b)  Combo Box
You can create a list of selection where users can choose one from the drop-down list. For example, Blood type (A,B,AB,O) and Gender (Male , Female).

c) Check Box
You can add options and let users to select accordingly, for example marital status, language proficiency and etc.

d) DateComboBox
You can select a date from a drop-down calendar.

3) Click Save, the field(s) will be created under Other Tab in Users Module.

Batch Add User into TimeTec TA Made Easy by Importing User from File


Introduction
TimeTec TA is a highly flexible cloud-based time & attendance management system, that allows you to import user information from file. This feature provides a convenient way to integrate user information from the existing 3rd party system, if any, into TimeTec TA. In this article, we will provide a step-by-step guide on how to import users from files with .xlsx or .txt formats.

Benefit
This feature allows you to add user in batch into TimeTec TA easily and offers a way for you to transfer users from existing third party HR or payroll system.

Process
1. To import user from file, first go to User Tab > Manage > Import Users > Browse File to import User (two format supported: xlsx and txt). The formats supported are Excel Files (.xlsx) and Text File (.txt). You can download the sample Excel and Text files to help you configure the layout and of the files.


2. Users can directly perform the field matching after importing file if the Excel file contains only 1 sheet.


If the attached Excel file contains multiple sheets, there will be a drop list to select the desired Excel sheet to match the user information. It is strongly recommended to follow the configuration in the sample file as this will smoothen the process of the field matching.

3. The system will then provide a preview of the users from the file. If there is any invalid user in the Excel file, the system will display it together with the reason of the user’s invalidity.
The valid users will be displayed and the information can be viewed before importing into the system.

4. You will be prompted for generate attendance after successfully importing user from file. The issuance date of the user can be changed here as well.

5. A message will be displayed indicating the users have been imported successfully. The total number of users added into the system will be shown.  

6. The users can be seen under User Module after the process is completed successfully.

How to Enrol Time Beacon/ NFC in TimeTec TA using Android Smartphones


NOTE 

N1: It is recommended to use Android phone for Beacon registration. 

N2: Currently, you can only use NFC tags with Android phones while iPhone users will not be able to use NFC clocking. 

N3The guide below uses Beacon as an example to demonstrate the method for enrolment of device. However, enrolment steps are the same for both Beacon and NFC, therefore you can also refer to this if you are using NFC. Additional points to note for NFC, where applicable, is shown in red text.

Process: To enrol your Beacon/ NFC devices into TimeTec TA account, you need to complete the following three setups: 
Step 1: Add Time Beacon/ NFC as a Check Point

Step 2: Enrol the Beacon/ NFC using the TimeTec TA App
Step 3: Assign Beacon/ NFC  to a Check Point Group, and allocate users under each group accordingly.   

Step 1: Add Time Beacon/ NFC as a check point
 

1) Login to your TimeTec TA account with master account holder, go to Devices > NFC | Beacons


2) At the NFC | Beacon list click on Add> Select Beacon/ NFC > Enter a New ID and Name, then press Save. 


Step 2:  Enrol your Beacon/ NFC using the TimeTec Mobile App 
Android Users (Recommended for Beacon & NFC enrolment process)
1) Turn on the Bluetooth of your smartphone. (For NFC enrolment: Turn on NFC function)
2) Login to TimeTec TA mobile app with master admin account. 
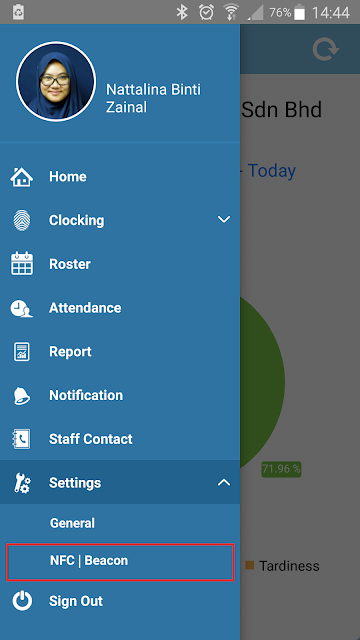
3) Click on the Menu Button (3 lines on the top left corner of the app)> Setting> NFC | Beacon 


4) List of your checkpoints will appear> Select the unregistered Checkpoint, displayed in brighter colour.


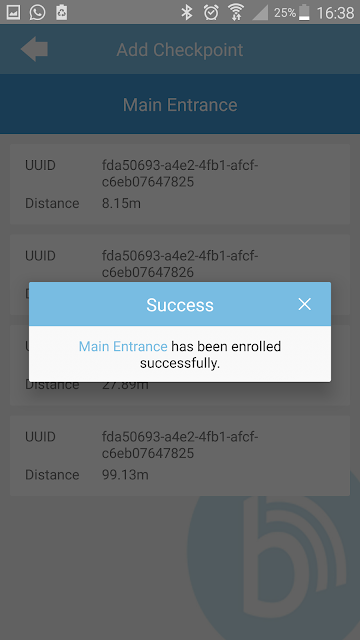
5) Once the device is selected, the UUID and the distance of the available Beacons will appear in the list. (For NFC enrolment: Tap your smartphone at the NFC tag and confirm Yes to register it to server)

6) Select the preferred Beacon (Based on the Distance), to enroll the UUID of the Beacon in TimeTec


Step 3: Assign Beacons/ NFC to a Check Point Group, and allocate users under each group accordingly  
1) Login to your TimeTec TA account with master account holder, go to Devices> NFC | Beacons
2) At NFC | Beacon Group, click on Add > Enter the ID and Location of your Beacon/ NFC


3) Enable the Group, then click on the Plus button to add check points (Beacon/ NFC) to the group. You can add both Beacon and NFC checkpoints to the same group.

 4) Click on the human Icon in front of each group to assign users to the Beacon/NFC Groups and you’re done!

Any questions, direct them to support@fingertec.com

Related Post

8 Fun Facts about the BLE powered Beacon


Did you know that ……

1. Before the days of the BLE Technology, Beacons were typically referred to Lighthouses, tall structures that guide ships to navigate at sea. The BLE Beacon, however, is no lighthouse. 

2. The BLE Beacon is a small device that transmits signals. Designed on purpose to be low powered, and to emit short-range signals at set intervals. Its short transmission range makes it the perfect device for providing location-based information and services, such as marking time attendance.  

3. BLE actually stands for Bluetooth Low Energy, it is an enhanced and advanced version of the Classic Bluetooth designed by Nokia back in the days. BLE has come a long way from its predecessor, enabling a greater variety of functions and data exchange capability, including reporting Time Attendance. 

4. BLE Beacons are easy to use, and apps such as TimeTec TA has made it so that users only need to Sign in, and with a single tap, you can mark your attendance in the office. It's technology, not magic!

5. Beacon is a widely accessible technology. Because BLE capability is found in most of our mobile devices today, Beacons are able to work on Android and iOS platforms on smartphones and tablets.

6. With BLE, Beacons maintains a very good battery life. Generally lasting from about 18 to 24 months, while some may even last over 5 years. Despite their reliability, Beacons don’t actually work that hard. They let Bluetooth do all the work, and Bluetooth is incredibly energy efficient. Even with a small sized battery, it packs a good punch.

7. Beacons are not just user-friendly, they are respectful. Because Beacon requires users to Opt-in for a successful pairing. It makes a secure, friendly and respectful device for Time Attendance.

8. When BLE Beacons are implemented with TimeTec TA in your office, you can forget punch cards and access cards, all you need is your smartphone to clock in and/or out. 

Try your hand at Time Beacon for Attendance using TimeTec TA mobile app and watch this video to know how easy it is to get your attendance data sorted out. Stay tuned for more info about beacon on this blog.