Showing posts with label leave balance. Show all posts

TimeTec Leave - How to Configure Accrual Interval in Leave Policy to Allow Monthly Earned Leave Balance


Introduction
Some company regulations provide a prorated leave balance from the full yearly entitlement based on staff’s joining date, while others practice prorated calculation earned monthly. However, the monthly earned leave is usually calculated on a prorated basis. For example, the staff is entitled to 18 days annual leave per year. Therefore, every month the staff is eligible for 1.5 days of annual leave. If the staff is entitled to 12 days yearly, they shall receive one day of annual leave monthly. This article will demonstrate how to configure the leave policy to allow for earned leave balance every month.

Process
1. In TimeTec Leave, go to Leave Settings > Leave Policy

2. Search for the policy group, click on the edit button to review and amend the current settings.


3. Click on the edit button for the leave type that needs to be configured based on the monthly earned leave. Set the Default Balance as Empty so when a user is first assigned into this policy, they will not receive any balance yet and shall only receive the balance based on the accrual interval settings. Under the Upon Renewal column, change reset to Full Allowance into Carry Over All or Carry Over Limit, and set the carry over settings accordingly for the limit and expiry date, if any. 
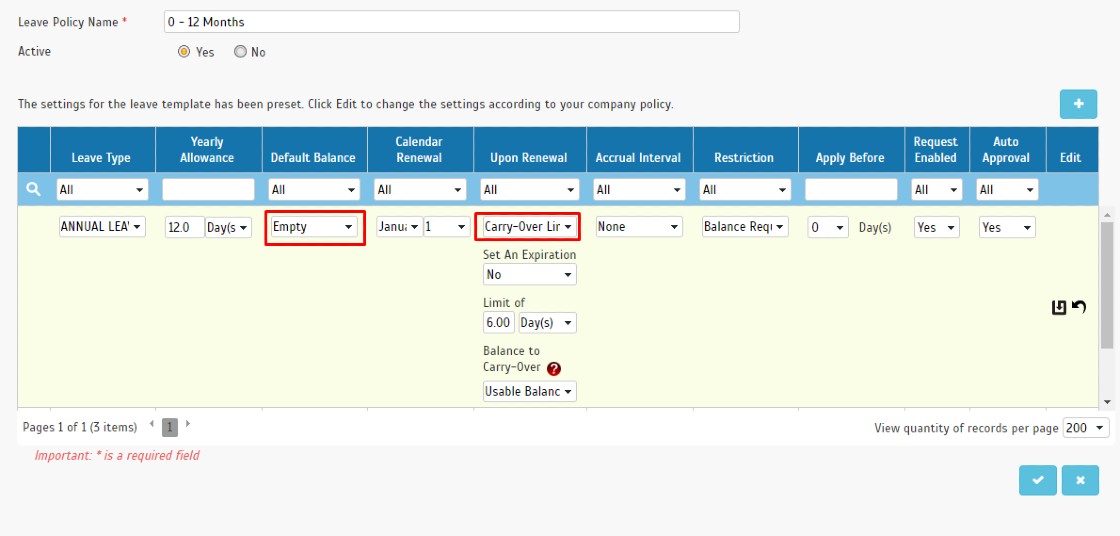

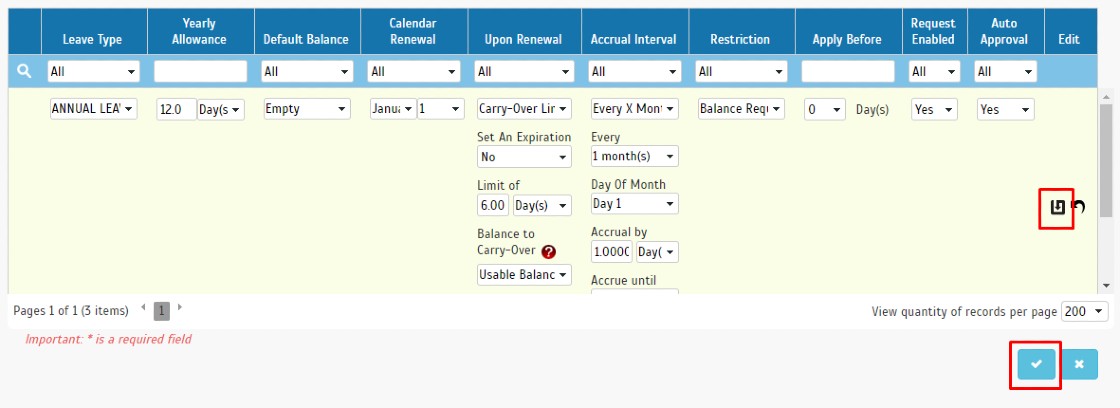
4. Accrual Interval will be the column to set for the monthly earned leave. Change the accrual interval from None to Every X Month. Set to earn the balance every how many months (e.g. every 1 month) and the day of the month to receive the balance (e.g. Day 1, Hired day, Last day). Set the amount to be credited into the balance under Accrual by. For Accrue until, select Until Allowance is Full so that the total accrual received by users will not exceed their yearly allowance (e.g. if yearly allowance is 16, accrual monthly by 1.5 days; the user will receive 1.5 days monthly until the tenth month of the accrual, while the eleventh month will only receive 1 day, and none on the 12th month).


5. Click on the Update button to Update button to update the changes, and then the Save button.
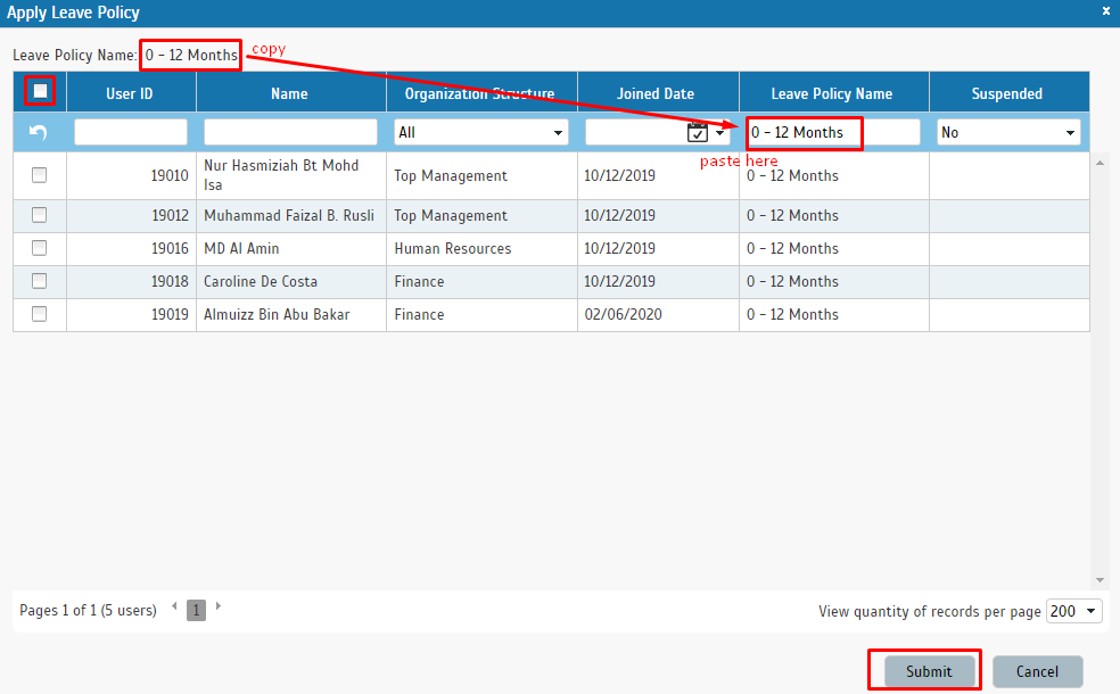
6. Reassign Users into the policy to apply the changes in the settings. Copy the leave policy name and paste it under the Leave Policy search box to reassign easily. Once users within that policy have appeared, tick the box above to select all users and then submit.

7. Please note that existing users assigned to the policy before you made the changes will remain with the leave types and balance in the previous settings. Amendment to the user balance is required to change existing users balance. You may refer to this article to update/import user leave balance through Excel file https://www.fingertectips.com/2021/08/how-to-import-user-leave-balance-using.html

Note: If some of the screenshots or steps viewed here are different from the ones in the current system, this is due to our continuous effort to improve our system from time to time. Please notify us at info@timeteccloud.com, we will update it as soon as possible.



Option to Reset User’s Leave Balance in Timetec Leave


Introduction
Resetting a user’s leave balance can come in handy when there is an issue pertaining to a user’s leave balance. For instance, it can be a mess when the admin has imported an incorrect leave balance or has manually edited an incorrect leave balance multiple times. 
However, any taken leave or earned leave will remain untouched.


Under the user leave balance page, there is a ‘Reset Balance’ button which allows the admin to reset the current leave balance according to the user’s leave allowance and policy settings.
Note: This action cannot be reversed

Process
To find the reset leave balance button, simply navigate to User tab > Manage user. Then, find the intended user for change followed by clicking on the leave settings button on the right.


After opening the leave settings for the user, simply navigate the Balance tab and the reset leave balance button will be on the bottom right corner.

 
To use the feature, simply click on the button. Upon clicking on the button, there will be a confirmation message shown to the admin.


After confirming the message, the user’s leave balance will be updated by eliminating previous updates, including imported leave balance and manually edited leave balance. However, the entitlement will not be erased but will be kept instead.


For another example, if the default balance in the leave policy assign to the user is 0 days, the balance will remain at 0 days after reset.


Note: If some of the screenshots or steps viewed here are different from the ones in the current system, this is due to our continuous effort to improve our system from time to time. Please notify us at info@timeteccloud.com, we will update it as soon as possible.


How to Track the Changes made to a User’s Leave Balances in Timetec Leave


Introduction
You should probably be aware that all changes that have been made to a user’s leave balances and should be able to track whenever you wish to review the details. This can be done by viewing the Audit Trail in the User Leave Settings. All specifics will be provided in that section regardless the balances were automatically updated by the system or were manually edited by an Admin. Recently, we have also enhanced the Audit Trail by adding in the updated Leave Balance after every amendment has been made. This has been done to accommodate whenever users wish to recheck any configurations made to their profile. 

Process
1. Login into TimeTec Leave > USER > Manage User.

2. Search the User Name / ID and click the ‘Gear’ symbol.

3. Click on the ‘BALANCE’ tab and click the ‘Audit Trail’ icon.


Leave Application (Approved Application)
1. Below is an example of the Audit Trail Message of Leave Application that has been approved.


Leave Application (Cancelled Application)
1. Below is an example of the Audit Trail Message of Leave Cancelled Application.


Manually Edit (Add and Deduct Leave Balance)
1. Manually Edit of Leave balance will be presented in the ‘Pencil’ icon instead of the ‘Cloud’ icon. If an admin has manually edited the leave balance, they can simply insert a message to notify users and that the message can be traced back in this module. Below is an example of a manually added leave balance command:
;

2. Below is an example of Manually deducted leave balance:


Carried Forward Balance has Expired
1. Below is an example of deducted leave balance due to the expiration of Carried Forward Balance.

Import ‘Leave Taken’
1. Below is an example of Imported ‘Leave Taken’ without Deducting Balance


2. Below is an example of Imported ‘Leave Taken’ with Deducted Balance.


Cancelled Import ‘Leave Taken’
1. Below is an example of Cancelled Import of ‘Leave Taken’ without deducting Leave Balance.

2. Below is an example of Cancelled Import of ‘Leave Taken’ with deducted Leave Balance.


Replacement Credit Application
1. 
Below is an example of Approved Replacement Credit Application.

2. Below is an example of Cancel Approved Replacement Credit Application.

Disable & Reset Replacement Leave
1. Below is an example of the Disable & Reset Replacement Leave at the System Setting.


Note: If some of the screenshots or steps viewed here are different from the ones in the current system, this is due to our continuous effort to improve our system from time to time. Please notify us at info@timeteccloud.com, we will update it as soon as possible.

How to Set User Leave Balance Notification to Email and TimeTec Leave App


Introduction
Introduced a new function known as the User Leave Balance Notification. This function allows the Admin to send a notification to users to update them on their latest leave balances, especially if the leave has been recently adjusted. This feature will reduce the workload from the Admin to manually Email to the staff regarding their le
ave balance and by following the simple steps below, the user will automatically receive their leave balance notification thru the Email and TimeTec Leave App as well.

Process
1. Login into TimeTec Leave > Go to USER > Manage User


2. Search the user > Click Leave Setting (Gear Icon)

3. Go to BALANCE


4. For any Leave Type, click Edit (Pencil Icon)


5. Mark the checkbox for “Send notification to user” and Save


6. Repeat for all the leave types that you wish to include in the notification
7. Click the “Notify User” button at the bottom

8. The system will send email and mobile notification with the latest leave balance for leave types that you have selected earlier.

A. User Leave Balance Notification Email
1. Below is an example of User Leave Balance Notification received by the user.


B. User Leave Balance Notification Mobile Phone (TimeTec Leave App)
1. On TimeTec Leave App, go to Notification.


2. Click on the ‘Balance: Your update leave balance’


3. Below is an example of User Leave Balance Notification received by the user.


Note: If some of the screenshots or steps viewed here are different from the ones in the current system, this is due to our continuous effort to improve our system from time to time. Please notify us at info@timeteccloud.com, we will update it as soon as possible.


TimeTec Leave - Using Prorated Leave Balance for New Hire


Introduction
Prorated balance is a feature available in both leave policies and length of service accruals, where the number of leave days is divided based on service duration.

Take this scenario for an example. If your company's leave policy allocates 12 annual leaves a year in January, and you hired a new employee in October, you can use the prorated balance to allocate a percentage of his yearly allowance to the remainder of the calendar year.

*Prorated Balances are calculated using the user's Joined Date. If there is no available Joined Date, the current date is the Joined Date.

Hence, the new hire prorated leave balance can be set to four types of rounding on top of the standard.
1.   Standard prorated
2.   Rounding up to a full day
3.   Rounding up to a half-day
4.   Rounding down to a full day
5.   Rounding down to a half-day

A.   Default Standard Prorated
By default, the calculation for percentage Standard Prorated given by TimeTec explained as per below:


B.  Prorated leave setup
1.  Go to TimeTec Leave > Leave Settings > Prorated Leave Balance > Add

2.  Set the “Prorated Leave Balance Name” > click on “Set the percentages uniformly”

3.  On the bottom of the page, click on “Rounding” icon > Choose “Rounding Type” Round up or Round down and “To the Nearest” Full day or Half Day > Submit.

Round up to the nearest half: will add a half-day to your latest leave balance.
E.g.: Full working Hours: 8, Leave balance: 5 days 2 hours and 30 minutes.
Round up to the nearest half day = 5 days 4 hours

Round up to the nearest full day: will add one day to your latest leave balance.
E.g.: Full working Hours: 8, Leave balance: 5 days 2 hours and 30 minutes.
Round up to the nearest full day = 6 days


C.  Rounding Example:
You can refer to the picture below for Rounding examples:


D.  How to apply Standard prorated into Leave Policy

1.    Go to TimeTec Leave > Leave Setting > Leave Policy > click on (+) icon.

2.      Click on (+) to add new leave type into policy.

3.      On the Default Balance tab you can choose all the Prorated rounding that has been set before


Note: If some of the screenshots or steps viewed here are different from the ones in the current system, this is due to our continuous effort to improve our system from time to time. Please notify us at info@timeteccloud.com, we will update it as soon as possible.