

Get Installation Wiring Diagram and Settings for R3 and R2c Pairing
IntroductionWith the new release of our latest products, some terminal installations are different from our previous guides and diagrams. Below is the full installation wiring diagram and settings to connect R3 with R2c.
Benefits
By pairing R3 with R2c, you can have a totally secured biometrics with having to invest in two master terminals. All verifications and data storage are managed by the master terminal. You can also control the employee movements by implementing the Anti-PassBack settings when you pair the R3 with R2c.
Process

Enable the R2c setting at the R3: Press Menu > User Management > Access > Anti-Passback Setting > With R2c > Set to Y

If the R2c does not respond during installation:
Check on the below R3 settings:
1. Make sure the settings in R3 are set as below.
Baud : 115200 BPS
RS232 : OFF Baud : 115200 BPS
RS485: ON

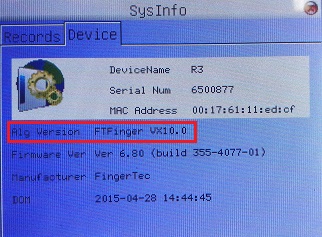
2. Make sure the R3 Fingerprint algorithm is BioBridge VX 10.0: Press Menu > System Info
> Device > Alg Version FTFinger VX10.0
**If you found that the Alg Version is FTFinger VX9.0, you need to change it to
VX10.0: Press Menu > System > System > Alg Version > FTFinger VX10.0
VX10.0: Press Menu > System > System > Alg Version > FTFinger VX10.0
Check on the R2c settings:
1. Check the Dip Switch settings below:


need any connection r3 to ingressus?
ReplyDelete