How To Configure Web Clocking With Geolocation In TimeTec TA

Monday, December 31, 2018 TimeTec 4 Comments


Introduction:
There are several clocking options provided by TimeTec TA which are FingerTec Biometric Terminal Clocking, Web Clocking, GPS Clocking, Mobile NFC Clocking and Mobile Beacon Clocking. For more details regarding these clocking methods, please refer to this article: http://www.fingertectips.com/2017/04/tips-to-choosing-best-clocking-method.html

That said, in this article, we will be guiding you on how to configure Web Clocking with Geolocation in TimeTec TA. Please refer to the steps below on how to carry out this particular process.

How to enable Web Clocking:
1. Make sure that the users have a valid email address and have already activated their TimeTec TA account.
2. By default, all users with an email address will be allowed to view their attendance via Web at www.timetecta.com.
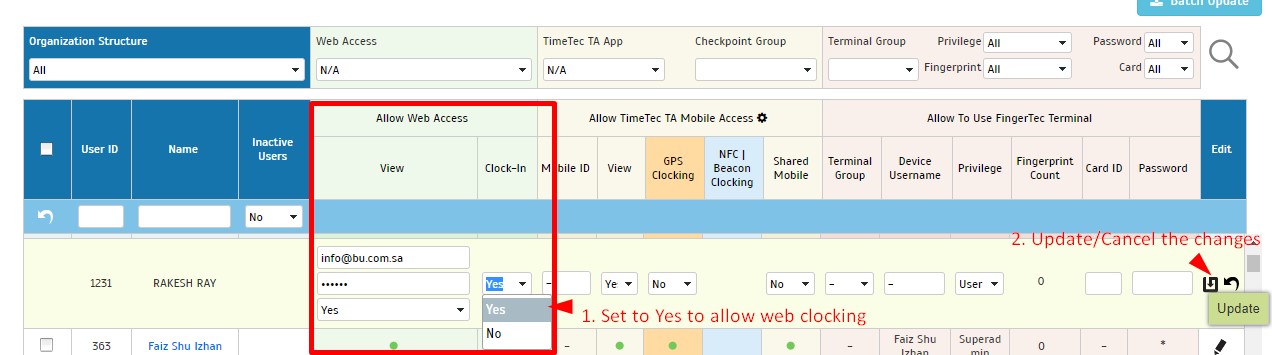
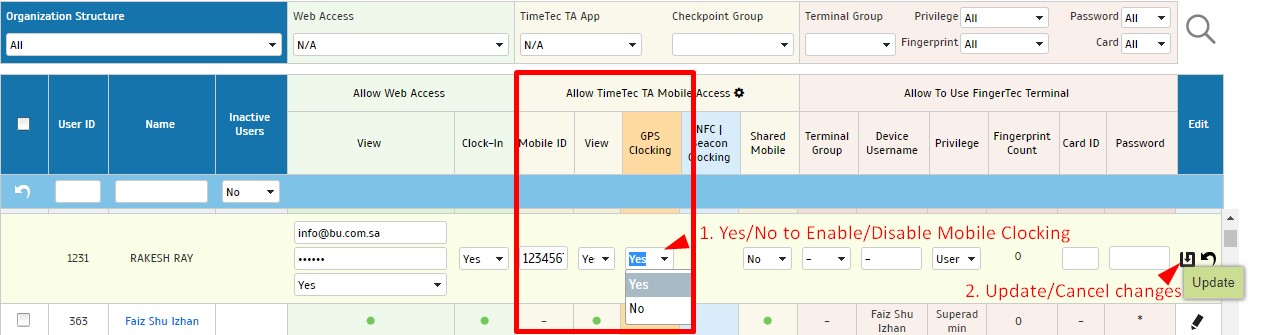
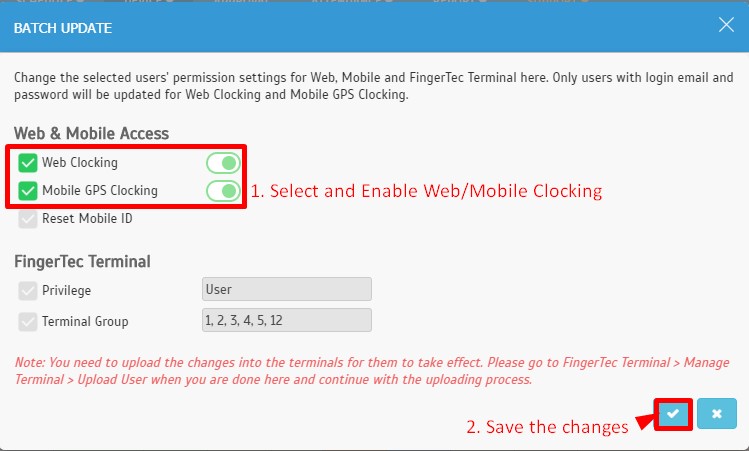
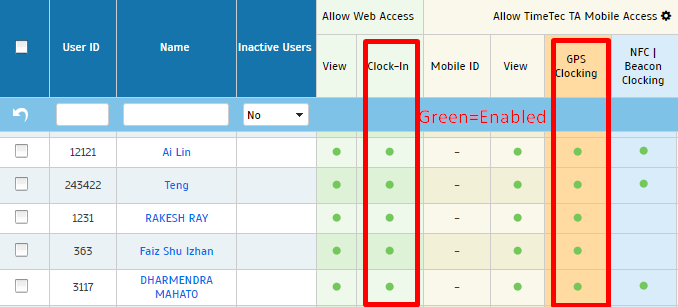
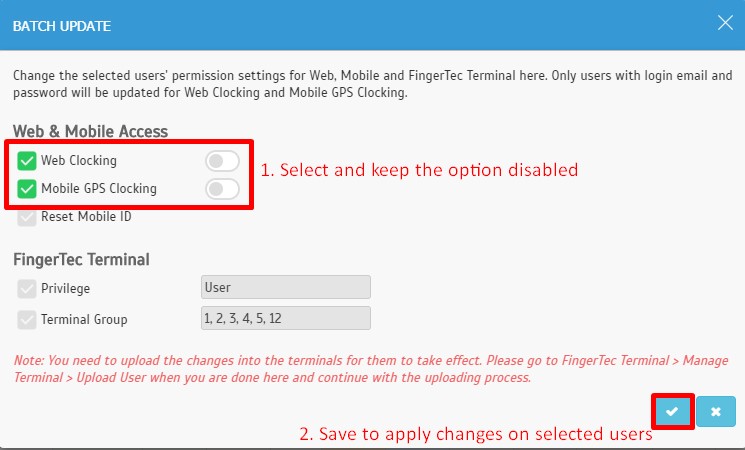
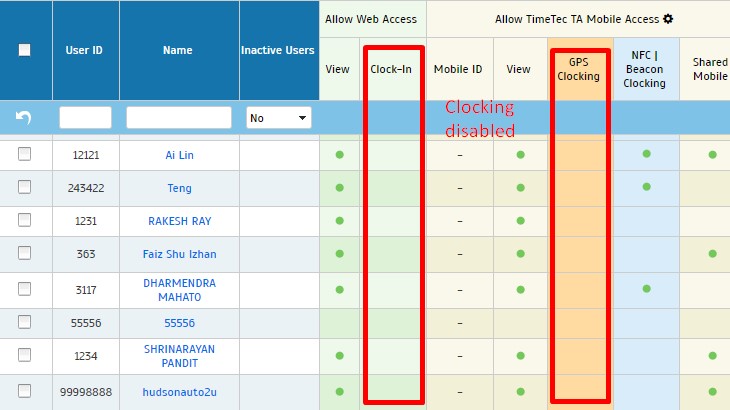
3. Set Web Clocking permission at Device > Assign Users to Device > Allow Web Access.

Web Clocking With Geolocation:
In recent release, TimeTec TA has included a new feature for Web Clocking complete with Geolocation. This new function of location sharing is implemented through the HTML5 Geolocation API, which uses the location services feature provided by the browser to determine your location.

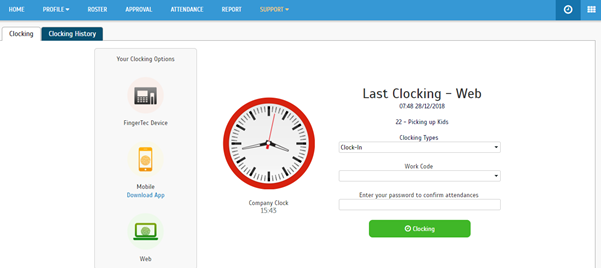
Once you log into TimeTec TA, you will be able to view the screen below. Proceed to select the Clocking Types and Work Code. Lastly, enter the password to confirm your attendance and click on the Clocking button.


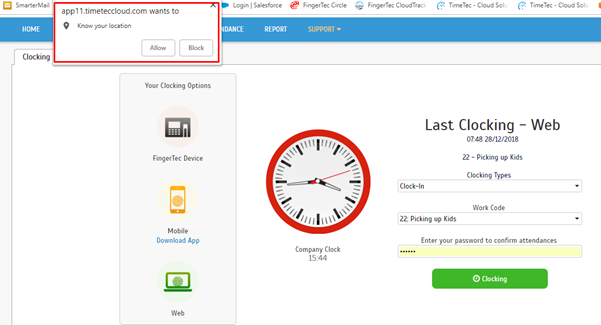
As clocking with the location data provided might pose some privacy issues, the location data will thus not be available unless the user approves it. This means that while clocking, you will need to click on ‘Allow’ on the pop-up that requests for your permission on your location.
 

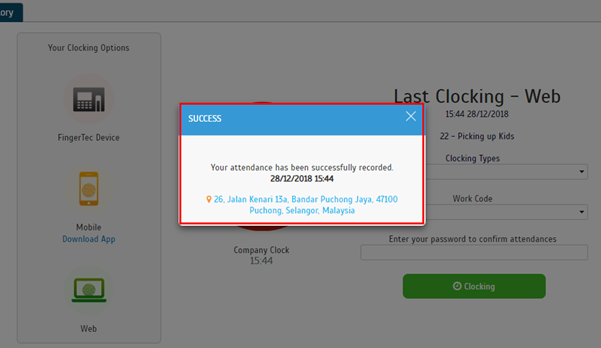
Once done, a successful clocking message will be displayed along with the location that you’ve clocked at.


That it, you’re all set! For further enquiries about TimeTec TA, feel free to contact our Support Team by sending an email to support@fingertec.com

Note: If some of the screenshots or steps viewed here are different from the ones in the current
system, this is due to our continuous effort to improve our system from time to time. Please notify us at info@timeteccloud.com, we will update it as soon as possible.

4 comments:

Have any questions or inquiries about FingerTec? Drop your input here.

How To Auto Export Attendance Data in Specified Folder and Email in TCMS V3/Ingress

Monday, December 31, 2018 TimeTec 8 Comments


Introduction:
Ingress and TCMS V3 offer a feature whereby you can configure the export scheduler feature to auto export the attendance data to a specified folder as well as send the file to the respective email. In other words, you can set the export file to be sent out automatically into your preferred folder without the need to manually generate the files. Therefore, we’ve prepared a step-by-step guide on how to carry out the procedure as described below:

Process:
1) Firstly, you need to configure your email account in Ingress/TCMS V3. Go to System Settings > Email > Edit > Edit Email Configuration > Save > Click Test Account Settings.
 

2) You will receive notification as shown in the screenshot below


3) Go to System Settings > Server > Export Scheduler Path > browse location to store the Attendance Details or Attendance Summary export file [configure your preferred folder].


4) Go to the Attendance tab > Export Scheduler > You can select either Details Attendance Sheet or Summary Attendance Sheet > configure all of the details and select the Email setting.


Remark:
For Data Audit List Export Scheduler, you may refer to the link provided below. Note that the auto export to email feature is applicable for Details Attendance and Summary Attendance Sheet only
http://www.fingertectips.com/2017/11/export-scheduler-for-attendance-and.html

5) Proceed to configure the template settings.


- Configure the Output Target File in the same export scheduler folder and select the field to be exported.

6) Select the configured template then choose the respective user for export > Ok


7) Once done, the system will auto export the data to the respective export scheduler folder path. Note that a copy of the exported file will be sent to your email account.


Note: If some of the screenshots or steps viewed here are different from the ones in the current
system, this is due to our continuous effort to improve our system from time to time. Please notify us at info@timeteccloud.com, we will update it as soon as possible.

Related Posts
Export Scheduler for Attendance and Transaction data in Attendance Module
Auto Generate Report to a Specific Path using Report Scheduler in Ingress and TCMS V3

8 comments:

Have any questions or inquiries about FingerTec? Drop your input here.

How to Configure Staff Contact View In TimeTec

Monday, December 31, 2018 TimeTec 0 Comments


Note:
Please note that the information and images below refer to TimeTec TA software. However, this particular module/ feature is also available in TimeTec Patrol and TimeTec Leave with the same rules and functionality, hence you can also use this as reference for all three abovementioned softwares.

Introduction:
TimeTec TA provides a centralized platform whereby the information within you company is displayed accurately and in real-time. Additionally, Admins can also modify the data and information in which the user (staff) can view at Staff Contact on the Mobile App/Web interface. Hence, this article will discuss on how to configure the Staff Contact View in TimeTec TA.

Process:
First, please define which info that the staffs can view in an organization structure by following the steps below:

1. Login to TimeTec TA with your Admin account, proceed to the Company tab, and Select System Settings. Then click the Edit icon to make changes on the settings.


2.  Select ALLOW TO VIEW STAFF CONTACTS as:
I. All (Users can view all company staff contact)
II. Own Organization Structure (Users can only view staff contact within their own organization structure/department)


Click on Save to confirm the changes.

Change Staff Contact Information View 
Next, to change the Staff Contact information view, please select Profile Field under the Company tab.


Next, click on Staff Contact Information.


Displayed on the right (Circled in Red), is the default display contact information.
Displayed on the left (Circled in Blue), is the optional information that can be added into display.


After adding the display options, you can also remove it by clicking on the Disabled button.


Click Save to save the changes.

View Staff Contact
Web
1. Login to your account via browser.
2. From Profile Option, select Staff Contact.


3. Click on the Name of the Users displayed in the list to view their contact details.


Mobile App
1. Login to your account and from the Menu, select Staff Contact > Select Staff Name to view the contact details.


Note: If some of the screenshots or steps viewed here are different from the ones in the current
system, this is due to our continuous effort to improve our system from time to time. Please notify us at info@timeteccloud.com, we will update it as soon as possible.

0 comments:

Have any questions or inquiries about FingerTec? Drop your input here.

How To Enable/Disable GPS & Web Clocking In TimeTec TA

Monday, December 31, 2018 TimeTec 0 Comments


Introduction:
TimeTec TA is a versatile smart solution that provides employees with various clocking methods to assist in enhancing the productivity within the workplace. Hence, in this article, we will be discussing on how to enable/disable GPS & Web Clocking in TimeTec TA.

Process:
At the ‘Assign Users to Device’ page, Admins can assign users to different clocking devices to enable viewing or reporting of attendance via the selected devices. Here is how one can Enable/Disable GPS/Web clocking through this module:

- Login to TimeTec TA using your computer browser, and Select Assign Users to Device from the Device tab.


- Click on ‘Edit’ icon at User’s tab and Set Web Clocking to ‘Yes/No’ to Enable/Disable.


- To Enable/Disable GPS Clocking, Set the GPS Clocking option to Yes/No. Next, click Update/Cancel to save the changes.


Batch Update:
To change the Web and Mobile Clocking, as well as FingerTec Terminal permission settings for more than one user, Admins can likewise use the Batch Update option accordingly.

First, select all of the relevant users, then click ‘Batch Update’ to adjust the settings.

Next, select Web/Mobile Clocking and Enable the option to allow for Web Clocking or Disable the option to prevent users from accessing the function. Please refer to the following:

To Enable-


To Disable-


Note: If some of the screenshots or steps viewed here are different from the ones in the current
system, this is due to our continuous effort to improve our system from time to time. Please notify us at info@timeteccloud.com, we will update it as soon as possible.

0 comments:

Have any questions or inquiries about FingerTec? Drop your input here.

How To Solve Parse Failed Error when Importing User Data from Excel file in Ingress/TCMS V3

Monday, December 31, 2018 TimeTec 8 Comments


Introduction:
Instead of individually enrolling user ID into the device, note that system administrators can upload all user data (such as UserID, Name, Username, Department) from the Excel files. This is done to reduce processing times as well as to prevent the repeating of steps when enrolling the users. However, they must first ensure that the appropriate excel file templates are used before importing the data into TCMS V3/Ingress Software; otherwise, the system will display the error “Parse Failed”.

Apart from that, the PC Setting can also cause the “Parse Failed” error to occur even though the Excel format is correct. Please refer to the steps below on how to solve this particular error.

Process:
There are 2 situations which can caused the “Parse Failed” error to occur:

A.   Excel File Format
B.   PC Setting

Excel File Format:
A1. Users must first create 1 new Excel file based on the template shown in the software.
Additionally, you can download an example of the Excel file here: https://s3.amazonaws.com/files.fingertec.com/Yusri+Tools/Badge.xlsx

Refer to the screenshot below for more clarification-


A2. In the Excel file, you must insert only the data (i.e. without color or box). Please refer to the example in the screenshot below.


Remark - If you include the data with color or table, it will then cause a “Parse Failed” error to be displayed during the import process.


PC Setting: 
B1. If the Excel files are already configured based on the given steps, but are still displaying the “Parse Failed” error; the cause might be due to the PC setting.

To solve the issue, please download Microsoft Access Database Engine in the link provided below.
https://www.microsoft.com/en-us/download/confirmation.aspx?id=13255

If you have other inquiries or still unsuccessful in importing the Excel data into TCMS V3/Ingress Software, kindly forward your Excel file to support@fingertec.com for further review and we will also update this article if we discovered another issue that is causing the error.

Note: If some of the screenshots or steps viewed here are different from the ones in the current
system, this is due to our continuous effort to improve our system from time to time. Please notify us at info@timeteccloud.com, we will update it as soon as possible.

8 comments:

Have any questions or inquiries about FingerTec? Drop your input here.

How to Manually Download User from a Terminal and Upload to all Terminals in TimeTec TA

Tuesday, November 27, 2018 TimeTec 1 Comments


Introduction: 
The following steps will explain how to download users from one terminal and upload them to the rest of the terminals. The is done to ensure that the users are able to clock-in or clock-out at the other terminals in another separate location, and not just on the terminal that users have been registered.

Process: 
A) Download user from the registered terminal.
1) After registering a new user in the terminal, download the newly registered user into TimeTec TA. Proceed to Device > FingerTec Terminal.


2) Select the device in which you have enrolled the new user and choose Download User.


3) User will then be redirected to the Download User page. Click “Sync”, so that the device will synchronize and display the latest user stored within the terminal. Once done, you can check the sync status at Support > FingerTec Support > Terminal Command Queue.


4) After the device has been successfully synchronized, you may proceed to download the user by selecting User > Submit.


5) A confirmation message will be displayed to confirm the action. Click Submit.


B) Upload User To All Terminal
1) Once the user has been downloaded from the terminal, you may proceed to upload the new user to all terminal. Go to Device > FingerTec Terminal.


2) Select all device that you want to upload the user into and select Upload User.


3) Select the users to be uploaded and click Submit.


4) A confirmation message will be displayed to confirm the action. Click Submit.


Note: If some of the screenshots or steps viewed here are different from the ones in the current
system, this is due to our continuous effort to improve our system from time to time. Please notify us at info@timeteccloud.com, we will update it as soon as possible.

1 comments:

Have any questions or inquiries about FingerTec? Drop your input here.