Sync employees between TimeTec TA and FingerTec Terminals with Terminal Automation feature

Friday, August 25, 2017 TimeTec 0 Comments


Introducing our latest feature in TimeTec TA: Terminal Automation. This feature is designed to ease user transfer between FingerTec terminals and TimeTec TA as well as ensuring that no user is left out from the system. Below are 2 functions that you can set in Terminal Automation feature:

A) Auto-create FingerTec Terminal User in TimeTec TA
Admins no longer have to download users from the terminal manually every time new users enroll into FingerTec terminal. Now according to the time set, the system will automatically create user profiles everyday if there are any new users detected in the terminal(s). As such, this function saves time and eases the company in monitoring and keeping the system updated.

The Process
1. Select the terminals that you want to enable for Terminal Automation
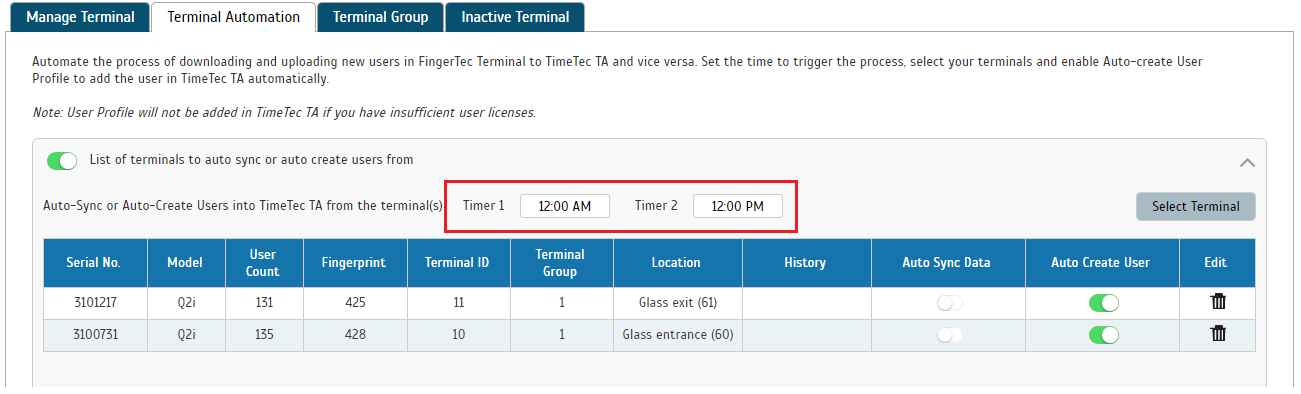
Go to Device > FingerTec Terminal. Click on the second tab - Terminal Automation. Enable the “List of terminals to auto sync or auto create users from” and click Select Terminal.


2. Set the timer for auto-download and create users into TimeTec TA
By default, the Auto-Create User is enabled so that newly enrolled users in the terminal will be automatically created in the system. On the other hand, you can also set up to 2 timers for the automation process and the system will do the automation process everyday according to the time set. Additionally, you can check the past events in the History column for monitoring purpose. 


IMG_18082017_132911_0.png

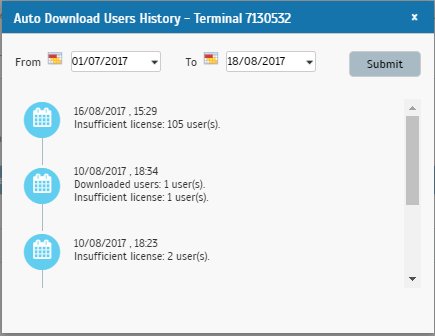
Note: System will not add users in TimeTec TA if you have insufficient user license.

B) Upload Users in TimeTec TA to FingerTec Terminal
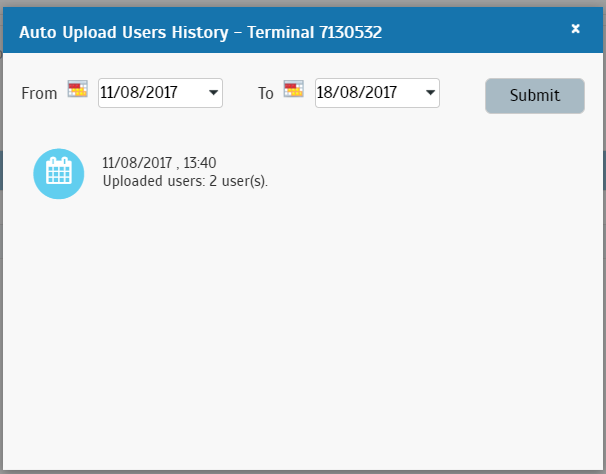
Whenever users are created in TimeTec TA, the system will automatically upload newly created users to your FingerTec terminal(s).  

The Process
Go to Device > FingerTec Terminal > Terminal Automation tab. Scroll down to the second section. 
Enable “List of terminals to auto upload users to after create user in step above” and click Select Terminal
Note: Automation process for uploading users can only be enabled when you have enabled the auto-sync option and set the sync timer at the first section.  


There will be a pop up displaying all of your added FingerTec Terminals in TimeTec TA. Select the terminals and click Submit.

View all uploading activities at the History column. 
IMG_18082017_133142_0.png


You can delete the terminal(s) if you no longer require this automation process.


0 comments:

Have any questions or inquiries about FingerTec? Drop your input here.

How to connect Ingress software using the MySQL database from another location

Friday, August 25, 2017 TimeTec 1 Comments


Introduction
Within many organization, a server PC is normally restricted to data storage while accessibility is only allowed for just a few personnels. For situations such as these, you can alleviate the problem by connecting Ingress software from another PC to the server PC and store all of your supposed attendance and access data into MySQL database. Please note that both PCs must be in the same network as the connection will be based on the network IP address.

Steps/ Procedure
First of all, to complete the setup, you will need to have:
1) Two different PC with the same network
2) MySQL version 5.5 (database)
3) SQLyog (to access the MySQL)
4) Ingress software

After obtaining the above requirement, you need to install the MySQL to the PC that you want to host the database. After installing MySQL, you need to install SQLyog because there are still few settings which needs to be carried out in order for the database to be accessible from other PC.
You can refer to this picture:
1.png

First, open the SQLyog and connect to the database.
2.png

Then go to User Manager.
4.png

From User Manager, select root@localhost and go to Global Privileges, then tick all the box from this page
5.png

Lastly for the PC that doesn’t contain Ingress software, you’ll need to create new user and assign the name as Ingress in order for the Ingress software to recognize this user.
6.png

Click Add New User
Username: ingress
Password: ingress
Host: %

Then click save
7.png
After that, just follow the previous procedure, select ingress@% and grant all the access for this user. Click save. Note: All of these steps need to be done at the server side.

The next steps are on How to connect Ingress software to the database that you have setup previously:
Firstly, you need to ensure that you can ping the IP address of the server (MySQL database location).
You can check the IP config of that PC before trying to ping that IP.
By receiving the reply from the other PC means that both PC can be accessed over the network.

For example, you can refer here:
8.png

9.png

After you’ve already confirm that the IP can be ping, you can now proceed to the next steps.
Install the Ingress software from this PC and after Installation, open the DB installer. This is the important part.
10.png
From Step 1, please insert the IP address of that server (the previous IP that you ping previously). Admin user name: root Password: root The username and password should be based on what you have set from your MySQL installation, but for demonstration purpose, we only use ‘root’ during installation. Then, proceed to Step 2 and 3. Once you’ve already finished all the steps above, you can now open the Ingress software and login to it. The default username: admin and default password: 123 After you entered the software, you can see the Database address showing the IP address of the server PC that you’ve setup previously.

11.png
If the IP address is still showing your PC’s IP address, this means that there are some incomplete steps carried out during the installation process. Please refer to the previous steps in order to troubleshoot the problem and ensure that you follow all the steps given.

1 comments:

Have any questions or inquiries about FingerTec? Drop your input here.

FingerTec Kadex - i-Kadex Firmware Enhancements

Friday, August 25, 2017 TimeTec 0 Comments


Introduction
FingerTec Kadex is an Access Control and Time Attendance smart card reader. This terminal allows password and card verification in both single and combination mode including Card only, Password only, Card/Password, and Card & Password verification styles. Furthermore, Kadex terminal can be used as an Entry and Exit terminal by pairing it to its compatible slave reader: i-Kadex. Please note that i-Kadex slave reader uses a Wiegand-out connection to master Kadex.

Fault & Fix
A) Fault:
Reportedly, on firmware build 3544-02, Ver 6.60 July 2014, paired Kadex and i-Kadex would malfunction while the user verification was selected as Card & Password. The error occurs whenever User A and User B performs card verification at Kadex (Entry Device) and on i-Kadex (Exit Reader) respectively, simultaneously. Following the error, the door would not be released and both user A and B will fail to access the supposed door. As a result, Kadex terminal faces a temporary “Hang” before returning to normal functional mode.

B) Fix:
With reference to the fault description, FingerTec hardware developers have released firmware build 3544-02, Ver 6.60 March 2017. This firmware changes the behavior of the terminal on a similar scenario, whereby User A verifies at the entry device (Kadex) while the concurrent verification of User B at the exit terminal (i-Kadex) will be rejected until the Card and Password entry of User A is completed.

*Please consult your reseller or direct your enquiry to support@fingertec.com before updating your device firmware.

0 comments:

Have any questions or inquiries about FingerTec? Drop your input here.

Ingress/TCMS V3 - Configure Open Schedule / Open Shift / Flexible Shift with Qualify Minutes before shift starts feature

Friday, August 25, 2017 TimeTec 7 Comments


Introduction
Open schedule also known as Open Shift or Flexible Shift is a function for allowing all users to enter any shifts scheduled that were set in their group roster.

For example, Morning Shift starts from 7AM to 7PM and Night Shift starts from 7PM to 7AM. If a user comes to work at 7AM, the system will then automatically detect and label the supposed user as coming in for a morning shift.

Information
Initially, Qualify Minutes will be shown as blank. However, it should be noted that the system by default will assign 60 minutes for Qualify Minutes. Hence, if Morning Shift starts from 7AM to 7PM, users are allowed to come in anytime between 6AM to 8AM.

However, if a user comes in too early or arrives too late (More than 60 minutes), you can refer to the steps below to assign a new time for Qualify Minutes in order for the system to be able to detect the correct shift schedule.

Process
Step 1 – Configure shift schedule using Daily schedule type.
For example, the usual schedule: Morning – 7AM to 7PM / Night – 7PM to 7AM
1.png

2.png

# Additional Info
For the system to function correctly, please ensure that the schedule timing for each shift does not overlap with one another.
Example of schedules without the time overlapping: 
Morning – 7AM to 7PM / Night – 7PM to 7AM OR,
Morning 7AM to 3PM / Evening 3PM to 11PM / Night 11PM to 7AM

Example of schedule with the time overlapping: 
Morning – 7AM to 7PM / Noon – 12PM – 12AM / Night 7PM to 7AM
Steps 2 – Configure group roster for Open Shift / Open Schedule / Flexible Shift Create weekly roster
3.png

4.png

Click button Edit > Click Auto Schedule
5.png

Select schedule number for Open Schedule
6.png

After clicking OK, the group roster will be shown as below:
7.png

Step 3 – Set time for Qualify minutes before shift starts
Initially, the box is set as BLANK. Therefore, the system by default is already assigned at 60 minutes. That means for schedule 7AM to 7PM, a user can come to work anytime between 6AM to 8AM and the system will be able detect the correct schedule number.
8.png
However, if users happen to come in too early or arrives too late (more than 60 minutes), you will then need to increase Qualify Minutes time by following the steps below:
Steps 3.1 – Open schedule > Click Clocking Range > click Edit

9.png

Step 3.2 – Untick ‘Replace with latest clocking’ for column Out and Done > set Qualify minutes before shift starts as 120 minutes > save

10.png

Steps 3.3 – please follow the same steps for other daily schedules.

# Additional Info
Whenever you set ‘Qualify minutes before shift starts’ time, the ‘Replace with latest clocking’ feature will be disabled. Therefore, to ensure that ‘Replace with latest clocking’ feature continues working properly when setting time for ‘Qualify minutes before shift starts’, you need to untick ‘Replace with latest clocking’ for column Out and Done.

7 comments:

Have any questions or inquiries about FingerTec? Drop your input here.

Face ID 3 New Firmware (10 August 2017)

Monday, August 21, 2017 TimeTec 0 Comments


FingerTec have updated Face ID 3 firmware to include the much anticipated feature: Per Day Verification Type as well as an additional Verification type - Face or Password & Card.
Feature Description
With Per Day Verification, user can now set a specific verification style for a particular day and time. For example, the usual Monday to Friday can be customized to “Face Only” during office hours (8am – 5pm), and “Face & Card” for out of office hours (5pm – 8am) while Saturday and Sunday can be arranged to “Face & Card” for the whole day.
This feature is suitable for company who wishes to strengthen their security after working hours and during rest days.
Feature Settings
To enable this feature in Face ID 3, first you need to update the firmware to version 4835-01 or later. Then download a tool from the link below in order to enable this function.
The settings of this feature can be manually set in the device [System > Advance Setting > PerDayVType] as shown in the picture below.
Alternatively, if the Face ID 3 is connected to Ingress Software, the settings can then be done under Access Level > Verify Type. After setting up the verify types and time zone, please make sure to Add Door and synchronize the device in order for it to take effect.

Remark: If PerDay Verification Type is turned ON, group and individual verification type will not be active. If timezone is not set in PerDay Verification Type, default type will be selected instead,  which is Face, Password or Card.
FingerTec authorized reseller can login and download the latest firmware at http://tips.fingertec.com/tips-download-firmware.php. For end users, please contact your local reseller or FingerTec Support team to acquire this latest firmware update.

0 comments:

Have any questions or inquiries about FingerTec? Drop your input here.

TCMS V3 Release Note v2.1.1.8 (8-8-2017)

Monday, August 21, 2017 TimeTec 0 Comments


This newly updated TCMS V3 software has 27 features enhancements and 5 additional bug fixes. Below are the details of the enhancements and fixes:


1. Added new language – French
TCMS V3 is now equipped with French language. (Note: Language can be changed under System Setting module.
1.png


2. Million Payroll (Malaysia and Singapore only) export function is now available in TCMS V3.
2.png


3. New search options is added within User module. Now, users can be searched by IC/Social Security, Designation, or Employee ID. Please refer to the comparison picture below for more information.
3.png


4. Added new option to browse the path of User/Attendance within USB file for importing purposes. Previously, the software was only able to detect User/Attendance file from a USB drive. But as for now, user can specify the folder path that contains the supposed USB file from any virtual machine (VM).
4.png


5. Revised device listing to alphabetical order in some modules such as Upload User, Download User, Remove Device User & Download Transaction Log.
5.png


6. Added more Date selections in Attendance Sheet : Yesterday, Last Week, Last Month, Last Payroll Cycle.
6.png


7. Added more information on Roster list: Overtime Only After / Diff.OT Only After. This can now be previewed on Group Duty Roster as shown in the screenshot below.
7.png


8. Holiday description will now be shown in Group Duty Roster when mouse over in order to ease configuration of the roster.
8.png


9. Added option to import holiday list from the past 3 years. To use this feature, first switch
to List View as shown in the screenshot below and select the holidays that you want to import.
9.png


10. Rename "Remark" tab in Attendance Module to "Work Code". This changes was made to provide a better understanding for our customers regarding the Work Code function within the Attendance module.
10.png


11. Export Scheduler for Data Audit List is added into TCMS V3 for exporting of audit data automatically to the specified path.
11.png


12. Enhancement placed on Add New Roster at Scheduling & Attendance module, whereby the Auto Schedule can now be carried out directly during this process.
12.png


13. Enhanced export attendance summary for .txt file, whereby the format for Numerical User ID is aligned to the right.
13.png


15. Added selection on exporting for 1st and 2nd half of Sage UBS Payroll in payroll export function.
15.png


17. Added sort and user selection filter by Employee ID in Report Module. To enable this function, go to system settings > Reports > Tick ‘Enable Employee ID selection’.
17.png


17-b.png


18. Added Late-In & Early Out filter option in Attendance Report Module.
18.png


19. Enhanced calculation of total wages, OT and etc, by department in Gross Wages Report.


20. Removed .XPS report format from Report Scheduler. As such, the current formats available are PDF, MHT, RTF, XLS, XLSX, CSV, Text, Image.
20.png
21. Enhanced report scheduler interface for email setting.
21.png


22. Display the last executed time for report scheduler.
22.png


23. Added 2 new date selections for report scheduler: This Week and Last Week.
23.png


24. Added an alternative filter ‘by department’ option in Report Scheduler.
24.png


25. Allowed schedule synchronization of device date & time. This function can be set in Devices tab under System Settings module.
25.png
26. Added capability to view the last auto executed time of database backup. Mouse over to the “i” logo in Database Configuration under System Settings module to view last backup time.  
26.png


27. Support anonymous SMTP access. SMTP Password is now not a mandatory field to be filled in thus allowing users to set up an anonymous SMTP server.  
27.png

In this release, following bugs are solved :

1. Fixed saving selected user at Export Sage UBS Payroll
2. Fixed incorrect value exported for Leave Hour for half day export to Sage UBS Payroll
3. Fixed failed to create Schedule (Only for Language Locale set to Indonesia)
4. Fixed incorrect total work hour calculated in Electronic Time Card report
5. Fixed invalid to run on Excel file .xlsx format generation

0 comments:

Have any questions or inquiries about FingerTec? Drop your input here.