

FINGERTEC SPECIAL FEATURE - INGRESSUS CONTROLLERS FEATURES UPGRADED

Throughout the years, FingerTec Hardware Research and Development Team has been focusing its effort to deliver numerous features requested by customers the world over. One of the products that was given a major improvement is Ingressus Controller.
The below article discusses the recently added features to Ingressus I (Single door Accecss controller), Ingressus II (2 doors Access controller), and Ingressus IV (4 Doors Access controller) and we are going to explore these features and their benefits.
Verification Type Selection
Ingressus Controllers can be facilitated with 3 different FingerTec slave readers for user verification and access in different modes namely Card, FingerPrint, PIN, and Password in solo and combination methods.
Compatible slave readers to Ingressus are listed in the following table with their details:
Connection Type
|
Verification Style Allowed
|
Maximum No of Devices on Ingressus
| |
R2c
|
RS485 Reader
|
Fingerprint, Card
|
Ingressus I= 2
Ingressus II= 4 (2 In & 2 Out)
Ingressus IV= 8 (4 In & 4 Out)
|
i-kadex
|
Wiegand
|
Card
|
Ingressus I= 2
Ingressus II= 4 (2 In & 2 Out)
Ingressus IV= 4 (Only In)
|
K-kadex
|
Wiegand
|
Card, Pin (Password)
|
Ingressus I= 2
Ingressus II= 4 (2 In & 2 Out)
Ingressus IV= 4 (Only In)
|
- Fingerprint: This method can be selected for Ingressus that is connected to R2c for verification purpose, to only allow users to perform verifications using fingerprints at selected doors.
- Card: All compatible slave readers with Ingressus support Smart Card (e.g. RFID card) verifications. Therefore, by selecting this option as the verification mode for doors at Ingressus, users need to use only card for verification.
- User ID and Password: The verification mode can be limited to User ID & Password only when the slave reader connected to Ingressus is k-Kadex. Selecting this method allows users to only enter their User ID followed by Password.
- Card & Fingerprint: R2c is the only slave reader that supports both card and fingerprint verifications. For better security, users are recommended to use a combination of verification style. When this verification method is implied, a user will only be able to perform a successful transaction on the device after fulfilling a verification of his registered card followed by his finger or vice versa.
- Card & Password: When the doors on Ingressus are equipped with k-Kadex reader, this verification method only allows users to access the door upon performing his card verification followed by a password or vice versa.
- Card or Fingerprint: This verification allows users to do verification with either one of cards or fingerprints. However, PIN and password are no longer an option when this method is selected.
- Card or User ID & Password: The most recently added verification style to Ingressus firmware, allows users to have either a card verification, or access the door by entering the ID followed by Password for k-Kadex only. Selecting this option leaves out fingerprint verification for the users.
How to Configure Verification Styles on Ingressus:
Every FingerTec access control device is bundled with Ingress, the door access and time attendance software. Our developers have carefully designed the Ingress software, to allow users to perform all required configurations remotely through the software by simply connecting the device in TCP/IP mode in the software. Inside Ingress, door by door settings of Ingressus controllers, including the selection of verification method can be performed by following the simple steps below:
- After having the Ingressus activated in Ingress, go to the doors tab and select the preferred door. The details tab allows the setup of various door settings. At the verify mode selection, choose the preferred style, and save the settings.

- To imply the settings in the Controllers, synchronize the changes once to the device accordingly.
Anti-Passback Mode
The Anti-Passback feature controls entry-exit activities of users in selected premises. The main objective of having Anti-Passback setting for the doors is to prevent users from tailgating one another while entering or exiting selected doors. Having the Anti-Passback option turned on, the list of users that have entered the premises can be obtained. This can come handy when an unexpected incident requires immediate evacuation of the employees.
Ingressus Controllers are equipped with multiple Anti-Passback selections, making it more flexible for users to setup multi door premises with Anti-Passback. Briefly explained below are the Anti-Passback options available for Ingressus II and Ingressus IV configurations:
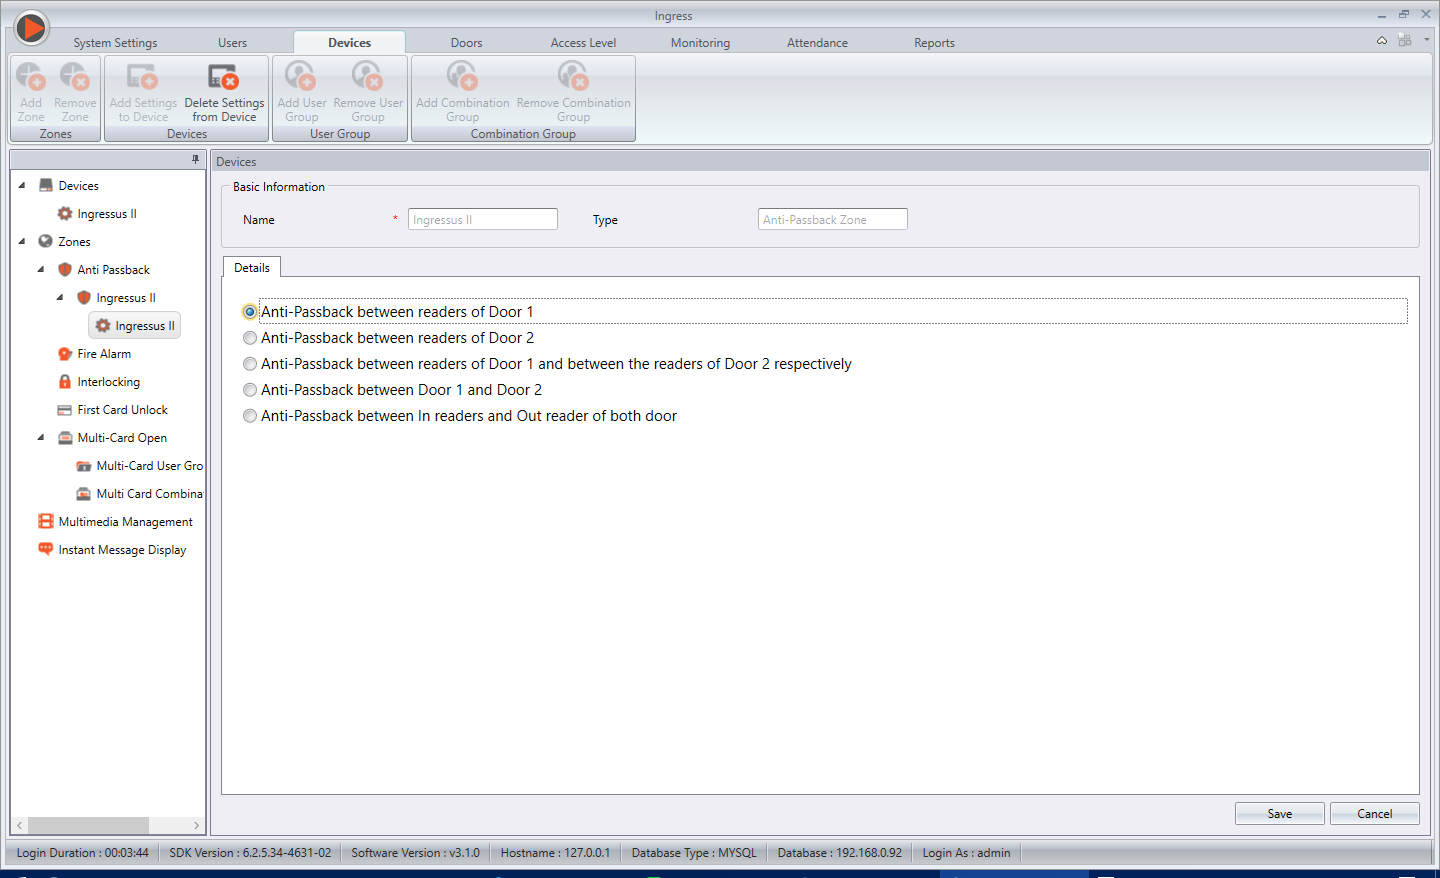
Ingressus II Anti-Passback Selection
1. Anti-Passback between readers of Door 1: Upon a user’s entry to door 1, he will be required to perform exit verification from door 1, before being able to re-enter door 1 again.
2. Anti-Passback between readers of Door 2: Similar to Anti-Passback option 1 above, setting this option will only allow users re-entry to door 2, as an exit verification is performed by the user on the same door.
3. Anti-Passback between readers of Door 1 and between the readers of Door 2 respectively: This is the combination of the first 2 options, where at each door anti-passback is effectively turned on.
4. Anti-Passback between Door 1 and Door 2: If a user enters through door 1, he will only be able to exit the door 2, while his attempt to exit or re-enter door 1 will result in anti-passback. Vice versa, entry from door 2, only grants exit from door 1.
5. Anti-Passback between in readers and out readers of both doors: Having this anti-passback option selected, user can exit through either one of the doors, after entry verification is performed, yet re-entry is only possible from any of the doors when one time exit is performed.
Ingressus IV Anti-Passback Selection
1. Anti-Passback between Door 1 and Door 2: Just like Ingressus II, by selecting this option, upon entry from door 1, user can only exit from door 2 and vice versa.
1. Anti-Passback between Door 1 and Door 2: Just like Ingressus II, by selecting this option, upon entry from door 1, user can only exit from door 2 and vice versa.
2. Anti-Passback between Door 3 and Door 4: Refer to above details, this time for door 3 and 4 only.
3. Anti-Passback between Door 1 and Door2, and between Door 3 and Door 4: This selection is to enable anti-Passback option 1 and 2 explained above in combination. E.g. if a user enters from door 1, he will only be able to exit from door 2, and there will be anti-passback for any exit attempt on door 1, 3, and 4.
4. Anti-Passback between Door 1, 2 and Door 3, 4: Briefly explained in remarks below:
* If a user enters from door 1 or door 2, exit can only be performed from either door 3 or 4, but not door 1 or door 2.
* If a user enters from door 3 or door 4, exit can only be performed from either of door 1 or 2, but not door 3 or door 4.
5. Anti-Passback between Door 1 and Door 2, 3: Briefly explained in remarks below:
* If a user enters from door 1, exit can only be performed from either of door 2 or 3, but not door 1.
* If a user enters from door 2 or door 3, exit can only be performed from door 1, but not door 2 or 3.
6. Anti-Passback between Door 1 and Door 2, 3: Briefly explained in remarks below:
* If a user enters from door 1, exit can only be performed from either of door 2, 3 or 4, but not door 1.
* If a user enters from door 2, door 3 or door 4, exit can only be performed from door 1, but not door 2 ,3 or 4.
7. Anti-Passback between In readers and Out readers of Door 1, 2 and Door 3, 4 (Only Available for R2c Slave Reader): Briefly explained in remarks below:
* If a user enters from door 1 or door 2, he can exit from either of door 1 and door 2, but exit from door 3, and 4 is not allowed.
* If a user enters from door 3 or door 4, he can exit from either of door 1 and door 2, but exit from door 1, and 2 is not allowed.
8. Anti-Passback between In readers and Out readers of Door 1, 2,3 and 4 (Only Available for R2c Slave Reader):
* If a user enters from any of the doors 1,2,3 and 4, he can choose to go out from any of the doors 1,2,3 and 4. Anti-passback happens when the user has not performed out from any of the doors before re-entering the premises.
How to configure Anti-passback settings at Ingressus through Ingress
After activation of Ingressus on Ingress software, proceed to Add Zone which can be found by clicking on Zones under Device tab.

- Insert the zone name and select the Zone type as Anti-Passback Zone.

- Next, click on the zone you created and choose Add Settings to Device from above.

4. Select the device name and click OK.

- Select the preferred anti-passback option for Ingressus and synchronize the changes to your controller. Below displays the available options for Ingressus II and IV respectively.


0 comments:
Have any questions or inquiries about FingerTec? Drop your input here.