Ingress software update – version 3.0.2

Friday, May 29, 2015 TimeTec 0 Comments

In this month’s update for Ingress, we have added 8 new features for Ingress users.

1.        Added Date Range into User Movement Analysis and Device Activity Report
          
Previously, users were not allowed to select any date range, instead the system only allows
           them to generate the whole report.
           “Date range” selection in User Movement Analysis and Device Activity Reports let the users to
           choose the specific dates of the data that they require, and the reports will only generate the
           data on the selected dates.


2.     Simple Access Control Setup Wizard Is Now Available


          The latest Ingress version allows users to add doors and assigned the devices for entry/exit purpose.
          Since this is a crucial step in Ingress setup, FingerTec has made it easier with this simple Wizard.


      Click on the “orange” button on the top left corner > Quick Setup Wizard > Simple Access Control Setup.
          NOTE: Only a maximum of 2 devices is permitted for a door. If you only have 1 device installed for entry, 
          you do not have to key in anything for the exit device, leave it blank

 
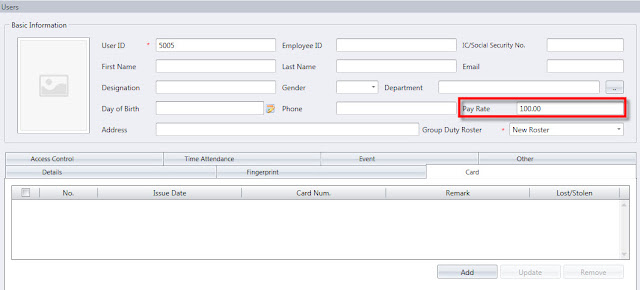
3.         Ingress allows insertion of Pay Rate for each user

Pay Rate is amount of money received per unit time. Each employee has his/her own pay rate and any extra hours such as overtime will be calculated based on the basic pay rate for example overtime is 1.5 times of the  basic pay rate. Now, Ingress allows users to key in pay rate of each user in the Users section. The availability of this information is crucial when payroll integration is concerned.


Go to User Tab > Double click on the specific user > Edit > Type in the value in the Pay Rate column.
4.         Configure Wages Setting From User Duty Planner

In Ingress, user can configure the overall wages settings at the System Settings tab for everyone that is using the same setting. Ingress latest version allows user to set the wage setting at the User Duty Planner for individual.

This feature is important for an organization that has a variety of wage settings applicable to different employees.
 

Go to Attendance Tab > User Duty Planner > Edit > Right Click On Any Day > Enter the Pay Rate Accordingly > Save

5.         Save the Unregistered Card List into User Module

             This feature was a request from a client who wants to key in all the unregistered cards into
             Ingress, and register the number(s) to specific users when necessary. Having this feature will
             ease registration of the new card users without having to scan the card number again.
             When an unregistered card is waved at the terminal, the system will obtain the card’s 
             number and save it in Ingress. During new registration, the admin can search for these card
             numbers and assign them to a new user(s) or existing user(s).
             This feature is only applicable in FingerTec’s monochrome terminals, Q2i and TA200 Plus
             only.
             Go to User Tab > Add New User or Click on Existing User > Click on the small box besides 
             the card number > Select the Data Range > Double click on the desired card number.


6.        Enable system to check for any duplicated Card ID in User Module
            Prior to this update, Ingress had no way to tell user whether there is a duplicated card ID in
            the system.
            In this release of Ingress, when the admin enter a card ID which is already in use, the error
            below will pop to indicate that another employee is using this card.
 
7.         Included seconds in clocking type identification in Attendance Module
Ingress improves its commitment to time with addition of seconds in the clocking time. With this function available, user will be able to see the accuracy of the clocking activities up to its second value. This feature might be useful in Job Costing for tasks that are budget sensitive where every second counts.
 
 
8.           Added "Show Zero Hour" option in Electronic Time Card Report

               By default, reports without selecting the “Show Zero Hour” function will not show the
               transaction data for employees who are on Holiday, Restday, and missed punch.
               The new function “Show Zero Hour” in the latest version of Ingress allows user to generate
               a full report regardless of the lack of accuracy or presence of errors during daily
               verifications when the user select “Show Zero Hour” in the settings of Electronic Time Card
               Report.
 13 Error Fixes
1.   Fixed duplicated IP Address error when using URL/DYDNS connection
2.   Fixed Ingress Migration Wizard Error when Migrating from TCMSv2 (Thai Language)
3.   Fixed report not tally with data audit list issue after generation
4.   Fixed wrong Rest/Offday displayed in User Time Attendance
5.   Fixed section and department not imported according to selection at Ingress Migration Wizard
6.   Fixed Employee Name not displayed in Report if First/Last Name is empty
7
.   Fixed replace with latest clocking error when the time surpassed midnight
8.   Fixed OT on Offday not calculated error if the done time surpasses midnight
9.   Fixed first day of the week issue in Auto Schedule
10. Fixed restore database issue
11. Fixed miss punch filter not working in Attendance Sheet
12. Fixed Event List Report not tally with Monitoring Log Listing
13. Fixed attendance unable to save after edit if the done time surpasses midnight


0 comments:

Have any questions or inquiries about FingerTec? Drop your input here.

Resetting Access Right in Ingress

Wednesday, May 20, 2015 TimeTec 0 Comments


Ingress, as we know it, is an integrated access control management software which comes with a complete solution for centralizing, managing and monitoring door activities of all FingerTec’s access control devices. Naturally, most of the settings in this software are of door access settings.

In any case that a door setting is configured incorrectly, there are TWO options to reset the access settings:

1.       Reset it by door

2.       Reset the whole access settings of the software, without initializing the whole system.

1. Reset Access Right by door

Go to Doors tab > Click on the door that you want to reset the settings > Access Group Tab > Reset Access Right.

By doing this, all access settings of this door will be reset to its default settings, and the settings for other doors will remain unaffected.


2. Reset All Access Settings in Ingress

 
You can reset all the access settings in Ingress  by performing the steps below:

Go to System Settings Tab > System Parameter Settings > Devices > Reset Access Rights

By performing these steps, all the access settings in Ingress will be cleared and restored to its default.

0 comments:

Have any questions or inquiries about FingerTec? Drop your input here.

FingerTec’s TA100C and AC100C (FMM100) Devices Come With Data Backup Feature

Friday, May 15, 2015 TimeTec 1 Comments

With the new FMM100 core board comes a few useful new features in TA100C and AC100C. One of the features in FMM100 core board is to allow users to backup the device’s data and configuration in the device itself. This backed up data can be restored in the future or it can be copied to another device of the same model whenever needed.


This new feature eliminates the worry of data lost or corrupted after being transferred to the software. Take advantage of this feature to better use of the system.

There are two types of backup available in these models.

1.      Internal backup allows you to create backup to be saved inside the terminal itself.

2.      USB backup allows you to create backup and save it inside the USB to be downloaded on another location without deleting the data inside the terminal.

To back up data internally, follow these steps:

Menu > Data Management > Backup Data > Backup to Device > Start Backup

To restore the internal backup data, follow these steps:

Menu > Data Management > Restore Data > Restore from Device > Start Restore

To back up data into a USB flash disk, follow these steps:

Menu > Data Management > Backup Data > Backup to USB Disk > Start Backup

To restore the backup file from a USB flash disk, follow these steps:

Menu > Data Management > Restore Data > Restore from USB Disk > Start Restore

** NOTE: If you backed up the data into a USB flash disk, it is recommended that you restore the data immediately to determine the usability of the data. If the restoration fails, you need to repeat the backup process.

1 comments:

Have any questions or inquiries about FingerTec? Drop your input here.

Adding Expiration Rule To User in the New TA100C FMM

Friday, May 15, 2015 TimeTec 2 Comments

The new core board version of TA100C FMM allows adding of expiration rule to a user. This feature is important for organizations that have many temporary workers or contract workers on site(s). The administrator can set the expiration rules for each worker and the system will stop taking transactions from these staff’s credentials when the expiration rules are met. The expiration rule can be set based on date, entry or both.

To proceed, enable this option in the new TA100C terminal by following the below steps:

Enabling User Expiration on TA100C
Press Menu > System > Attendance > Expiration Rule > Select “On”


Select Expiration Rule Options

Once the Expiration Rule has been enabled, select the action for the system to execute once the rule qualifies. Please refer below steps to select the expiration rule:

Press Menu > System > Attendance > Expiration Rule Options
There are several options to choose from, which are:

1. Keep user, no audit future punch - The system will continue to keep the user’s data including the fingerprints and will block future clocking activities from the specific ID.

2. Keep user and audit future punch – The system will continue to keep the user’s data including the fingerprints and as well as the future clocking activities of the specific ID.

3. Delete user – The system will delete the user once the expiration date is reached for that specific ID.


Adding Expiration Rules to A New User

After the configuration has been completed, the system is now ready to accept users for the rules, refer to the below steps on how to add expiration rule to a user:

Press Menu > User Mgt > New User > Select Expiration Rule> Expiration Rule Options > Select Rule

There are several options available to be added to a user, select one:
1. None: No expiration rule.

2. Expired date: Select a specific expired date to a user.

3. Entries: Select a number of entries provided to a user before the access expired.

4. Expired date and entries: Select a range of date and number of entries for a user.

Adding Expiration Rules to Existing User

Refer to the below steps to add expiration rule to the existing user in the terminal:

Press Menu > User Mgt > All Users > Select User > Edit> Select Expiration Rule > Expiration Rule Options > Select Rule


Once the configuration and settings are completed, users will be imposed with expiration rule which will take effect once the rules are met. Use this feature to control and manage your temporary workers, contract workers, contractors, etc.


2 comments:

Have any questions or inquiries about FingerTec? Drop your input here.

Upgrading TCMS V2 Software v2.1.1 or v2.1.2 to the latest v2.2.027

Thursday, May 14, 2015 TimeTec 23 Comments

1)      Backup your TCMSv2 software database from version v2.1.1 or v2.1.2

2)
     
Un-install that version of TCMSv2 Software at the control panel.

3)      Rename the TCMSv2 folder to TCMSv2 old data 1

a.       C:\Program Files (x86)\FingerTec\TCMSv2  rename the folder to

b.      C:\Program Files (x86)\FingerTec\TCMSv2 old data 1

4)      Install the TCMSv2 software version 2.1.2q. You can download the setup file here.

5)      Activate your terminal and restore the old database into the 2.1.2q version.

6)      Backup the database one more time.

7)      Un-install the TCMSv2 Software version 2.1.2q at the control panel.

8)      Rename the TCMSv2 folder to TCMSv2 old data 2

a.       C:\Program Files (x86)\FingerTec\TCMSv2  rename the folder to

b.      C:\Program Files (x86)\FingerTec\TCMSv2 old data 2

9)      Restart PC.

10)   Install the latest version TCMSv2 software version 2.2.027. You can download the setup file 
         here.


11)   Activate your terminal and restore the old data 2 database into the latest TCMS V2 version.

23 comments:

Have any questions or inquiries about FingerTec? Drop your input here.