Introduction
In the i-Neighbour App, a unit owner is the master owner who can invite his family members or tenants as residents in his neighbourhood. For example, a unit owner can invite those who stay in the same unit to employ the i-Neighbour App, such as his wife and other family members. Additionally, the owner can also add a master tenant (first tenant) and a few other tenants (if he/she rents the house to several people). However, management can control the number of family members/tenant added by the owner by setting up approval rules.
This document explains how the owners can invite members into the i-Neighbour App and share the link to family members/tenant after getting management approval. This way, one system can gather everybody in the community. Simply put, owners are required to utilize the App to add in his family members and tenant(s).
Steps and Procedures
1. Launch the i-Neighbour App. Click on the links below to download your corresponding i-Neighbour App:
a. i-Neighbour in Google Play.
b. i-Neighbour in iOS.
c. i-Neighbour in Huawei.
2. Tab at Manage Unit
3.At Occupancy Status, you will notice that your status is regarded as Owner or as Rental.
b: If you are the owner and want to invite tenant(s), please inform the management office to change your ‘Occupancy Status’ unit to Rental.
a. Owner - Unit Owner who is living in the unit and the only one who can invite family members into the platform.
b. Rental - Only Master Tenant living in the unit and tenant(s) can be invited into the platform.

4. Tap on the blue icon at the top right of the screen to proceed.
5. Fill in the Name and Relationship (family members, tenant).
These are the selection views from each of the ‘Relationship’ chosen.
a. Owner-
6. Tap on the Submit button to proceed.
7. You need to wait for management approval. Click ok and you can see the status as Pending Approval.
8. Once approved, you will receive a popup notification. Tap the notification to proceed.
9. Tab the selected family members and you can view your family status as pending activation.
10. Tab on share link to send an invitation link to your family members.
How to activate the i-Neighbour account after receiving an invitation from a unit owner.
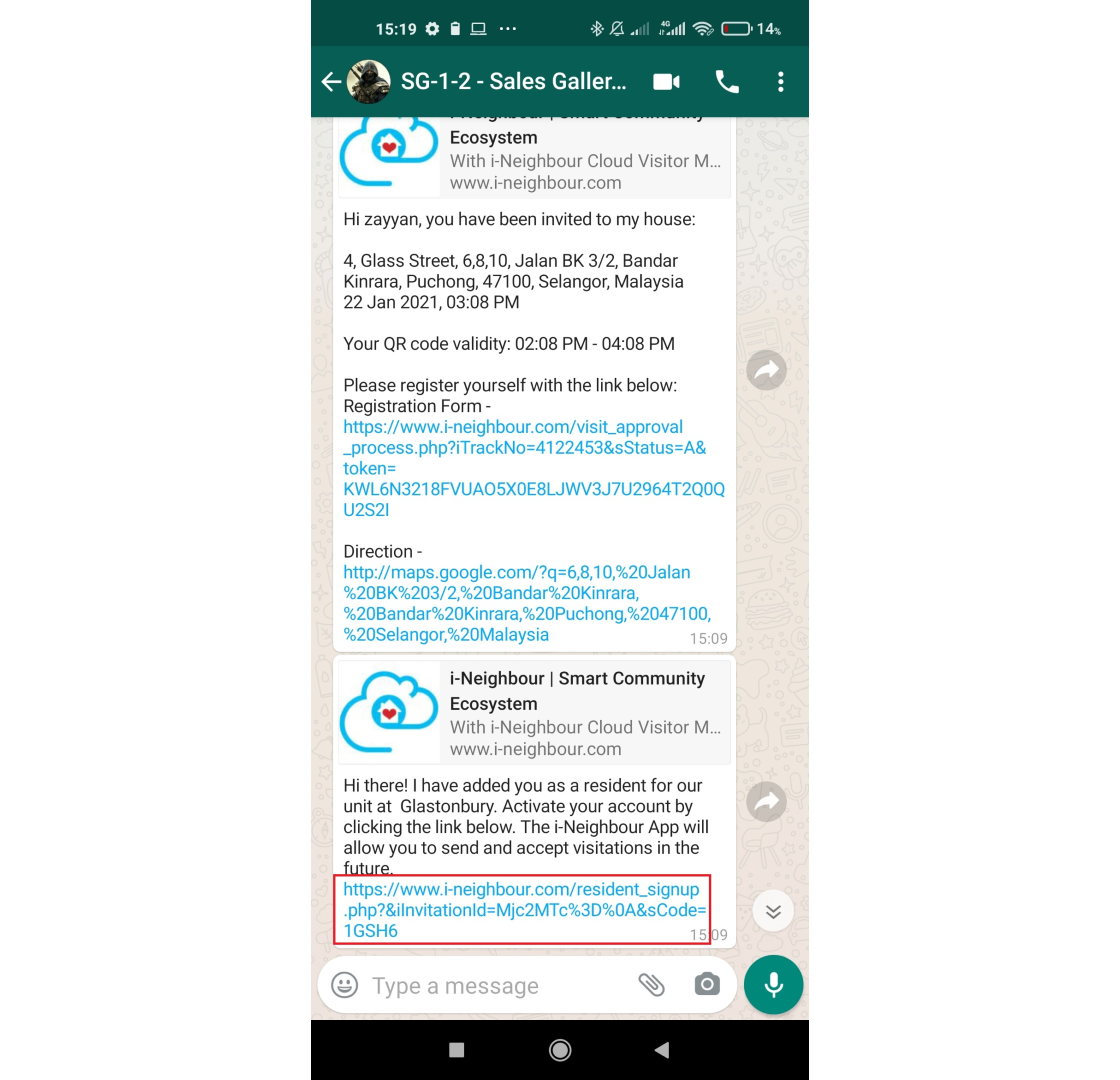
1. Tap on the link in the red box to start activating the account.
2. Enter a valid email address to use it in the i-Neighbour’s account and tap on Next.
3. Fill in the information and create a password. Then, tap on Submit.
Note: Password must contain a minimum of 8 alphanumeric and has at least one capital letter. E.g.: Abcde1234.
4. A successful message will be prompted with the QR code that appeared at the bottom of the screen for users to use it to download the i-Neighbour App.
5. Launch the i-Neighbour App. Enter the same email address and password that you have registered earlier. Then, tap ‘Login’.
7. Your family members/tenant can start using the i-Neighbour App.
We have prepared a video guide on how to add family members/tenants and how to activate an account in the i-Neighbour App. Please follow the links provided below:
a. Invite Family Members and Tenant
b. How to activate an account
If you are still having problems after completing all of the steps stated above, please contact us via support@i-neighbour.com.
Note: If some of the screenshots or steps viewed here are different from the ones in the current system, this is due to our continuous effort to improve our system from time to time. Please notify us at info@i-neighbour.com, we will update it as soon as possible.
Introduction
Generally, when users are applying for leaves, they may have to comply with various system conditions and restrictions due to the Admins' settings. If the request does not meet certain criteria, the leave application could be rejected.
However, there may be exceptional cases where Admins need to apply for leaves (or replacement credit) on behalf of users and at the same time, bypass these restrictions.
Therefore, to streamline the operation process, we have added a System Settings option: Allow Restrictions to be Overridden. When this option is enabled by default, it will remove all restrictions imposed by Leave Type Settings, Crunch Time, Leave Restriction when Admin is applying for leaves (or replacement credit) on behalf of user(s).
Leave Settings
Basically, the leave type will be set as usual as shown below,
Usually, the leave application will consist of several restrictions which can be set as enabled or disabled in leave type. Without enabling the “Allow Restrictions to be Overridden” function, the restrictions will affect the leave application such as “Apply Before” as shown below,
By enabling “Allow Restrictions to be Overridden”, it will bypass several restrictions while applying for leave on behalf including,
1. Maximum Request Days
2. Apply Before
3. Reason
4. Leave Attachment
5. Crunch Time
6. Apply Leave Restriction
To enable the setting, simply navigate to System Setting > Leave Management > Allow Restrictions to be Overridden as shown below.
After enabling the setting, the leave application restrictions will be overridden when admin applying leave on behalf as shown below,
Note: If some of the screenshots or steps viewed here are different from the ones in the current system, this is due to our continuous effort to improve our system from time to time. Please notify us at info@timeteccloud.com, we will update it as soon as possible.
Introduction
AdapTec Plus and AdapTec X has a siren function to pair with a master device to enhance the alarm sound signal from a master device. This siren will go off when a master device sends a signal such as a door open, a device broken, etc (depends on types of master) to AdapTec Plus and Adaptec X.
Process
FingerTec Remote Control Door Switch has two channels to mute the triggered alarm at AdapTec Plus and AdapTec X Siren and Exit Switch. Exit Switch using Remote Control Door Switch is easier for users because they can control door access remotely without needing long wiring for the exit button. Hence, receptionists can open the door for authorized people remotely.
Connection above is for internal siren for AdapTec Plus or Adaptec X only. For more sound coverage, an additional external siren 12VDC can be added.
Note: If some of the screenshots or steps viewed here are different from the ones in the current system, this is due to our continuous effort to improve our system from time to time. Please notify us at info@fingertec.com, we will update it as soon as possible.
Introduction
TimeTec new models such as Smart AC1/TD and Face ID 5/TD carry new firmware and architecture that need a new SDK set to make sure seamless integration of hardware and software. Therefore, TimeTec introduces AWDMS as the middleware between Ingress and the devices.
Many users do not get a clear picture of how to connect the devices to AWDMS and Ingress. To accomplish this, you just need to follow the below steps.
Process
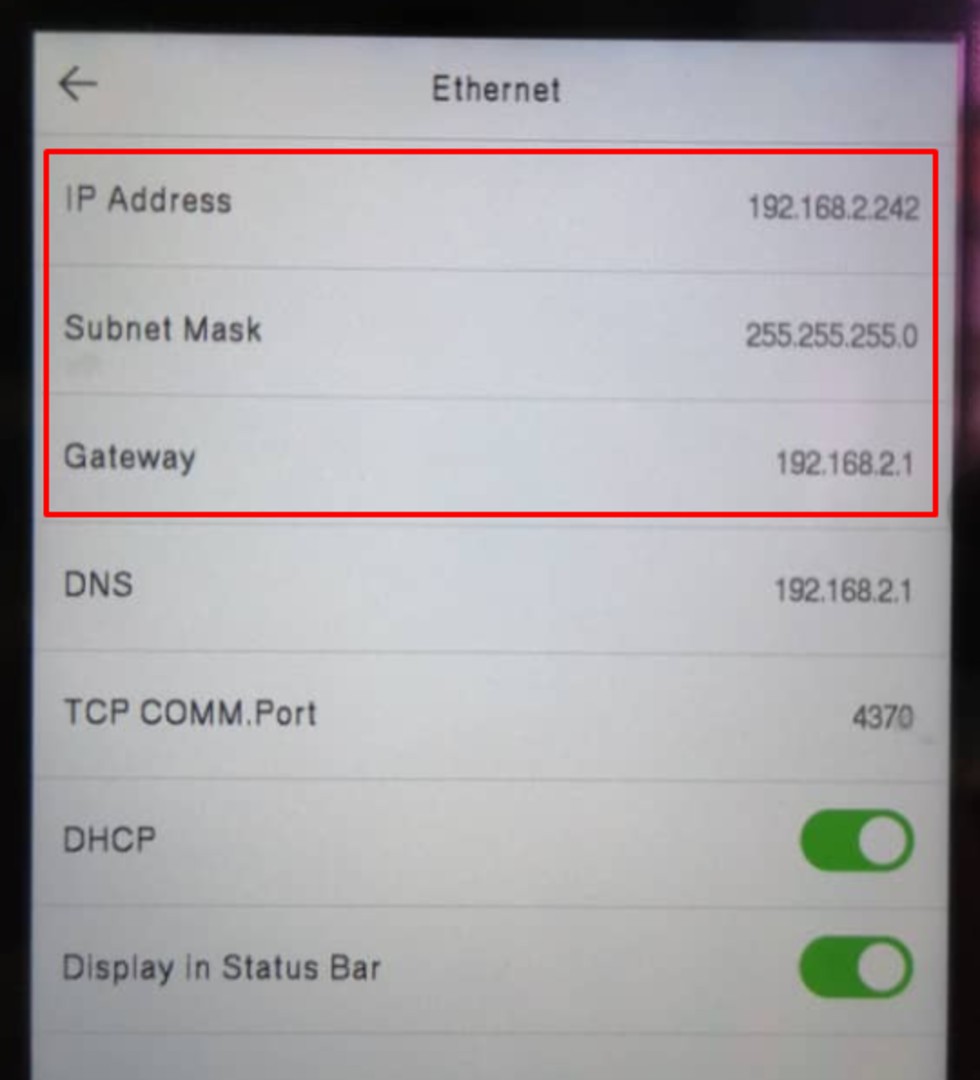
1) If you use LAN connection, configure the IP Address, Subnet Mask and Gateway on your device. Go to Menu > COMM. > Ethernet.
2) Configure the Server Address and Server Port on your device. Go to Menu > COMM. > Cloud Server Setting.
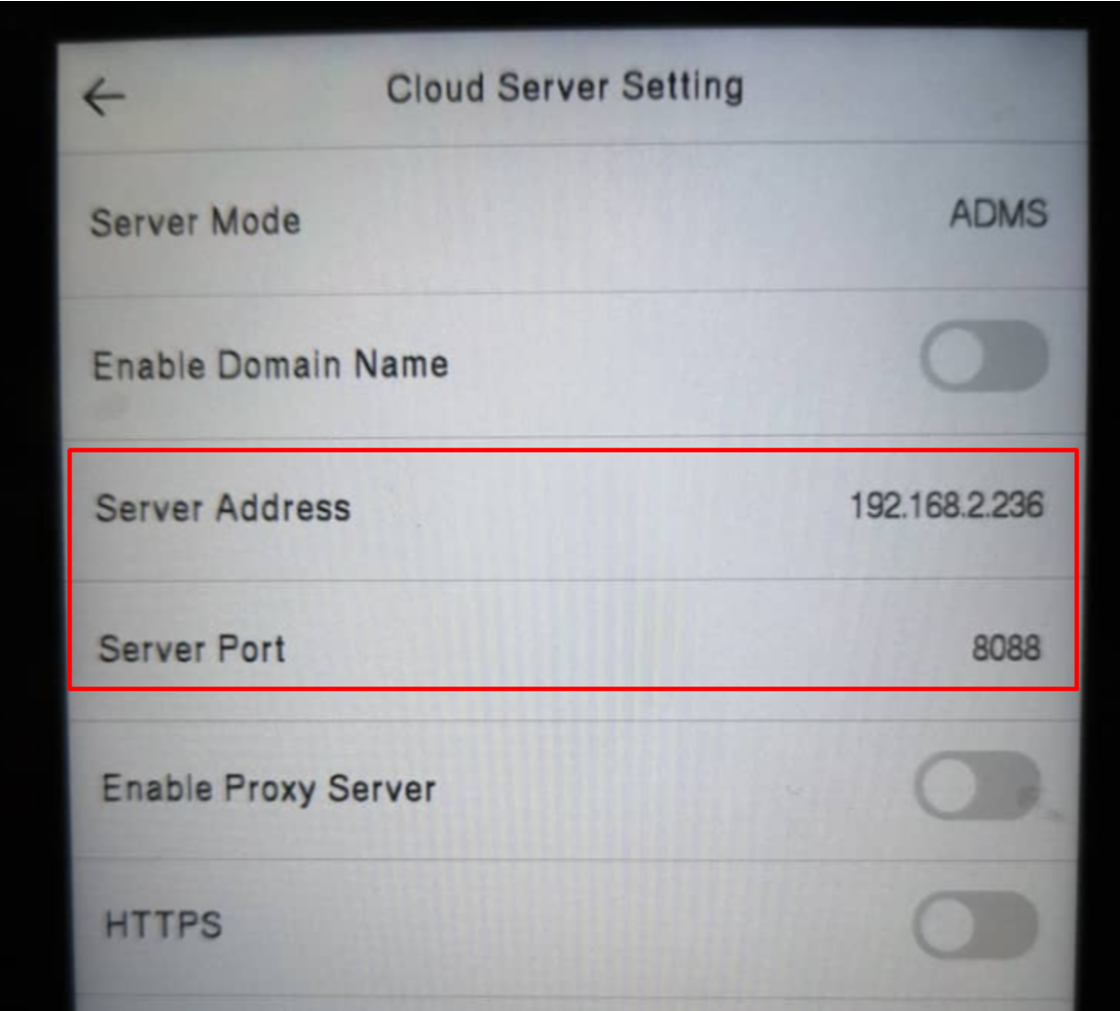
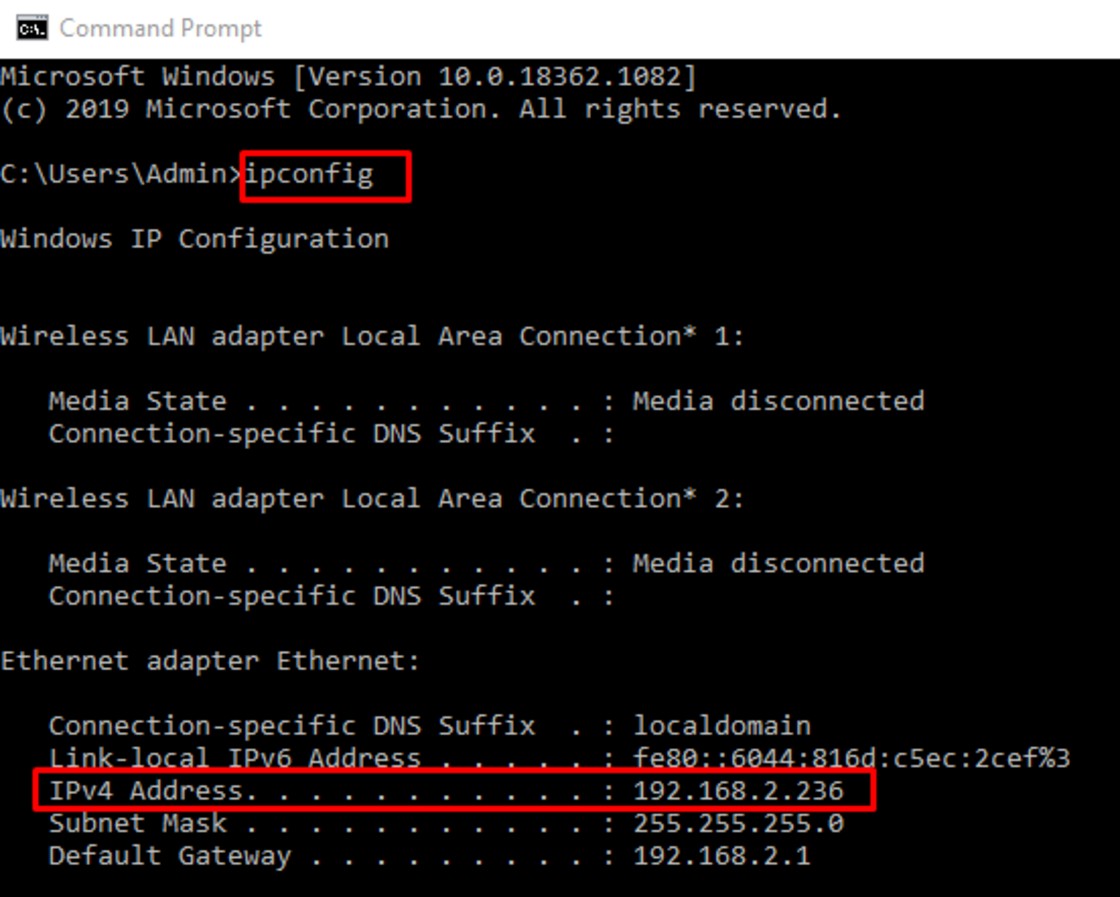
Note: Server Address is your computer IP address where the Ingress and AWDMS are installed. You can check it using Command Prompt and type in ‘ipconfig’.
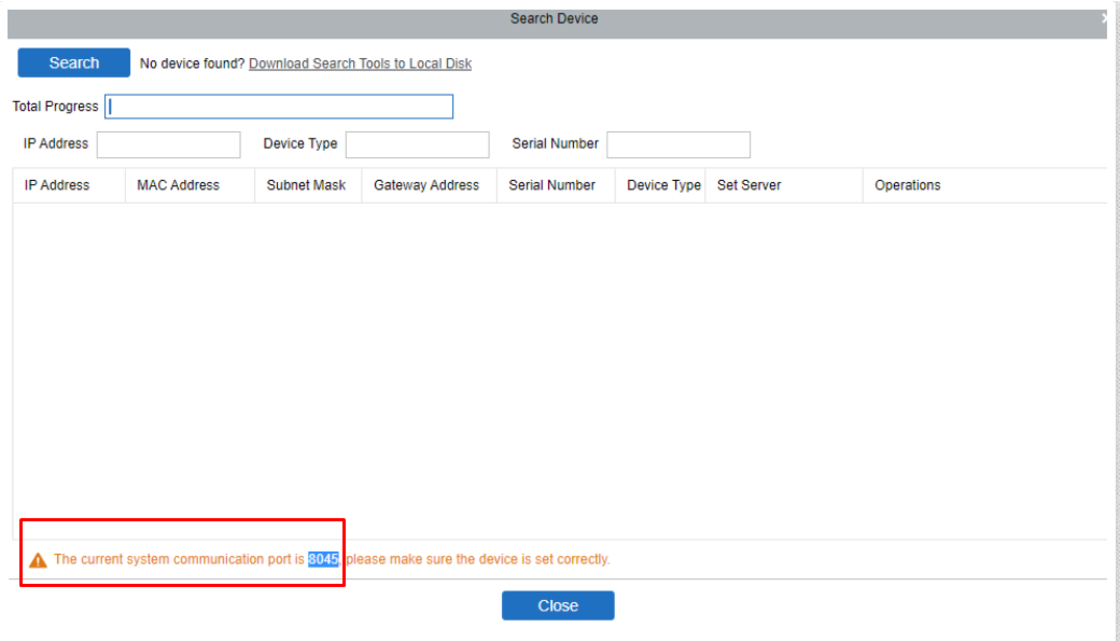
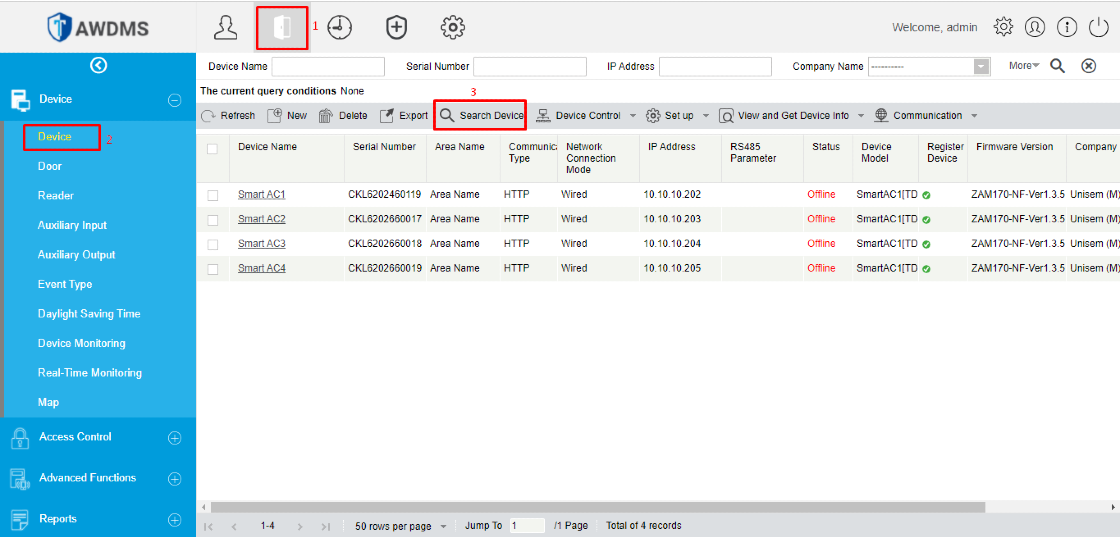
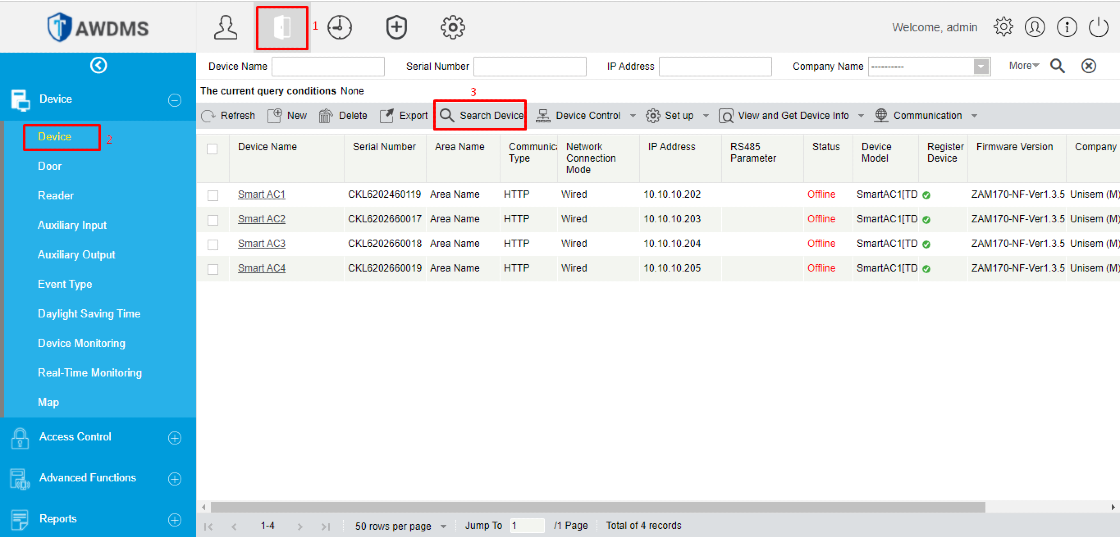
Server Port is the default port which is 8088 or you can check it in AWDMS. Go to Access module > Device > Search Device.
3) Before you can activate your device in Ingress, you need to make sure that you are able to search it in AWDMS. Go to Access module > Device > Search Device > Search.
Note: Once the device is found, DO NOT add it via AWDMS. You only need to add it in Ingress.
4) Add the device in Ingress. Go to Devices > Add Device > Fill in the Device Name, Serial No. and choose the Communication Mode as AWDMS > Add.
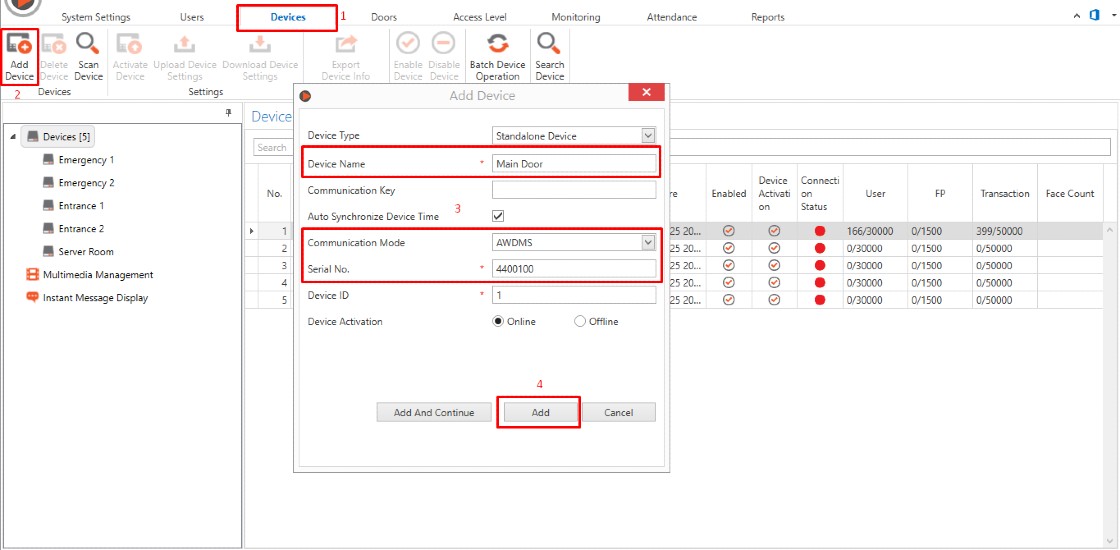
Note: If some of the screenshots or steps viewed here are different from the ones in the current system, this is due to our continuous effort to improve our system from time to time. Please notify us at info@fingertec.com, we will update it as soon as possible.
Introduction:
TimeTec TA has introduced a new feature which enables the approval process of the user’s attendance report to be performed within the system. Therefore, users with administrator privilege can check user attendance data before deciding whether to approve or to reject the attendance report. This feature is suitable for companies that require a supervisor to verify the attendance report of his/her employees. Even better, the approval function can be performed by the Admins on both web and mobile platforms for added conveniences.
This article will be guiding on enabling and choosing the Attendance Approval edit rights feature in TimeTec TA.
Process:
How to Enable/ Initial Setup
1. Login to TimeTec TA (Web) and go to Company tab > Click on System Settings.
2. Next, go to the Time & Attendance section and then click on the Edit button.
3. Tick on the Attendance Approval option and then choose a date to start enabling this option.
Edit Rights:Admin Only: Only admin with editing rights are allowed to edit employees’ attendance
All Users: All users are allowed to edit their own attendance.
4. Click on “Save” to continue with the setup
Note: If some of the screenshots or steps viewed here are different from the ones in the current system, this is due to our continuous effort to improve our system from time to time. Please notify us at
info@timeteccloud.com, we will update it as soon as possible.
For this month, FingerTec has released Ingress software v4.1.0.4 which has 9 new features and 13 bug fixes to enhance the user experience when using Ingress Software.
1. Added support AWDMS ATT module
2. Added new date selection when generate attendance sheet
3. Added new selection from customized fields when Export User
4. Added options for temperature alert and without mask filter when generating the Health Screening Report and Health Screening Visitor Report
5. Added Show All Users option inside Health Screening Summary report
6. Added new user role for Pay Rate and Type
7. Added Issue Date, Expiry Date and Palm Vein in the Users Column Chooser
8. Added AWDMS database backup & restore
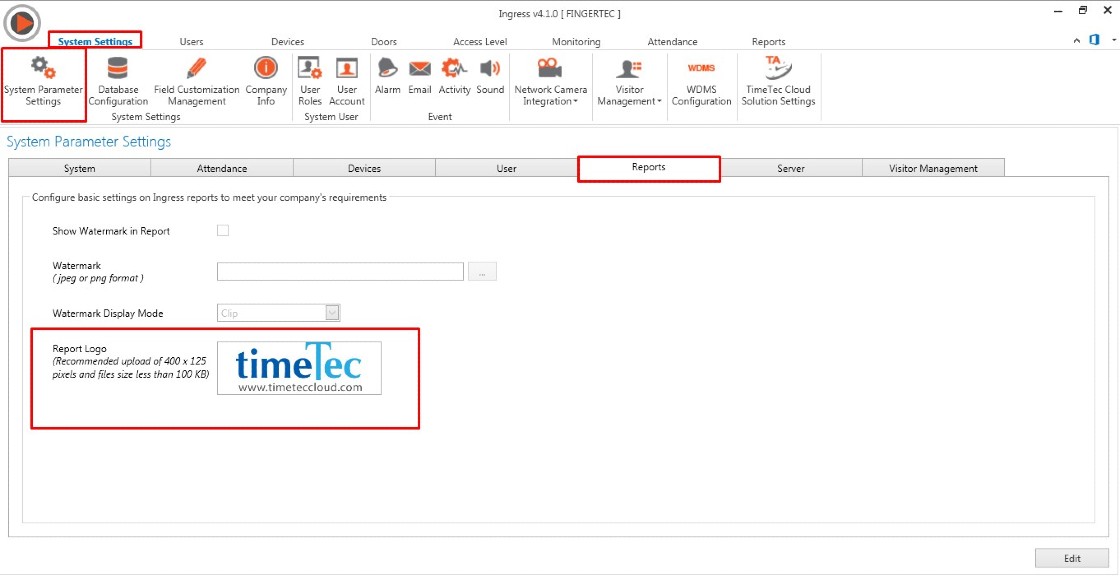
9. Added report logo at System Settings – Report


Bug Fix:
10. Fixed incorrect total face count for user downloaded from AWDMS in User Listing Report
11. Fixed Last Name displayed problem in ETC Report when generating from Report Scheduler
12. Fixed incorrect result displayed on ETC Report when untick show zero hour option
13. Fixed double punch clocking go to next day IN column when using last log out time with first rounding time range (Flexi Schedule)
14. Fixed incorrect sorting for date time (AM/PM) in Transaction Listing Report
15. Fixed incorrect calculation Total OT and Diff OT when interval start from 00:00/12:00 AM
16. Fixed concurrent download issue when download attendance logs from AWDMS
17. Fixed manual download cause TIMING file missing logs if remove transaction after auto download is enable
18. Fixed incorrect export serial number to TIMING file for Smart AC1 device which more than 10 digits
19. Fixed failed to remove leave type in attendance sheet when using User Duty Planner
20. Fixed incorrect date range display in report if filter by "Last Month"
21. Fixed crash issue in Weekly Listing Report after Export by User Selection was clicked
22. Fixed unable to save Permanent Door Open Close Timezone and Permanent Door Open Close Holiday Timezone to none