TimeTec TA New Feature: Notification for Announcement and Attendance


Introduction

Since the introduction of TimeTec TA, clients have been asking for notifications on tardiness to alert the admins on these activities. We are proud to introduce this feature in the latest release of TimeTec TA and it can be set online and in mobile app!

We offer two types of notifications, announcement and attendance, which come in default messages but customizable according to your company’s preferences.

Announcement notifications can be configured to notify users about new employees that are joining your company, employee’s birthday, anniversary of services and etc.

Attendance notifications can be configured to notify Admin and/or users about their tardiness activities.

Benefits

By having notification feature in TimeTec TA, the company can improve employer-employee relationship with new employee and birthday alerts, and both parties are informed of tardiness activities to seek room for improvements.

Process
1.      Click notification (Bell Icon) > Settings (Gear Icon)
    2.       In the current version, the Notification feature only applies for Announcement and
            Attendance, many more to come in our future releases.


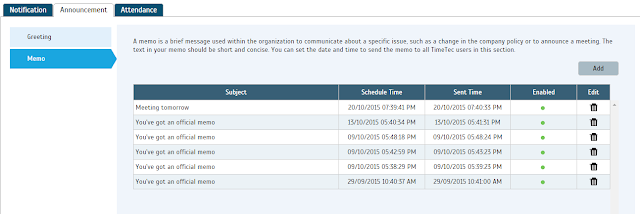
      3.     
In the Announcement window, there are two types of notifications, Greeting and Memo. 
4.      Notifications in Greeting include Welcome, Birthday, and Anniversary wishes.
 
5.    Memo is a short message that contains important information from the employer for the employees for example change in company’s policy, announcement on certain rules, and etc. You can configure the memo as shown below. Administrators can set the date and time to send the memo to all TimeTec users. Click ‘Add’ to configure the memos.
 
 
6.      For Attendance notification, you can set the Late In, Early Out and Clocking notifications.
   Late In and Early Out notifications will notify admin and alert users on users’
attendance’s tardiness.
          
           The Clocking notification will notify the administrators and alert users on users’ clocking
           activities. Both administrators and users will receive notifications every time users Clock-In
           their attendances not on time.


       7.    The notification will be received on the smart phone that has been installed with TimeTec
             
Mobile app.


Ingress & TCMS V3 Software – Reports for Job Costing Function


Introduction

Job costing is a function that tracks the cost of a particular job that has been assigned to specific employees. This function provides a company with data about the job type and the duration it takes to complete the job for accurate assessment and pay calculations.  Examples of companies that usually use the job costing function are accounting firms, law firms, automobile servicing companies, construction companies and etc.

In Ingress & TCMS V3, this function is available when using flexi schedule. As the weekly and daily schedule in both software only provide allowances for 3 pairs of clocking records, companies that require more clocking slots (e.g. need 4 pairs when employees are entitled to 3 breaks a day) may also find this function appropriate for their working arrangements. Using this, the software will calculate work time for each In-Out pair, to provide a better attendance analysis. 


Benefits
By using the Job Costing feature in Ingress software, the management’s work is simplified. And by generating two such reports from Ingress software, which are the Job Cost Analysis & Detailed Employee Time Card reports, the management does not have to calculate all the job costs manually even though the pay rate is different for each task.


Process
Note:
Please be informed that the below configurations are done on Ingress software, as shown in the accompanying images. However, this can also be applied in TCMSV3 to achieve comparable results, as the configuration is similar with only a slight difference in the interface.

1) Create a flexi schedule.


2) Enable Job Costing Features in the Flexi Schedule’s General tab.


3) Define Work Code at the Remark.


4) For different employees, you can configure different pay rates for different jobs.


5) Upload the work code into the terminal.


6) After downloading the transaction data from the FingerTec terminal, the attendance sheet will
    display the user with the transaction data.


Result: Job Cost Analysis
This report is exclusively for the Job Cost Option at the flexi schedule. It displays the users’ multiple break times and also the job’s work code for the particular break time.


Result: Detailed Employee Time Card Report
This report is exclusively for the Job Cost Option at the flexi schedule. It displays the users’ multiple break times and also the job’s work code for the particular break time. Unlike the Job Cost Analysis, this report will summarize the attendance details.


Login Issue after updating to Ingress v3.0.4 from an older Ingress version.


Introduction

Users have found issues when logging in to Ingress software after updating their Ingress software to v3.0.4, where “Invalid username/password” error pops up even when they have inserted the correct password. This is caused by the change to the database structure in the v3.0.4 update.
Benefits

By following the procedures below in Ingress Server PC, users will be able to login to Ingress software without any problems.
Process

1) Shut down Ingress and Ingress Server.

2) Download the DBinitialization tool here.

3) Extract the downloaded file. Copy the file and paste it in the Ingress Server folder (Local Disk C > Program Files (x86) > Fingertec Worldwide > Fingertec Ingress > Ingress Server)

4) Launch the DBinit.exe file by double clicking on the file.

5) Once completed, run Ingress DBInstaller, which is in the same Ingress Server folder.

6) Key-in root password and click the Test Connection button.

7) Click on the Update Connection button, and once done, click the Upgrade Database button.

8) Close the DBInstaller, and launch the Ingress software. Login using the existing username and password.

Backup/Restore Ingress Database using 3rd Party MySQL Manager Tool


Introduction

Ingress was designed to work with MySQL database, which is known to be powerful, reliable and is widely used by many other systems. The downside of MySQL database is that the configuration requires advanced IT knowledge.

It is important to take regular backups of the databases of the Ingress software. Should the software crash or the hard disk of the computer malfunctions, all of the contents in the software as well as the settings will be lost. Only with a backup can all the data be restored.

Benefits

By using any MySQL manager, admin or GUI tool, the time needed to backup or restore large databases can be reduced tremendously. The time can be used to set up the software again. The MySQL Manager is inexpensive to use and you can obtain it for free by downloading from the Internet.

Process:

BACKUP THE DATABASE
1)     Once you have installed the SQL manager, run the program from the desktop shortcut. This is the first window you will see.
 
 
a)    Click the button on the top left labeled New. A window will appear asking for the name of this connection. Provide the connection name and click OK to continue.
 
a)    Provide the IP address of your database in the field labelled MySQL Host Address.
b)    Provide your database username and password in the appropriate fields.
c)    Enter 3306 in the Port Column.
d)    Click Save, then click Connect.
 
2)     Now that you have connected to the database, you can proceed to make a backup of your database. You should be able to see on the left panel of the window a list of the available databases.


3)      Select Ingress and right click on it. This will cause a menu to appear. Find the option labelled as 'Backup Database as SQL dump ...' and click it.
 
       4)    Under 'Export as SQL', you have the option of backing up the database structure or data or          
               both. Make sure both is selected for the backup to be successful.

 
      5)     Click the '....' button next to the 'Export to File:'. This will bring up a file save window. Find
               an appropriate folder to store your database backup.
6)    Now that the settings have been configured, click 'Export' to start the backup process. The
       program will inform you when it is completed.

RESTORING THE DATABASE
       1)    To restore your database, first connect to your MySQL server using the instructions from 1)
               and 2) in the database backup process above. When you have connected to the MySQL server, go to
               
the DB menu near the center top of the window then click on 'Restore from SQL dump ...’.


2)    Click the '...' or ellipsis button and find the database backup that you have saved and open it. Once you have found the database, click 'Execute'. This will recreate your database into the software and the restore process is complete.

Keeping Track of Your Terminal's Transaction Memory Capacity (Updated Version)

All the FingerTec terminals are equipped with a flash memory to store transaction data, fingerprint templates, face templates, etc. The flash memory is a permanent (non-volatile) storage and it can store data even without the power supply. The FingerTec terminals’ memory capacity varies for each model. Time attendance only terminals have far less transaction storage capacity compared to the multimedia models.

When you perform a successful verification, the terminal will store a transaction log into its memory. The transaction will be stored in the terminal until it is downloaded into our TCMSv2 software, or manually deleted. If you do not download or delete the transaction data after a period of time, the memory’s storage will reach its maximum capacity and the terminal will cease to work or function properly. If you are using a USB flash disk to manage the transaction records, click 
here for further instructions. If you are only using the FingerTec terminal for door access purposes and do not need the transaction data, it is recommended that you perform a housekeeping to ensure that the terminals to continue to work in a tip top condition.

You can set a reminder at the terminal before its memory reaches the maximum capacity. If the configured figure is 99, the terminal will alert users when it reaches its last 99 transaction storage. 


Fo terminals AC100, TA100, AC900, R2, Kadex: Press Menu > Options > Log Opt > Alm SuperLog / Alm Attlog

Alm SuperLog: to notify users if the operational log storage is less than the configured figure. The default figure is 99.

Alm AttLog: to notify users if the transaction storage is less than the configured figure. The default figure is 99.


For AC100C, TA100C, TA200 Plus, Q2i, I-Kiosk 100, R3, and TA500: Press Menu > System > System > Log Alert


For AC100C, TA100C (FMM100):  Press Menu > System > Attendance > Attendance Log Alert

For Face ID Series (Face ID2, Face ID3, Face ID4, Face ID4d): Press Menu > System > Log Setting > Log Alert

For I-kiosk 100 Plus: Press Menu > System > Param Setup > Log Alert

Log Alert: To instruct the terminal to alert user if the transaction storage is less than the configured figure. The default figure is 99.

Title: Configuring fire alarm in two pieces of Ingressus to open all doors when smoke sensor is triggered.

Introduction

Ingressus can be integrated with multiple auxiliary inputs and outputs. One of the main safety features of Ingressus is that it can be combined with smoke sensors in an event of fire to trigger alarm alert and to open all doors of your premise(s) simultaneously.

 
Benefits

By tapping on this configuration, Ingressus will open selected doors when the fire alarm is triggered either from the first Ingressus or from the second Ingressus. It is crucial to get the people affected clearing the areas when the controllers detect smoke.

 
Process:

1.   The Ingressus must be activated first before the “Zones” feature appears in “Device” tab.
 
 
2.   Add both Ingressus into the Zones by selecting the “Fire Alarm” options > Add Zone > Add
      Settings to Device.
 
 
3.   Configure both Ingressus in Fire Alarm feature and make sure the Fire Alarm Action is set
       correctly. Auxiliary 1 and Auxiliary 2 must be selected as the Output Point Address. The Lock
       1 and Lock 2 must also be selected in order for the system to open doors when the fire
       alarm is triggered.
 
 
4.   After configuring the Fire Alarm, the settings must be saved and synced to the Ingressus for
      the changes to be reflected.

5.   You can refer to the wiring diagram for both the Ingressus with its Auxiliary input and Output
      below.