How to Install and Run the TCMS v2 Software with Windows 7 Platform

To install the TCMSv2 software, double click on the installation file (or run direct from the Go Green DVD). By default, the installer will install the TCMSv2 software into the C: drive and it will also create a shortcut icon on the desktop.

1. You are the Administrator of the computer
An alert message will appear when you double click on the TCMSv2 shortcut icon. The message is a reminder for you to use the “Run As Administrator” command to start up the TCMSv2 software.


Use the right mouse button to click on the TCMSv2 shortcut icon and select “Run As Administrator” to start up the TCMSv2 software.

Setting the New R2 (FEM565) with R2i/R2c


FingerTec has developed a new FEM565 core board and shipped it with the new batch of R2 terminals. The new FEM565 coreboard is faster, more powerful, and has several added advantages as compared to the previous FEM500 coreboard.

The improved R2 is ready to be paired with the R2c (a new slave terminal to replace the R2i, which is using RS485 cable). However you can still pair the improved R2 with your existing R2i by configuring a few settings.

You will find an option “With R2i – Y/N” (Y to enable R2 to pair with R2i) under Advance Option in the previous R2 terminal.
As for the improved R2 terminal with R2i: Press Menu > Option > Access Option > 485 Reader Fun. > Y or N > Set to N > Save > Restart both the R2 and R2i. If you would like to use the improved R2 with the R2c, you can set the “485 Reader Fun.” and configure to “Y” to activate it.


Written by Henry Pang
Edited by Vincent

New Firmware, New Features

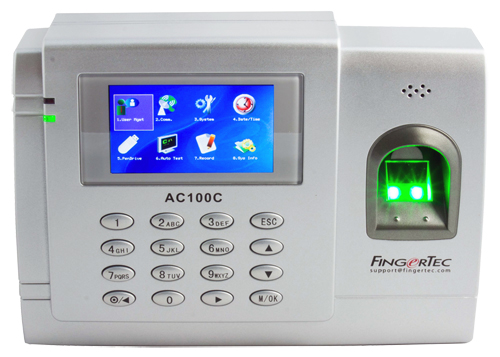
AC100C


1) To Enable & Disable DHCP features for LAN
This feature is to enable the Dynamic Host Configuration Protocol (DHCP) feature for the Local Area Network (LAN so that the server can auto-assign the IP address to the terminal. However, the user is required to manually insert their network’s gateway in the terminal.

To enable the DHCP function: Press Menu > Comm> Misc Set > Ethernet DHCP > On

2) User Name Sort list
At the user management menu, the user list is sorted according to the User ID. With this new feature, it is possible to sort the user list according to the user name and alphabetically.

To enable this feature: Press Menu > System > System > User Sort > On

You can download the AC100C’s latest firmware here. 


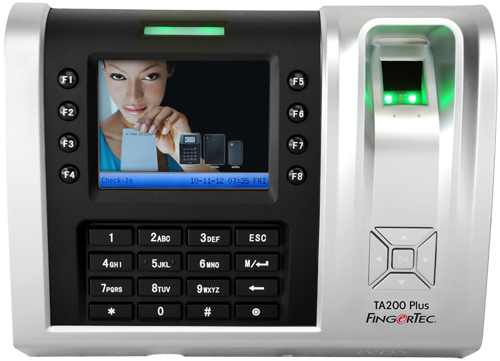
TA200Plus (FEM 800)

1) To Enable & Disable DHCP features for LAN
This feature is to enable the Dynamic Host Configuration Protocol (DHCP) feature for the Local Area Network (LAN) so that the server can auto-assign the IP address  to the terminal. However, the user is required to manually insert their network’s gateway in the terminal.

To enable the DHCP function: Press Menu> Comm> Network > DHCP > LAN

2) User name Sort list
At the user management menu, the user list is sorted according to the User ID. With this new feature, it is possible to sort the user list according to the user name and alphabetically.

To enable this feature: Press Menu > System > System > User Sort > On

You can download the TA200Plus’s (FEM 800) latest firmware here. 


Q2i (FEM 800)

1) To Enable & Disable DHCP features for LAN
This feature is to enable the Dynamic Host Configuration Protocol (DHCP) feature for the Local Area Network (LAN) so that the server can auto-assign the IP address  to the terminal. However, the user is required to manually insert their network’s gateway in the terminal.

To enable the DHCP function: Press Menu> Comm> Network > DHCP > LAN

2) User name Sort list
At the user management menu, the user list is sorted according to the User ID. With this new feature, it is possible to sort the user list according to the user name and alphabetically.

To enable this feature: Press Menu > System > System > User Sort > On


3) To Enable the Adaptec Plus Feature
With the new firmware, the user have the option to enable/disable the Q2i to use with the AdapTec Plus.

To enable this feature: Press Menu > System > System > 2P > AdapTec Plus

You can download the Q2i’s (FEM 800) latest firmware here. 
  
For more information regarding updating firmware, please refer to my previous post here. 


Written by Vincent

Keeping Track of Your Terminal's Transaction Memory Capacity

All the FingerTec terminals are equipped with a flash memory to store transaction data, fingerprint templates, face templates, etc. The flash memory is a permanent (non-volatile) storage and it can store data even without the power supply. The FingerTec terminals’ memory capacity varies for each model. Time attendance only terminals have far less transaction storage capacity compared to the multimedia models.

When you perform a successful verification, the terminal will store a transaction log into its memory. The transaction will be stored in the terminal until it is downloaded into our TCMSv2 software, or manually deleted. If you do not download or delete the transaction data after a period of time, the memory’s storage will reach its maximum capacity and the terminal will cease to work or function properly. If you are using a USB flash disk to manage the transaction records, click 
here for further instructions. If you are only using the FingerTec terminal for door access purposes and do not need the transaction data, it is recommended that you perform a housekeeping to ensure that the terminals to continue to work in a tip top condition.

You can set a reminder at the terminal before its memory reaches the maximum capacity. If the configured figure is 99, the terminal will alert users when it reaches its last 99 transaction storage. 


For terminals AC100, TA100, AC900, R2, Kadex : Press Menu > Options > Log Opt > Alm SuperLog / Alm Attlog


Alm SuperLog: to instruct the terminal to alert user if the transaction storage of administrator login is less than the configured figure. The default figure is 99.

Alm AttLog: to instruct the terminal to alert user if the transaction storage is less than the configured figure. The default figure is 99.


For terminals AC100C, TA100C, TA200 Plus, Q2i, I-Kiosk 100, R3, and TA500: Press Menu > System > System > Log Alert


For terminals Face ID 2, Face ID 3: Press Menu > System > Log Setting > Log Alert

For terminal I-kiosk 100 Plus: Press Menu > System 
> Param Setup > Log Alert


Log Alert: To instruct the terminal to alert user if the transaction storage is less than the configured figure. The default figure is 99.

Setting an Automatic Download Interval in the TCMS V2

FingerTec users verify their fingerprints, passwords or cards at a terminal to report attendance or gain access. The date and time of verification is captured as transaction data and saved into the terminal’s memory. To view the transaction data, you will need to download the transaction data from the terminal into the software to generate attendance data, in-out records and reports. It can be done manually or automatically.

With the set automatic download interval function, you can configure the software to download the transaction automatically. You can determine the desired time and even the time interval to perform the download. To go to the said function, click Devices and select Set automatic download interval.

There are 2 types of function when it comes to automatic download interval:


FingerTec Support Now Via Google Talk!


FingerTec Worldwide’s Technical Support Team has now activated their Google Talk account. You may contact us by using Google Talk to get instant technical support. Below are the contacts: 


If you wish to contact us using other instant messaging options, please refer to the following link: http://www.fingertec.com/ver2/skype/skype-technical.html


Written by: Vincent