Introduction
In TimeTec VMS, hosts can invite visitors with a single or a multiple in-out visit type. The single in-out is the common visit type for walk-in and a one-time visit, while multiple in-out is typical for recurring visitors that need to visit for multiple days. However, in case the host or visitors need to end the visitation duration earlier, the host can cancel the invitation in TimeTec VMS to prevent any unsanctioned re-entry.
Process
1. Login to TimeTec VMS mobile app with staff account. Go to the Visitor module.
2. In My Visitors, go to the Upcoming visitor list. Then click on the visitor to select. Cancelling a visitor's invitation is permissible before the visitor checks in or after he/she checks out, as long as the visitor’s name appears in the Upcoming visitor list.
3. You will be able to see the visitor’s details. Scroll down and tap on Cancel Invitation.
4. Enter the reason for cancelling the invitation and submit. Once submitted, the visitor’s status will turn to Cancelled.
5. When an invitation is cancelled, the visitor cannot enter using the same QR code as before and need to perform a new registration to obtain a new valid QR code.
Note: If some of the screenshots or steps viewed here are different from the ones in the current system, this is due to our continuous effort to improve our system from time to time. Please notify us at info@timeteccloud.com, we will update it as soon as possible.
Introduction
During the i-Neighbour setup process, login credential code can be set to "Later" until the system admin confirms to send the codes to all residents. This article explains how admin can send and resend the login credentials code to the residents. However, the codes can only be sent to owners with email addresses only.
Process
Step 1: Go to Neighbourhood > Manage Unit.
Step 2: At the Manage Unit tab, click Pending Activation.
Step 3: Tick the first box to select all.
Or tick the selected owner.
Step 4: Click ‘Send Login Credential’ to send an activation email.
Once done, the login credential sent time will be updated to the latest sent time.
If you are still having problems after completing all of the steps stated above, please contact us via support@i-neighbour.com.
Note: If some of the screenshots or steps viewed here are different from the ones in the current system, this is due to our continuous effort to improve our system from time to time. Please notify us at info@i-neighbour.com, we will update it as soon as possible.
Introduction
You should probably be aware that all changes that have been made to a user’s leave balances and should be able to track whenever you wish to review the details. This can be done by viewing the Audit Trail in the User Leave Settings. All specifics will be provided in that section regardless the balances were automatically updated by the system or were manually edited by an Admin. Recently, we have also enhanced the Audit Trail by adding in the updated Leave Balance after every amendment has been made. This has been done to accommodate whenever users wish to recheck any configurations made to their profile.
Process
1. Login into TimeTec Leave > USER > Manage User.
2. Search the User Name / ID and click the ‘Gear’ symbol.
3. Click on the ‘BALANCE’ tab and click the ‘Audit Trail’ icon.
Leave Application (Approved Application)
1. Below is an example of the Audit Trail Message of Leave Application that has been approved.
Leave Application (Cancelled Application)
1. Below is an example of the Audit Trail Message of Leave Cancelled Application.
Manually Edit (Add and Deduct Leave Balance)
1. Manually Edit of Leave balance will be presented in the ‘Pencil’ icon instead of the ‘Cloud’ icon. If an admin has manually edited the leave balance, they can simply insert a message to notify users and that the message can be traced back in this module. Below is an example of a manually added leave balance command:
;2. Below is an example of Manually deducted leave balance:
Carried Forward Balance has Expired
1. Below is an example of deducted leave balance due to the expiration of Carried Forward Balance.Import ‘Leave Taken’
1. Below is an example of Imported ‘Leave Taken’ without Deducting Balance
2. Below is an example of Imported ‘Leave Taken’ with Deducted Balance.
Cancelled Import ‘Leave Taken’
1. Below is an example of Cancelled Import of ‘Leave Taken’ without deducting Leave Balance.2. Below is an example of Cancelled Import of ‘Leave Taken’ with deducted Leave Balance.
Replacement Credit Application
1. Below is an example of Approved Replacement Credit Application.2. Below is an example of Cancel Approved Replacement Credit Application.
Disable & Reset Replacement Leave
1. Below is an example of the Disable & Reset Replacement Leave at the System Setting.Note: If some of the screenshots or steps viewed here are different from the ones in the current system, this is due to our continuous effort to improve our system from time to time. Please notify us at info@timeteccloud.com, we will update it as soon as possible.
Introduction
Hierarchy charts are the visual tools used by the management to help illustrate the roles and an organization’s hierarchy. Whether you’re in a business, a nonprofit, or a government organization, a chart can help your employees to understand the chain of command, with clear information on who the people should report to. A clear Hierarchy chart can also lay out the inefficiencies at your workplace.
Construct your own company Hierarchy chart with TimeTec TA or TimeTec Leave. By constructing a Hierarchy chart, you are able to determine who is the immediate supervisor of the staff and as a staff, they also would be able to view their position or role in the Hierarchy chart. This also benefits the manager or superior role since they are authorized to decide on the Clocking Monitoring and Tardiness monitoring of the staff who are assigned as their sub-coordinates in the Hierarchy charts within the system.
Process
1. Go to USER > Hierarchy Chart
2. Construct your company's hierarchy chart in this tab. Click Add to create and name the position's level or designation. You can also add a sub-position to the main position or other designations in the same way. To complete the process, click Assign Users to add into the Hierarchy Chart in order to place users at their appropriate position.
3. Click ▼ to expand the selected chart or ‘tick’ the ‘Expand’ button to expand all the Hierarchy Chart.
4. Once you have finished constructing the Hierarchy Chart, you can view and export the Hierarchy Chart into PDF format by clicking on ‘Generate Names & Photos’ or ‘Generate Names Only’
5. Below is an example of a constructed Hierarchy Chart which was generated by Names & Photos. Click ‘Export Hierarchy Chart to PDF’ to save the file as PDF format. Users are able to view this chart through the Website Portal (PROFILE > Hierarchy Chart) too.
Hierarchy Chart sync with User Profile
1. Based on the constructed Hierarchy chart in the system, the field ‘Immediate Superior’ will be automatically filled in in each staff profile.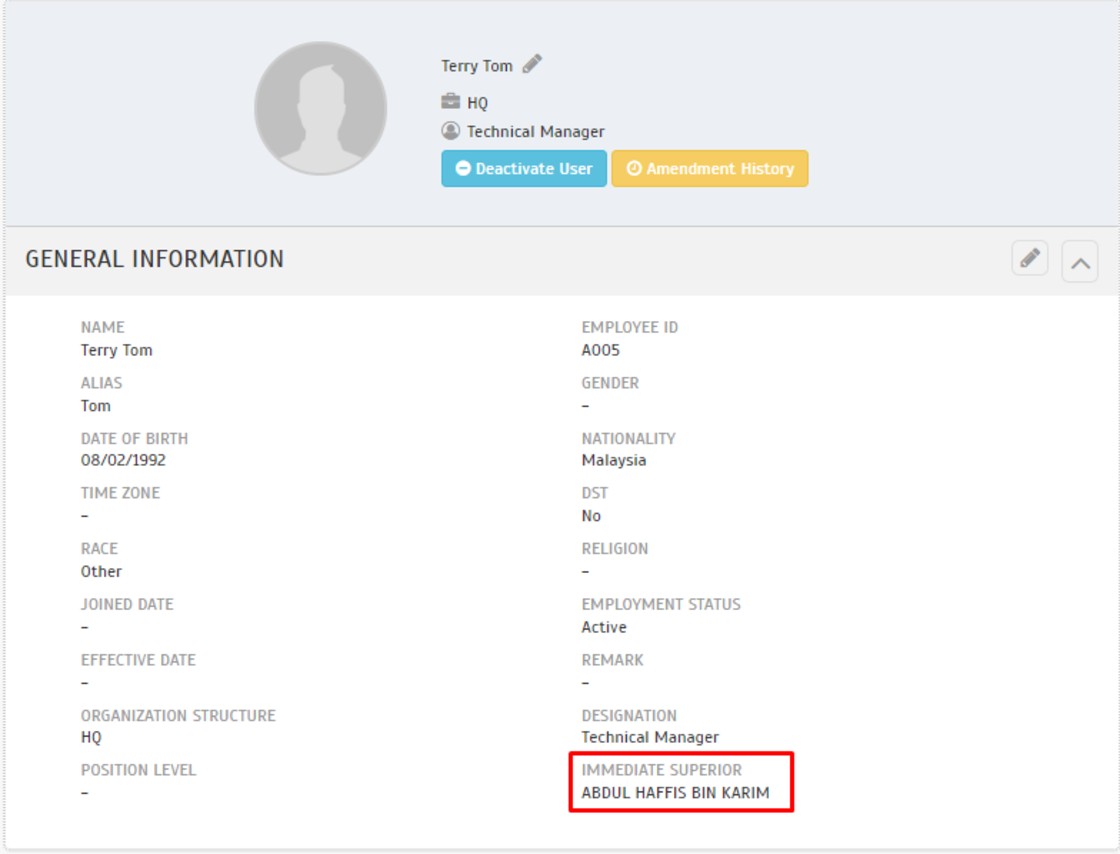
Superior / Manager able to prefix the Clocking Monitoring & Tardiness Monitoring of a Sub-Coordinate
1. Login into TimeTec TA account and go to ‘Monitoring’2. Click the ‘+’ Button to add a new Clocking Monitoring setting.
3. Click the ‘Add User Icon’ and select ‘Others’4. Now, as a superior or manager, you can select the users which have been assigned under your sub-coordinate to be added into the clocking monitoring setting.
Note: If some of the screenshots or steps viewed here are different from the ones in the current system, this is due to our continuous effort to improve our system from time to time. Please notify us at info@timeteccloud.com, we will update it as soon as possible.
Introduction
QR code is a great addition to the TimeTec smart product and solutions line. This QR code will be served as a credential to grant access via your mobile App (QF Master) using an Android smartphone. This unique access code will control the IN and OUT activities of each door when it is paired with a TimeTec BLE-2 via a Bluetooth connection.
Process
Step 1 - On TimeTec Access, click on the User tab > Face Enrollment and QR code.
Step 2 - Search User and click the Generate button under the QR Code column.
Step 3 - Re-login to the User account on TimeTec Access mobile apps to refresh the settings. Tap on the Unlock tab > Show QR Code. Use the QR code to access to the QF Master device for door unlocking purposes.
Step 4 - In TimeTec Access, you may reset the User’s QR code by clicking on the ‘Reset’ button under the QR code column.
Step 5 - To manage the QR code by batch, you may select your desired users and click on the Manage button. Note: If some of the screenshots or steps viewed here are different from the ones in the current system, this is due to our continuous effort to improve our system from time to time. Please notify us at info@timeteccloud.com, we will update it as soon as possible.


