Showing posts with label Mobile App. Show all posts

TimeTec VMS - Facility Module


Introduction
In the month of October, we have added a new module: Facility in TimeTec VMS. This module allows employees to book available facilities in the office building using the TimeTec VMS App or through the Web. It simplifies the facility booking operation and makes the process more efficient as the entire process can now be performed as a self-service and unmanned.

Section 1: Manage Facilities (Web)
This tab is for Admin to add available facilities in the system. The Manage Facility feature is only available for Admin view. 

Steps to add a new facility
1. Go to Facility > Manage Facility and click +ADD button.

2. Add information about the facility. E.g: Facility Name, Operating Hours, Approver List, Cancellation option, etc. 


3. Next, define the availability/booking slot of the facility. 


4. Add the facility pictures. Upload photos of the facilities for reference.


Section 2: Add Booking Requests (Web)
Once the facility has been successfully added, users can start booking the facility. To book a facility, users  need to:
1. Click on the +ADD button location on the “Request & Approval” page.


2. The system will then initiate the booking process by allowing the user to choose and review the facility he/she intends to book.


3. Select the booking date and time. The system supports booking for multiple dates and time in a single request.


Note: Admin can make facility booking for personal or on behalf of other employees. 


Section 3: Manage Booking Request (Web)
Once a booking request has been submitted, the user will be able to view the booking details and check its status at Request & Approval > Manage Request page.


Manage Request (Requester View)

Whereas for approvers, they are able to review the requests and respond to each request accordingly.


Manage Request (Approver View)


Section 4: Facility Booking in Mobile Application

In the TimeTec VMS mobile app, the facility module is available under My Account section. Tap at More to access this section.


More Tab (with Facility Module added)

From this module, the user can view the list of facilities available for bookings. To book a facility, the user needs to:

1.    Select a facility
2.    View the facility information 
3.    Select time slots 
4.    Add remark/attachment
5.    Submit the request


Add Booking Request

Once the booking request is submitted, the user will be able to view his/her booking details and check the booking status at the Booking History page.
 

Booking History & Booking Details 

Whereas approvers will be able to review the requests and respond to each request accordingly.


Approval Process


Note: If some of the screenshots or steps viewed here are different from the ones in the current system, this is due to our continuous effort to improve our system from time to time. Please notify us at info@timeteccloud.com, we will update it as soon as possible.

Logging into i-Neighbour with a different mobile device


Introduction
By signing up and later logging into the account via the i-Neighbour app, the owner will have to input the mobile ID which was first used for registration. In the event where the owner changes their phone number, the owner can request the change by inserting the login email address to get a 4-digit email from i-Neighbour for resetting purposes.

This feature is designed to protect all account intrusion. Despite it is inevitable to avoid email and password breaches, this will protect the owner’s account when a different mobile ID is detected. In fact, this is important when the owner's privacy is stored within such as invoices, family members' contact details, and IoT (internet of things) that allow them to get through barrier gates and doors via using the app.

This article will be demonstrating the steps to log in to i-Neighbour if you are using a different phone.

Process 
1. Install the i-Neighbour apps from Google Play Store / Apps Store and Login.


2. Enter your username and password and tap on 'Login'.


3. You will need to request an activation code from i-Neighbour to be sent via email due to the use of a different mobile ID. Click to get an activation code.


4. Check your email for the code for account activation.


5. Insert the activation code into the empty field and click Activate Now.


6. Click login.


7. Now you can enjoy the features in the i-Neighbour apps.


If you are still having problems after completing all of the steps stated above, please contact us via support@i-neighbour.com.

Note: If some of the screenshots or steps viewed here are different from the ones in the current system, this is due to our continuous effort to improve our system from time to time. Please notify us at info@i-neighbour.com, we will update it as soon as possible.

How to Add Note in the Roster and Calendar with TimeTec TA Web and Apps


Introduction
Calendar Notes will help keep all of your ideas in one place. Jot down thoughts and ideas to prevent yourself from forgetting any important events. Your notes will be viewable directly on your calendar in the TimeTec TA. You can also pick up directly at your content schedules from right where you left off.

Use Calendar Notes to keep track of all your important dates and deadlines. This is perfect for indicating campaign timelines, meeting dates, holidays, and special events.

Process
(TimeTec Web)
1. Login to TimeTec TA > ROSTER


2. Click on the date and the note.


3. Fill in the note and click save
Max. length of 250 characters


4. Once it is saved, there will be a small green sign appearing on the date, indicating that a note has been saved on the particular date.


TimeTec TA Apps
5. On the TimeTec TA Apps, go to the side menu and click ‘Roster’


6. Press and hold the selected date to add a note.


7. Then, the Add Note will appear as a pop out box. Fill in the note and click ‘Save’ to add.


8. Once the note has been saved, the system will display as shown below. A small grey dot will appear on the date, indicating a note has been added.


Note: If some of the screenshots or steps viewed here are different from the ones in the current system, this is due to our continuous effort to improve our system from time to time. Please notify us at info@i-neighbour.com, we will update it as soon as possible.

How to Share Mobile to Login and Clocking for Multiple Accounts in TimeTec TA Application


Introduction

Some of the companies or organisations may use Mobile clocking to record their attendance.
(e.g. GPS clocking, WiFi clocking, and etc.) In the current state, not all staff are using smartphones or their smartphones that are compatible with the TimeTec TA Apps.

With Shared Mobile, it is no longer an issue with users’ phone compatibility since TimeTec TA is now available for phone sharing. The Admin / HR can remotely assign the user’s mobile
phone to be set as a shared mobile.

Once the user’s mobile phone has been assigned as a shared mobile. The user can login using the given mobile ID and will be automatically captured by the system. This will allow the mobile phone to be used for multiple login or clocking for designated users.

Process

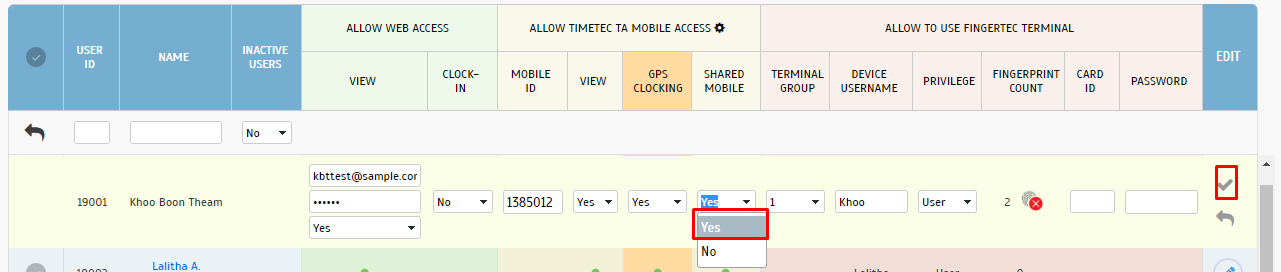
1. This setting process can be done by authorised admin or HR only. Firstly, log into the TimeTec TA (using the web browser) and go to Device > Assigned users to device


2. Search the particular user to set his/her phone to be used as a shared mobile. Click on the
Pencil icon (EDIT)

3. On the Shared Mobile section, select ‘Yes’ to enable the shared mobile feature and click on the tick button to update.

4. Once it is updated, the shared mobile status will turn into a green dot that indicates the
shared mobile feature is being turned on.

5. After the setting on the website is done, the mobile phone with the registered mobile
ID will be able to share and login with multiple accounts. The below image is a sample of the login page using the 1st user account in TimeTec TA apps.

6. The user will be able to login and perform GPS clocking after logging in.

7. The image below is a sample of the login page using a different user account.

8. For this user account, users will still able to login and perform the GPS clocking.


Note: If some of the screenshots or steps viewed here are different from the ones in the current system, this is due to our continuous effort to improve our system from time to time. Please notify us at info@timeteccloud.com, we will update it as soon as possible.

Troubleshooting Steps for Missing GPS location in iOS and Android Mobile Phones for TimeTec TA


Introduction
TimeTec TA cloud attendance system offers various methods to carry out clocking for attendance namely Biometric Terminal, QF Master App, Web Clocking and Smartphones. TimeTec TA app offers 5 ways of attendance clocking using a smartphone such as Mobile Clocking with Geo Location, Mobile Clocking with Wifi, Mobile Clocking with Time Beacon, Mobile Clocking with NFC and Supervisor Mobile Clocking (with photo option).

In this article, we will be discussing how to troubleshoot the missing GPS location when users attempt to clock attendance using TimeTec TA app for iOS and Android mobile phone. Please do ensure that your location Service has been turned on on your mobile phone.


Steps for iOS
Make sure the location service is turned on. Open up the TimeTec TA app setting and ensure the app has been enabled to access with the Location services. Please refer to the following steps:
1) Go to Settings > Privacy > Location Services.
2) Make sure that Location Services is on.

3) Open Settings
4) Search for TimeTec TA
5) Select the Location option and ensure the Location Access is set to “While Using App”.

4) Make sure to select “While Using the App” so the app is allowed to use the mobile location services.

Steps for Android:
Make sure the location service is turned on. Open up the TimeTec TA app setting and ensure the app has been enabled to access with the Location services. Please refer to the following steps:
1) Go to Settings > Security > Location Services.
2) Make sure the Location Services is on and select High Accuracy.

3) Go to Location setting, go to App-level permission > search for TimeTec TA > make sure the permission has been granted to the TimeTec TA app.


Note: If some of the screenshots or steps viewed here are different from the ones in the current system, this is due to our continuous effort to improve our system from time to time. Please notify us at info@timeteccloud.com, we will update it as soon as possible.